11
Seite 11
-
210 x 297mm
-
44000180594/01
-
SCHWARZ
-
11-516 (sr)
DEUTSCH
5.3 Aufsetzen der Mischkanüle. Vor jedem Mischvorgang!
Schlauchbeutel mit PentaMatic-Verschlusskappe dürfen nur zusammen mit
3M ESPE Penta Mischkanülen verwendet werden.
5.3.1 Aufsetzen der Mischkanüle auf eine Pentamix 3 Kartusche
왘Den Verschlussbügel durch Anheben des Entriegelungshebels öffnen
(Abb.13) und vollständig nach oben klappen, bis der Verschlussbügel
einrastet (Abb.14).
왘Die Mischkanüle mit dem CE-Zeichen nach oben zunächst nur auf die
Spitze der Antriebswelle aufstecken (Abb.15). Durch leichtes Drehen die
Mischkanüle auf die Auslassöffnungen der Schlauchbeutel ausrichten
(Abb.16). Die Mischkanüle aufstecken und durch kräftiges Andrücken
sicherstellen, dass die Mischkanüle dicht auf den Auslassöffnungen sitzt
(Abb.17).
-
Achtung: Die Mischkanüle bei zurückgezogener Antriebswelle nie
lediglich auf die Auslassöffnungen der Schlauchbeutel aufsetzen.
Das vollständige Eingreifen der Antriebswelle in die Mischkanüle wird
dadurch möglicherweise verhindert. In diesem Fall blinkt die Betriebs-
anzeige und das Gerät läuft nicht an (siehe Abschnitt 6).
왘Den Verschlussbügel herunterdrücken, bis er hörbar einrastet (Abb.18).
5.3.2 Aufsetzen der Mischkanüle auf eine Pentamix 2 Kartusche
왘Den Gerätedeckel öffnen.
왘Den Entriegelungshebel lösen.
왘Die Mischkanüle mit dem CE-Zeichen nach oben zunächst nur auf die
Spitze der Antriebswelle aufstecken (Abb.15). Durch leichtes Drehen die
Mischkanüle auf die Auslassöffnungen der Schlauchbeutel ausrichten
(Abb.16). Die Mischkanüle aufstecken und durch kräftiges Andrücken
sicherstellen, dass die Mischkanüle dicht auf den Auslassöffnungen sitzt
(Abb.17).
왘Den Verschlussbügel herunterdrücken bis er hörbar einrastet (Abb.18).
왘Den Gerätedeckel schließen.
5.4 Anfahren einer neuen Kartusche
왘Den Startknopf drücken (Abb.19). Das Pentamix 3 Gerät kann wahlweise
mit dem rechten oder dem linken Startknopf bedient werden.
왘Beim Anfahren eines neuen Schlauchbeutelpaares zunächst 5
-
15 sec.
lang warten, bis sich Druck in der Kartusche aufgebaut hat, bevor sich
die Schlauchbeutel selbsttätig öffnen.
왘Nach dem Öffnen kann eine der beiden unterschiedlich eingefärbten
Pasten vorströmen, was zu einem ungleichen Mischungsverhältnis führt.
Aus diesem Grund die vorströmenden Pasten beobachten, verwerfen
und die Paste erst dann verwenden, wenn die Mischung in gleich-
bleibender Farbe gefördert wird (Abb.19).
왘Nach dem Mischen die Mischkanüle als Verschluss auf der Kartusche
belassen!
5.5 Befüllen von Abformlöffel und Penta Elastomer-Spritze
왘Den Startknopf drücken. Das Pentamix 3 Gerät kann wahlweise mit dem
rechten oder dem linken Startknopf bedient werden.
-
Das Gerät fördert nur so lange, wie der Startknopf niedergehalten wird.
Nach dem Loslassen des Startknopfes ist ein kurzes Nachlaufen des
Gerätes hörbar. Dies dient der Druckentlastung der Schlauchbeutel,
um den Pastennachlauf zu minimieren.
-
Den Startknopf nicht arretieren, um gefährliche Situationen und
Dauerbetrieb zu vermeiden. Das Gerät aus Sicherheitsgründen nur mit
geschlossenem Deckel betreiben.
왘Zum Befüllen den Löffel schräg halten. Die Mischkanüle von einer Seite
beginnend (Abb. 20 oder 21) mit in die Paste eingetauchter Austritts-
öffnung kontinuierlich über den Löffelboden führen. Anschließend bei
Bedarf die Abformmasse mit einem Spatel glatt streichen.
왘Beim Befüllen eines Triple Tray®zuerst nur eine Seite befüllen. Den Start-
knopf kurz loslassen, um den Löffel zu drehen. Anschließend die andere
Seite befüllen.
왘Eine Mischkanüle darf nur benutzt werden, solange sich die Mischerwelle
im Inneren des Mischers leichtgängig dreht. Wird der Mischvorgang für
mehr als 30 sec. unterbrochen, beginnt das Material im Inneren der
Mischkanüle auszuhärten und es muss eine neue Misch
kanüle montiert
werden. (Siehe Punkt 5.3 „Aufsetzen der Mischkanüle“).
Wird der Mischer
mit verfestigtem Material im Inneren betrieben, schaltet das Gerät auto-
matisch ab, um Schäden zu vermeiden.
왘Die Penta Elastomer-Spritze (nach Entfernen des Spritzenkolbens) mit
der hinteren Spritzenöffnung auf die Mischeröffnung aufstecken und den
Startknopf drücken (Abb. 23).
-
ACHTUNG: Nicht jede Penta Abformmasse eignet sich als Spritzen-
material. Bitte die Gebrauchsinformation des jeweiligen Produktes
beachten.
5.6 Wiederanfahren einer teilentleerten Kartusche
왘Nach längerer Lagerung (insbesondere bei Silikonen) die Auslassöffnun-
gen der Schlauchbeutel mit einem Instrument von eventuellen Pfropfen
befreien.
왘Gegebenenfalls das Gerät ohne Mischer starten, um den Pastenfluss zu
kontrollieren.
왘Einen neuen Mischer aufsetzen und den Mischvorgang starten.
5.7 Kartuschenwechsel
Ist eine Kartusche fast leer, empfiehlt es sich, eine zweite startbereite
Kartusche zur Hand zu haben, um schnell wechseln zu können.
Diese Kartusche sollte, wie unter 5.4 „Anfahren einer neuen Kartusche“
beschrieben, vorbereitet sein.
Von geübtem Personal kann auch während des Löffelbefüllens der
Kartuschenwechsel vorgenommen werden. Hierbei wird, um Zeit zu sparen,
die volle Mischkanüle der entleerten Kartusche auf die vorbereitete neue
Kartusche umgesetzt. Kolben herunterfahren nicht vergessen!
Benutzungsdauer der Mischkanüle: Siehe 5.5
5.8 Lagerung angefahrener Kartuschen
왘Angefahrene und teilentleerte Schlauchbeutel nur in der Kartusche und
mit aufgesetztem und gefülltem Mischer lagern.
왘Kartuschen mit angefahrenem Schlauchbeutel entweder liegend oder
mit dem Mischer nach unten lagern (Abb. 24). Andernfalls kann es durch
zurückfließende Abformmasse zur Verlängerung der Wiederanfahrzeit
oder zur Vermischung von Basis- und Katalysatorpaste kommen.
5.9 Füllstandsanzeige
Die Füllstandsanzeige ermöglicht die Kontrolle der Füllmenge der Schlauch-
beutel.
Sind die Kolben in der obersten Position eingerastet, ist der rote Füllstands-
zeiger nicht sichtbar.
Erreicht der rote Füllstandzeiger den ersten Teilstrich, befindet sich noch
genügend Abformmasse im Gerät, um entweder einen großen Abformlöffel
oder drei Triple Trays ausreichend zu befüllen (Abb. 25).
Bei vollständiger Entleerung der Schlauchbeutel verschwindet der rote
Füllstandszeiger und das Gerät schaltet selbständig ab.
5.10 Entsorgung der Verbrauchsmaterialien
Gebrauchte Mischkanülen und entleerte Schlauchbeutel mit dem Restmüll
entsorgen. Bitte dabei die lokalen Müllentsorgungsrichtlinien beachten.
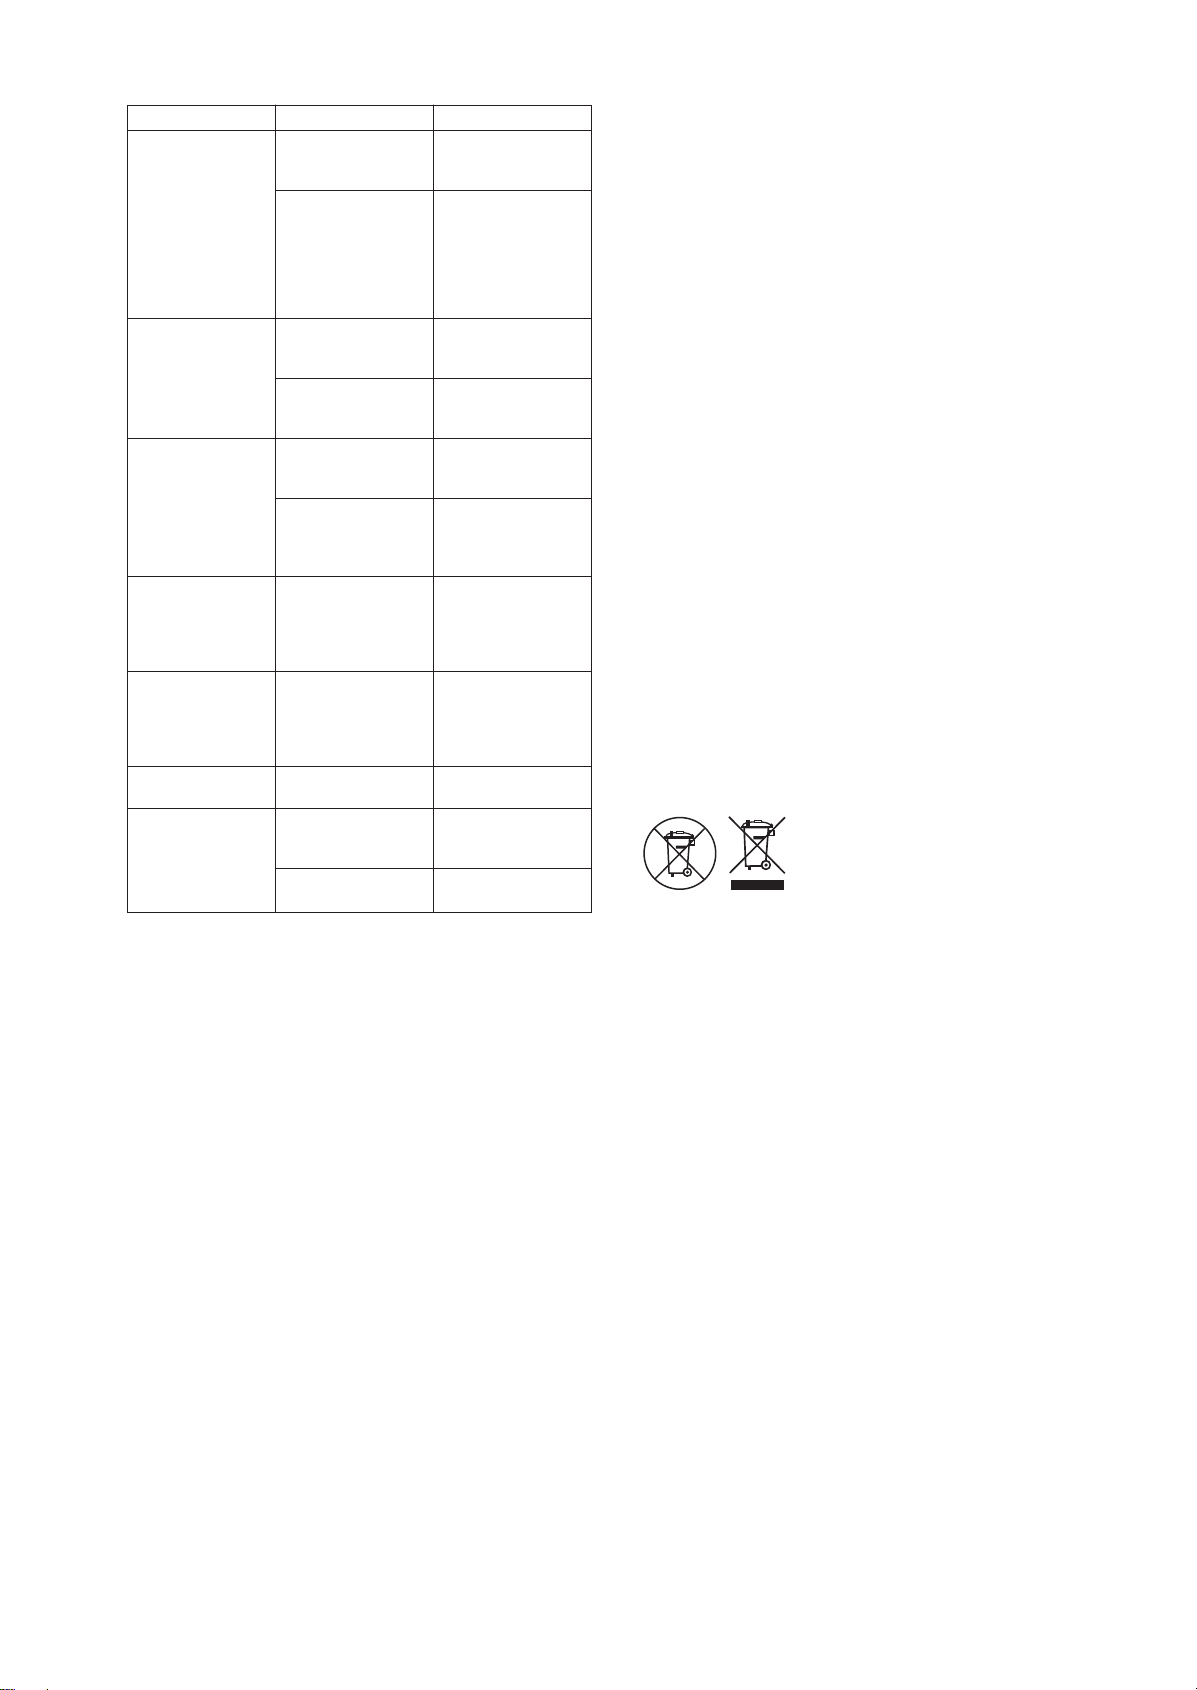
6. Störungen und Fehlermeldungen
Auftretende Störung Ursache Lösung
Gerät läuft nicht an Schlauchbeutel leer Neue Schlauchbeutel in
die Kartusche einlegen
Gerät läuft nicht an Kolben sind nicht in die Kolben durch Drehen
und Betriebsanzeige Kartusche eingeführt des Handrades bis zu
blinkt den Schlauchbeuteln
schieben
Mischerwelle greift Mischkanüle abziehen
nicht vollständig in die und erneut aufstecken
Mischkanüle ein wie unter 5.3 beschrie-
ben
Gerät läuft an, aber Neues Schlauchbeutel- Nach Einlegen eines
es wird keine Paste paar neuen Schlauchbeutel-
gefördert paares dauert es ca.
5
-
15 sec. bis sich die
Schlauchbeutel durch
den Druck öffnen
Kolben sitzen nicht auf Die Kolben mit dem
den Schlauchbeuteln Handrad nach vorne
auf drehen, bis die Kolben
mit deutlichem Wider-
stand die Schlauchbeutel
berühren
Pastentemperatur zu Pasten Raumtemperatur
niedrig annehmen lassen
(mindestens 18°C)