3M PELTOR TEP-200 EU User manual

TM
Tactical Earplug (TEP)
Level Dependent Earplug (LEP)
Electronic Earplug (EEP)
User Instructions

TEP-200 EU/
LEP-200 EU/
LEP-200 EU OR
EEP-100 EU/
EEP-100 EU OR
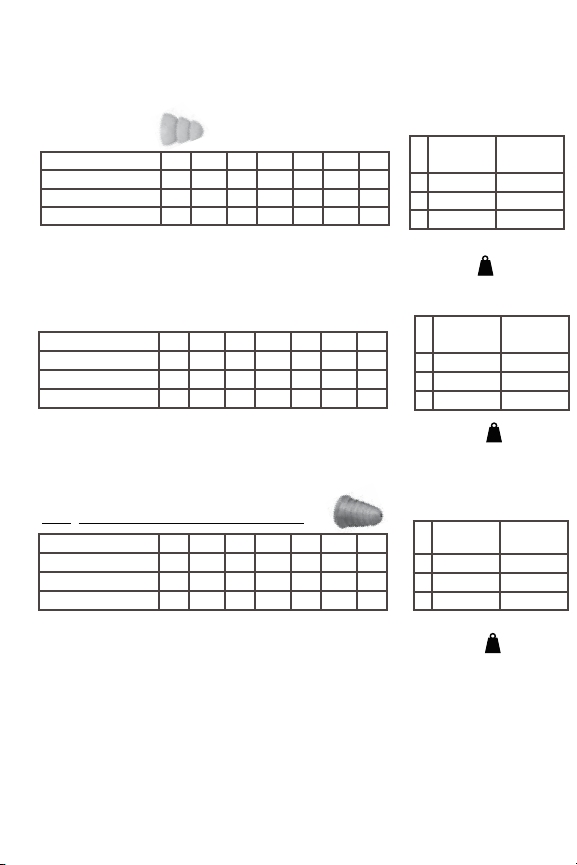
H 111 dB(A) 114.9 dB(A)
M 114 dB(A) 113.6 dB(A)
L 114 dB(A) 113.1 dB(A)
Frequency (Hz) 125 250 500 1000 2000 4000 8000
Mean Attenuation (dB) 34,5 31,5 36,2 33,4 34,8 34,9 38,8
Standard Deviation (dB) 6,0 5,4 5,6 4,3 3,8 5,0 4,0
Assumed Protection Value (dB) 28,5 26,1 30,6 29,1 31,0 29,9 34,8
TEP-200 EU/
LEP-200 EU/
LEP-200 EU OR
EEP-100 EU/
EEP-100 EU OR
H 118 dB(A) 118.5 dB(A)
M 118 dB(A) 116.6dB(A)
L 121 dB(A) 115.3 dB(A)
Frequency (Hz) 125 250 500 1000 2000 4000 8000
Mean Attenuation (dB) 35,5 32,5 37,1 38,0 37,6 39,5 45,5
Standard Deviation (dB) 4,5 4,0 4,4 3,7 2,9 4,6 4,2
Assumed Protection Value (dB) 30,9 28,4 32,7 34,3 34,6 34,9 41,3
TEP-200 EU/
LEP-200 EU/
LEP-200 EU OR
EEP-100 EU/
EEP-100 EU OR
H 113 dB(A) 119.4 dB(A)
M 118 dB(A) 117.4 dB(A)
L 119 dB(A) 117.5 dB(A)
Frequency (Hz) 125 250 500 1000 2000 4000 8000
Mean Attenuation (dB) 37,8 36,0 40,5 41,2 41,3 39,6 46,1
Standard Deviation (dB) 4,3 5,5 4,2 4,7 3,2 4,3 3,6
Assumed Protection Value (dB) 33,5 30,5 36,3 36,5 38,0 35,3 42,5
1:E 9 g
9 g
9 g
LABORATORY ATTENUATION TABLES
EN 352-2:2002/EN 352-7:2002 or EN 352-2:2020/EN 352-7:2020
3MTM UltraFitTM Eartips
1:A
1:B
1:C
1:D
1:F
SNR=32 dB*H=31 dB M=30 dB L=29 dB
3MTM PELTORTM CCC-GRM-25 Communication Eartips
3M™ Torque™Eartips
(not included in TEP-200 EU, LEP-200 EU and EEP-100 EU)
SNR=36 dB*H=35 dB M=34 dB L=32 dB
SNR=38 dB*H=37 dB M=36 dB L=34 dB
Criterion Levels
*3M strongly recommends personal t testing of hearing protectors. Research sug-
gests that users may receive less noise reduction than indicated by the attenuation
label value(s) on the packaging due to variation in t, tting skill, and motivation of the
user. Refer to applicable regulations for guidance on how to adjust attenuation label
values. In the absence of applicable regulations, it is recommended that the SNR be
reduced to better estimate typical protection.

EN 1-11
BG 12-24
CZ 25-34
DE 35-46
DK 47-57
EE 58-68
ES 69-80
FI 81-90
FR 91-102
GR 103-115
HR 116-126
HU 127-138
IS 139-149
IT 150-161
KZ 162-175
LT 176-187
LV 188-198
NL 199-209
NO 210-220
PL 221-232
PT 233-245
RO 246-257
RS 258-268
RU 269-283
SE 284-294
SI 295-304
SK 305-315
TR 316-326
UA 327-339
ZH 340-352
TACTICAL EARPLUG (TEP)
LEVEL DEPENDENT EARPLUG (LEP)
ELECTRONIC EARPLUG (EEP)

1
3M™ PELTOR™ Tactical Earplug, TEP-200 EU,
Level Dependent Earplug, LEP-200 EU/LEP-200 EU OR and
Electronic Earplug, EEP-100 EU/EEP-100 EU OR User Instructions
Introduction
Congratulations and thank you for choosing 3M™ PELTOR™ Communication Solutions!
Welcome to the next generation of protective communication.
Intended Use
The TEP-200 EU/LEP-200 EU/LEP-200 EU OR, EEP-100 EU and EEP-100 EU OR
level dependent hearing protectors help provide hearing protection in noisy environments
while enabling environmental listening in quiet environments.
Important
Please read, understand, and follow all safety information in these instructions prior
to use. Retain these instructions for future reference. For additional information or any
questions, contact 3M Technical Services (contact information listed on the last page). For
correct use, consult supervisor, User Instructions, or call 3M.
This hearing protector helps reduce exposure to hazardous noise and other loud
sounds. Misuse or failure to wear hearing protection at all times when exposed
to hazardous noise may result in hearing loss or injury. For correct use, consult
supervisor and User Instructions, or call 3M Technical Services. If your hearing seems
dulled or you hear a ringing or buzzing during or after any noise exposure (including
gunre), or for any other reason you suspect a hearing problem, leave the noisy
environment immediately and consult a medical professional and/or your supervisor.
WARNING
EN

2
WARNING
Failure to follow these instructions may result in serious injury or death:
a. Choking hazard – keep away from infants and small children.
b. If there is any drainage from your ear or you have an ear infection, consult a medical
professional before wearing earplugs.
c. Listening to audio communication may reduce your situationalawareness and
ability to hear warning signals. Stay alert andadjust the audio volume to the lowest
acceptable level.
d. To reduce the risks associated with igniting an explosion, do not use this product in a
potentially explosive atmosphere.
Failure to follow these instructions may reduce the protection provided by the
product and may result in hearing loss:
a. 3M strongly recommends personal t testing of hearing protectors. Research suggests
that users may receive less noise reduction than indicated by the attenuation label
value(s) on the packaging due to variation in t, tting skill, and motivation of the user.
Refer to applicable regulations for guidance on how to adjust attenuation label values.
In the absence of applicable regulations, it is recommended that the SNR be reduced to
better estimate typical protection.
b. Ensure the hearing protector is properly selected, t, adjusted, and maintained.
Improper t of this device will reduce its effectiveness in attenuating noise.
Consult the enclosed instructions for proper t.
c. Inspect the hearing protector before each use. If damaged, select an undamaged
hearing protector or avoid the noisy environment.
d. The output of the electrical audio circuit of this hearing protector may exceed the
daily limit sound level. Adjust the audio volume to the lowest acceptable level. Sound
levels from any connected external device such as 2-way radios and phones may ex-
ceed safe levels and must be appropriately limited by the user. Always use external
devices at the lowest sound level possible for the situation and limit the amount of
time you are exposed to unsafe levels as determined by your employer and applica-
ble regulations. If your hearing seems dulled or you hear a ringing or buzzing during
or after any sound exposure (including gunre), or for any other reason you suspect
a hearing problem, go to a quiet environment immediately and consult a medical
professional and/or your supervisor.
e. Only use approved and compatible 3M™ PELTOR™ Communications Eartips.
f. If the requirements above are not adhered to, the protection afforded by the earplugs
will be severely impaired.
g. EN 352 Safety Statements:
• The output of the level dependent circuit of this hearing protector may exceed the
daily limit sound level.
• Performance may deteriorate with battery usage. The typical period of continuous
use that can be expected from the earplug battery is approximately 16 hours.
• This product may be adversely affected by certain chemical substances. Further
information should be sought from the manufacturer.
• These earplugs should not be used where there is a risk that the connecting cord
could be caught up during use.
EN

3
CAUTION
• Risk of explosion if battery is replaced by an incorrect type.
• Only charge batteries between 0°C (32°F) and 45°C (113°F).
• With Lithium ion batteries, there is a risk of re and burns. Do not open, crush, heat
above 55°C (131°F), or incinerate.
• For greater comfort and safety, remove eartips slowly with a twisting motion to
gradually break the seal.
Note:
• When worn according to the User Instructions, this hearing protector helps reduce
exposure to both continuous noises, such as industrial noises and noises from vehicles
and aircraft, as well as very loud impulse noises, such as gunre. It is difcult to predict
the required and/or actual hearing protection obtained during exposure to impulse
noises. For gunre, the weapon types, number of rounds red, proper selection, t and
use of hearing protection, proper care of hearing protection, and other variables will
impact performance. To learn more about hearing protection for impulse noise, visit
www.3M.com/hearing.
• This earplug is provided with level dependent attenuation. The user should check
correct operation before use. If distortion or failure is detected, the user should refer to
the manufacturer’s advice of maintenance and replacement of the battery.
• This earplug is provided with safety-related audio input. The user should check correct
operation before use. If distortion or failure is detected, the user should refer to the
manufacturer’s advice for maintenance.
Attenuation Data
The attenuation rating SNR was obtained with the device powered off. Explanation of
attenuation tables:
European Standard EN 352
1:A Frequency (Hz)
1:B Mean attenuation (dB)
1:C Standard deviation (dB)
1:D Assumed protection value, APV (dB)
1:E
H= Hearing protection estimation for high-frequency sounds (ƒ ≥ 2000 Hz).
M = Hearing protection estimation for medium-frequency sounds (500Hz < ƒ < 2000 Hz).
L= Hearing protection estimation for low-frequency sounds (ƒ ≤ 500 Hz).
1:F Criterion Level
H = Criterion level for high-frequency noise
M = Criterion level for medium-frequency noise
L = Criterion level for low-frequency noise.
EN

4
A:1
A:2
A:3
A:4
A:5
Fig. A
Product Note
• Storage temperature (complete kit): -20°C to 50°C (-4°F to 122°F )
• Operating temperature earpiece: -20°C to +50°C (-4°F to 122°F)
• Operating temperature charger: 0°C to +45°C (32°F to 113°F)
Product Components: Earpiece
1. Power/Control button (Silicone TPV)
(Fig. A:1)
2. Microphone (ABS plastic) (Fig. A:2)
3. Charging contacts (Gold) (Fig. A:3)
4. Eartip stem (ABS plastic) (Fig. A:4)
5. Eartip (SEBS TPE, Urethane foam)
(Fig. A:5)
B:2
B:1
Fig. B
B:7
B:3
B:4
B:5 B:6
Fig. C
C:2
C:1
C:4
C:2
C:3
Charging Case: TEP-200 EU/
LEP-200 EU/LEP-200 EU OR
1. Battery compartment (Fig. B:1)
2. Retention cord storage posts (Fig. B:2)
3. Test/Status button (Fig. B:3)
4. Earpiece charging receptacle (Fig. B:4)
5. Indicator light (Fig. B:5)
6. Micro B USB charging port (Fig. B:6)
7. Latch (Fig. B:7)
Charging Case:
EEP-100 EU/EEP-100 EU OR
1. Earpiece charging receptacle (Fig. C:1)
2. Indicator light (Fig. C:2)
3. Micro B USB charging port (Fig. C:3)
4. Latch (Fig. C:4)
Charging
The 3M™ PELTOR™ TEP-200 EU/
LEP-200 EU/LEP-200 EU OR and EEP-
100 EU/EEP-100 EU OR Earplugs should
be charged before use.
Note: To maximize battery life, always
store earbuds in the case.
• For the TEP-200 EU/LEP-200 EU/
LEP-200 EU OR, the earpieces are
charged inside the charging case
using 3 AA batteries or Micro B USB
cord (not provided). Charging time is
approximately 90 minutes, regardless of
charging method.
• For the EEP-100 EU/EEP-100 EU OR,
the earpieces are charged using a Micro
B USB cord (provided). Charging time is
approximately 180 minutes.
EN

5
Charging by Micro B USB Port
for the TEP-200 EU/LEP-200 EU/
LEP-200 EU OR/EEP-100 EU/
EEP-100 EU OR
To charge the earpieces, follow
the below.
1. Plug the Micro B end of the
USB cable into the charging case
(Fig. B:6 for TEP-200 EU/LEP-
200 EU/LEP-200 EU OR or Fig.
C:3 for EEP-100 EU/EEP-100 EU
OR) and the opposite end into a
USB power source.
The charger will automatically detect the USB connection and draw power from it instead
of the AA batteries.
Charging by Battery for the TEP-200 EU/LEP-200 EU/
LEP-200 EU OR
1. To insert the 3 AA batteries into the battery compartment
(Fig. B:1), open the charging case by rmly lifting up the
latch (Fig. B:7).
2. Gently open the battery compartment door inside the
charging case.
3. Insert the batteries while ensuring (+)(-) poles are
aligned according to the diagram on the charging case.
4. Close the battery compartment door.
5. Locate and line up the charging contacts on both the
earpiece (Fig. A:3) and charging receptacle inside the
case (Fig. B:4). Insert the narrow end of the earpiece rst
(Fig. D:1), then gently rock and snap it into the receptacle
(Fig. D:2).
6. Repeat for the second earpiece.
Fig. D:1
Fig. D:2
Fig. D:3 LIGHT STATUS EARPIECE STATUS
Solid Red Charging
Blinking Red Not Charging
Fast Blinking Red Temperature Fault
Solid Yellow Charging - Low Battery
Blinking Yellow Not Charging - Low Battery
Solid Green Charging Complete
Important: Ensure the charging
contacts (Fig. A:3) on the
earpiece are pointed down so
contact is made with the charging
points in the receptacle. Push the
Test/Status button (Fig. B:3) to
verify a good connection is made
between the earpieces and the
charging points in the receptacle.
• For the TEP-200 EU/
LEP-200 EU, LEP-200 EU OR,
observe the indicator light (Fig.
B:5 and Fig. D:3).
Fig. D:4 LIGHT STATUS EARPIECE STATUS
Bright Red Charging
Bright Green Charging Complete
Dim Red No Earpiece
No Light Temperature Fault or Not
Plugged In
EN

6
2. For TEP-200 EU/LEP-200 EU/LEP-200 EU OR, push the Test/Status button (Fig. B:3) to
make sure a good connection is made between the earpieces and the charging points in
the receptacle (Fig. B:4). Observe the indicator light (Fig. B:5) to ensure the earpieces are
charging (Fig. D:3).
3. When charging the EEP-100 EU/EEP-100 EU OR, the lights will automatically activate
once the earpieces are in place and the USB cable is connected to a power source.
The charging cases are designed to prevent charging in temperatures below 0ºC (32ºF)
and above +45°C (113°F).
Use only new alkaline AA or LR6 batteries (for TEP-200 EU/LEP-200 EU/LEP-200 EU OR).
If using an external power supply for charging the earplugs, only connect to a listed power
supply certied according to IEC/UL/CSA 60950-1 or an equivalent local safety standard.
The power supply shall have a rated output of 5 Vdc, 200 mA (minimum).
Removing the Earpieces from the Charging Unit
To remove the earpieces from the charging unit, gently lift up the earpiece while holding on
to the charging case.
Eartip Selection
Three 3M™ UltraFit™ Eartip sizes (small: 7-12 mm, medium: 8-13 mm, and large: 9-16 mm)
are provided as well as a single size of the 3M™ PELTOR™ CCC-GRM-25 Eartips (6-9 mm).
To choose the appropriate 3M™ UltraFit™ Eartip size, begin with the medium size. Ensure
that it is small enough to penetrate the ear canal and provide a secure t but also is large
enough that at least one ange seals the ear canal at the canal entrance. If the medium
size does not provide a proper t, proceed with the small or large size eartips as these were
designed to t users for whom the medium size is not suitable. With the 3M™ CCC-GRM-25
Eartips and 3M™ Torque™ (8-14 mm) (not included in TEP-200 EU/LEP-200 EU and EEP-
100 EU), one size is intended to t most.
WARNING: Do not use product if proper t cannot be obtained.
Attaching Eartips and Optional Retention Cord (not included with EEP-100 EU)
Only Use 3M™ PELTOR™ Eartips designed for use with this product. Do not insert the
earpiece directly into the ear without a correctly attached 3M™ PELTOR™ Eartip.
Note: For the EEP-100 EU, the retention cord may be purchased separately (see “Reorder”).
1. To attach the optional retention cord, place one end of the retention cord onto the eartip
stem (Fig. A:4 and Fig. E:1).
2. Push the eartips (Fig. A:5) onto the eartip stem (Fig. A:4 and Fig. E:2).
3. Fully seat the eartip at the base of the eartip stem (Fig. E:3).
Fig. E:3
Fig. E:1 Fig. E:2
EN

7
Fig. F:1 Fig. F:2
Fitting 3MTM PELTORTM TEP-200 EU/LEP-200 EU/LEP-200 EU OR/EEP-100 EU and
EEP-100 EU OR Earplugs
The earpiece should be powered off prior to insertion. Eartips should be clean and in good
condition before tting.
1. Select a proper eartip size for your ear canal.
2. Hold the earplug with the eartip attached (Fig. F:1).
3. Insert the eartip into the ear canal while pulling the ear outward away from the head
and upward with the opposite hand (Fig. F:2).
4. Rotate the earplug toward the back of the head (Fig. F:3).
5. With the earplug powered off, check to ensure you have a good eartip t. Pull the
earpiece gently. It should not come out of the ear easily. If it does, repeat the insertion.
Listen to steady loud noise with eartips in both ears. The noise should sound softer.
Cover your ears with tightly cupped hands. The noise should sound about the same
whether or not your ears are covered. If you cannot obtain a good t, try a different type
or size of eartip.
CAUTION: For greater comfort and safety, remove the eartips slowly with a twisting
motion to gradually break the seal.
Fig. F:3
Using the TEP-200 EU/LEP-200 EU/LEP-200 EU OR earplug
1. Power On: Turn the product on by pressing and holding the Power/Control button for
2 seconds (Fig. A:1). This is referred to as a “long” press. You may release the button
when you hear a tone. The earpiece should now be on and in the low volume setting.
Repeat this process for the other earpiece.
Note: When the earpiece is turned on and properly tted in your ear, sound entering your
ear should not sound distant, faint, or mufed. If it does, make sure the device is turned
on.
2. Environmental Listening: When the earplugs are powered on, you can adjust the
volume to a comfortable setting by quickly pressing and releasing the Power/Control
button. This is referred to as a “quick” press. When powered on, the earpieces allow
sounds to pass through in quiet environments while restricting the volume level in loud
environments.
Upon power on:the TEP-200 EU/LEP-200 EU/LEP-200 EU OR defaults to the low
setting, which reproduces the environmental sounds at a reduced level. Each setting is
indicated by a unique tone.
Additionally, audio levels are selectable by pressing the Power/Control button quickly.
This cycles through the following audio levels (each level is indicated by a “beep”):
• TEP-200 EU and LEP-200 EU: low, medium, high and microphone off.
• LEP-200 EU OR: low, medium, high and extra high
.
Note for TEP-200 EU and LEP-200 EU, the microphone off setting allows you to shut off
the environmental microphones without turning off the earpiece. This can be especially
helpful when the earpieces are in the “comms mode” and you are experiencing difculty
hearing your radio or phone due to environmental noise. A quick press will cycle back
through the volume settings.
EN

8
A:1
A:2
A:3
A:4
A:5
Fig. A
3. Wireless Communication: (Requires neck loop accessory, sold separately)
a. Ensure the neck loop is worn and attached to a communications (Comms) product.
See instructions provided with neck loop.
b. To activate the wireless communications feature, a “medium” press is required.
Press and hold the Power/Control button until the beep played when the button is
rst pressed goes away. You will hear a voice tag to announce either “Comms 1”,
“Comms 2”, or “Comms Off”. “Comms 1” and “Comms 2” have different wireless gain
settings. If you experience interference, try the alternate setting.
c. When the wireless feature is activated, you will will hear the environmental sounds
mixed together with the sounds from the electronic device connected to the neck
loop, unless you turn off the environmental microphones to maximize electronic
communications via phone or radio.
d. The volume control on the earpiece adjusts the environmental microphones while the
volume control for the attached communications product will adjust that volume.
4. Automatic Power Off: To conserve battery power, the earplugs will automatically
shut off if the Power/Control button has not been pressed for 2 hours. During the last
60 seconds before shutoff, a verbal “timeout” message will repeat every 20 seconds.
Reset the automatic shutoff timer by pressing the Power/Control button.
5. Low Battery Tone: When less
than one hour of battery life
remains, a tone will be emitted and
then repeated every ve minutes.
6. Power Off: Press and hold
the Power/Control button for 2
seconds, until a double beep is
heard. Then the button can be
released and the earpiece is
powered off. Repeat this process
for the other earpiece.
Note: When powered off and properly t in the ear canal, the earplugs will still help
provide hearing protection.
Using the EEP-100 EU/EEP-100 EU OR earplug
1. Power On: Turn the product on by pressing and holding the Power/Control button for
2 seconds (Fig. A:1). This is referred to as a “long” press. You may release the button
when you hear a tone. The earpiece should now be on and in the low volume setting.
Repeat this process for the other earpiece.
Note: When the earpiece is turned on and properly tted in your ear, sound entering your
ear should not sound distant, faint, or mufed. If it does, make sure the device is turned
on.
2. Environmental Listening: When the earplugs are powered on,you can adjust the
volume to a comfortable setting by quickly pressing and releasing the Power/Control
button. This is referred to as a “quick” press. When powered on, the earpieces allow
sounds to pass through in quiet environments while restricting the volume level in loud
environments. Upon power on, the EEP-100 EU/EEP-100 EU OR defaults to the low
setting, which reproduces the environmental sounds at a reduced level. Each setting is
indicated by a unique tone.
• Audio levels are selectable by pressing the Power/Control button momentarily. This
cycles through three audio levels: low, medium, and high.
3. Power Off: Press and hold the Power/Control button for 2 seconds, until a double beep
is heard. Then the button can be released and the earpiece is powered off. Repeat this
process for the other earpiece (Fig. A).
Note: When powered off and properly t in the ear canal, the earplugs will still help
provide hearing protection.
EN

9
Attach/Detach Windscreen (not included with EEP-100 EU)
The windscreen may help minimize wind noise in high wind conditions.
Note: For the EEP-100 EU, windscreens may be purchased (see “Reorder”).
1. Remove a disposable windscreen from the perforated windscreen sheet backing (Fig.
G:1).
2. Locate the earplug microphone (Fig. G:2).
3. Carefully center the disposable windscreen over the microphone port and press the
adhesive backed windscreen to the microphone port (Fig. G:3).
4. To detach, remove the windscreen and dispose when necessary. To attach, follow steps
1-3.
Note: After storing and/or recharging the earplug in the charging case, it may be
necessary to remove the old disposable windscreen and replace it with a new screen.
G:1
G:2 G:3
Fig. G
Storage of the TEP-200 EU/LEP-200 EU/LEP-200 EU OR Charger Case
Remove the batteries when storing the charging case for extended periods of time. Please
refer to the storage temperature ranges listed in the “Product Note” section.
Cleaning and Maintenance
Charging Case
The interior of the charging case should be kept free from dust and debris. The charging
points must make direct contact with the charging contact on the earpiece to ensure
charging. Cleaning these contact points with a cotton swab or soft cloth is recommended
if visual inspection reveals debris or if the user experiences problems charging the
earpieces.
To maintain water resistance capability, the perimeter of the charging case and seal ring
must be kept free of dirt and other materials that would prevent proper closing of the case
and the Micro B USB charging port cover must be closed.
TEP-200 EU/LEP-200 EU/LEP-200 EU OR/EEP-100 EU/EEP-100 EU OR Earpieces
Earpieces can be cleaned with a lightly damp cloth. Using a cotton swab to clean the
charging contacts may be required if debris is visible or if the user experiences problems
charging the earpieces.
Eartip Cleaning and Replacement
Remove and clean the eartips routinely and more frequently for those who produce
excess ear wax.
3M™ UltraFit™ Eartips (reusable)
Wash eartips with warm water and soap as needed. Look for tears or cracks under any of
the anges. Replace as needed.
EN

10
APPROVALS
Hereby, 3M Svenska AB declares that the radio equipment type Radio communication
receiver is in compliance with Directive 2014/53/EU and other appropriate directives to
fulll the requirements for the CE marking. 3M Svenska AB also declares that the PPE
type headset is in compliance with Regulation (EU) 2016/425.
The PPE is audited annually (if Category III products) and type approved by SGS Fimko
Ltd., Takomotie 8, FI-00380 Helsinki, Finland, Notied Body No. 0598.
The product has been tested and approved in accordance with EN 352-2:2002 and EN
352-7:2002 or EN 352-2:2020, EN 352-7:2020 and EN 352-9:2020.
The applicable legislation can be determined by reviewing the Declaration of Conformity
(DoC) at www.3M.com/peltor/doc. The DoC will also show if some other type-approvals
are also applicable.
3M™ Torque™ Eartips and 3M™ CCC-GRM-25 Eartips (disposable)
Clean by wiping with a clean, dry cloth. Replace if the eartip is damaged, detached from
the stem, or if it is not soft and pliable.
Description Product Number 3M ID Part Number
3M™ PELTOR™Retention Cord TEP-CORD 70-0716-7379-5
3M™ UltraFit™ Communication Tips
Replacement, Large (25 pairs) 370-TEPL-25 70-0716-7374-6
3M™ UltraFit™ Communication Tips
Replacement, Medium (25 pairs) 370-TEPM-25 70-0716-7373-8
3M™ UltraFit™Communication Tips
Replacement, Small (25 pairs) 370-TEPS-25 70-0716-7372-0
3M™ PELTOR™ Communication Eartip CCC-GRM-25 70-0716-7521-2
3M™ Torque™ Eartips (50 pairs) PELTIP5-01 XH001679626
3M™ PELTOR™ TEP-200 Replacement
Charging Station Case TEP-200C 70-0716-5026-4
3M™ PELTOR™ LEP-200 Replacement Charg-
ing Station Case LEP-200C 70-0716-7513-9
Replacement Earplug, black TEP-200E 70-0716-7705-1
Replacement Earplug, yellow LEP-200E 70-0716-7704-4
3M™ PELTOR™ Neckloop TEP-LOOP-200 70-0716-7703-6
Reorder: Product and Accessories
Replacement eartips are available from 3M. Navigate to 3M.com/PELTOR for addition-
al ordering information. To reorder additional eartips, use 3M ID/product codes.
EN

11
This product contains electrical and electronic components and must not be
disposed of using standard refuse collection. Please consult local directives for
disposal of electrical and electronic equipment.
Battery Disposal
The TEP-200 EU/LEP-200 EU/LEP-200 EU OR and the EEP-100 EU/
EEP-100 EU OR earplugs have a non-replaceable lithium-ion battery.
Many rechargeable batteries are required to be recycled by local, state/
province, and national laws. To properly recycle/dispose of the battery,
always follow local solid waste disposal regulations.
Battery Note
Do not mix old and new batteries.
Do not mix alkaline, standard, or rechargeable batteries.
To properly dispose of the AA batteries, follow local solid waste disposal regulations.
No Modications: Modications to this device shall not be made without the written
consent of the 3M Company. Unauthorized modications may void the warranty and
the authority granted under Federal Communications Commission rules permitting the
operation of this device.
When retrieving your DoC, please locate your part number. The part number of your
earpiece can be found on the bottom of the charging case. An example can be seen in the
picture below.
A copy of the DoC and additional information required in the Directives can also be
obtained by contacting 3M in the country of purchase. For contact information, see the last
pages of this user instruction.
WARRANTY AND LIMITATION OF LIABILITY
WARRANTY: In the event any 3M Personal Safety Division product is found to be
defective in material, workmanship, or not in conformity with any express warranty for a
specic purpose, 3M’s only obligation and your exclusive remedy shall be at 3M’s option,
to repair, replace or refund the purchase price of such parts or products upon timely
notication of the issue by you and substantiation that the product has been stored,
maintained and used in accordance with 3M’s written instructions.
EXCEPT WHERE PROHIBITED BY LAW, THIS WARRANTY IS EXCLUSIVE AND IS IN
LIEU OF ANY EXPRESS OR IMPLIED WARRANTY OF MERCHANTABILITY, FITNESS
FOR A PARTICULAR PURPOSE OR OTHER WARRANTY OF QUALITY, OR THOSE
ARISING FROM A COURSE OF DEALING, CUSTOM OR USAGE OF TRADE, EXCEPT
OF TITLE AND AGAINST PATENT INFRINGEMENT.
3M has no obligation under this warranty with respect to any product that has failed due
to inadequate or improper storage, handling, or maintenance; failure to follow product
instructions; or alteration or damage to the product caused by accident, neglect, or
misuse.
LIMITATION OF LIABILITY: EXCEPT WHERE PROHIBITED BY LAW, IN NO EVENT
SHALL 3M BE LIABLE FOR ANY DIRECT, INDIRECT, SPECIAL, INCIDENTAL OR
CONSEQUENTIAL LOSS OR DAMAGES (INCLUDING LOST PROFITS) ARISING
FROM THIS PRODUCT, REGARDLESS OF THE LEGAL THEORY ASSERTED. THE
REMEDIES SET FORTH HEREIN ARE EXCLUSIVE.
EN

12
3M™ PELTOR™ Tactical Earplug, TEP-200 EU, Level Dependent Earplug, LEP-200
EU/LEP-200 EU OR и Electronic Earplug, EEP-100 EU/EEP-100 EU OR Инструкции
за потребителя
Въведение
Поздравления и Ви благодарим, че избрахте решенията за комуникация на
3M™ PELTOR™! Добре дошли в следващото поколение защитна комуникация.
Предназначение
Зависимите от нивото слухови протектори TEP-200 EU/LEP-200 EU/LEP-200 EU OR,
EEP-100 EU и EEP-100 EU OR предоставят защита на слуха в шумни среди, като
същевременно позволяват слушане на околния шум в тихи среди.
Важно
Моля, прочетете, разберете и спазвайте цялата информация за безопасност в
тези инструкции преди употреба. Запазете тези указания за бъдеща справка. За
допълнителна информация или въпроси се свържете с техническото обслужване
на 3M (информацията за връзка е посочена на последната страница). За правилна
употреба се посъветвайте с ръководителя си, инструкциите за употреба или се
свържете с 3М.
Този слухов протектор помага за намаляване на излагането на опасен шум и
други силни звуци. Неправилната употреба или непоставянето на средства-
та за слухова защита по всяко време, когато сте изложени на опасен шум,
може да доведе до загуба на слуха или увреждане. За правилна употреба се
посъветвайте с ръководителя си, инструкциите за потребителя или се свържете
с техническото обслужване на 3М. Ако слухът Ви е притъпен, чувате звънене
или бръмчене по време на или след излагане на шум (включително при стрелба
с огнестрелно оръжие), или поради друга причина подозирате проблем със
слуха, напуснете незабавно шумната среда и се консултирайте с медицинско
лице и/или с ръководителя си.
ПРЕДУПРЕЖДЕНИЕ
BG

13
BG
ПРЕДУПРЕЖДЕНИЕ
Неспазването на тези инструкции може да доведе до сериозно нараняване или смърт:
а. Опасност от задавяне – пазете от бебета и малки деца.
b. Ако от ухото Ви изтича течност или ако имате инфекция на ухото, консултирайте се с меди-
цинско лице преди да носите тапи за уши.
c. Слушането на музика или друга аудиокомуникация може да намали Вашата ситуационна
осведоменост и способността Ви да чувате предупредителни сигнали. Бъдете нащрек и
регулирайте силата на звука до най-ниското допустимо ниво.
d. За да се намалят рисковете, свързани с причиняване на експлозия, не използвайте този
продукт в потенциално взривоопасна атмосфера.
Неспазването на тези инструкции може да намали защитата, предоставена от продукта, и
може да доведе до загуба на слуха:
a. 3M настоятелно препоръчва персоналното тестване на слуховите протектори. Изследвания
показват, че потребителите може да получат по-малко намаляване на шума от посочените
върху опаковката стойности на етикетите за заглушаване поради различието при поставяне,
уменията за поставяне и мотивацията на потребителя. Направете справка с приложимите
регламенти за насоки относно регулирането на стойностите на етикета за заглушаването.
При липса на приложими разпоредби се препоръчва SNR да бъде намалено, за да се оцени
по-добре типичната защита.
b. Уверете се, че слуховият протектор е правилно избран, поставен, регулиран и поддържан.
Неправилното поставяне на това устройство ще намали ефективността му при заглушаване
на шума. Консултирайте се с приложените инструкции за правилно поставяне.
c. Преглеждайте слуховия протектор преди всяка употреба. Ако е повреден, изберете здрав
слухов протектор или избягвайте шумна среда.
d. Изходният сигнал от електрическата аудиоверига на този слухов протектор може да
надвиши дневния лимит за ниво на звука. Регулирайте силата на аудиото до най-ниското
допустимо ниво. Нивата на звука от всяко свързано външно устройство, като например
двупосочни радиостанции и телефони, може да надвишат безопасните нива и трябва да
бъдат надлежно ограничени от потребителя. Винаги използвайте външни устройства при
възможно най-ниските нива на звук спрямо ситуацията и ограничете времето, в което сте
изложени на опасни нива, определени от Вашия работодател и приложимите разпоредби.
Ако слухът Ви е притъпен, чувате звънене или бръмчене по време на или след излагане на
звук (включително при стрелба с огнестрелно оръжие) или поради друга причина подозирате
проблем със слуха, отидете незабавно в тиха среда и се консултирайте с медицинско лице
и/или с ръководителя си.
e. Използвайте само съвместими комуникационни накрайници за уши
3M™ PELTOR™.
f. Ако посочените по-горе изисквания не бъдат спазени, защитата, осигурявана от
тапите за уши, ще бъде сериозно намалена.
g. Декларации за безопасност EN 352:
• Изходният сигнал от зависещата от нивото верига на този слухов протектор
може да надвиши дневния лимит за ниво на звука.
• Характеристиките може да се влошат в хода на употреба на батериите. Оби-
чайната продължителност на работа, която може да се очаква от батерията на
тапите за уши при непрекъсната употреба, е 16 часа.
• Този продукт може да се повлияе негативно от определени химични вещества.
Допълнителна информация трябва да бъде потърсена от производителя.
• Тези тапи за уши не бива да се използват, когато има риск свързващият кабел
да бъде захванат от нещо по време на употреба.

14
ВНИМАНИЕ
• Опасност от експлозия, ако батерията бъде заменена с грешен тип.
• Зареждайте батериите само между 0°C (32°F) и 45°C (113°F).
• С литиево-йонни батерии е налице опасност от пожар и изгаряния. Не ги отваряйте,
мачкайте, нагрявайте над 55°C (131°F) или запалвайте.
• За по-добър комфорт и безопасност отстранете накрайниците за уши бавно с усукващо
движение за постепенно нарушаване на уплътнението.
Забележка:
• Когато се носи в съответствие с тези инструкции за потребителя, този заглушител помага
за намаляване на излагането както на непрекъснати шумове, като например индустриални
шумове и шумове от превозни средства и самолети, така и на много силни импулсни шумове,
като например изстрели. Трудно е да се предвиди необходимата и/или действителната защита
на слуха, получена по време на излагането на импулсни шумове. При стрелба видовете
оръжие, броят изстреляни патрони, правилният избор, поставянето и използването на защи-
тата на слуха, правилната грижа за защитата на слуха и други променливи ще влияят върху
характеристиките. За да научите повече относно защитата на слуха от импулсен шум, посетете
www.3M.com/hearing.
• Тези тапи за уши се предоставят със заглушаване, зависещо от нивото. Потребителят трябва
да провери правилното функциониране преди употреба. В случай на изкривяване на звука или
неизправна работа потребителят трябва да направи справка със съвета на производителя
относно поддръжката и смяната на батерията.
• Тези тапи за уши се предлагат с обезопасен аудиовход. Потребителят трябва да провери
правилното функциониране преди употреба. В случай на смущение на звука или неизправност
потребителят трябва да направи справка със съветите на производителя за поддръжка.
Данни за заглушаване
Коефициентът на намаляване на шума (SNR) е получен при изключено захранване на устрой-
ството. Обяснение на таблиците за заглушаване:
Европейски стандарт EN 352
1:A Честота (Hz)
1:B Средна стойност на заглушаване (dB)
1:C Стандартно отклонение (dB)
1:D Предполагаема стойност на защита, APV (dB)
1:E
H = Прогнозирана слухова защита при високочестотни звуци (ƒ ≥ 2000 Hz).
М = Прогнозирана слухова защита при средночестотни звуци (500 Hz < ƒ < 2000 Hz).
L= Прогнозирана слухова защита при нискочестотни звуци (ƒ ≤ 500 Hz).
1:F Ниво на определяне на критерий
H = Базово ниво за високочестотен шум
M = Базово ниво за средночестотен шум
L = Базово ниво за нискочестотен шум
Забележка за продукта
• Температура на съхранение (целия комплект): –20°C до 50°C (–4°F до 122°F)
• Работната температура на слушалките: –20°C до 50°C (–4°F до 122°F)
• Работната температура на зарядното устройство: 0°C до 45°C (32°F до 113°F)
BG

15
BG
A:1
A:2
A:3
A:4
A:5
Фиг. А
Компоненти на продукта:
Слушалки
1. Бутон за захранване/контрол (Сили-
конов TPV) (Фиг. A:1)
2. Микрофон (ABS пластмаса) (Фиг.
A:2)
3. Контакти за зареждане (Злато) (Фиг.
A:3)
4. Щифт за накрайник за уши (ABS
пластмаса) (Фиг. A:4)
5. Накрайник за уши (SEBS TPE,
уретанова пяна) (Фиг. A:5)
Фиг. C
C:2
C:1
C:4
C:2
C:3
Кутия за зареждане: TEP-200 EU/LEP-
200 EU/LEP-200 EU OR
1. Отделение за батерии (Фиг. B:1)
2. Щифтове за съхранение на въженцето
на тапите за уши (Фиг. B:2)
3. Бутон за тестване/състояние (Фиг. B:3)
4. Гнездо за зареждане на тапите за уши
(Фиг. B:4)
5. Индикаторна светлина (Фиг. B:5)
6. Порт за зареждане Micro B USB (Фиг.
B:6)
7. Ключалка (Фиг. B:7)
Кутия за зареждане: EEP-100 EU/EEP-
100 EU OR
1. Гнездо за зареждане на тапите за уши
(Фиг. С:1)
2. Индикаторна светлина (Фиг. С:2)
3. Порт за зареждане Micro B USB (Фиг.
С:3)
4. Ключалка (Фиг. С:4)
Зареждане
Тапите за уши на 3M™ PELTOR™ TEP-
200 EU/LEP-200 EU/LEP-200 EU OR и
EEP-100 EU/EEP-100 EU OR трябва да
бъдат заредени преди употреба.
Забележка: Винаги съхранявайте тапите
за уши в кутията, за да увеличите макси-
мално живота на батерията.
• За TEP-200 EU/LEP-200 EU/LEP-200
EU OR слушалките се зареждат в
кутията за зареждане с помощта на 3
батерии АА или Micro B USB кабел (не
е включен в комплекта). Времето за
зареждане е приблизително 90 минути,
независимо от начина на зареждане.
• За EEP-100 EU/EEP-100 EU OR
слушалките се зареждат с помощта
на Micro B USB кабел (включен в
комплекта). Времето за зареждане е
приблизително 180 минути.
B:2
B:1
B:7
B:3
B:4
B:5 B:6
Фиг. B

16
Зареждане на TEP-200 EU/LEP-200 EU/LEP-200 EU OR
чрез батерия
1. За да поставите 3 батерии АА в отделението за
батерии (Фиг. В:1), отворете кутията за зареждане, като
повдигнете ключалката (Фиг. В:7).
2. Внимателно отворете вратичката на отделението за
батерии в кутията за зареждане.
3. Поставете батериите, като се уверите, че полюсите
(+)(–) са в съответствие с диаграмата на кутията за
зареждане.
4. Затворете вратичката на отделението за батерии.
5. Открийте и включете контактите за зареждане на
слушалки (Фиг. А:3) и гнездото за зареждане в кутията
(Фиг. В:4). Първо поставете тесния край на слушалката
(Фиг. D:1), след това внимателно я разклатете и я
наместете в гнездото (Фиг. D:2).
6. Повторете за втората слушалка.
Фиг. D:1
Фиг. D:2
Фиг. D:3 СЪСТОЯНИЕ НА
СВЕТЛИНИТЕ СЪСТОЯНИЕ НА СЛУ-
ШАЛКИТЕ
Постоянно свети в
червено Зареждане
Мига в червено Не се зарежда
Мига бързо в
червено Грешка в температурата
Свети постоянно
в жълто Зареждане – изтощена
батерия
Мига в жълто Не се зарежда – изтощена
батерия
Свети постоянно в
зелено Зареждането е приключено
Важно: Уверете се, че контактите за
зареждане (Фиг. А:3) на слушалката
са насочени надолу така, че да имат
контакт със зареждащите точки
на гнездото. Натиснете бутона за
тестване/статус (Фиг. B:3), за да
проверите дали е осъществен добър
контакт между слушалките и зареж-
дащите точки в гнездото.
• За TEP-200 EU/LEP-200 EU,
LEP-200 EU OR наблюдавайте
индикаторната светлина (фиг. B:5
и фиг. D:3)..
Фиг. D:4 СЪСТОЯНИЕ НА
СВЕТЛИНИТЕ СЪСТОЯНИЕ НА СЛУ-
ШАЛКИТЕ
Ярко червено Зареждане
Ярко зелено Зареждането е приключено
Замъглено
червено Не са поставени слушалки
Липса на светлин-
на индикация Грешка в температурата
или не са включени
Зареждане на TEP-200 EU/LEP-200
EU/LEP-200 EU OR/EEP-100 EU/EEP-
100 EU OR чрез Micro B USB порт
За да заредите слушалките, За да
заредите слушалките, следвайте
инструкциите по-долу.
1. Вкарайте Micro B накрайника на
USB кабела в кутията за зареждане
(фиг. B:6 за TEP-200 EU/LEP-200
EU/LEP-200 EU OR или фиг. C:3
за EEP-100 EU/EEP-100 EU OR), а
другия накрайник в USB източника на
захранване.
Зарядното устройство автоматично
ще открие USB връзката и ще
започне да черпи енергия от нея
вместо от батериите АА.
BG

17
2. За TEP-200 EU/LEP-200 EU/LEP-200 EU OR натиснете бутона за тестване/статус
(фиг. B:3), за да проверите дали е осъществен добър контакт между слушалките и
зареждащите точки в гнездото (фиг. B:4). Наблюдавайте индикаторната светлина (Фиг.
В:5), за да сте сигурни, че слушалките се зареждат (Фиг. D:3).
3. Когато зареждате EEP-100 EU/EEP-100 EU OR, светлините ще се активират
автоматично, след като слушалките бъдат поставени и USB кабелът бъде свързан към
източник на захранване.
Кутиите за зареждане са проектирани да не позволяват зареждане при температури под
0°C (32°F) и над +45°C (113°F).
Използвайте само нови алкални батерии АА или батерии LR6 (за TEP-200 EU/LEP-200 EU/
LEP-200 EU OR).
Ако използвате външно захранване за зареждане на слушалките, свързвайте само към
устройство, което е сертифицирано съгласно IEC/UL/CSA 60950-1 или еквивалентен
местен стандарт за безопасност. Захранването трябва да бъде с номинална мощност от
5 Vdc, 200 mA (минимум).
Изваждане на слушалките от зарядното устройство
За да извадите слушалките от зарядното устройство, внимателно повдигнете слушалката,
като държите кутията за зареждане.
Избор на накрайник за уши
Три 3M™ UltraFit™ размера на накрайници за уши (малък: 7 – 12 mm, среден: 8 – 13
mm, и голям: 9 – 16 mm), както и единичен размер на 3M™ PELTOR™ CCC-GRM-25
накрайниците за уши (6-9mm). За да изберете подходящия размер на 3M™ UltraFit™
накрайника за уши, започнете със средния размер. Уверете се, че е достатъчно малък,
за да влезе в ушния канал и да прилепва сигурно, но също така е достатъчно голям, така
че най-малко един фланец да уплътнява ушния канал във входа на канала. Ако средният
размер не приляга добре, преминете към малкия или големия размер накрайници за
уши, тъй като те са предназначени за потребители, за които средният размер не е
подходящ. При накрайниците за уши на 3M™ CCC-GRM-25 и 3M™ Torque™
(8-14 mm)
(не са включени в TEP-200 EU/LEP-200 EU и EEP-100 EU) за повечето потребители е
предназначен един размер.
ПРЕДУПРЕЖДЕНИЕ: Не използвайте продукта, ако не приляга добре.
Поставяне на накрайници за уши и допълнително въженце на тапите (не е включено
в комплекта на EEP-100 EU)
Използвайте само 3M™ PELTOR™ накрайници за уши, които са предназначени за
употреба с този продукт. Не поставяйте слушалките директно в ухото без правилно
поставен 3M™ PELTOR™ накрайник за уши.
Забележка: Въженцето на тапите за EEP-100 EU може да бъде закупено отделно (вижте
„Допълнителна поръчка“).
1. За да поставите допълнителното въженце, поставете единия край на въженцето на
тапите върху щифта за накрайник за уши (Фиг. A:4 и Фиг. E:1).
2. Натиснете накрайниците за уши (Фиг. А:5) към щифта (Фиг. A:4 и Фиг. E:2).
3. Поставете добре накрайника в основата на щифта (Фиг. Е:3).
BG
This manual suits for next models
4
Table of contents
Languages:
Other 3M Accessories manuals

3M
3M MicroTouch SCT32nnEX Quick setup guide

3M
3M MODULE A125 User manual

3M
3M Bair Hugger Outpatient User manual

3M
3M PELTOR User manual

3M
3M Dynapro ET 3170 Terminal Series B User manual

3M
3M PELTOR User manual

3M
3M LEP-100 EU User manual

3M
3M 8686 User manual

3M
3M 718 User manual

3M
3M MicroTouch DST2270DX Quick setup guide