3M AC-900 User manual

3M AEROSPACE & COMMERCIAL TRANSPORTATION DIVISION
St. Paul, MN 55144-1000 USA
www.3M.com/aerospace or 1-800-364-3577 or 1-800-235-2376
Made in USA with US and GloballySourced Materials
3M 2015. All rights reserved.
3M is a trademark of 3M Company.

AC-900 Manual page 1
[REV:B] 03/17/2015
IMPORTANT SAFETY INSTRUCTIONS
WARNING – When using electrical appliances or equipment, basic precautions should
always be followed, including the following:
a.) Read all instructions before using
b.) To reduce the risk of injury, do not use near children
c.) Do not contact moving parts.
d.) Only use attachments and/or parts recommended or sold by the manufacturer.
e.) Do not use outdoors.
f.) To disconnect, turn all controls to the off (“O”) position, including turning timer to zero,
then remove plug from outlet.
g.) Do not unplug by pulling on cord. To unplug, grasp the plug, not the cord.
h.) Unplug from outlet when not in use and before servicing or cleaning.
i.) Do not operate with a damaged cord or plug, or if equipment malfunctions or is dropped
or damaged in any manner. Contact the manufacturer for examination, repair, or
electrical and/or mechanical adjustment.
j.) Turn the power switch to the off position (“O”) when the equipment is not in use and
before servicing or cleaning.
k.) To reduce the risk of electrical shock, do not put equipment in water or other liquid. Do
not place or store equipment where it can fall or be pulled into any type of liquid.
l.) Connect to a properly grounded outlet only. See grounding instructions. Contact a
qualified electrician if necessary.
SAVE THESE INSTRUCTIONS

Model AC-900 Automatic Mixer
AC-900 Manual page 2
[REV:B] 03/17/2015
GROUNDING INSTRUCTIONS
WARNING
This equipment must be grounded. In the event of malfunction or breakdown, grounding
provides a path of least resistance for electrical current to reduce the risk of electric shock. This
appliance is equipped with a cord having an equipment-grounding conductor and a grounding
plug. The plug must be plugged into an appropriate outlet that is properly installed and
grounded in accordance with all local codes and ordinances.
DANGER -Improper connection of the equipment-grounding connector can result in a risk
of electric shock. The conductor with insulation having an outer surface that is green with or
without yellow stripes is the equipment-grounding conductor. If repair or replacement of the
cord or plug is necessary, do not connect the equipment-grounding connector to a live terminal.
Check with a qualified electrician or serviceman if the grounding instructions are not completely
understood, or if in doubt as to whether the equipment is properly grounded. Do not modify the
plug provided with the equipment – if it will not fit the outlet, have the proper outlet installed by
a qualified electrician.
This equipment is for use on a nominal 120V circuit, and has a grounding plug that looks like the
plug illustrated in sketch A. A temporary adaptor, which looks like the adaptor illustrated in
sketches B and C, may be used to connect this plug to a 2-pole receptacle as shown in sketch B if
a properly grounded outlet is not available. The temporary adaptor should be used only until a
properly grounded outlet can be installed by a qualified electrician. The green colored rigid ear,
lug, and the like, extending from the adaptor must be connected to a permanent ground such as a
properly grounded outlet box cover. Whenever the adapter is used, it must be held in place by
the metal screw.
SAVE THESE INSTRUCTIONS

Model AC-900 Automatic Mixer
AC-900 Manual page 3
[REV:B] 03/17/2015
OPERATING INSTRUCTIONS
WARNING – Read, understand, and adhere to all instructions and
warnings completely and carefully before using equipment. If anything is not
absolutely clear, contact the manufacturer for clarity before using the
equipment to reduce the risk of injury.
CAUTION – Always wear safety goggles and gloves and if necessary,
respiratory protection (see Safety Data Sheet) when operating or cleaning
equipment – particularly when material is involved. Contact your material
manufacturer for specifics.
WARNING – To reduce the risk of electric shock, unplug before cleaning
and/or servicing.
AVERTISSEMENT: – Pour réduire le risqué de choc électrique,
débranchez avant le nettoyage ou l’entretien
Replace fuse with Fast Acting 250V, 5A fuse only
Remplacer avec Fast 250V interim, 5A fusible seulement
Description
The Model AC-900 Automatic Mixer is designed to perform the complete mixing operation of
cartridge packaged materials.
Stroking of the dasher rod is accomplished by means of a reversing air cylinder and the rotation of the
dasher rod is accomplished by a quiet, high quality, induction gear motor, therefore the service
requirement for this unit are compressed air (60psi, 1.5 C.F.M.) and 115V, 60 Hz, 1 Phase, 5 Amps.
The rotation speed of the motor is constant depending on load, but the stroking length and speed of the
air cylinder can be varied by adjustments.
The most effective stroking speed for most materials is between 16 and 22 strokes per minute. The
stroke speed on the Model AC-900 Automatic Mixer has been pre-set at mid-point for the six fluid
ounce cartridges, so the speed will be a few strokes per minute slower for the eight fluid ounce
cartridges and a few strokes per minute faster for the two and one-half fluid ounce cartridges.

Model AC-900 Automatic Mixer
AC-900 Manual page 4
[REV:B] 03/17/2015
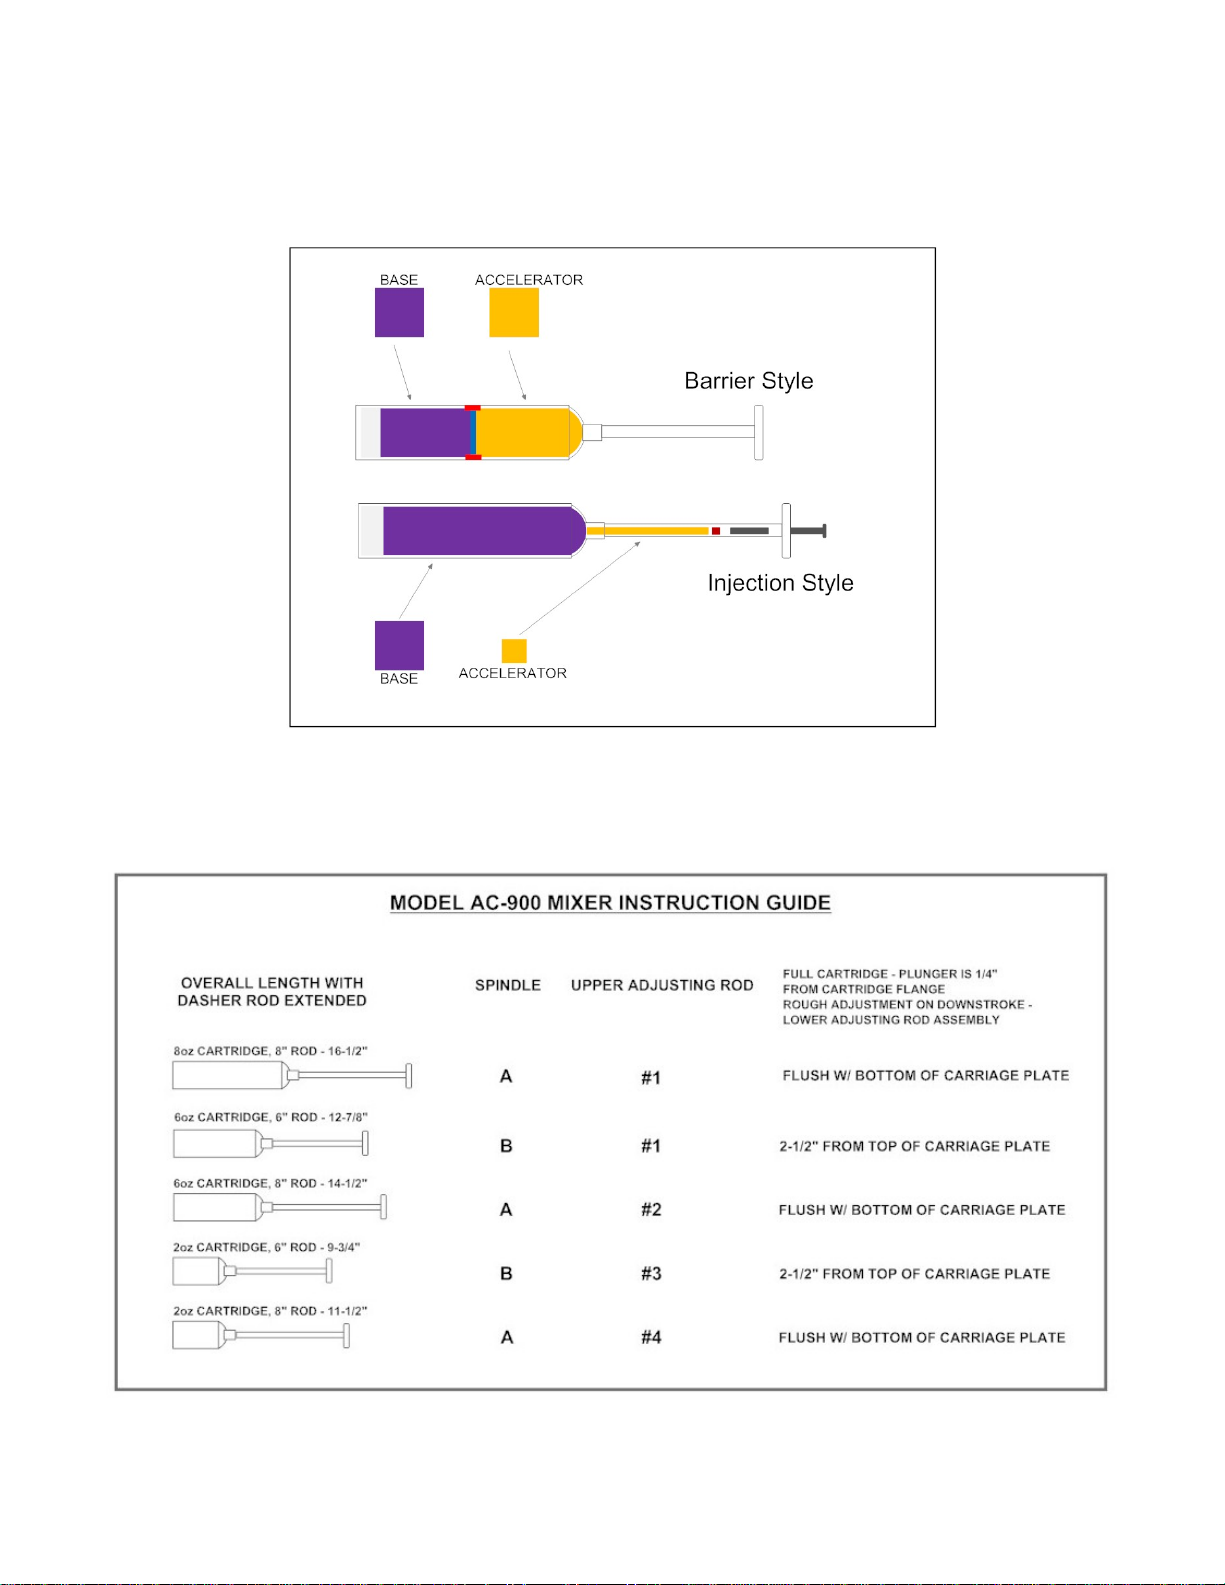
The instruction plate attached to the left-hand side of the box lists the cartridge size/dasher rod
size, the proper spindle number and upper stroke adjustment rod to use, and the correct setting in
inches for the down stroke adjustment rod. This is a guide for full kits only. Most likely, the
sealant you will be mixing is not a full kit. Select kit to be mixed and prepare for mixing as
stated in the instructions on side of the box OR follow instructions below for a non-full kit /
short package.
Determine if cartridge is “fully packaged” or is a short package and make appropriate down
stroke adjustment as shown on instructions on side of box. A cartridge is “fully packaged”
when material in dasher rod has been injected or barrier has erupted, and the rim of plunger is
3/16” from end of cartridge while dasher rod is pushed all the way to touch plunger. If cartridge
is not fully packaged, shorten down stroke by the difference in inches of the location of the
plunger between a fully packaged cartridge and the actual location of the plunger. OR you can
perform the following under “Full Instructions”:
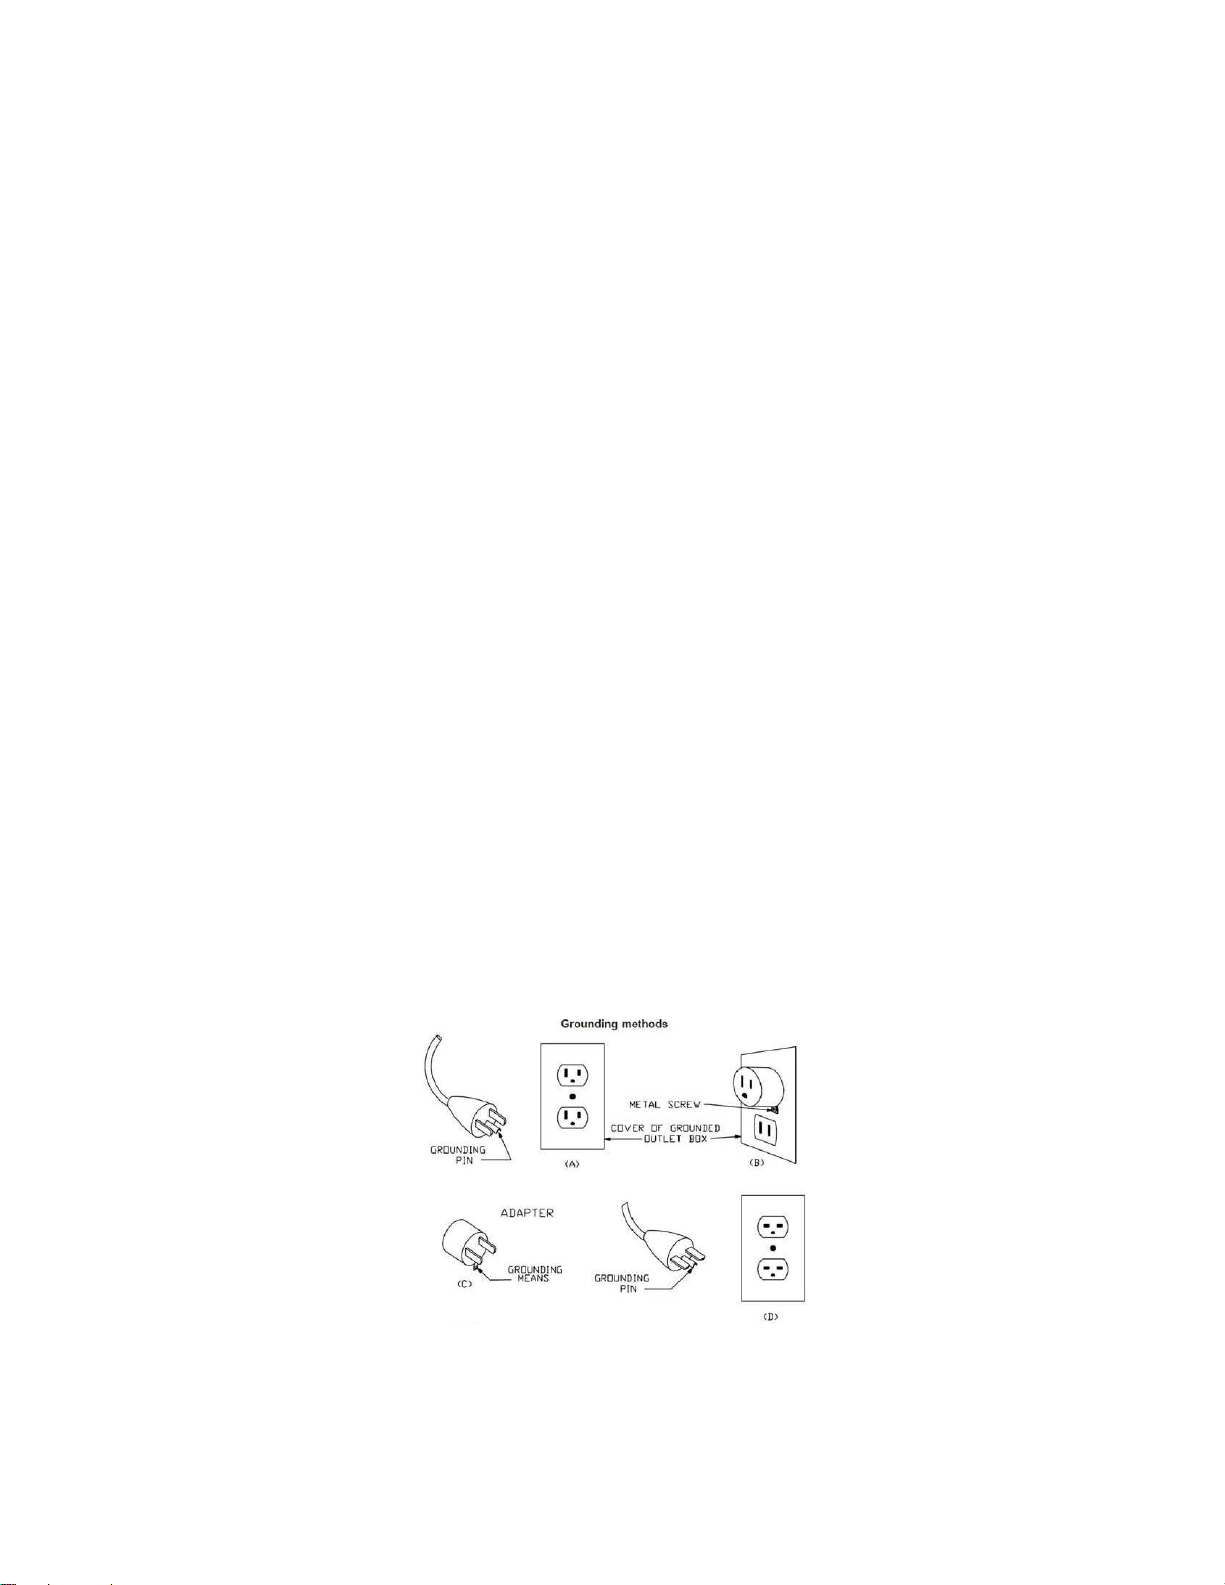
WARNING - Do not operate this device in explosive atmospheres, such as in the presence of
flammable liquids, gases or dust.
WARNING - If materials spill, disconnect power and follow Safety Data Sheet (SDS) for spill clean-
up procedure.
WARNING – Dispose of mixer in accordance with all applicable regulations.
Quick Instructions: If you are not familiar with the mixer, please proceed to “Full Instructions”
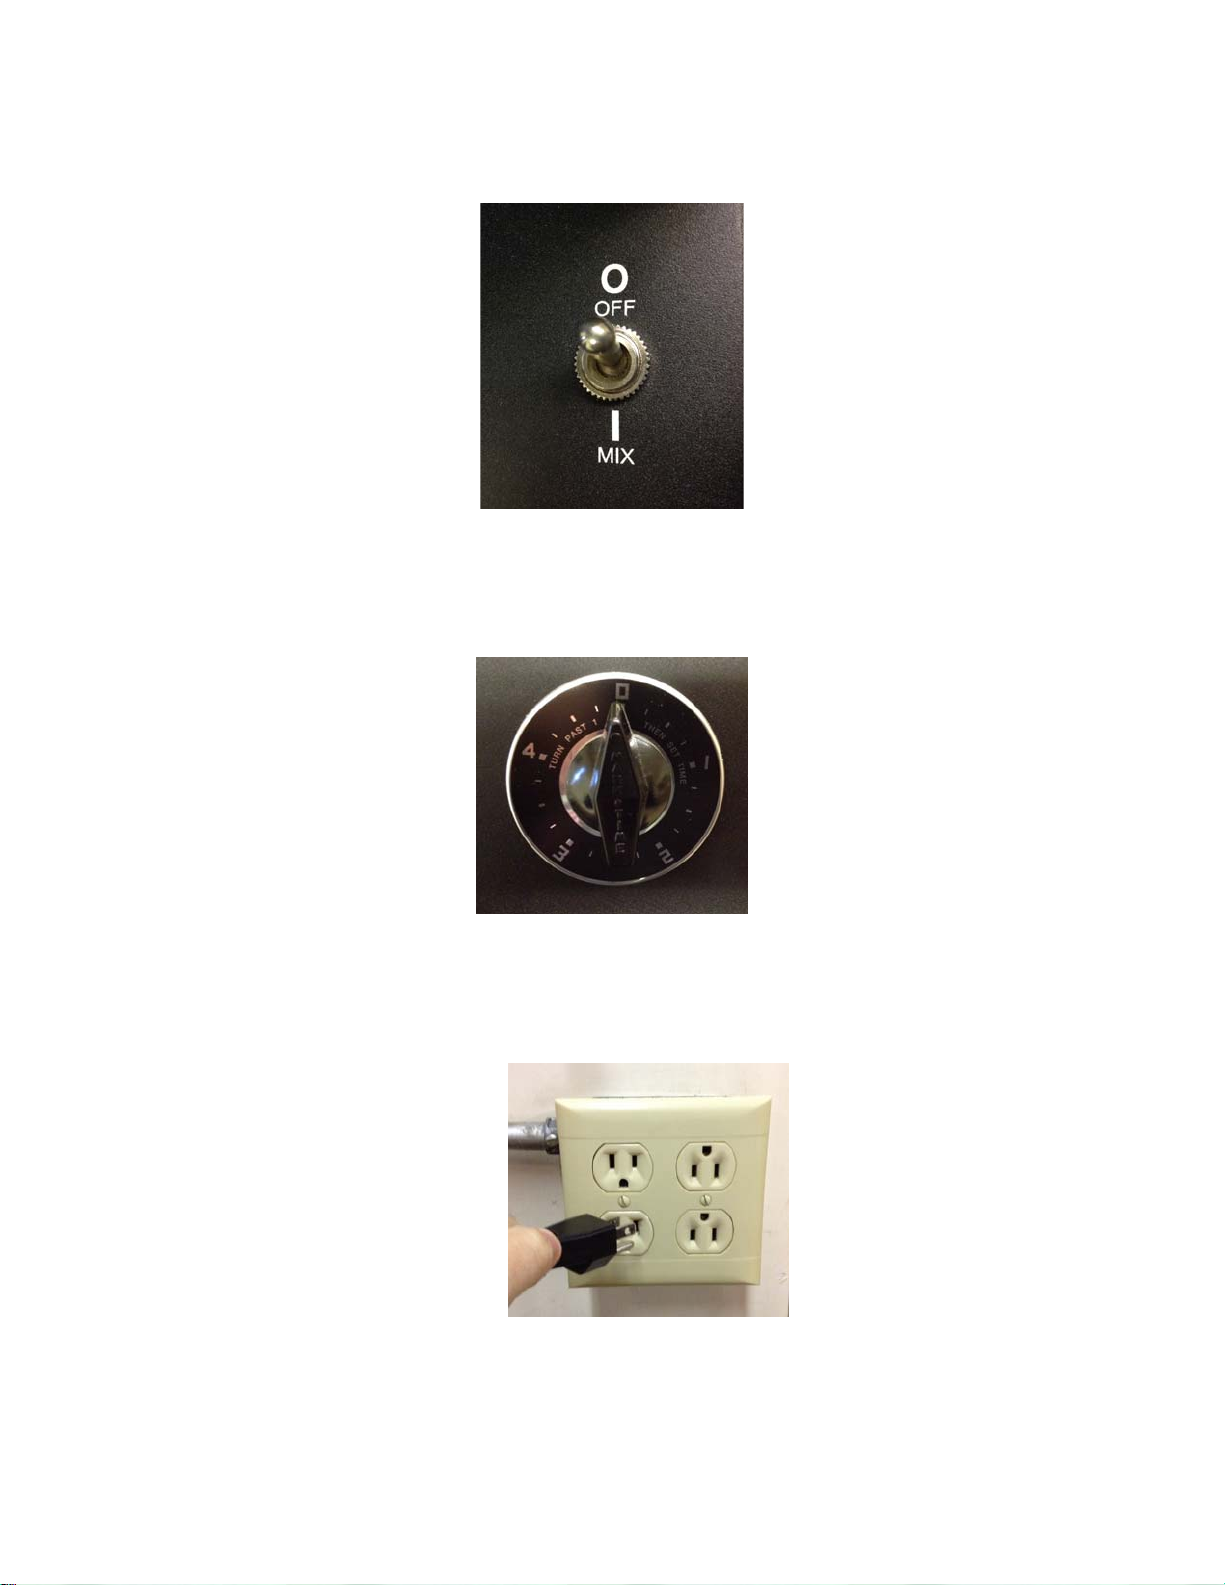
1. Ensure the “OFF / MIX” switch on the top of the mixer is in the “OFF” position
2. Remove air cylinder cap assembly from carriage plate and insert cartridge, rod end first,
through mounting hole in carriage plate.
3. Pull dasher rod down onto pins of the drive spindle.
4. Grasp cartridge and pull down until it is fully seated in carriage plate; then install and lock air
cylinder / cap assembly by twisting pins (by hand only!) into carriage plate “ears”.
5. Turn timer knob to desired number of minutes for mixing. (If mix period is less than two
minutes, timer must be turned past two minutes then returned to the desired time); keeping
fingers and all extremities clear, flip switch on top of machine to “MIX” position which will
begin the cycle of machine and mixing of material in cartridge.
6. When timer has completed its cycle, both air and electric power will be shut off and cartridge
may be removed.

Model AC-900 Automatic Mixer
AC-900 Manual page 5
[REV:B] 03/17/2015
7. Remove cartridge by first putting “OFF / MIX” switch in “OFF” position.
8. Unlock (twist) and remove air cylinder/cap assembly.
9. Remove dasher rod from drive spindle and then lift cartridge through carriage plate for use as
required.
CAUTION: Keep clear of all possible moving parts – ie. Carriage plate cycling and spindle
turning.
CAUTION: Disconnect air supply and/or electrical power when equipment is not in use, and
before servicing.

Model AC-900 Automatic Mixer
AC-900 Manual page 6
[REV:B] 03/17/2015
Full Instructions
1. Identify which kind of packaged material you desire to mix. Is it barrier or injection style?
2. Then, determine the size cartridge and rod you are desiring to mix, and use the appropriate
spindle and upper adjusting rod.

Model AC-900 Automatic Mixer
AC-900 Manual page 7
[REV:B] 03/17/2015
3. The upper rods are located on the back of the mixer in the rack and are numbered to make
identifying the correct upper rod easier.

Model AC-900 Automatic Mixer
AC-900 Manual page 8
[REV:B] 03/17/2015
4. Ensure the Model AC-900 Automatic Mixer is switched to “OFF” position on switch. This will
make certain the machine does not cycle.
5. Ensure timer is set to “0”, or no time. This will make certain the machine does not cycle.
6. Plug mixer into proper electrical outlet – 110V for standard mixer.

Model AC-900 Automatic Mixer
AC-900 Manual page 9
[REV:B] 03/17/2015
7. Plug mixer hose fitting (Hansen) into your regulated shop air supply.
We recommend setting the shop air regulator between 60-90 psi:

Model AC-900 Automatic Mixer
AC-900 Manual page 10
[REV:B] 03/17/2015
8. The air cylinder assembly regulator located on the back of the mixer is preset at the factory to
12psi. If adjustment is needed, carefully follow these instructions, otherwise proceed to step #9:
Turn the Model AC-900 Automatic Mixer around so that you can access the back of the
machine. Keep clear of all possible moving parts – ie… carriage plate cycling, and spindle
turning. Carefully and continuing to keep clear of all moving parts, flip switch on machine to
“MIX” then turn timer slightly to get machine to turn on and cycle. The mixer will immediately
cycle and “dry run”. This will allow you to set the regulator on the back of the Model AC-900
Automatic Mixer for the cap assembly. The purpose of the cap assembly is to hold the plunger
in place when the cartridge is locked into the carriage plate. You can only set the pressure of
this regulator when the mixer is cycling. As mixer is now cycling, pull black knob out on the
regulator, turn to the desired pressure, then push knob back in to the locked position. We
recommend setting this regulator at 10-12psi for most materials. Turn machine to “OFF” and
set timer back to “0”. Turn the Model AC-900 Automatic Mixer back around to access the front
of the machine.
9. The mixer is now ready for you to prepare the packaged material. Depending upon the type of
packaged material, either inject the catalyst into the base (for injection style) according to
manufacturer’s instructions OR remove barrier tape band, depress firmly around this area to
break barrier, then push dasher rod to the back of the cartridge to the plunger to push the barrier
all the way to the back of the cartridge so that it is out of the way for mixing. Remove any
flange cap from the back of the cartridge if necessary.

Model AC-900 Automatic Mixer
AC-900 Manual page 11
[REV:B] 03/17/2015
10.Push and twist firmly, yet carefully the dasher rod so that the dasher blade inside the cartridge is
seated against the plunger located at the bottom of the cartridge. This is basically performing a
full “down stroke” for the cartridge of material you are preparing to mix.

Model AC-900 Automatic Mixer
AC-900 Manual page 12
[REV:B] 03/17/2015
11.Firmly with both hands, carefully pull up on the carriage plate assembly towards the
“MANUAL DOWN” poppet valve :
12.Place cartridge into carriage plate assembly, rod end first, and place dasher rod onto spindle
pins. Note that the carriage plate will move down as you perform this

Model AC-900 Automatic Mixer
AC-900 Manual page 13
[REV:B] 03/17/2015
13. Pull cartridge down into carriage plate so that the cartridge flange is seated into the carriage
plate and lock into place with the cap assembly. Push “MANUAL UP” poppet to release air, if
necessary. Tighten by using the pin for leverage, but only tighten by hand. Do NOT over
tighten and do NOT use tools such as a hammer, etc.
14. Now, loosen knurled knob that’s holding the adjusting rod assembly.

Model AC-900 Automatic Mixer
AC-900 Manual page 14
[REV:B] 03/17/2015
15. With both hands, pull down firmly on carriage plate assembly until mixing blade seats onto
plunger inside cartridge. You will feel the resistance as you pull down.

Model AC-900 Automatic Mixer
AC-900 Manual page 15
[REV:B] 03/17/2015
16.Turn / screw adjusting rod assembly until it pushes down on the poppet valve on the mounting
plate about ¼ of the way down. Lock it down with the knurled knob.
17. This is now the distance you have set for the down stroke of the machine to the cartridge you
are mixing. You may need to “fine tune” the length of the stroke slightly. Do this by the
adjusting rod.
18. Make certain machine is clear and safe to cycle.

Model AC-900 Automatic Mixer
AC-900 Manual page 16
[REV:B] 03/17/2015
19. Turn machine to “MIX” – KEEP CLEAR OF ALL MOVING PARTS
20. Turn timer to material manufacturer’s specified mixing time recommendations – KEEP
CLEAR OF ALL MOVING PARTS – MIXER WILL BEGIN TO CYCLE

Model AC-900 Automatic Mixer
AC-900 Manual page 17
[REV:B] 03/17/2015
21. Mixer will automatically stop when timer reaches zero
22. You can test to see if the mixer is set up properly by holding in the poppet valves and observing
the dasher inside the cartridge spinning at the up stroke and the down stroke.
23. When time expires at the determined amount of time, the mixer will automatically stop. Turn
switch back to “OFF”, and then remove the now mixed cartridge of material by removing the air
cylinder assembly, and then the cartridge. Your material is now mixed and ready to dispense!
CAUTION: Disconnect air supply and/or electrical power when equipment is not in use, and
before servicing.
Technical Information: The technical information, recommendations and other statements
contained in this document are based upon tests or experience that 3M believes are reliable, but the
accuracy or completeness of such information is not guaranteed.
Product Use: Many factors beyond 3M’s control and uniquely within user’s knowledge and
control can affect the use and performance of a 3M product in a particular application. Given the
variety of factors that can affect the use and performance of a 3M product, user is solely
responsible for evaluating the 3M product and determining whether it is fit for a particular purpose
and suitable for user’s method of application.
Warranty, Limited Remedy, and Disclaimer: Unless an additional warranty is specifically
stated on the applicable 3M product packaging or product literature, 3M warrants that each 3M
product meets the applicable 3M product specification at the time 3M ships the product. 3M
MAKES NO OTHER WARRANTIES OR CONDITIONS, EXPRESS OR IMPLIED,
INCLUDING, BUT NOT LIMITED TO, ANY IMPLIED WARRANTY OR CONDITION OF
MERCHANTABILITY OR FITNESS FOR A PARTICULAR PURPOSE OR ANY IMPLIED
WARRANTY OR CONDITION ARISING OUT OF A COURSE OF DEALING, CUSTOM OR
USAGE OF TRADE. If the 3M product does not conform to this warranty, then the sole and
exclusive remedy is, at 3M’s option, replacement of the 3M product or refund of the purchase
price.
Limitation of Liability: Except where prohibited by law, 3M will not be liable for any loss or
damage arising from the 3M product, whether direct, indirect, special, incidental or consequential,
regardless of the legal theory asserted, including warranty, contract, negligence or strict liability.

Model AC-900 Automatic Mixer
AC-900 Manual page 18
[REV:B] 03/17/2015
FAQ: ARE THE CAP ASSEMBLY PINS SUPPOSED TO FULLY ENGAGE THE CARRIAGE
PLATE “EARS”?
The pins slightly engage the two carriage plate “ears”. The pins may not necessarily engage fully
when the machine is new. As the carriage plate wears and with cartridge variation, the pins will
engage the ears deeper. The third pin must face the operator and is only used to hand tighten the
cap into the carriage plate. Do not tap on the third pin with a hammer or other tool. This may
damage or break the carriage plate. The motion of mixing a cartridge naturally tightens the
cartridge into the carriage plate. The cap assembly is only used to keep the cartridge in place and
from rotating. If the material is highly viscous, you may need to adjust the regulator on the back of
the Model AC-900 Automatic Mixer to slightly increase the air pressure to hold the plunger in
place. If required, we recommend increasing in 2 psi increments until the proper pressure is
achieved. This varies based upon materials, but 10-12psi should be sufficient for most materials.
(To adjust, see step #8 above)

Model AC-900 Automatic Mixer
AC-900 Manual page 19
[REV:B] 03/17/2015
FAQ: HOW DO I ADJUST THE UP STROKE AND/OR DOWN STROKE SPEED?
The mixer is set at the factory to mix approximately 20 strokes per minute at 60 psi. However, you
may need to adjust the stroke speed depending upon materials and/or type of packaging you are using.
ADJUST THESE SCREWS ON THE PILOT VALVE COUNTERCLOCKWISE TO SLOW DOWN
THE SPEED OF THE STROKE. ONE SCREW IS FOR THE UP STROKE, THE OTHER IS FOR
THE DOWN STROKE. YOU WANT TO KEEP THEM EVEN WHEN MIXING.
The upper screw adjusts the
up stroke speed.
The lower screw adjusts the
down stroke speed.
(ViewfromthebackoftheModelAC‐900AutomaticMixer)
Table of contents
Other 3M Mixer manuals