ab CryptoBox 700HD mini User manual

RS232
SERVICE
PORT
1x
SPDIF
COAXIAL
OUTPUT
1x
LAN
100MBit
ETHERNET
1x
UNIVERSAL
SERIALPORT
2x
USB
SUPPORTFOR
WIFIEXTENSION
WiFi
SMARTCARD
READER
1x
CA
Display
7-SEGMENT
DISPLAY
RAM
HIGHSPEED
DDRIIIMEMORY
NEWCORE
1GHz
CPU
Media
Player
H265
codec
FullHD
1080p DLNA
Auto
FastScan Auto
DiSEqC PVR
TimeShift Android
iOSapp Eco
friendly
Mini HD Digital Satellite Receiver
CryptoBox 700HD
Usermanual
(EN)


1
Content
Safety Precaution ....................................................................3
1. Reference ·········································································4!
1.1 General Features··························································4!
1.2 Accessories································································4!
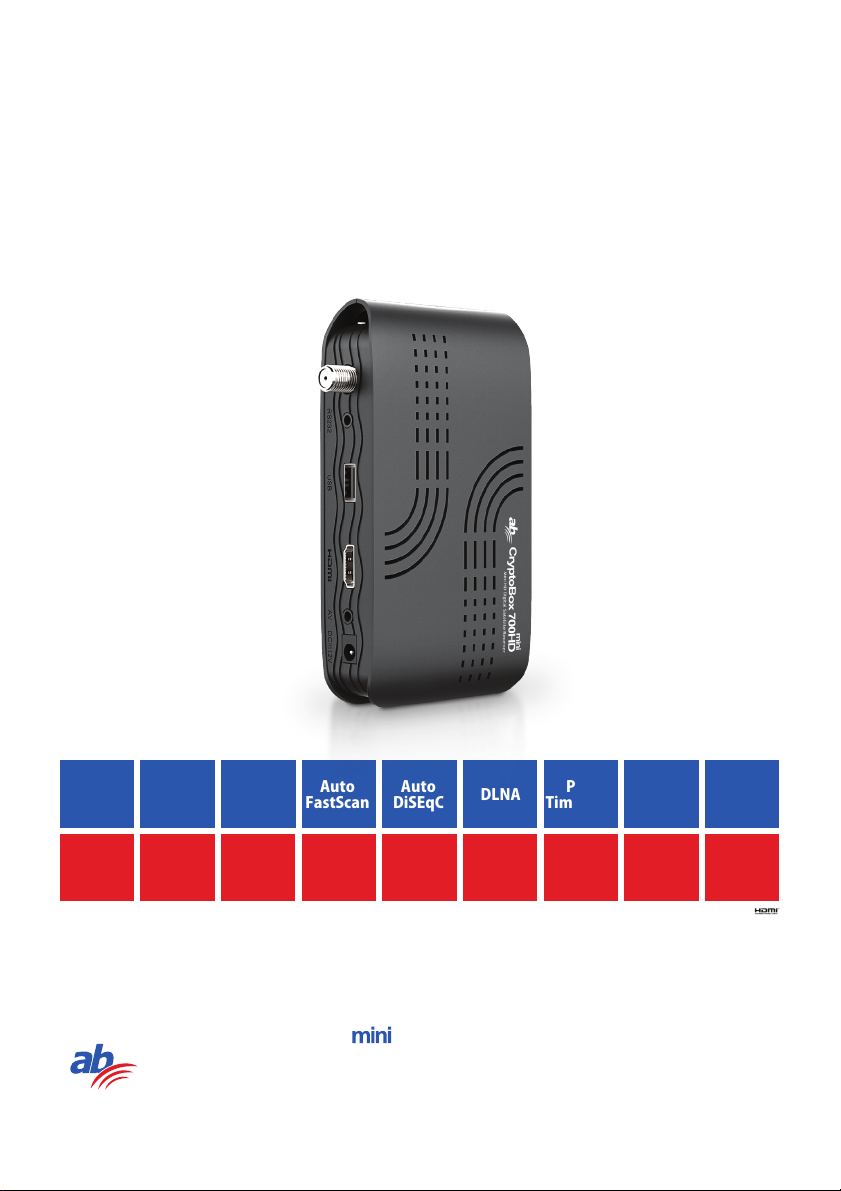
2. Product Overview································································6!
2.1 Rear Panel ·································································6!
3. Installation ········································································9!
3.1 Antenna Settings ·························································9!
3.2 Fast scan ·································································15!
3.3 Factory Default ························································· 15!
3.4 USALS Setup ··························································· 16!
4.Edit Channel ···································································· 17!
4.1 TV Channel ····························································· 17!
4.2 Radio Channel ·························································· 18!
4.3 TV Favorite ····························································· 20!
4.4 Radio Favorite ·························································· 20!
4.5 Sort Channels ··························································· 21!
4.6 User Channel List ······················································ 21!
5. Settings·········································································· 21!
5.1 System Settings························································· 22!
5.2 OSD Setup ······························································ 23!
5.3 Parental control ························································· 24!
5.4 Times ···································································· 24!
5.5.IP Setting ································································ 26!
5.6 3G ········································································ 26!
5.7 Wi-Fi····································································· 27!
5.8 USB Update····························································· 28!
5.9 About STB ······························································ 28!
6. X-tras ············································································ 28!

2
6.1 Calendar ·································································29!
6.2 Games···································································· 29!
6.3 Network Apps ·························································· 29!
7. Multimedia ····································································· 30!
7.1 Basic Operations ······················································· 31!
7.2 Setting ··································································· 32!
7.3 Play Files ································································ 34!
8. Basic Operation ································································ 37!
8.1 Audio ···································································· 37!
8.2 Satellite List····························································· 37!
8.3 EPG ······································································ 37!
8.4 Subtitle··································································· 38!
8.5 Teletext ·································································· 38!
8.6 Find channel ···························································· 38!
8.7 Program Information··················································· 39!
9. Channel List ···································································· 40!
9.1 OK List ·································································· 40!
9.2 Favorite List····························································· 40!
10. USB Control ·································································· 42!
10.1 Recording and Timeshift ············································ 42!
10.2 PVR List ······························································· 43!
11. Additional Information ······················································ 44!
11.1 Trouble Shooting ····················································· 44!
11.2 Technical Specification ·············································· 45!
11.3 Glossary································································ 46!

3
!Safety Precaution
This STB has been designed and manufactured to satisfy the international
safety standards. Please read the following safety precautions carefully before
operating this receiver.
44Main Supply:
Before operating, please check the units operating voltage is 90~250V AC
50/60Hz.
44Overload:
Do not overload a wall outlet, extension cord or adapter, neither use damaged
power cord or touch it with wet hand as this may result in electric shock.
44Liquid:
The receiver shall not be exposed to dripping or splashing water, and that no
objects filled with liquids, such as base, shall be placed on the apparatus.
44Ventilation:
Keep the slots on top of the receiver uncover to allow sufficient airflow to the unit.
Do not put the receiver on soft furnishings or carpets. Do not expose the
receiver to direct light or do not place it near a heater or in humid conditions. Do
not stack other electronic equipments on top of the receiver.
44Cleaning:
Plug out the receiver from the wall outlet before cleaning. Clean the receiver by
a soft cloth or mild solution of washing-up liquid (no solvents).
44Connection:
Disconnect the receiver from the mains when you connect it to satellite LNB or
disconnect it from LNB. Failure would possibly cause damage to the LNB.
44Location:
Put the receiver indoor in order to avoid lightening, raining or sunlight.
44Uncover:
Do not remove the cover, to reduce the risk of electric shock. Contact qualified
and licensed service personnel to repair the receiver, or contact your dealer.

4
1. Reference
1.1 General Features
DVB-S/DVB-S2 Satellite Compliant (MPEG-II/ MPEG-IV/ H.264)
SCPC & MCPC receivable from Ku and C band satellites
Universal, Single, Single S & C Band Wideband LNB
Sensitive Tuner with Loop-Through
DiSEqC1.0/1.1/1.2/ (USALS)
Unicable Supported
Blind search supported
Auto DiSEqC Search
PAL/NTSC Conversion
True full Color (32 bits) on screen display (OSD)
Storing memory: 100 satellite, 4000 transponders and 6100 channels
26 favorite group and parental lock supported
Multi-language menu supported
Multi-language audio supported
Multi-language DVB Subtitle output
7 days Electronic Program Guide (EPG)
Teletext output through VBI and OSD
USB 2.0 Interface
Support many network functions
1.2 Accessories
l Users manual
l Remote Control Unit
l Batteries

5
Figure 1.Accessories

6
2. Product Overview
2.1 Rear Panel
Figure2. Rear Panel (A)
1. LNB IN
Connect the satellite antenna cable.
2. RS232
Connect to the computer using serial line.
3. USB2.0
One USB 2.0 Host Port.
4. HDMI
Connect to the TV using an HDMI cable.
5. AV
Connect to the TV using a AV cable.
6. DC-12V
Connect to adapter.
Figure2. Rear Panel (B)
1. COAXIAL

7
Digital Audio output.
2. LAN
Connect to the internet using an Ethernet cable.
3. USB2.0
One USB 2.0 Host Port.
6. IR-EX
Connect the Front Panel, to receive the signal from remote control.
2.2 Remote Control Unit (RCU)
You can control this receiver by this remote controller with full function.
1. STANDBY: Switch between operation and standby modes.
2. F1: Accessorial function.
3. SHIFT: Enable/Disable timeshift.
4. MUTE: Mute audio.
5. I I : Pause/Time shift.
6. ◄◄: Fast rewind.
7. ►►:Fast forward.
8. ●: Record.
9. ►: Play.
10. ■:Stop recording and playing.
11. MENU: Activate main menu.
12. EXIT: Exit current menu step by step.
13. ▲/ ▼/◄/►:Navigates through the Menus
14. OK: Confirm
15. RELOAD: Move to the previous viewed channel.
16. EPG (Electronic Program Guide): Display
the program guide.
17. V+/V- : Change volume in viewing mode.
18. CH+/CH-: Change program.
19. INFO: Display the program information.

8
20. FAV: Display favorite channel list you set before.
21. NUMERIC KEY (0~9): Enter a TV/radio channel number or menu option
number
22. PAGE-/PAGE+: Page up/down on menu or channel list.
23. MEDIA: Access to the USB menu.
24. SAT: Show the scanned satellite list.
25. SUB: Display the subtitle language list.
26. TV/RAD: Switch between TV and RADIO.
27. FIND: Quickly find channels which you want.
28. V-FORMAT: Set the screen mode.
29. TXT: Display the teletext.
30. AUDIO: Display the audio list

9
3. Installation
You should install the receiver when powering on your product for the first time
after purchase.
Tip: The default password is 0000. If you have forgotten your password, please
contact your local product distributor.
3.1 Antenna Settings
Antenna Settings allows you to configure the antenna setting parameters.
Menu->Installation->Antenna Settings
1. Satellite: Highlight the satellite you want to search.

10
2. Transponder: Press the ◄/►button to change the TP.
3. LNB Type: Press the ◄/►button to change the LNB frequency.
4. LNB Power: Press the ◄/►button to select the required LNB power.
5. 22 KHz: Press the ◄/►button to select ON, OFF or Auto.
6. DiSEqC 1.0: Press the ◄/►button to select the required DiSEqC1.0 input.
7. DiSEqC 1.1: Press the ◄/►button to select the required DiSEqC1.1 input.
8. Motor: Press the ◄/►button to select DiSEqC1.2 or USALS.
9. Scan Mode: Press the ◄/►button to select scan mode.
10. Start search: Press the ◄/►button to select Satellite & Multi-Sat & Blind
scan & Transponder & Multi-Transponder which you want to start search.
3.1.1 Antenna Settings for Satellite
Press the ◄/►or OK button you can see the pre-stored Satellite list, in this
menu, you can execute select, Add, Move, Delete, Rename Satellites.
ØØSelect
In this menu, you can press the ▲/▼ keys choose the satellite which you want
to use, and then press the OK to confirm the setting.
ØØAdd
Press Red button to add a new satellite. Here you can input new Satellite angle,
Satellite Direction (East, West), Band (Ku, C) and press OK to confirm the
setting, and then this new satellite will be added to the end of the Satellite list.

11
ØØMove
In this menu, you can select the satellite that you want to move from the satellite
list by pressing the Green button, and press OK, you will be asked to move the
satellite to put where, input the destination number and press OK. Then you can
move one satellite from one position to another.
ØØDelete
You can delete the user satellite. Select the satellite that you want to delete from
the satellite list. Then press the Yellow button. You will be asked to confirm
whether delete the satellite or not. If you select YES, all the channels and
transponders in the selected satellite will be deleted. And the selected satellite
will disappear.
ØØRename
You can press the Blue button to change the satellite name. When the
keyboard popup, you can select the character which you want to edit the name.
3.1.2 Antenna Settings for Transponder
If you change the satellite, the transponder will be changed automatically. You
will find the transponder list of selected satellite here. In this menu, Press the
◄/►or OK button you can see the pre-stored Transponder list, and you can
execute Select, Add, Delete, Edit Transponders.
ØØSelect
In this menu, you can press the ▲/▼keys choose the Transponder which you

12
want to use, then press OK to confirm the setting.
ØØAdd
You can press the Red button to add a transponder. Here you can input new
Transponder frequency, choose polarization (Ver, Hor), input new symbol rate,
and choose FEC (1/2, 2/3, 3/4, 6/5, 7/8, Auto). And press OK to confirm the
settings, and then this new Transponder will be added to the TP list in ascend
order sorted by frequency.
ØØDelete
You can delete the Transponder of the satellite. Select the Transponder that you
want to delete from the TP list. Then press the Green button. You will be asked
to confirm whether delete the satellite or not. If you select YES, all the channels
in the selected Transponder will be deleted, and the selected Transponder will
disappear.
ØØEdit
Press Yellow button to edit. Here you can set the Transponder frequency,
polarization, symbol rate and FEC.
ØØDelete All
Press the button. You can delete all the channels and Transponder in the
selected satellite will be deleted.
3.1.3 Search Channels from Satellite
A: Satellite Search
1. Highlight the Satellite and press the OK button to enter satellite list. And then
select one satellite you want to search.
2. Complete the antenna settings of this satellite.
3. Highlight the Start Search and select satellite then press the OK button to
confirm.
B: Multi Satellites Search
1. Highlight the Start Search and select Multi satellites then press the OK
button.
2. Highlight the satellites in the satellite list, but make sure they are all

13
configured to your DiSEqC Switch before press the OK to mark them.
3. Press Exit will start searching programs of the satellites you have marked.
C: Blind Search
1. Highlight the Satellite and press the OK button to enter satellite list. And then
select one satellite you want to search.
2. Complete the antenna settings of this satellite.
3. Highlight the Start Search and select Blind Search then press the OK
button to confirm.
D: TP Search
1. Highlight the Satellite and press the OK button to enter satellite list. And then
select one satellite you want to search.
2. Complete the antenna setting of this satellite.
3. Highlight the Transponder and press the OK button to enter TP list. And
then select one transponder you want search.
4. Highlight the Start Search and select Transponder then press the OK
button to confirm.
E: Multi TP Search
1. Highlight the Satellite and press the OK button to enter satellite list. And then
select one satellite you want to search.
2. Complete the antenna setting of this satellite.
3. Highlight the Start Search and select TP Search then press the OK button
to confirm.
4. Highlight the transponders in the TP list press the OK to mark them.
5. Press Exit will start searching programs of the transponders you have
marked.
3.1.4 Antenna Settings for Motor
Menu-> Installation ->Antenna Settings->Motor

14
1. Motor Mode:
Select DiSEqC 1.2 or USALS using the ◄/►button. DiSEqC 1.2: General
motor antenna using DiSEqC 1.2. USALS: Motor antenna using USALS.
ØØMove Auto[W/E]
Press ◄/►button, the dish will be motorized to East/West continuously, and it
will stop until it find the best signal.
ØØMove west-east
Press ◄/►button, the dish will be motorized to East/West step by step, until
you find the best signal showed on the signal bar.
ØØFine Tuning(1)
Input digital button to set the moving step
ØØStore Position
Save the current position you searched.
ØØGo to Position
Press OK button to move the dish to the position which you saved.
ØØGo to Reference
Press OK button to move the dish to 0 position.
ØØSet West Limit
You can set the maximum motor limit for both West to prevent damage to the
antenna.
ØØSet East Limit

15
You can set the maximum motor limit for both East to prevent damage to the
antenna.
ØØDisable Limit
Disable West limit and East limit.
ØØGo to X.X
Press OK button to move the dish to the USALS Setup.
Tip: Before you use USALS, you should go to Main Menu
→
Installation
→
USALS Setup to set you local position firstly.
3.2 Fast scan
To fast search channels by different providers base on Astra (19.2) satellite and
the 12515 transponders.
3.3 Factory Default
You can restore the product to the factory default and you can also setup it
according to the wizard.
Warning: Please note that once you perform Factory Default all, all data and
settings will be deleted.
1. Menu->INSTALLTION -> Factory Default
2. Input the password.
3. Highlight the option you want and press the OK button to execute it.
Tip: If you select “yes”, all data and setting will be lost. Then waiting a moment,
you will view the OSD language menu where you can select the language
according your mind.
1) All: All data and settings will be deleted.
2) Channel List Only: All channels data will be deleted.
3) Radio Channel Only: All radio channels data will be deleted.
4) Scramble Channel Only: All scramble channels data will be deleted.
5) TP Channel Only: All the channels data in the selected Transponder will
be deleted.
6) SAT Channel Only: All the channels data in the selected satellite will be

16
deleted.
3.4 USALS Setup
Menu-> Installation ->USALS Setup
If you set the Motor Mode to USALS, you need set the longitude and the latitude
in USALS Setup.

17
4.Edit Channel
Tip: You can press the Sat button to choose different satellite according to the
help information, press OK to confirm, then all the channels of this sat will be
display.
4.1 TV Channel
Menu->Edit Channel->TV Channels / Radio Channels
Edit Channels enables you to move, delete, rename, lock/unlock, and swap the
channels in the channel list conveniently.
Tip: Radio Channels operation similar to the TV Channels.
1. Move Channels
1) Press Red button to enter move mode.
2) Highlight the channel you want to move and press OK to select the channel.
3) Press the ▲/▼button to the destination in the channel list and press the OK
button.
1.1 Move Group Channels
1) Highlight the channel you want to group move. Then press the Blue button to
sign the channel.
2) Press the ▲/▼ or ◄/►button to highlight other channels you want to group

18
move.
Then press the Blue button to sign the channel one by one.
3) Press the ▲/▼to the destination in the channel list and press OK to confirm.
2. Delete Channels
1) Highlight the Delete function using ◄/►button or press Green button
directly.
2) Press the ▲/▼ to highlight the channel you want to delete, press the OK
button to sign the channel.
3) Press the EXIT button, here, select Yes will delete the chosen channels.
3. Lock/unlock Channels
1) Highlight the Lock function using ◄/►button or press Yellow button
directly.
2) Highlight the channel you want to lock, press the OK button to confirm.
3) Input the password to lock the channel. If you want to lock another channel,
you will not be asked to Input the password again until you press EXIT.
Note: If the highlighted channel is locked, press the OK button is switched into
Unlock.
4. Rename Channels
1) Highlight the Rename function using ◄/►button or press Blue button
directly.
2) Highlight the channel you want to rename, press the OK button.
3) Enter a channel name directly using the keyboard displayed on the screen
and press the Blue button to complete.
4.2 Radio Channel
1. Move Channels
1) Press Red button to enter move mode.
2) Highlight the channel you want to move and press OK to select the channel.
3) Press the ▲/▼button to the destination in the channel list and press the OK
Table of contents
Other ab Media Player manuals