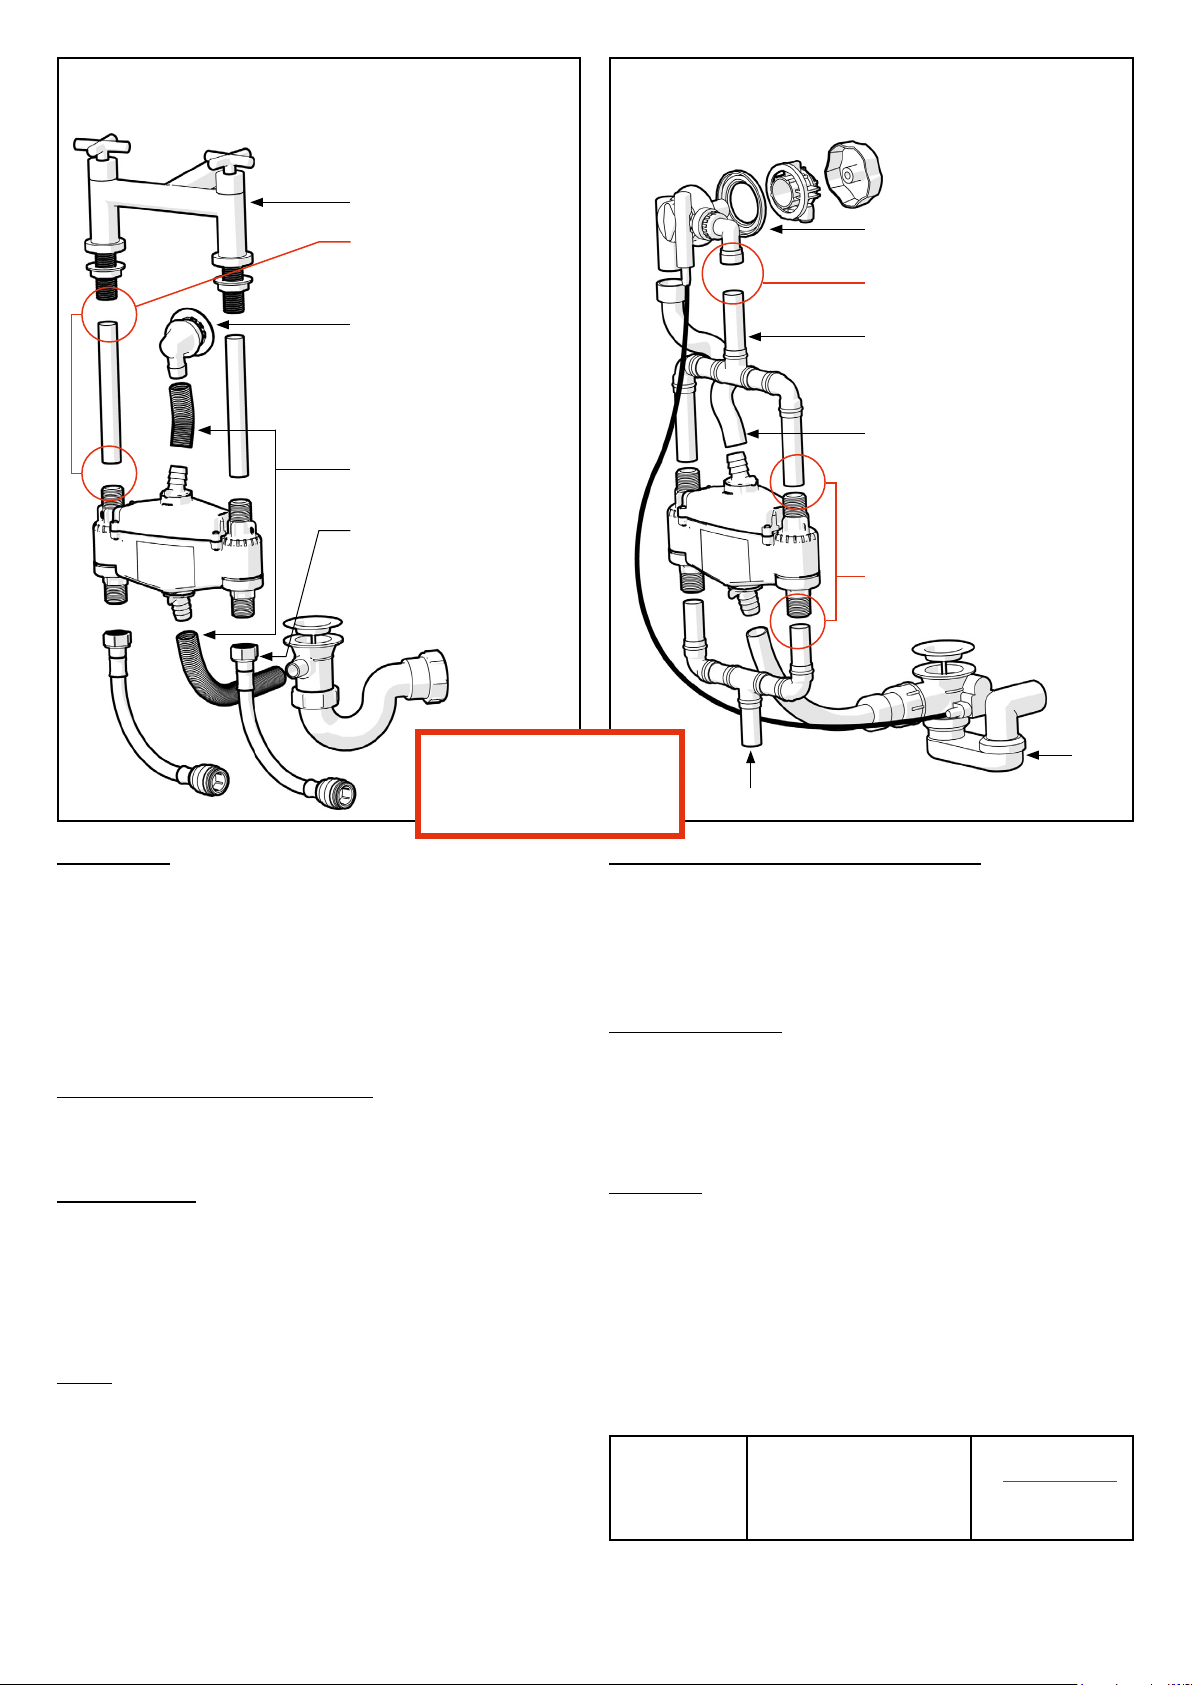
manuals.online logo
Brands
  1. Home
  2. •
  3. Brands
  4. •
  5. About Time
  6. •
  7. Safety Equipment
  8. •
  9. About Time Nova-Flo User manual

About Time Nova-Flo User manual

Installation
Instructions
Congratulations on purchasing a
Nova-Flo® ood prevention device.
Fitted correctly, Nova-Flo®will provide peace of mind to homeowners,
landlords, hotels and care providers by protecting against overowing
baths that would otherwise result in costly ood damage and lost rental
income. Since activation substantially shuts off tap supplies Nova-Flo®
will also prevent water wastage and reduce energy consumption.
In some instances, Nova-Flo®can be installed to kitchen sinks and basins.
For further guidance, please refer to our website: www.nova-o.com
Recommendation
Installing Nova-Flo®to a bath or sink requires an understanding of the
individual plumbing arrangements. Installers must ensure water supplies
can be isolated.
We recommend using a qualied professional who is familiar with work
of this nature. Nova-Flo® must not be installed under any tension
and is designed to be used with hand tightened connections.
Positioning
The unit must be located between the overow outlet (See Fig. 3) and
the waste trap, as close to the overow outlet as possible. If required,
xings such as cable ties or exible wire can be used through the ears
(Fig.1, D) to support the unit in the preferred position. This will allow any
excess water owing from the overow outlet of the bath to pass through
the unit causing activation of the valves to shut off the supply water.
The positioning of the unit is the same for all types of installations.
The location of taps will have no effect on how the Nova-Flo®operates,
making it suitable for virtually any tap style or location.
Connection to overow pipe
Nova-Flo® will t the majority of exible overow pipes found on common
bath overows. The existing overow pipe will need to be cut to leave two
lengths. Take care measuring to ensure that there is an adequate length
of pipe leading to and from the barb connectors.
The barb connector (Fig.1,A) is attached
to the Nova-Flo®body by insertion and
rotation of 45 degrees clockwise (Fig.2).
The four points on the barb connector must
line up with the point indicators on the body
and cap when fully secure.
The barb is set at an angle to aid off-centre
installations. There are four positions which
it can be set to.
There are two sizes of overow barb
connectors supplied with Nova-Flo®in order
to t the majority of exible overow pipes available. The overow pipe
should be pushed onto the barb connector rmly, creating a watertight t.
For a tight tting pipe, submerge the overow pipe in boiling water
to soften it enough to push over the barb connector. Take care not to
scald yourself.
For a loose tting pipe, use the supplied rubber sleeve to enlarge the
barb connector. A small smear of silicone sealant on the outside of the
sleeve will aid insertion into the pipe.
Please ensure all ttings are watertight by looking for leaks during
testing once the installation is complete.
Orientation
The Nova-Flo® unit must be tted in a vertical orientation. It must not be
tted lying at or at an angle as this will hinder operation. Directions are
clearly marked on the main body of the unit.
WARNING
Do not use soldered or compression ttings or solder ux in direct
contact with the unit. Care must be taken to avoid any heat transfer
to the unit if soldering ttings in close proximity.
www.nova-o.com
IMV220318
Fig. 1
Part descriptions & dimensions (mm)
The Flood Prevention Device
Barb connector
¾" BSP pipe connector
Main body
Securing ear
Side valve
C
E
Fig. 2
Box contents
Quantity Item
1 Nova-Flo®unit
2 Large Barb Connector
2 Small Barb Connector
2 O-ring for Barb Connector
2 Rubber Sleeve
A
B
C
D
E
A
B
D
Fig. 4
Part descriptions & dimensions (mm)
Water supplies
The Nova-Flo® valves are not hot or cold specic, so hot or cold water
can be run through either side.
1. Bath and Wall Mounted taps: (See Fig. 3)
The water supplies for the hot and cold feeds must pass up through
each side valve (Fig. 1, E) of the Nova-Flo®unit respectively with the
upper ¾" BSP connectors (Fig. 1, B) leading to the tap controls or mixer.
2. Bath Filler and Waste Combinations: (See Fig. 4)
The mixed water supply fed from the tap controls is to be split and
directed equally to both side valves. The upper connections are then
to be reconnected and a branch led to the ller and waste head.
Use of a Thermostatic Mixing Valve (TMV)
It is recommended that a TMV be installed prior to the Nova-Flo®unit.
e.g. Thermally mixed water should be directed through one side valve
of the Nova-Flo®unit. Nova-Flo® is rated at a maximum hot water
temperature of 60 degrees Centigrade.
Purging of system
Once tted, the system will need to be purged to clear any air trapped
inside. This is done by allowing the taps to run at full ow for 1 minute,
then turning them off. Repeat this procedure three times. Should the
valves actuate, simply turn off the taps, wait for ve seconds then turn
them on gently. Once the system is purged of air, activation of the valves
such as this will not occur. In some installations with an exceptionally fast
ow rate, unexpected water shut off may occur before the bath is full. In this
occurrence simply restrict the water ow by closing the supply valves slightly.
Testing
Test for leaks before replacing any bath surround or cladding.
To ensure correct operation, you are advised to check its operation
once every six months. To do this, keep the taps on and direct water
from a shower head or pour water from a large jug into the overow
outlet until activation. Whilst doing this it can be quicker to cup a cloth
with your hand below the overow outlet to channel more water into it.
Should the overow system ever become clogged with soap, hair etc.
resulting in a blockage remove the lower barb connector by rotating
it 45 degrees anti-clockwise and clear any debris with a cotton bud or
similar, then ret the barb connector. Care should be taken not to lose
the o-ring. Should more intensive cleaning be required you can nd
more maintenance guidance at www.nova-o.com
Resetting the water upon activation of the valves
If water pours down the overow outlet, the taps will be substantially shut
off. There will remain a small trickle of water which is intentional and reminds
the user to turn off the taps (the overow can easily handle this trickle).
To reset the unit, ensure there is no more water going through the
overow then simply turn off the taps and wait for ve seconds. Upon
opening the taps full ow is resumed. Your taps and water supply will be
unaffected in normal use.
Recommended ttings
To ensure compatibility we recommend installers use the Nova-Flo®
push-t or compression xing packs. Where the xing pack is not used
installers must ensure compatibility of their chosen ttings with the ¾"
BSP side valve connections, which are designed for use with hand
tightened plastic connectors. The lower port of each side valve should be
connected to a exible hose to ensure that the unit is not installed under
tension. We recommend the use of shower pump exible hoses or similar.
WARRANTY Nova-Flo® (the device) is warranted to be free of defective
parts, material and construction for a period of 2 years from date of
purchase. The device is designed for occasional use as a preventative
device and should not be used as a means of automatically setting your
bath water level on a regular basis.
About Time Design Ltd (the company) and our suppliers take no
responsibility for the quality of tment of Nova-Flo®or any loss or
damage caused by defective installation. We recommend installation by
a qualied professional to ensure there are no leaks and that the device
performs according to specication. The company takes no responsibility
for consequential loss under any circumstances. In event of queries,
in the rst instance please our helpline on +44 (0)1608 811 707.
Nova-Flo and Flowban are registered trademarks of About Time Design Ltd
Patent Protected: GB: 2428800, 2458783, 2476539, 2476351, 2476542, 2476353,
2476707, 2476540, 2476541, 2458783; Europe: 2279367; USA: 8215335 & 8517045.
Water Regulations Advisory Scheme Limited (WRAS Ltd.) owns WRAS Approved Product
Certication Mark and reserves all rights to it.
Manufactured by
About Time
Design Ltd
Distributed by
Lifescience Products Ltd
Unit 19, Cheltenham Trade Park
Gloucestershire GL51 8LZ
Contact
W: www.nova-o.com
E: info@nova-o.com
T: +44 (0)1608 811707
© Copyright About Time Design Ltd, 2022
Fig. 3
Part descriptions & dimensions (mm)
These parts not supplied:
Taps.
(4 of) ¾" BSP to 22mm
hand tighten pipe
connectors.
Overow outlet.
22mm pipe (Length to be
calculated according to
bath, taps and plumbing
connections used).
Overow exy-pipe
(trim to t).
Flexible hose with ¾" BSP
hand tighten connector.
IMPORTANT:
Nova-Flo®must not be
installed under any tension
Bath ller and
waste combination.
Suitable 22mm pipe
to tap connector.
22mm pipe (shown
with soldered ttings). The
lengths need to be calculated
according to conguration.
Overow exy-pipe
(trim to t) For some
installations a replacement
may be necessary. A washing
machine hose is often ideal,
secured with Jubilee clips
(4 of) ¾" BSP to 22mm
hand tighten pipe connectors.
Channelling mixed water supply from tap controls
Trap
Trap
These parts not supplied:

Popular Safety Equipment manuals by other brands

ADC ML-96 installation manual

ADC

ADC ML-96 installation manual

Dupont Tyvek 600 Plus CHA5 Instructions for use

Dupont

Dupont Tyvek 600 Plus CHA5 Instructions for use

Schlosser KB55-EB75KS EU-SG 333 operating instructions

Schlosser

Schlosser KB55-EB75KS EU-SG 333 operating instructions

RP GROUP KMUK403SC manual

RP GROUP

RP GROUP KMUK403SC manual

Ferno KED Pro user manual

Ferno

Ferno KED Pro user manual

ABS Lock X-First II LX-FI2 Series installation manual

ABS

ABS Lock X-First II LX-FI2 Series installation manual

Bornack FALLSTOP BK user manual

Bornack

Bornack FALLSTOP BK user manual

Ferno Traverse Rescue 15-0105 user manual

Ferno

Ferno Traverse Rescue 15-0105 user manual

pewag PLZW Translation of original operating manual

pewag

pewag PLZW Translation of original operating manual

Dupont Tychem 6000 F FaceSeal TF611T Instructions for use

Dupont

Dupont Tychem 6000 F FaceSeal TF611T Instructions for use

Honeywell UniLED user manual

Honeywell

Honeywell UniLED user manual

ABS Safety ABS-Lock FALZ IV-RB quick start guide

ABS Safety

ABS Safety ABS-Lock FALZ IV-RB quick start guide

MSA FireHawk M7 Maintenance and repair guide

MSA

MSA FireHawk M7 Maintenance and repair guide

CMC Rescue ProSeries Litter Harness quick start guide

CMC Rescue

CMC Rescue ProSeries Litter Harness quick start guide

Reer MOSAIC MO2 Quick installation guide

Reer

Reer MOSAIC MO2 Quick installation guide

Outdoor Research ALTIHEAT Instructions for use

Outdoor Research

Outdoor Research ALTIHEAT Instructions for use

3M NANO-LOK 3500276 User instructions

3M

3M NANO-LOK 3500276 User instructions

Uponor AquaSAFE Quick reference guide

Uponor

Uponor AquaSAFE Quick reference guide

manuals.online logo
manuals.online logoBrands
  • About & Mission
  • Contact us
  • Privacy Policy
  • Terms and Conditions

Copyright 2025 Manuals.Online. All Rights Reserved.