Access SLANTBACK Roll-Up Cover Quick start guide

Call Customer Service:
(701) 251-1427
www.accesscover.com/faq
HELP LINE
HELP LINE
Thank you for purchasing an ACCESS®Roll-Up Cover. ACI has manufactured this roll-up cover with
pride using superior quality materials and craftsmanship. With proper care, your cover will provide
years of service and enjoyment.
NOTICE TO INSTALLER: It is recommended you take the time to read these instructions
before installing this cover even if already familiar with the product. Often improvements
are made without prior notice. Always handle cover and components with care to avoid damage.
If you nd a part missing or defective, or if you are having trouble installing this product, please
have serial number ready (found on decal under rear bar by tailgate) and call the customer service
number on the back page. When done, these instructions and warranty information must be
given to the consumer.
NOTICE TO CONSUMER: Before using this product, read the operating instructions,
maintenance and safety sections of this owners manual and save for future reference.
Product must be registered to
validate the warranty. Go online to
www.agricover.com/productregistration
or complete the registration
form on Page 11.
INSTALLATION INSTRUCTIONS
AND OWNER’S MANUAL
Original SLANTBACK®Roll-Up Cover
Tested. Trusted. Guaranteed.

2
INSTALLATION INSTRUCTIONS:
(NOTE: For additional installation assistance go online to accesscover.com
instruction manual and click on installation video.)
Unpack cover components.
Clean truck box if dirty.
COMPONENTS:
1 driver side rail
1 passenger side rail
1 element seal kit
6 clamps (long box kits 8 clamps)
1 left and 1 right tension adjuster with nuts & bolts
1 pre-rolled up cover assembly
A. Position side rail with weather
strip against inside lip of box.
Push rail forward until it touches
front of box. End of rail with
strike goes to rear.
B. At front, adjust top of rail
ush with top of box and
hold it there with assistance
of another person or with a
spring clamp.
1: INSTALLING COVER SIDE RAILS
TOOLS NEEDED:
1 - 1/2” wrench (for rail clamps) 1 - Tape measure or ruler 1 - Scissor
1 - Spring clamp optional 2 - 9/16” wrenches
(to hold rails in place while clamping) Protective eyewear
PREPAR ATION
Top of rail ush with top
side of box at front
Nylon
strike to
rear
NOTE: Some installs require drilling/bolting. Those kits will contain special side
rail instructions. Follow those instructions for rail attachment in conjunction with
instructions in this owner’s manual.
NOTE ON BED LINERS: With an under-the-rail drop in bed liner, installation is
possible with minimal trim cutting of bed liner at front corner of box and back by
tailgate to allow side rail to install properly. Considerable trim cutting is required
with an over-the-rail drop in bed liner.
At front set top
of rail ush with
top of box
Shape of rail may vary This part of
the rail should
be near level

2 3
C. Install 1st clamp as close to
front as possible and use ½”
wrench to tighten.
IMPORTANT TO KEEP RAIL ON
TRUCK SECURELY: Before using
wrench on clamp, make sure
clamp teeth engage grooves on
rail, turn nut nger tight and
then use wrench.
This part of
the rail should
be near level
Adjust clamps
UP( ) or DOWN( )
until they hold rail
near level when
tightened
Shape of rail may vary
1st
Clamp
E. Install 2nd clamp on rail at midway
point of box. Adjust rail ush at top of
box and repeat clamping procedure,
always making sure teeth are engaged on
rail grooves. Continue with 3rd clamp as
close to tailgate as possible.
D. With rail ush at top of box and
clamp teeth engaged, tighten clamp.
Check if rail is level. If rail tilts up,
loosen clamp, lower it, engage teeth and
tighten it. If rail tilts down, loosen clamp,
raise it, engage teeth and tighten it.
1: INSTALLING COVER SIDE RAILS CONT’D.
F. At tailgate, adjust rail height ush
with top of tailgate. Repeat clamping
procedure. For kits with a 4th clamp
see note below. Repeat STEP 1 to
install rail on opposite side. When done,
make sure all clamps are fully tight on
both rails.
Note: Most short box kits contain 6 clamps. Install 3 per side rail. For kits
containing 8 clamps, install 4th clamp between 2nd and 3rd clamp on each side
rail. See photo E.
2nd Clamp
3rd Clamp
See note for
4th Clamp
Shape of rail
may vary
At rear this
edge should
be ush with
top of tailgate
This part of rail
should be near
level
Top of tailgate
Adjust clamps
up( ) or down
( ) until they
hold rails
level when
tightened
Temporary
spring clamp

4
A. The cover comes pre-rolled to
its normal open position for ease
of installation. Set pre-rolled cover
on tailgate with front bar facing up
as shown. Align XT Dial Tension
Adjuster (marked “L”) on driver side of
cover– positioned as shown in photo.
3: ASSEMBLING TENSION ADJUSTERS TO COVER
B. Turn 1-¼” bolt with at washer onto
nut in bar. Leave loose for now. See
photo. Repeat for XT Dial (“R”) on
passenger side of cover, and leave that
bolt loose also.
“L” Left
XT Dial
Nut
2: APPLY ELEMENT SEAL
NOTE: For additional protection–locate and seal miscellaneous factory
holes, crevices, stake pockets, etc. that may be on box (sealant not included).
ELEMENT
SEAL SIDE RAIL
CLEAN
TOP OF
BOX
HEADER
INSIDE FRONT
OF BOX
ALIGN SEAL
AGAINST
FRONT OF
RAIL AND
INSIDE EDGE
OF BOX
STARTING
HERE
B. Peel paper back, align and adhere
Element Seal™ at one corner across box
to opposite corner and cut to length.
A. At front of box header, clean top
surface with alcohol pad (if needed
wash rst).

4 5
4: MOUNTING COVER TO SIDE RAILS
A. Set rolled up cover on rails at front of
box (behind cab) with bar facing up. Roll
cover bar onto front of rails and fold/
tuck vinyl ap under. Now bar will face
down. Let straps hang to inside of box.
Push cover bar forward until it sets at on
front of side rails and overhangs them.
B. Slide left tension adjuster over until
it engages under side rail. (See photo in
Step 4 E for tension adjuster tab under
side rail.) Push bar back and forth to
line up holes-do not turn dial wheel.
Insert bolt from top, at washer and
nut from bottom.
D. Center the front bar between the
two side rails.
E. Then tighten bolt (left loose
earlier) under front bar on
each tension adjuster.
Center front bar between
rails until space is equal
at both ends
NOTE: Before tightening, make sure vinyl
weather ap is still tucked under front bar.
Tab goes
under–
then
tighten
bolt
C. Hold bolt at top and tighten nut un-
der side rail. Repeat procedure for right
hand tension adjuster.

6
A.Unroll cover and place rear bar into
strikes on side rails. Press down on bar to
close (20-30 pounds pressure). The cover
fabric may be tight. Over time under ten-
sion it will conform to its hardware and
loosen slightly. If bar is too hard to push
down, adjust tensioners equally as needed
to close.
5: INITIAL OPERATION AND ADJUSTMENTS
B. Close tailgate slowly - top of tailgate
should t snug under cover bar. If it is too
tight - raise rails by loosening rear clamps
adjust rail up and tighten clamps. If too
loose adjust rails lower.
C. Check cover tension by releasing
autolatch and open and close rear bar
several times. It should snap down when
closing. Cover fabric should sound drum
like when tapped on. If adjustment is
needed, roll cover open and to loosen
turn XT-Dial Clockwise. To tighten
turn XT-Dial Counter Clockwise.
Always turn Dials in Equal
amounts. See photo at left.
D. When done, always seal both
sides of cover with hook and loop
system. For detailed operating
instructions see Page 7.
TIP: Reasons to keep cover drum tight:
1) Lasts longer
2) Less noise
3) Looks nicer
To loosen Cover
Turn Clockwise
To Tighten Cover
Turn Counter
Clockwise

6 7
Release retainer straps at front
and using both hands roll cover
out to rear of box.
Now along side of box, seal cover
edges with hook and loop sealing
system the full length of cover on
both sides. Pull with one hand -
seal with other hand.
Position roll-up bar against
strikes. Push down on bar until
autolatch locks in place.
Open tailgate, on driver side,
lightly pull straight down on
autolatch and rotate rear bar
with other hand
Securely fasten retainer straps to
store the cover.
Using both hands, roll cover
toward front of box (not against
the cab).
COVER OPERATING INSTRUCTIONS
TO CLOSE
TO OPEN
Note: view opening and closing demonstration video on www.accesscover.com
A. TO CLOSE:
Engage rear bar into strikes and push down on
cover bar until both latches lock into place under
side rails.
B. TO OPEN:
Open tailgate, near driver side, reach under
rear bar and pull loop down, at same time lift
up on rear roll-up bar.
Latch Latch
INSTALLATION
NOTE:
For proper latch
operation, make sure
the rails at tailgate
are set to correct
height and level. See
diagrams at right.
1. Lightly pull straight down to release
2. Rotate rear bar with other hand
AUTO LATCH II OPERATION
NOTE: Autolatch II is factory set. If needed adjust strap using the slip lock buckle to
ensure both latches fully engage the side rails.

8
PARTS DIAGRAM
QUICK RELEASE
STORAGE STRAPS
FRONT COVER BAR
XT-DIAL TENSION
ADJUSTER (LEFT)
⅜” x 1-¼” BOLT,
WASHER
(2 PER COVER)
FRONT
ELEMENT SEAL
⅜” x ¾” BO LT,
WASHER, NUT
(2 PER COVER)
RAIL CLAMPS
6–MOST SHORT BOXES
8–LONG BOXES
LEFT
SIDE RAIL
AUTO LATCH II
DUAL LATCHING
SYSTEM
RIGHT
SIDE RAIL
REAR
ROLL-UP
BAR
SUPPORT
BOW
TROUBLESHOOTING
PROBLEM SOLUTION
Cover too loose Turn bolt tension adjusters counter clockwise to move
front bar forward. (Refer to #5C, see arrows next to
adjuster)
Cover too tight Turn bolt tension adjusters clockwise to move front
bar rearward. (Refer to #5C, see arrows next to
adjuster)
Gap between roll-up bar and tailgate Rails set too high (Refer to #5B)
Cover is too wide Check rails. Rails in - too wide - push all clamps to
top of rail
Cover is too narrow Rails out - too narrow - pull all clamps down on rail
(Refer to #1D)
Lopsided cover too much on one side Check front bar. It must be centered side to side
(Refer to #4D)
Top of tailgate hits rear bar when
attempting to close
Raise side rails at rear of box until tailgate closes
without pushing rear bar up (Refer to #5B)
Autolatch doesn’t engage Check side rails for height and level. (Refer to #1F)
Inspect latches for jammed or broken parts. Check
tension of Autolatch strap, if strap is too tight latches
won’t engage rails, loosen strap as needed. (See Auto-
latch II operation - Page 7)

8 9
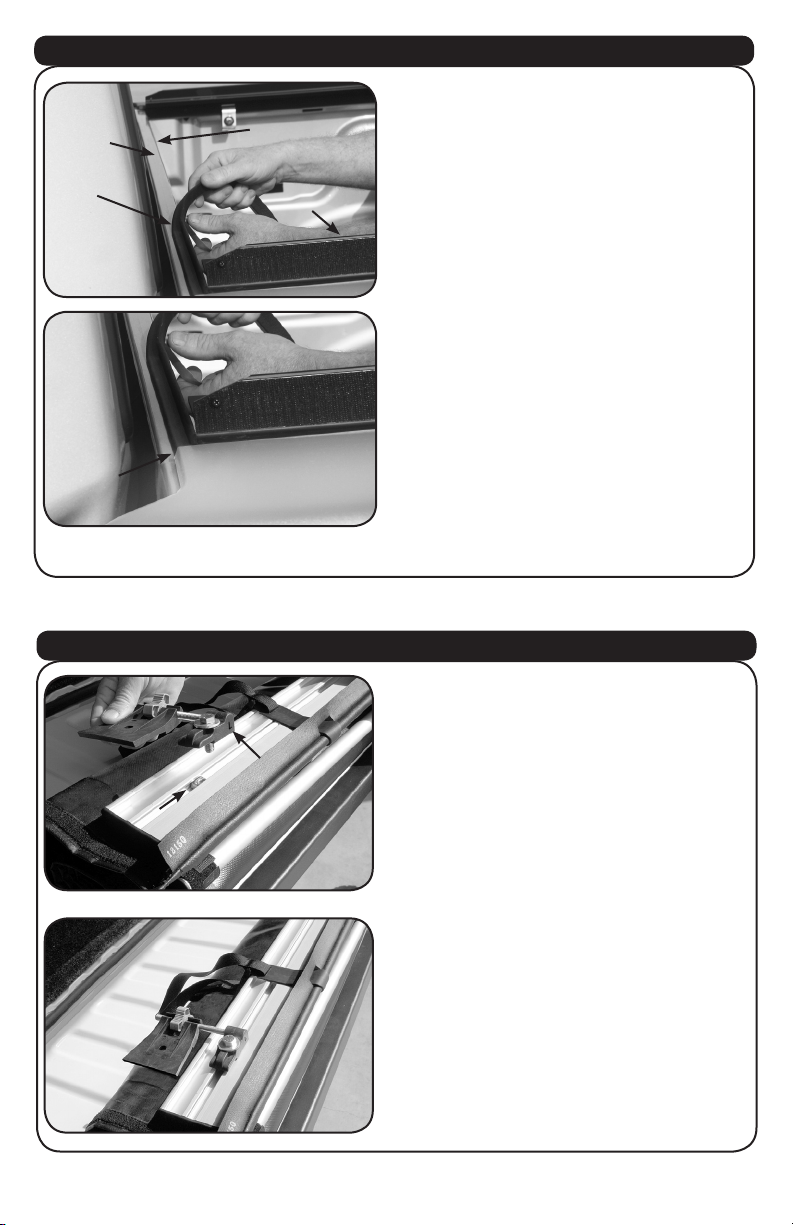
• Keep cover closed when not in use and always seal cover edges with
hook and loop sealing sytem the full length of cover on both sides.
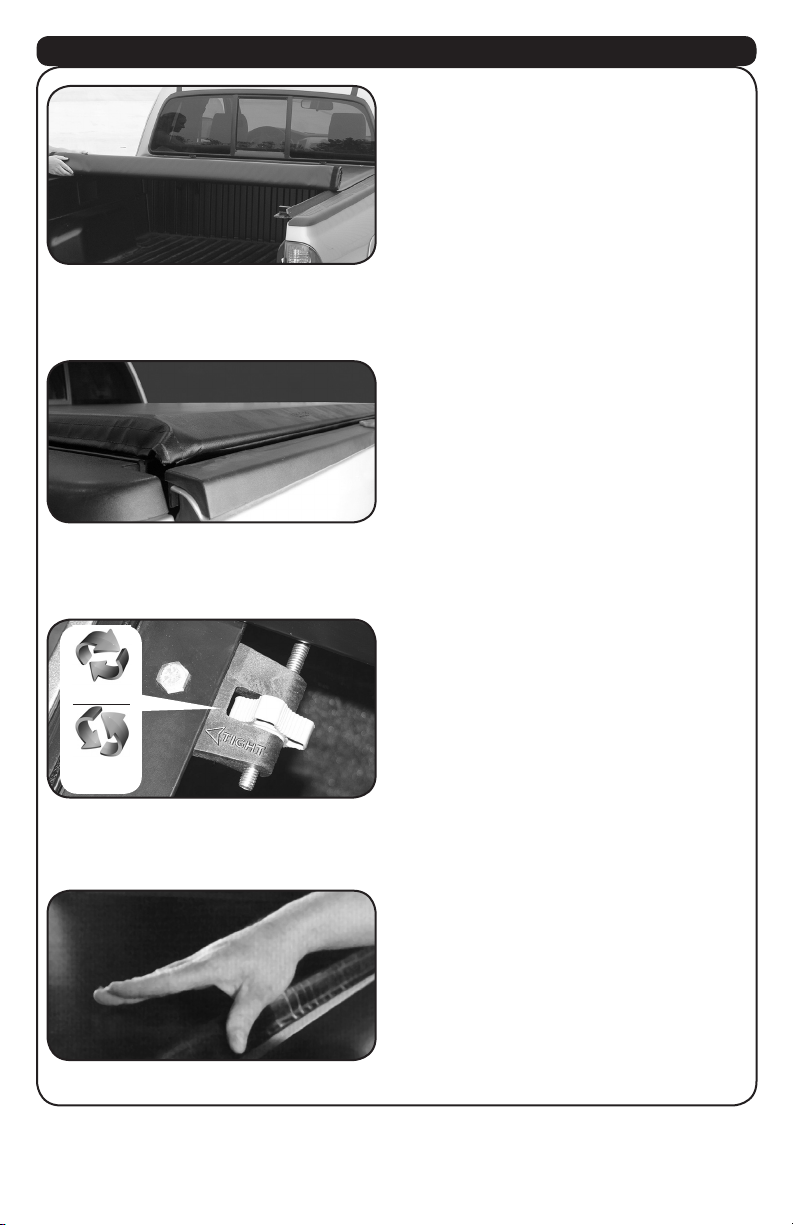
• Keep the cover tight, cover vinyl should sound drum-like when
tapped on.
• Make sure cover is properly latched and sealed. Lock while traveling
and before entering automatic drive-through car washes.
• Avoid storing cover in its rolled-up position for long periods of time.
• When cleaning, for best results use mild liquid soap and water. Never
clean with petroleum or citrus based products.
• Periodically treat cover with our Cover Care cleaner & UV Protectant in-
stead of petroleum based products that may dry out and damage the vinyl.
• Avoid allowing cargo to rub against cover while transporting, whether
in open or closed position.
TIPS FOR A LONGER LASTING COVER
INSPECTION AND MAINTENANCE
• Inspection and much of the maintenance can be done by the operator. It may be necessary to review the
installation and operating instructions.
• Periodically inspect the cover assembly and the condition of all parts. Check for loose bolts and parts and
tighten if needed. Test the operation to ensure that the parts are functioning properly and that the cover is
in top operational condition.
• If latch has been damaged replace with new one. NOTE: Inspection and/or maintenance should also be
performed anytime a malfunction is observed or suspected. If you need assistance inspecting and/or
servicing your cover, or if you want to order a replacement part, call the customer service number on the
back page. Always use original equipment replacement parts for your cover.
SAFETY INFORMATION
• Do not cover cargo that is higher than the cover.
• Do not place object(s) on or against the cover or its framework at any time
• Always secure cargo so it cannot shift and damage the cover or its parts.
• Do not use the covers framework to tie down cargo.
• Never stand, sit or ride on the cover or allow others to do so.
• Do not leave valuables in an unattended vehicle as cover does not prevent theft of contents in truck box.
• The cover does not eliminate moisture and dust from entering the truck box. Special wrappings or
packaging of the contents may be necessary.
• Due to poor ventilation, if you allow a pet/animal in the box, leave cover open. Do not allow people or
animals to occupy box with the cover closed.
• When towing vehicle backwards, cover must be rolled fully open and secured with safety straps or fully
closed and secured with manual slide lock.
• ALWAYS nish securing the cover. Use caution when operating cover in windy conditions.
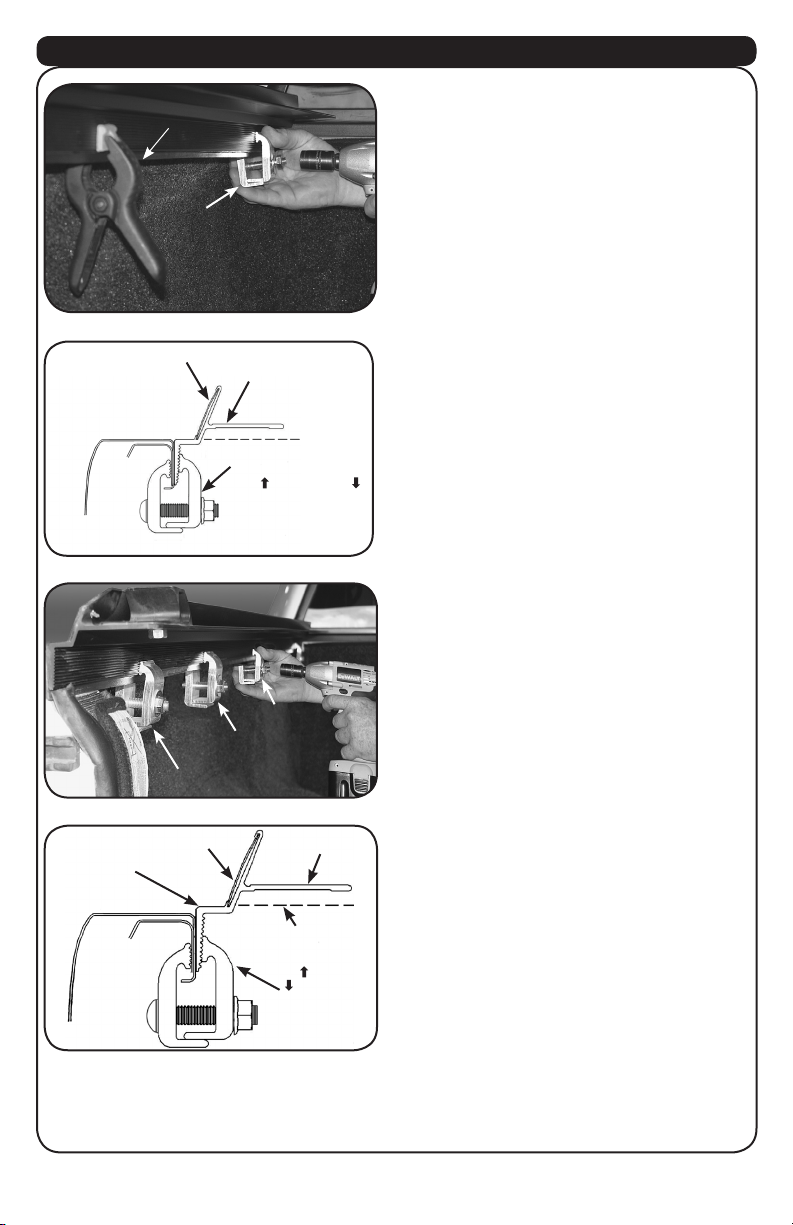
• Periodically check and/or retighten clamp bolts as needed.
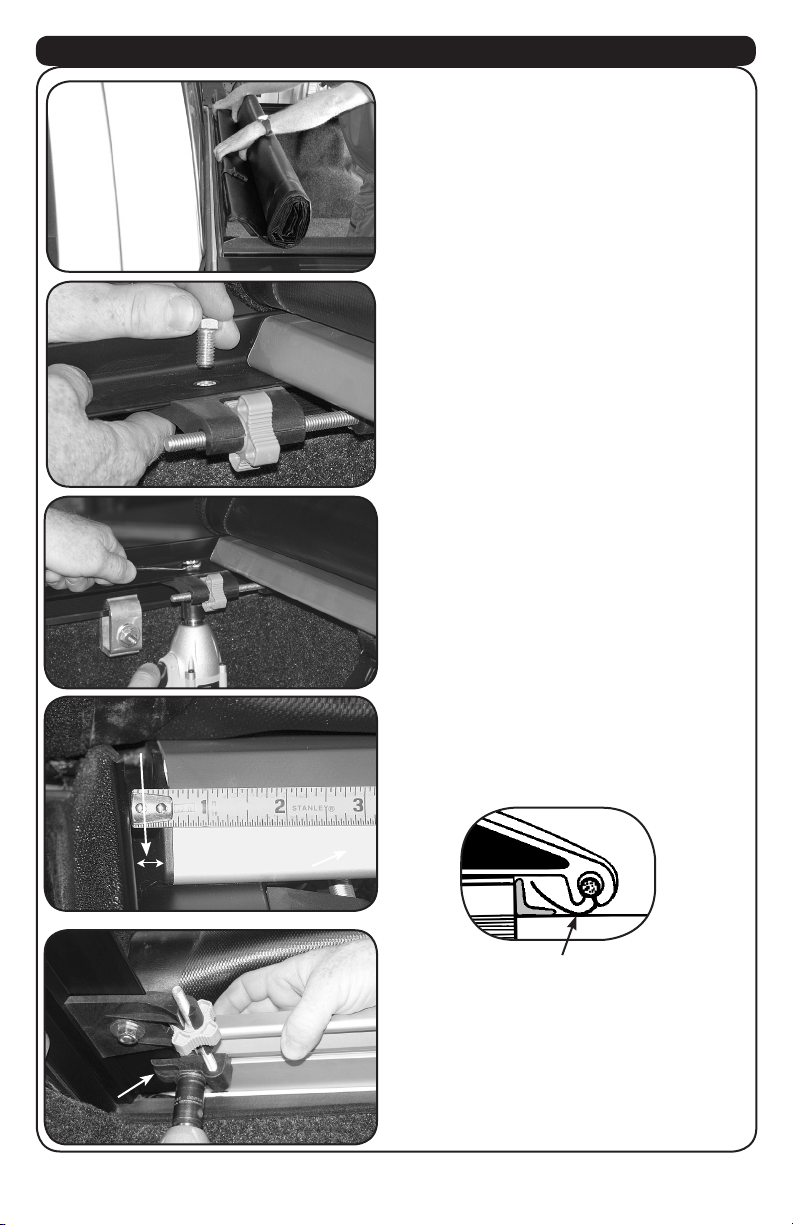
• Periodically check and/or retighten front bar tensioning bolts as needed.
• Periodically check and/or adjust Autolatch strap to ensure latches fully engage side rails.

10
Agri-Cover, Inc. extends the following Premium Cover™ warranty to the original retail purchaser of any
ACCESS® Original SLANTBACK®Roll-Up Covers:
Agri-Cover, Inc. warrants its ACCESS® Original SLANTBACK®Roll-Up cover to be free from defects in
material and workmanship, under normal use, as long as the original purchaser owns the truck on which the cover
was originally installed and as long as the cover remains properly installed on said truck.
Agri-Cover, Inc.’s sole obligation under this limited warranty is limited to the repair or replacement, at its option, of
defective parts only. No labor or service allowance is given or implied. IN NO EVENT SHALL AGRI-COVER,
INC. BE LIABLE FOR INCIDENTAL, CONSEQUENTIAL, OR SPECIAL DAMAGES. AGRI-COVER,
INC. EXPRESSLY DISCLAIMS ANY AND ALL IMPLIED WARRANTIES OF MERCHANTABILITY,
AND THERE ARE NO WARRANTIES WHICH EXTEND BEYOND THE LIMITED WARRANTY
DESCRIPTION CONTAINED HEREIN.
For warranty performance call our Customer Service Department at 701-251-1427 to determine if only a replacement
part is needed or if the cover needs to be returned for inspection and repair. Warranty registration must
be on le and/or proof of original purchase (detailed and dated receipt) required for warranty
to be effective. Goods to be returned must have a pre-authorized RA # (Returned Authorization
Number) - obtained by calling the number above. Mark the number on the package and ship it freight
prepaid to address below. Agri-Cover will pay freight to return goods to sender.
This limited warranty does not cover any damage due to accident, abuse, misuse, alteration, neglect, improper
installation, or ordinary wear and tear.
This limited warranty gives you specic legal rights and you may have other rights, which vary, from state to state.
ACCESS is a registered United States trademark of AGRI-COVER, INC.
For ACI patent information, please visit: http://www.agricover.com/patents/
PHONE 701-251-1427 7:30 am - 5:30 pm Central Standard Time
Monday thru Friday except Holidays
MANUFACTURER’S PREMIUM COVERTM
LIMITED WARRANTY
Agri-Cover, Inc.
Customer Service Dept
3000 Hwy 281 SE
PO Box 508
Jamestown, ND 58402
Phone: 701-251-1427
ACCESS - A Division of Agri-Cover, Inc.
Original SLANTBACK®Roll-Up Cover

10 11
WARRANTY REGISTRATION
Thank you for helping us serve you better.
1. Serial #: Truck Model:
(Serial # found on sticker under bar at tailgate. If calling in please have serial number available.)
2. Name of roll-up cover purchased:
3. Price Paid: Date of Purchase:
4. Dealers Name:
Dealers Location:
Dealers Phone:
5. Who installed the cover? Dealer Self
Other (specify)
6. How Would you Grade Excellent Good Average Below Average Poor
A. The Installation
B. Dealer Service
C. Value for the Money
D. Overall Satisfaction
with dealer
7. How did you rst hear about this cover?
Friend Dealer Advertisement (specify)
Seen on a Truck At a Show Other (specify)
8. Would you recommend this cover to a friend? Yes No
9. Comments/Suggestions:
10. Your Name:
Address:
City, State, Zip:
Phone:
E-mail:
11. Age Range
21–34 35–44 45–54 55–64 65–Over
12. Income Range
$20K–$40K $41K–$60K $61K–$80K $81K–$100K $100K+
Product must be registered to validate the warranty.
Go online to www.agricover.com/productregistration
to complete a registration form electronically.
Agri-Cover, Inc.
P.O. Box 508
Jamestown, ND 58402
Warranty form above may also be mailed to:

12

12 13
EZ- Retriever™ II
Truck Bed Mat
TrailSeal™
Tailgate
Protector
G2 Bed
Pockets
LED Light
Smart Accessory
Products from
866-797-3513 • accesscover.com

14
888-837-0852
3 Distinct Models To Choose From
ALL TERRAIN PLOW
180 UTILITY PLOW
HD UTILITY PLOW

14 15
mysnowsport.com
Plow Your Own Lot!
•Paysforitselfinoneseason!
•Simpleboltonmount,installs
inminutes
•Noelectricorhydraulic
componentstofreezeor
malfunction
The practical design does not
block headlights in plow or
transport position.
NO EXTRA LIGHTS
Our plows are easily lifted by
one person. Lower the blade,
plow until nished, then lift
the blade back to transport
position.
EASY TO LIFT
Built in trip edge won’t scratch
concrete, brick or black top,
tear up grass surfaces or
remove gravel.
TURF FRIENDLY
See it to
believe it!
Install
Video
Available
Online
•Theturf-friendlyrubber
cuttingedgewon’tscratch
yourlandscapingortearup
thegrass!
•Easystoragebetween
snowfallsorduringoseason
Heavy duty, corrosion
resistant, anodized
aluminum blade repels rust,
so it never needs painting.
RUST RESISTANT BLADE

© 2012 Agri-Cover, Inc. All Rights Reserved. Products subject to change without notice. 112612 PN 50213_U
Table of contents
Other Access Automobile Accessories manuals