manuals.online logo
Brands
  1. Home
  2. •
  3. Brands
  4. •
  5. aci
  6. •
  7. Accessories
  8. •
  9. aci HAZARDOUS ROOM Series Installation instructions

aci HAZARDOUS ROOM Series Installation instructions

Automation Components, Inc.
2305 Pleasant View Road | Middleton, WI 53562
Phone: 1-888-967-5224 | Website: workaci.com
Page 1
Version: 1.0
I0000816
FIGURE 1: ENCLOSURE
HAZARDOUS ROOM SERIES
Installation & Operation Instructions Phone: 1-888-967-5224
Website: workaci.com
3.09"
(78.59 mm)
3.09"
(78.59 mm)
SEAL FITTING
PRECAUTIONS
• DO NOT RUN THE WIRING IN ANY CONDUIT
WITH LINE VOLTAGE (24/120/230 VAC).
GENERAL INFORMATION
The ACI Hazardous Room Sensor is a single point
wall mounted temperature sensor that is designed
for use with electronic controllers in commercial and
industrial heating and cooling building manage-
ment systems. It is available with multiple thermistor
or RTD options. Hazardous Room sensors come
standard with a heavy-duty Copper-Free Aluminum
Connection Head that meets Class I, Division 1 & 2,
Group A, B, C, D; Class II, Division 1, Groups E, F, G;
Class II, Division 2, Group F & G; class III standards.
For optimal temperature measurement, follow
these tips:
•Do not install on external walls.
•Do not install near heat sources. eg: lamps, radiators,
direct sunlight, copiers, chimney walls, walls concealing
hot-water pipes.
•Avoid air registers, diusers, vents, and windows
MOUNTING INSTRUCTIONS
Thisproduct must be installed by atrained profession-
al with knowledge of local codes and regulations. Before carrying out any work, ensure local regulations and
site procedures are followed to maintain the overall certication of the sensor. The sensor should be mounted
in an area where air circulation is well mixed and not blocked by obstructions.
For mounting on a wall, ACI recommends a height of 48-60” (1.2-1.5 m) o the ground and at least 1.5’ (0.5
m) from the adjacent wall. Remove the cover from the housing by twisting o the cover. Attach the base
directly to the wall. Mounting holes are located at the corners of the housing – see FIGURE 1 (above). Seal
ttings, intrinsically safe barriers, and explosion proof ex ttings not provided by ACI.
Drill pilot holes for the mounting screws. Use the enclosure mounting holes as a guide, or use the
dimensions listed in FIGURE 1(p. 1). A 1/2”NPT tapping is located at the top of the enclosure.
Refer to the wiring instructions (p 2) to make necessary connections. The housing is provided with Green ground
screw if the housing requires an earth ground. After wiring, attach the cover to the base.
Automation Components, Inc.
2305 Pleasant View Road | Middleton, WI 53562
Phone: 1-888-967-5224 | Website: workaci.com
Page 2
Version: 1.0
I0000816
PROBLEM
Sensor reading is incorrect
Sensor reads infinity/very high resistance
Sensor reads low resistance
Erratic readings
SOLUTION(S)
•Verify sensor wiring to controller is not damaged and has continuity.
•Verify sensor or wires are not shorted together.
•Verify controller is setup for correct sensor curve.
•Disconnect sensor wires, and take a resistance reading with a multimeter.
•Compare the resistance reading to the Temperature Vs Resistance
Curves online: http://www.workaci.com/content/thermistor-curves-0
•Verify proper mounting location to conrm no external factors are
aecting reading.
•Sensor or wires are open.
•Sensor or wires are shorted together.
•Bad wire connections.
WIRING INSTRUCTIONS
All thermistor type units are supplied
with (2) ying lead wires, and all RTD’s are
supplied with (2) or (3) ying lead wires –
see FIGURE 3 and 4. The number of wires
needed depends on the application.
Connect thermistor/RTD wire leads to
controller analog input wires using wire
nuts, terminal blocks, crimp connectors,
or soldering. If the controller requires a
(2) wire input for a RTD, connect the (2)
common wires (same color) together. All
wiring must comply with local codes and
National Electric Code.
Note: When using a shielded cable, be
sure to connect only (1) end of the shield
to ground at the controller. Connecting
both ends of the shield to ground may
cause a ground loop. When removing
the shield from the sensor end, make
sure to properly trim the shield to
prevent any chance of shorting.
Note: If the controller requires a (2) wire
input for a RTD, connect the (2) common
wires (same color) together. If the
controller requires (3) wires, use (3)
individual wires.
FIGURE 4: 3-WIRE RTD WIRING
FIGURE 3: 2-WIRE THERMISTOR or RTD
WIRING
TROUBLESHOOTING
THERMISTOR OR
RTD 2WIRE
WIRE NUT
RTD 3WIRE
SAME COLOR WIRES
WIRE NUT
WIRING FROM CONTROLLER
ANALOG INPUT
WIRING FROM CONTROLLER
ANALOG INPUT
W.E.E.E. DIRECTIVE
At the end of their useful life the packaging and product should be disposed of via a suitable recycling
centre. Do not dispose of with household waste. Do not burn.
WARRANTY
The ACI Hazardous Series temperature sensors are covered by ACI’s Five (5) Year Limited Warranty, which is
located in the front of ACI’S SENSORS & TRANSMITTERS CATALOG or can be found on ACI’s website:
www.workaci.com.
Automation Components, Inc.
2305 Pleasant View Road | Middleton, WI 53562
Phone: 1-888-967-5224 | Website: workaci.com
Page 3
Version: 1.0
I0000816
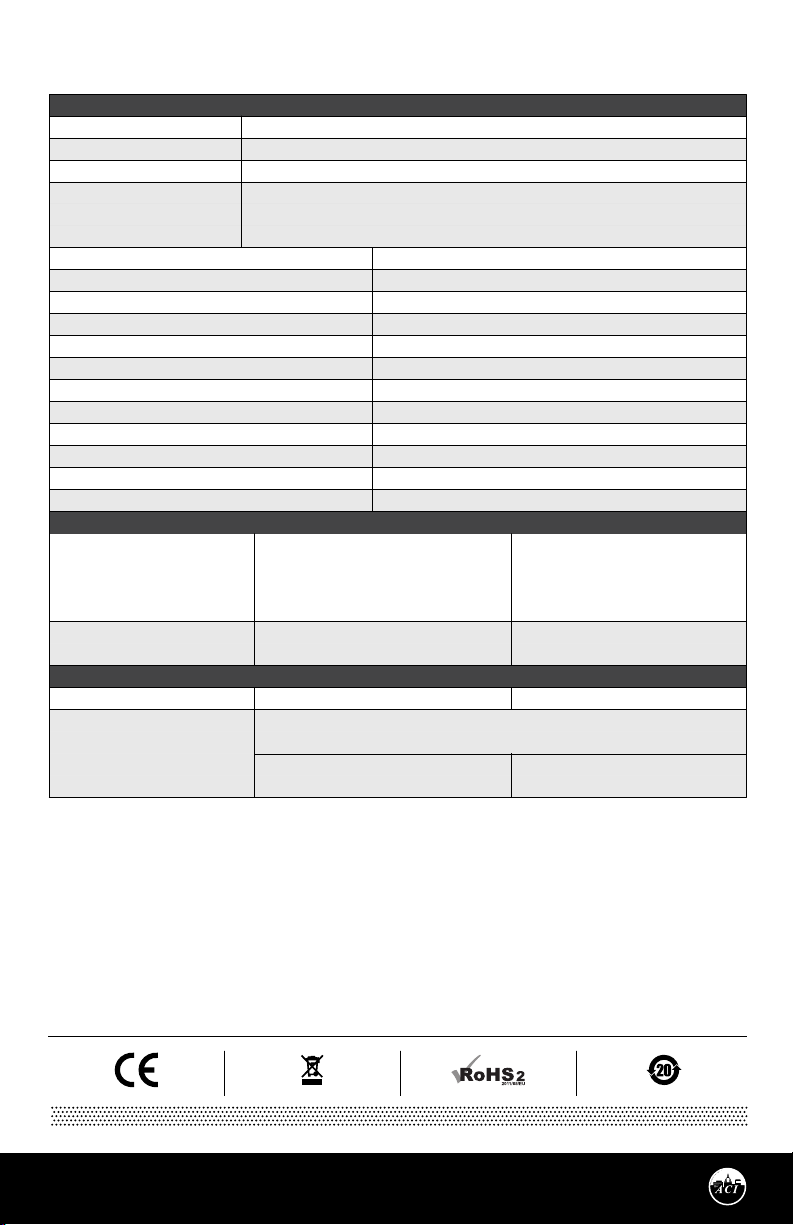
A/AN (Type III): 10 KΩ nominal (White/White)
A/CP (Type II): 10 KΩ nominal (White/Green)
A/CP-HT (Type II): 10 KΩ nominal (White/Green)
A/10K-E1: 10 KΩ nominal (Orange/Gray)
A/1.8K Series: +/- 0.5 °C @ 25 °C (77 °F)
and (+/-1.0 °C) (+/-1.8 °F)
A/100: 100 Ω nominal
+/- 0.06% Class A (Tolerance Formula: +/- °C = (0.15 °C + (0.002 * |t|))
where |t| is the absolute value ofTemperature above or below 0 °C in °C)
@ -40 °C (-40 °F): +/- 0.23°C (+/- 0.414 °F)
@ 0 °C (32 °F): +/- 0.15°C (+/- 0.27 °F)
One
-40 to 85 °C (-40 to 185 °F)
10 to 95% RH, non-condensing
“-D” Enclosure: Feraloy® Iron Alloy, -50 to 60
°C
(-58 to 140
°F
), NEMA 3, 4, 7ABCD, 9EFG
“-I” or “-INW” Enclosure: Feraloy® Iron Alloy, -50 to 60
°C
(-58 to 140
°F
), NEMA 3, 4, 7ABCD, 9EFG
“-R” Enclosure: Copper-Free Aluminum, -50 to 60
°C
(-58 to 140
°C
), NEMA 3, 4, 7ABCD, 9EFG
(see Enclosure Specifications)
CL. I, Div. 1 & 2, Groups A, B, C, D
CL. II, Div. 1, Groups E, F, G
CL. II, Div. 2, Groups F, G
CL. III
“-R” Enclosure: UL 1203 | “-D”, “-I” or “-INW” Enclosure: UL 886
C22.2 No. 30
Two | 1/2” NPT (National Pipe Tapered) Female Hubs
0.250” (6.35mm) | ½” NPT Thread
304 Stainless Steel
304 Stainless Steel | 0.260”
½” NPS Female Thread | ½” NPT Male Thread
A/1.8K: 1.8 KΩ nominal (Red/Yellow)
A/3K: 3 KΩ nominal (White/Brown)
A/20K: 20 KΩ nominal (Brown/Blue)
A/100KS: 100 KΩ nominal (Black/Yellow)
A/10K-E1 Series: +/- 0.3 °C (+/- 0.54 °F)
All Else: +/- 0.2 °C (+/- 0.36 °F)
A/1K: 1 KΩ nominal
@ 200 °C 392 °F): +/- 0.55 °C (+/- 0.99 °F)
SENSOR NON-SPECIFIC INFORMATION
Number Sensing Points:
Storage Temperature Range:
Operating Humidity Range:
Enclosure Specifications:
(Temperature, NEMA Ratings)
Operating Temperature Range:
Enclosure Explosion Proof Rating:
Enclosure Dust-Ignition Proof Rating:
Enclosure Raintight Rating:
Enclosure Wet Locations Rating:
Enclosure UL Standards:
Enclosure CSA Standards:
Enclosure Hubs | Hub Size:
Probe Diameter | Sensor Threads:
Probe Material:
Thermowell Material | Bore Diameter:
Thermowell Instrument Thread | Process Thread:
THERMISTOR
Sensor Output @ 25ºC (77ºF):
(Lead Wire Colors)
Accuracy 0-70ºC (32-158ºF):
PLATINUM
Sensor Output @ 0°C (32°F):
Accuracy:
PRODUCT SPECIFICATIONS

Other aci Accessories manuals

aci Room Series Installation instructions

aci

aci Room Series Installation instructions

aci ACCESS series Installation instructions

aci

aci ACCESS series Installation instructions

aci OA2630A Service manual

aci

aci OA2630A Service manual

aci ACCESS series Installation instructions

aci

aci ACCESS series Installation instructions

aci Room Series Installation instructions

aci

aci Room Series Installation instructions

aci ROOM Series Installation instructions

aci

aci ROOM Series Installation instructions

aci RT2630 Series Installation instructions

aci

aci RT2630 Series Installation instructions

aci DUCT TEMPERATURE Series Installation instructions

aci

aci DUCT TEMPERATURE Series Installation instructions

aci A/TT Remote Probe Series Installation instructions

aci

aci A/TT Remote Probe Series Installation instructions

aci BACnet / Modbus IMMERSION Series Installation instructions

aci

aci BACnet / Modbus IMMERSION Series Installation instructions

aci A/ASCS User manual

aci

aci A/ASCS User manual

aci A/CTE-50 User manual

aci

aci A/CTE-50 User manual

aci A/SCTA Series Installation instructions

aci

aci A/SCTA Series Installation instructions

aci RTD Freezer Series User manual

aci

aci RTD Freezer Series User manual

aci WPR2-300 Series User manual

aci

aci WPR2-300 Series User manual

aci BACnet Outside Series Installation instructions

aci

aci BACnet Outside Series Installation instructions

aci DRN3.1 User manual

aci

aci DRN3.1 User manual

aci DUCT Series User manual

aci

aci DUCT Series User manual

aci A/CTE2 Series Configuration guide

aci

aci A/CTE2 Series Configuration guide

aci A/CTA2 Series Installation instructions

aci

aci A/CTA2 Series Installation instructions

aci TUCH2 User manual

aci

aci TUCH2 User manual

aci SST2630 Installation instructions

aci

aci SST2630 Installation instructions

aci A/CTA2-5 User manual

aci

aci A/CTA2-5 User manual

aci A/CS2 User manual

aci

aci A/CS2 User manual

Popular Accessories manuals by other brands

Hydas 4657.1.00 instruction manual

Hydas

Hydas 4657.1.00 instruction manual

Arctic Cove MAC3822KP Operator's manual

Arctic Cove

Arctic Cove MAC3822KP Operator's manual

PASCO PS-3225 Operation manual

PASCO

PASCO PS-3225 Operation manual

Ono Sokki GS-5050 instruction manual

Ono Sokki

Ono Sokki GS-5050 instruction manual

wattstopper FM-105 installation instructions

wattstopper

wattstopper FM-105 installation instructions

Kambrook Snugasabug KEB302 Instruction booklet

Kambrook

Kambrook Snugasabug KEB302 Instruction booklet

Ravpower RP-PB134 user guide

Ravpower

Ravpower RP-PB134 user guide

R9 Technology SN400 user guide

R9 Technology

R9 Technology SN400 user guide

Electra e2.3 instruction manual

Electra

Electra e2.3 instruction manual

Endress+Hauser ISEmax CAS40D operating instructions

Endress+Hauser

Endress+Hauser ISEmax CAS40D operating instructions

V-TAC VT-3509 manual

V-TAC

V-TAC VT-3509 manual

ekwb EK-FC 1070 GTX Ti ASUS installation manual

ekwb

ekwb EK-FC 1070 GTX Ti ASUS installation manual

Dimetix EDS-C manual

Dimetix

Dimetix EDS-C manual

Cocoon HE150277 instruction manual

Cocoon

Cocoon HE150277 instruction manual

Tivoli Audio Fonico quick start guide

Tivoli Audio

Tivoli Audio Fonico quick start guide

INVENTOR BC-43B user manual

INVENTOR

INVENTOR BC-43B user manual

Lencore i.Net G3475 user guide

Lencore

Lencore i.Net G3475 user guide

QUANTOR MINICHILLY instruction manual

QUANTOR

QUANTOR MINICHILLY instruction manual

manuals.online logo
manuals.online logoBrands
  • About & Mission
  • Contact us
  • Privacy Policy
  • Terms and Conditions

Copyright 2025 Manuals.Online. All Rights Reserved.