ACN IRIS 3000 User manual

IRIS 3000® DIGITAL VIDEO
PHONE USER MANUAL
IRIS 3000®
DIGITAL VIDEO PHONE

IRIS 3000® DIGITAL VIDEO PHONE USER MANUAL
2
Contents
Safety Instructions ....................................................................3
1. Installing the IRIS 3000® Digital Video Phone ........... 3
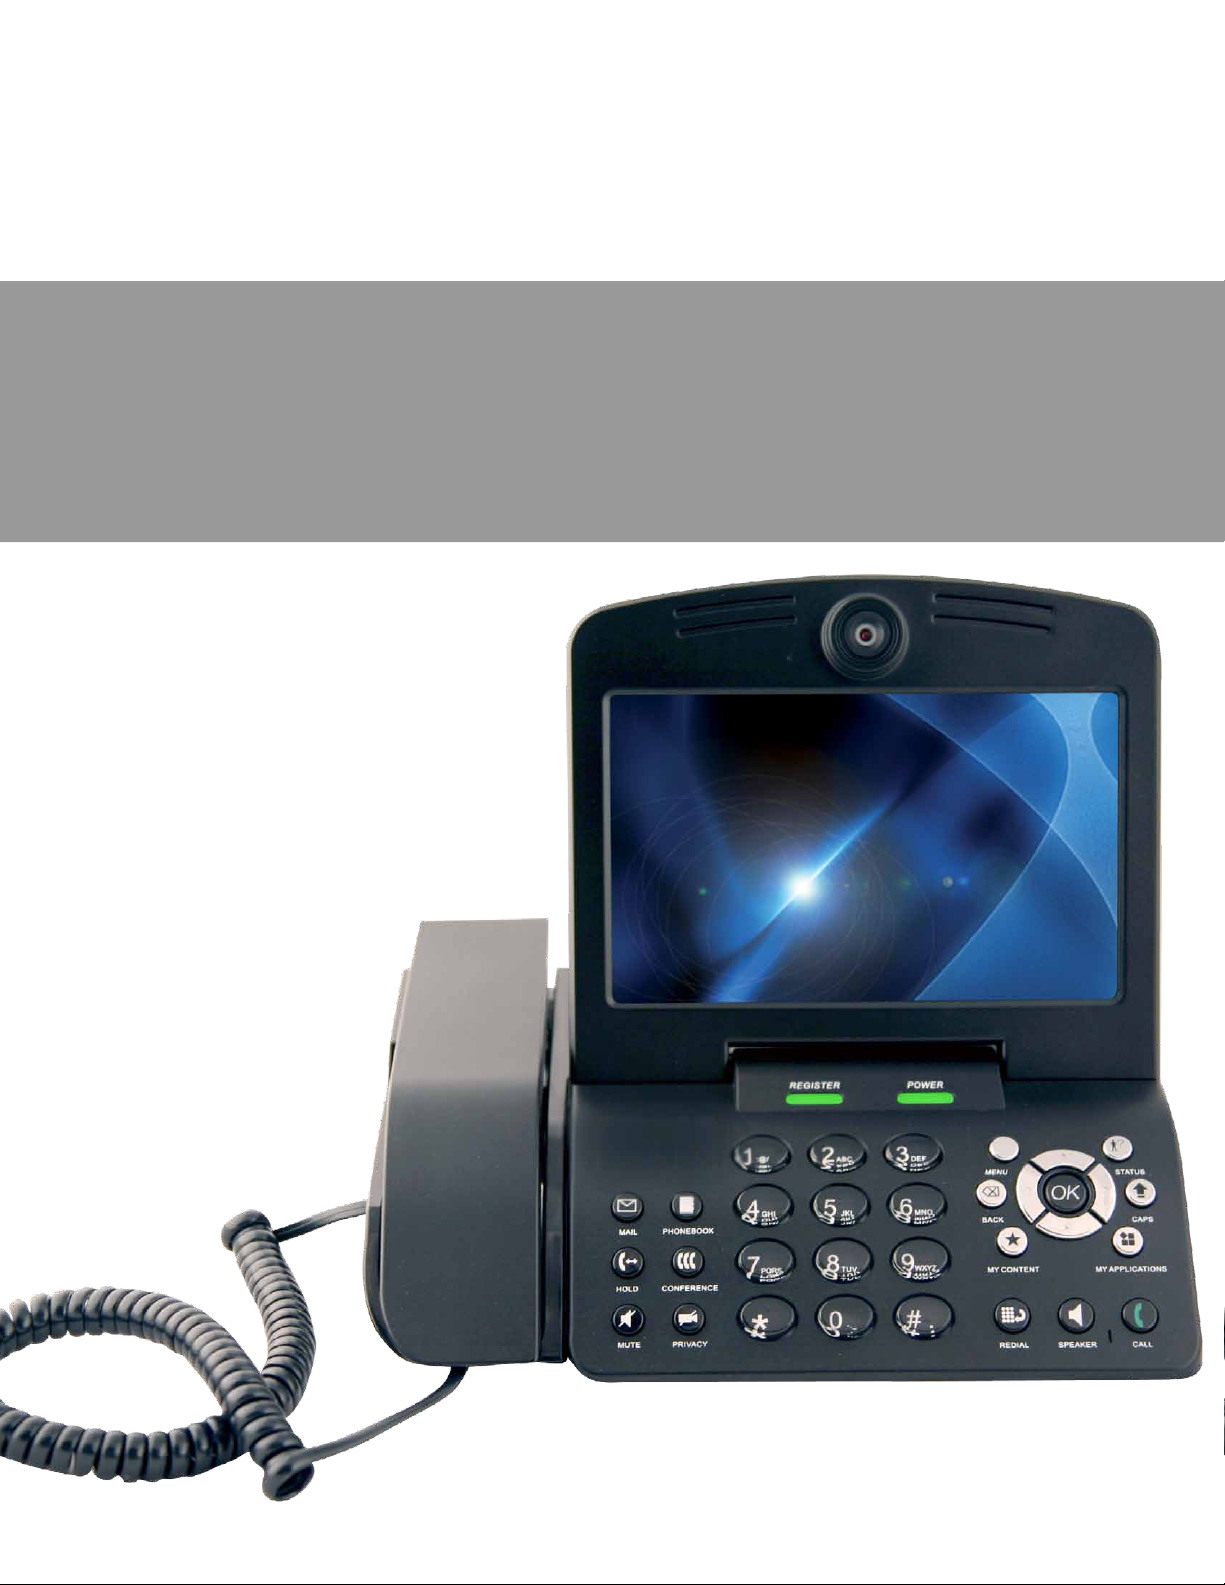
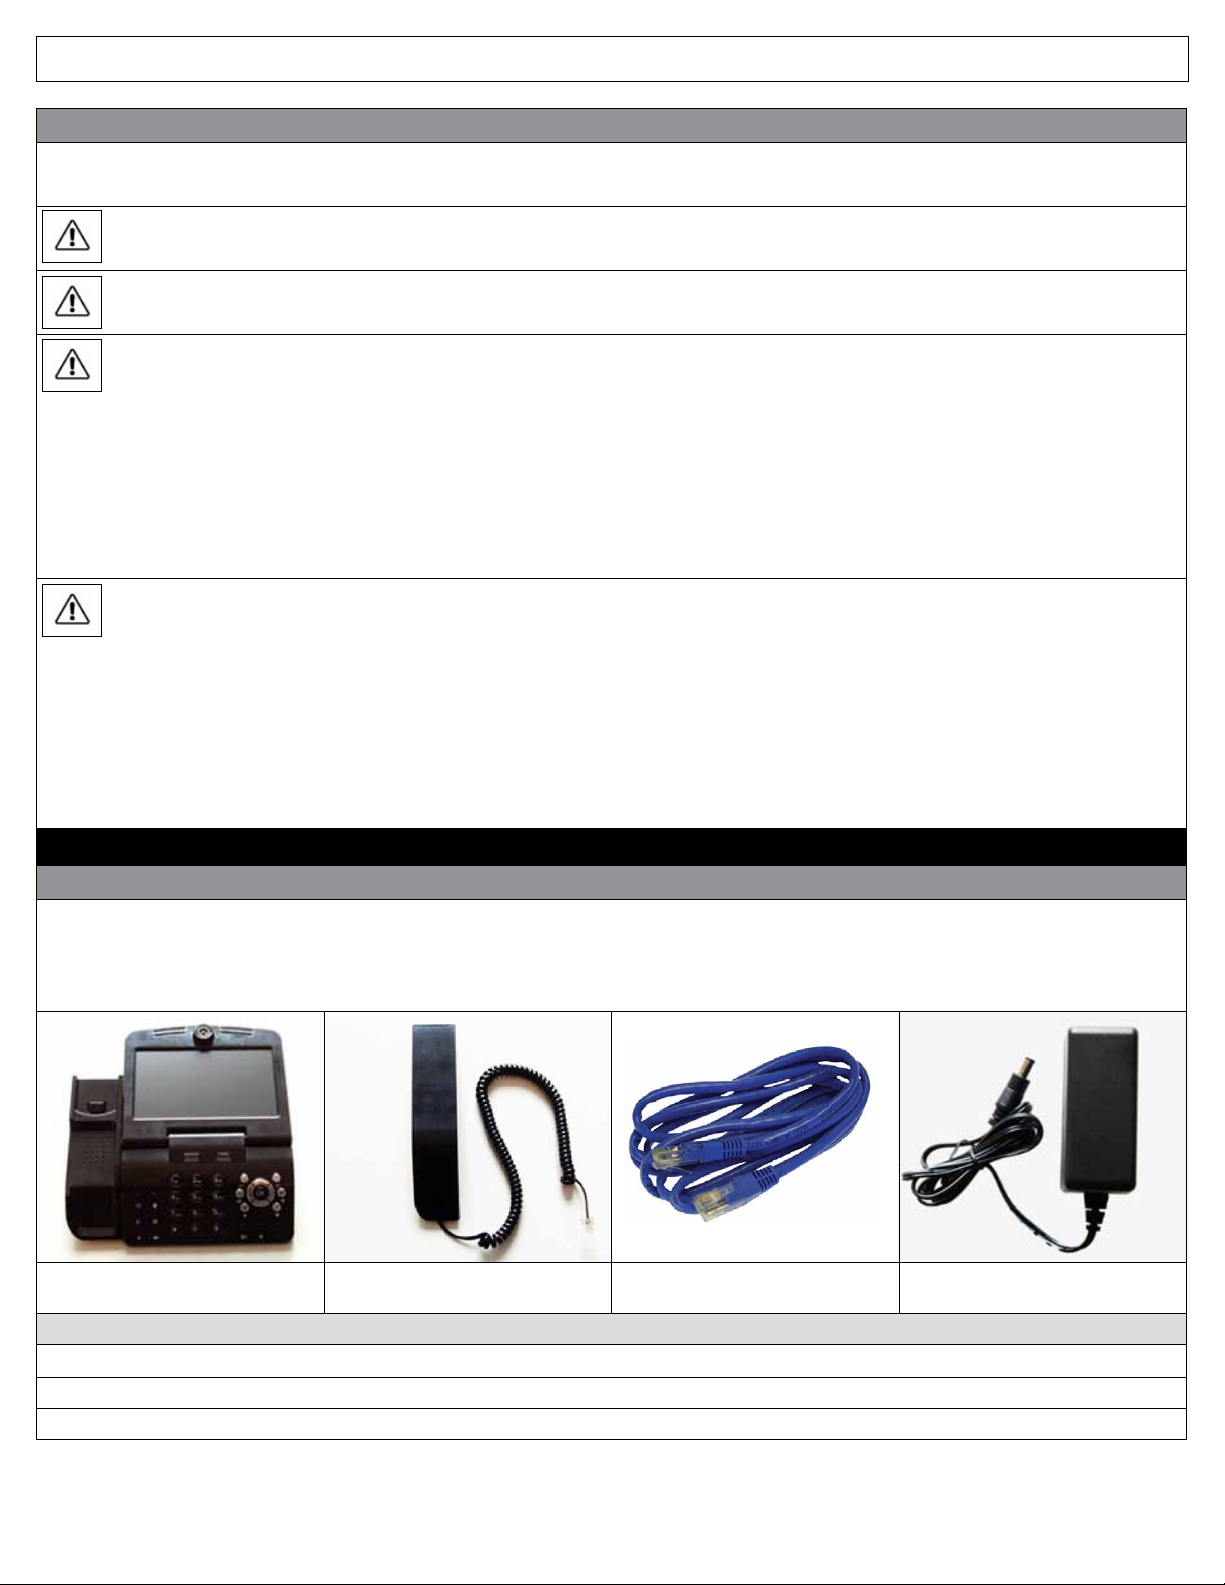
1-1. IRIS 3000® Digital Video Phone Components .................3
1-2. Connecting Your IRIS 3000® Digital Video Phone ..........4
1-3. Part Names and Functions .....................................................4
2. Keys and Shortcuts ......................................................... 5
3. Using Basic Functions of Your
Digital Video Phone ....................................................... 7
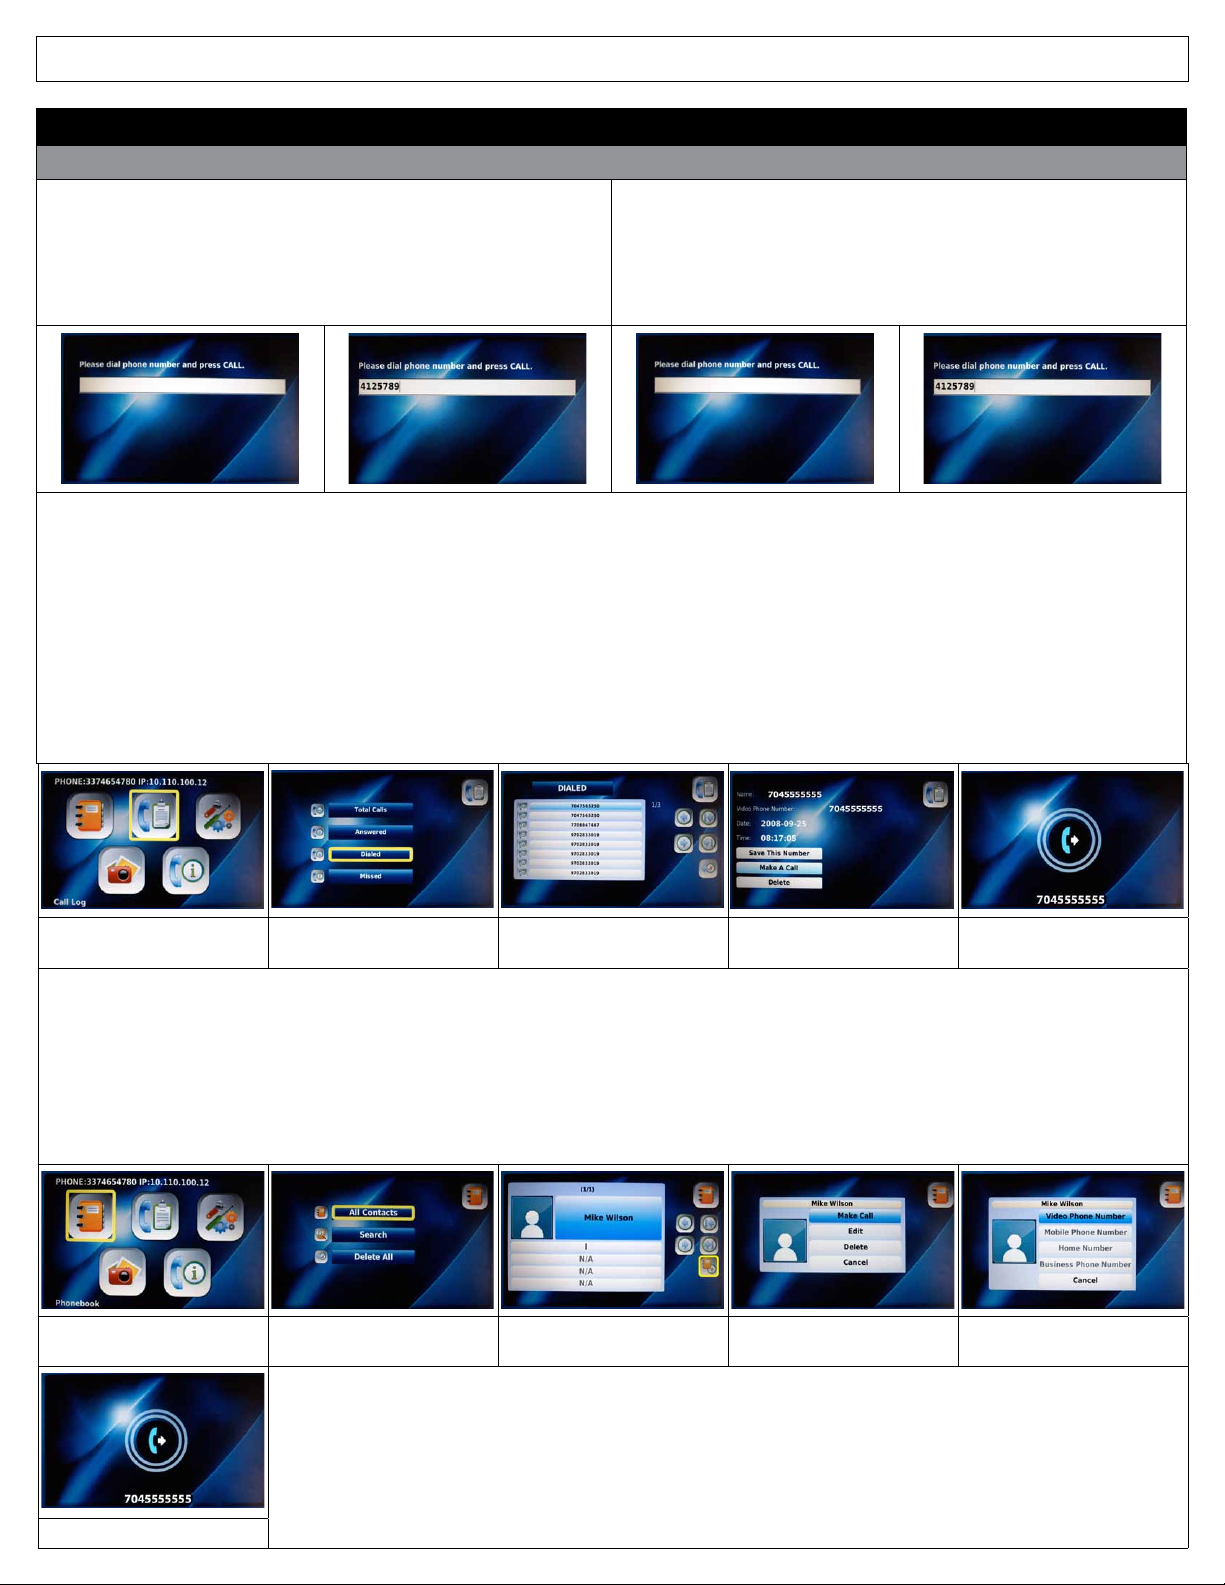
3-1. Making a Call ..............................................................................7
3-1-1. Making a Call in Dial Pad Mode ...........................................7
3-1-2. Making a Call in Standby Mode (When LCD is O) ......7
3-1-3. Making a Call from the Call Log Menu ..............................7
3-1-4. Making a Call in Phonebook Menu ....................................7
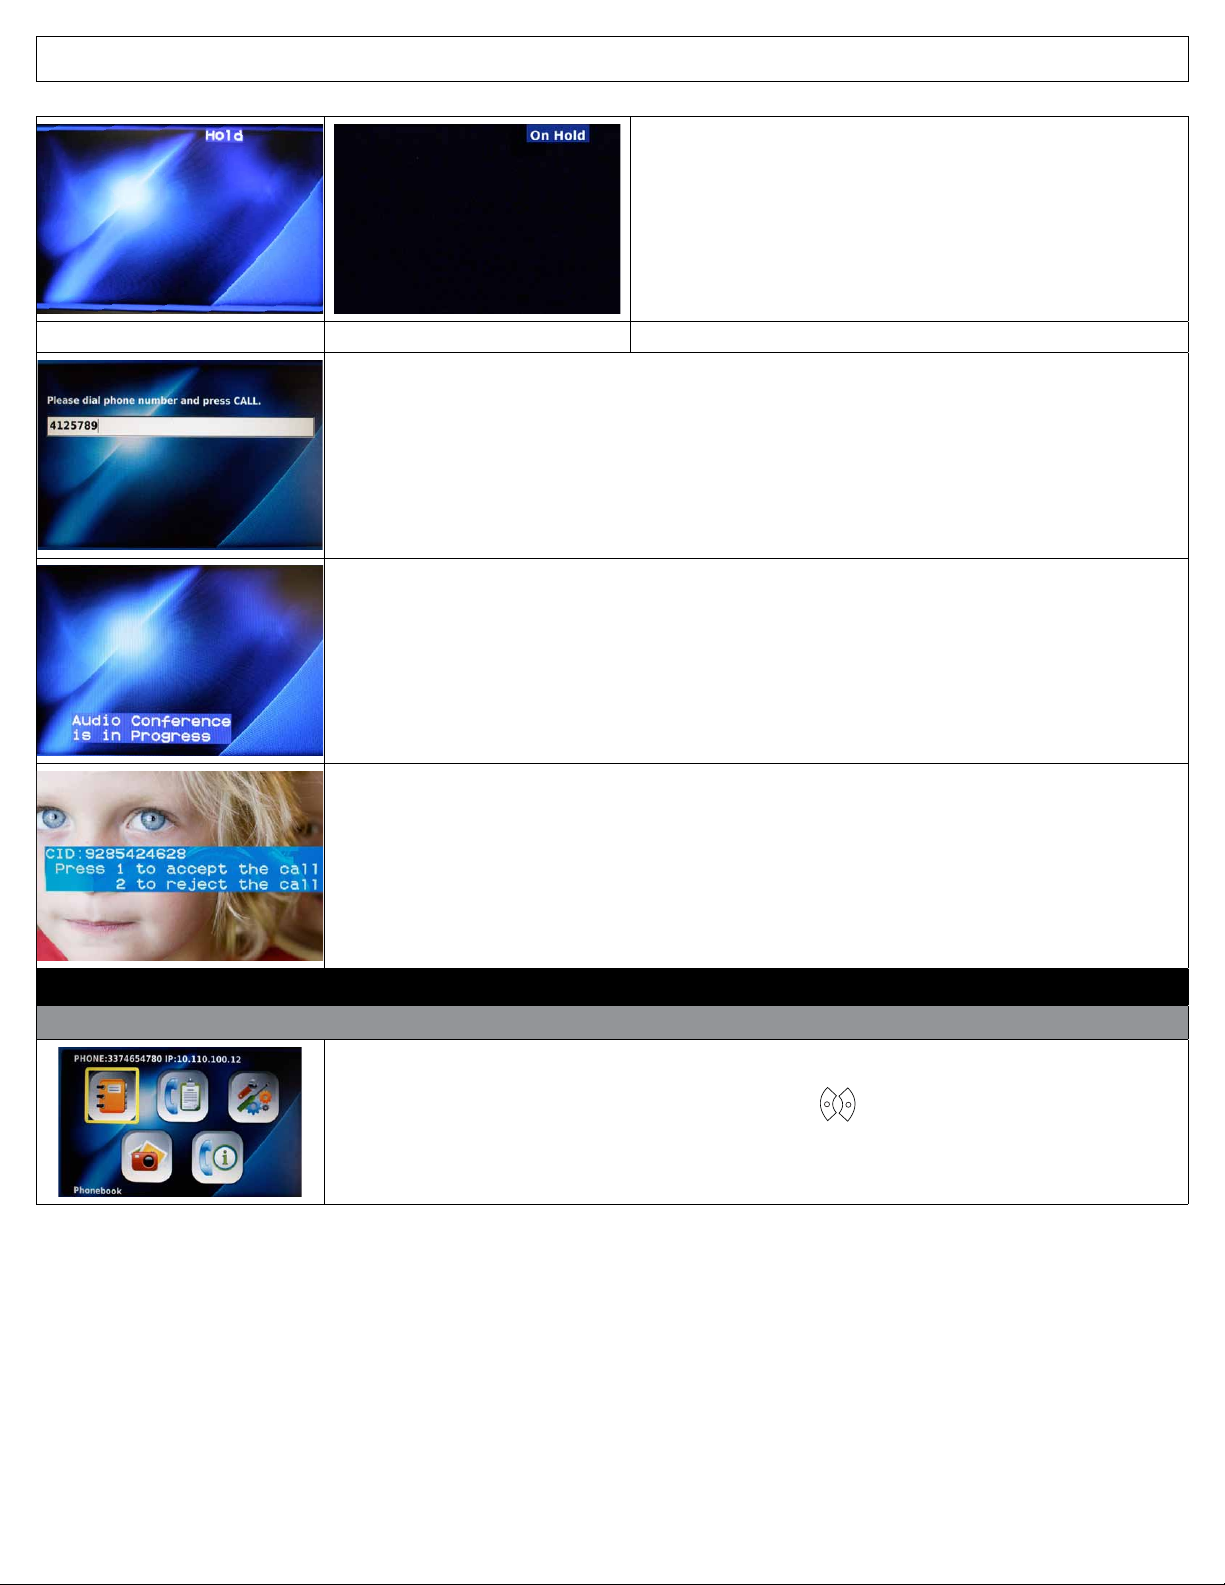
3-2. Receiving a Call ..........................................................................8
3-3. Rejecting a Call ..........................................................................8
3-4. Ending a Call ...............................................................................8
3-5. Listening to Your Voice Mail ..................................................8
3-6. Viewing the Status ....................................................................9
3-7. Useful Functions During a Call .............................................9
3-7-1. Mute ...............................................................................................9
3-7-2. Privacy ...........................................................................................9
3-7-3. Volume Control ..........................................................................9
3-7-4. Brightness Control ....................................................................9
3-7-5. Hold................................................................................................9
3-7-6. Conference Call ....................................................................... 10
3-7-7. Call Waiting .............................................................................. 10
4. Set-Up ............................................................................. 10
4-1. Menu........................................................................................... 10
4-2. Using Keypad in Set-Up ...................................................... 11
4-3. Entering Names and Characters ....................................... 11
4-3-1. Entering Numbers .................................................................12
4-3-2. Entering Letters ...................................................................... 12
4-3-3. Entering Numbers and Letters .......................................... 12
4-4. Phonebook ............................................................................... 12
4-4-1. All Contacts .............................................................................. 12
4-4-1-1. Add New Entry ........................................................................ 13
4-4-1-2. Make a Call................................................................................ 13
4-4-1-3. Edit Contact.............................................................................. 14
4-4-1-4. Delete Contact ........................................................................ 14
4-4-2. Search Contact. ....................................................................... 14
4-4-2-1. Search by Name ...................................................................... 15
4-4-2-2. Search by Phone Number ................................................... 15
4-4-3. Delete All ...................................................................................15
4-5. Call Log ...................................................................................... 16
4-5-1. Total Calls ................................................................................. 16
4-5-2. Viewing Answered Calls ......................................................16
4-5-3. Dialed Calls ............................................................................... 17
4-5-4. Missed Calls .............................................................................. 17
4-5-5. Making a Call, Saving or Deleting a Number
from the Call Log .................................................................... 17
4-6. Settings ...................................................................................... 18
4-6-1. System Settings ...................................................................... 19
4-6-1-1. Network ..................................................................................... 19
4-6-1-2. Factory Reset ........................................................................... 19
4-6-1-3. Sound ......................................................................................... 20
4-6-1-4. Display ....................................................................................... 20
4-6-1-5. Video Output ........................................................................... 21
4-6-1-6. LCD Brightness ........................................................................ 21
4-6-1-7. Picture Capture ....................................................................... 21
4-6-1-8. Self View .................................................................................... 21
4-6-1-9. Power Saving ........................................................................... 21
4-6-2. Wallpaper .................................................................................. 21
4-6-2-1. Digital Photo Frame On/O ...............................................22
4-6-2-2. Digital Photo Frame Delay .................................................. 22
4-6-2-3. Language .................................................................................. 22
4-6-2-4. Upload Bandwidth ................................................................ 22
4-6-2-5. Screen Size ................................................................................ 23
4-6-2-6. Frame Rate ................................................................................ 23
4-6-2-7. Video Codec ............................................................................. 23
4-6-2-8. Time Setting ............................................................................. 23
4-6-3. Upgrade ..................................................................................... 24
4-6-4. Administrator .......................................................................... 24
4-7. Digital Photo Frame .............................................................. 24
4-8. Information .............................................................................. 25
Troubleshooting Guide .......................................................................... 26
Warning Messages ................................................................................... 28

IRIS 3000® DIGITAL VIDEO PHONE USER MANUAL
3
Safety Instructions
This guideline is for user safety and prevention of any nancial loss in advance. Read thoroughly before using your digital video phone.
Precautions are categorized in two types and meanings are as follows:
Warning
This is a sign alerting you of possible death or severe injury if the instruction is not followed.
Caution
This is a sign alerting you of possible injury or nancial loss if the instruction is not followed.
Caution
When removing the power adapter, turn o the power switch and unplug the power plug.
Unplugging while the power is on may cause breakage of your IRIS 3000® Digital Video Phone. Do not install the IRIS 3000®
Digital Video Phone in an unsafe place or on an unstable surface.
The digital video phone may not operate properly, or may not work at all. Use a soft fabric when cleaning the LCD or camera.
Do not use strong chemical solutions or abrasive materials to clean your IRIS 3000® Digital Video Phone as they can damage
the equipment, especially the LCD or camera.
Install your IRIS 3000® Digital Video Phone close to the most accessible electrical outlet.
Warning
Do not install the unit in a location where it can be aected by dust or gas. Do not disassemble or modify the IRIS 3000® Digital
Video Phone or power adapter. The warranty will not cover any defect that occurs due to such mishandling. To avoid damage,
overheating or shock, do not install in a humid location.
Do not install the unit in direct sunlight or near heat sources, such as radiators. To avoid electric shock, do not touch the power
adapter during thunder and lightning. To prevent damage, keep the unit safe from sudden shock. Do not apply excessive
force, especially to the LCD screen or camera.
Sudden changes of temperature may cause damage to the unit. Disconnect the power cable or unplug the power adapter when the
unit is not in use for an extended period of time. Only use the power adapter supplied with the IRIS 3000® Digital Video Phone.
1. INSTALLING THE IRIS 3000® DIGITAL VIDEO PHONE
1.1 IRIS 3000® Digital Video Phone Components
The following items should be included with your IRIS 3000® Digital Video Phone. If an item is missing, please contact IRIS 3000® Digital
Phone Service Customer Support –1-866-619-6444.
*Warning: Use the power adapter that comes with your IRIS 3000® Digital Video Phone. Use of any other power adapter, other than one
provided by IRIS 3000® Digital Phone Service, may result in corruption of your IRIS 3000® Digital Video Phone or even re.
Main Body of IRIS 3000® Digital
Video Phone
Handset Ethernet Cable (RJ-45) Power Adapter
Before you get started:
Wired Internet service with 256 kbps upload speed or higher is required to use IRIS 3000® Digital Video Phone Service
The IRIS 3000® Digital Video Phone only works with IRIS 3000® Digital Phone Service
Recommended Set-up: Router with Ethernet cable (LINKSYS WRT 160N Recommended)

IRIS 3000® DIGITAL VIDEO PHONE USER MANUAL
4
1.2 Connecting Your IRIS 3000® Digital Video Phone
For the best result, please follow the installation procedures provided in the Quick Installation Guide located in the box with your device.
1. Plug in the handset line to
the body.
2. Connect the power cable to
the power adapter.
3. Connect the Ethernet cable
to the WAN port.
4. Turn on the power switch.
NOTE: The IRIS 3000® Digital Video Phone’s rst boot up may take up to 15 minutes. The system will perform an initial software update and provision the IRIS
3000® Digital Video Phone as part of this boot up process. Please allow ample time for the rst boot up. The IRIS 3000® Digital Video Phone’s LCD screen will
display a status as it moves through the process. On completion, the registration light will turn green.
1.3 Part Names and Functions
FRONT
1. Handset: Handset of digital video phone base
2. Speaker: Plays ring tones and transfers voice/sound in
speakerphone mode
3. Camera: Transmits video to the called party
4. LCD Screen: Displays your image and the image of the calling
party during a call
5. Keypad: Buttons that operate the functions of the digital video
phone
6. Microphone: Receives and transmits audio in speakerphone
mode
REAR
1. ON/OFF (I/O): Turns the digital video phone on/o
2. POWER (DC IN): Connects to the power adapter
3. USB: Universal Serial Bus port used to store data on the digital
video phone
4. LAN: Local Area Network connection
5. WAN: Connects to Internet via Ethernet cable
6. PHONE: Connects cordless phone or corded phone to the
digital video phone - FSX port
7. VIDEO OUT: Transmits video data to external monitor (TV or
computer)
8. AUDIO OUT: Transmits audio data to external speakers or audio
system
LAN (Local Area Network) is a computer network covering a small geographic area, like a home, oce or group of buildings. A home network is a
residential local area network, and is used to connect multiple devices within the home. The simplest home networks are used to connect two or more
PCs for sharing les, printers and a single connection to the Internet (usually broadband Internet through a cable or DSL provider).
WAN (Wide Area Network) is a computer network that covers a broad area. WANs are used to connect LANs and other types of networks together, so
that users and computers in one location can communicate with users and computers in other locations. The wide area network provides network
address translation (NAT), allowing multiple devices such as computers or video phones to share one IP address and Internet connection. The router
can be identied as it almost always has ve Ethernet ports on the back. One port is separate from the four other ports. The largest and most well-
known example of a WAN is the Internet.

IRIS 3000® DIGITAL VIDEO PHONE USER MANUAL
5
KEY USE
1. REGISTER The green LED light is lit when the digital video phone is connected to the IRIS 3000® Digital Phone Service
2. POWER Indicates if the digital video phone is switched on and the power cord is connected
3. MAIL Allows you to retrieve voice mail messages
4. HOLD Enables you to place or remove calls on hold
5. MUTE Disables voice transmission during call
6. PHONEBOOK Provides access to your Phonebook
7. CONFERENCE Allows you to audio conference multiple callers on to one line (3 caller audio conference call)
8. PRIVACY Disables video transmission during a call or becomes self-view when the phone is not in use
9. * Enters “*”
10. NUMERIC KEYPAD Enters numbers or letters
11. # Enters “#” or rejects incoming call
12. MENU Activates the Main Menu
13. BACK Moves to the previous menu, nishes a sequence or deletes characters or letters
14. MY CONTENT This is a future enhancement of IRIS 3000® Digital Phone Service
15. Navigation buttons used to navigate or set values for selected items
16. OK Use to select or conrm selections
20. STATUS Lists information needed for technical support such as conguration and software version
21. CAPS Allows you to capital, lowercase or numeric mode
22. MY APPLICATIONS This is a future enhancement of IRIS 3000® Digital Video Phone Service
23. REDIAL Calls the last number dialed
24. SPEAKER Activates/deactivates the speakerphone
25. CALL Calls the dialed number
Keys and
Shortcuts
Get Started With Your New
IRIS 3000® Digital Video Phone
2. KEYS and SHORTCUTS

IRIS 3000® DIGITAL VIDEO PHONE USER MANUAL
6
Making a Call
• Pick up handset or press SPEAKER
• Enter the phone number
• Press CALL
Making a Call from the Call Log Menu
• Scroll to Call Log from the Main Menu and press OK
• Select the menu location of the number you wish to call (Total
Calls, Answered, Dialed, Missed) and press OK
• Scroll to the number and press OK
• Scroll to Make A Call and press OK
Ending a Call
Hang up handset or press SPEAKER
Receiving a Call
When you receive an incoming call, you can view the number and
location of caller along with any additional contact information you
entered into the enhanced Phonebook. Pick up the handset or press
SPEAKER to answer the call.
Redialing a Call
To redial the last number dialed, press REDIAL. The digital video phone
will automatically call the last number dialed.
Rejecting a Call
To reject an incoming call, press #. The call will be sent directly to your
voice mail.
Volume Control
Control the volume by pressing the Navigation buttons or MUTE during
a call.
Left Navigation – Lowers the Volume
Right Navigation – Raises the Volume
Mute – Disables the voice transmission
To adjust the Speaker Volume when not on a call:
• Scroll to Settings from the Main Menu and press OK
• Scroll to System Settings and press OK
• Scroll down to Sound and press OK
• Scroll down to Speaker Volume and use the or to select the
desired Speaker Volume
• Press BACK and select YES to save your settings
To adjust the Handset Volume when not on a call:
• Scroll to Settings from the Main Menu and press OK
• Scroll to System Settings and press OK
• Scroll down to Sound and press OK
• Scroll down to Handset Volume and use the or to select
the desired Handset Volume.
• Press BACK and select YES to save your settings
Call Waiting
While on the digital video phone, a tone alerts you of another incoming
call.
• To accept the incoming call, press HOLD
(the current call will be placed on hold)
• Once the incoming call is completed, press the HOLD button to
reconnect to the original caller. To switch between calls, press HOLD
Call Conference
• Press HOLD during the initial call (the call can be incoming or
outgoing). This places the existing caller on hold.
• Dial the number of the third party and press CALL. When the third
party answers, press CONFERENCE.
Digital Photo Frame
To turn your Digital Photo Frame on:
• Scroll to Settings from the Main Menu and press OK
• Scroll to System Settings and press OK
• Scroll down to Display and press OK
• Scroll down to Digital Photo Frame and change settings to On
• Scroll down to Digital Photo Frame Delay and select the
desired delay between each photo
• Press BACK when nished and select YES to save your settings
NOTE: If you are displaying large photo les (more than 3 mega pixels), set
the delay to 20 seconds to allow time for each photo to load.
To display your Digital Photos:
• Insert the USB device or SD card into your digital video phone
• Scroll to Digital Photo Frame from the Main Menu and press OK
• Scroll to View Another Picture and press OK
• Select the device (SD or USB) where the pictures are stored and
press OK
• Select the directory where the pictures are stored and press OK
• Select the rst image and press OK
• The images will begin to appear with a set delay in between each
picture. Press BACK until you reach the Main Menu
Self-View
If you are not on a call, you can press PRIVACY to see what your callers
will see when they call.
Listening to Your Voice Mail
An envelope icon will appear in the bottom right-hand corner of your
screen to indicate you have voice mail and the number of messages
waiting.
To listen to your voice mail messages:
• Press MAIL
• Enter your 4-digit PIN and press #
• After announcing the number of new messages, the messages will
automatically begin to play
Voice Mail Functions
Press Command
1 Save message
2 Replay message
3 Delete message
4 Forward message
6 Play message envelope information
9 Hear user options
*Key Exit voice mail
For more information on your IRIS 3000® Digital Video
Phone, please refer to the User Manual located on
www.wgatesupport.com.

IRIS 3000® DIGITAL VIDEO PHONE USER MANUAL
7
3. USING BASIC FUNCTIONS OF YOUR DIGITAL VIDEO PHONE
3.1 Making a Call
3-1-1. Making a call in dial pad mode
Pick up the handset or press the SPEAKER button
• Enter the phone number
• Press the CALL button
Note: Refer to Section 3-3 in this User Manual for instructions on entering
numbers and characters.
3-1-2. Making a call in standby mode (when LCD screen is o)
Enter the rst digit of the phone number
• The dial pad window is displayed
• Enter the remaining digits of the phone number
• Press the CALL button
3-1-3. Making a call from the Call Log menu
Press the MENU button
• Use the Navigation buttons to select “Call Log”
• Press the OK button
• Using the Navigation buttons, select the menu location of the number you wish to call
(Total Calls, Answered, Dialed, Missed) using the Navigation buttons
• Press the OK button
• Use the Navigation buttons to select the number
• Press the OK button
• Use the Navigation buttons to select the icon “Make A Call”
• Press the OK button
Select “Call Log” and Press
OK
Select the type of Call Log
Menu and Press OK
Select the desired number
and Press OK
Select “Make A Call”
and Press OK
Makes the call
3-1-4. Making a call in Phonebook menu
Press the MENU button when the LCD is o or in idle mode
• The Main Menu is displayed
• Select the Phonebook menu by using the Navigation buttons
• Press the OK button
• Select All Contacts and press OK
• Scroll to the desired contact and press OK, select “Make A Call” and press OK
• Select Number you wish to call and press OK
Select the “Phonebook” from
the Main Menu and Press OK
Select “All Contacts”
and Press OK
Select the desired
contact and Press OK
Select “Make Call”
and Press OK
Select the type of number
you wish to call and Press OK
Calling United States and Canada Telephone Numbers
• Directory Assistance: 411
• Emergency: 911
• Local and Long Distance Calls: Dial 1 + Area Code + Phone Number (Example: 1-281-555-1212) (US & Canada)
• International Calling: To make an international call, dial 011 + (country code) + phone number
Makes the call

IRIS 3000® DIGITAL VIDEO PHONE USER MANUAL
8
3.2 Receiving a Call
The digital video phone begins ringing and the LCD screen will show the person calling or the name
and phone number of the person calling.
Pick up the handset or press the SPEAKER button to answer the call. If there is a picture associated
with a contact, it will be displayed.
3.3 Rejecting a Call
To reject an incoming call, press #. The call will be sent directly to your voice mail.
3.4 Ending a Call
Hang up the handset or if you are in speaker phone mode, press the SPEAKER button.
NOTE: Your call data is stored in the Call Log.
3.5 Listening to Your Voice Mail
An envelope will appear in the bottom right-hand corner of your screen to indicate you have a voice
mail message and the number of message(s) waiting or you will hear a voice mail message tone (5
beeps) when you lift the handset.
To listen to your voice mail messages:
• Press the MAIL button on the front of your digital video phone
• Enter your 4 digit PIN and press #
• After announcing the number of new messages, the messages will automatically begin to play
Voice Mail Functions
Press Command
1 Save message
2 Erase message
3 Replay message
4 Forward message
6 Play message envelope information
9 Hear User Options
* Key Exit Voice Mail

IRIS 3000® DIGITAL VIDEO PHONE USER MANUAL
9
3.6 Viewing the Status
Press the STATUS button to view information about your digital video phone.
Press the back button or highlight the box in the bottom right-hand corner of your screen and press
OK to exit the Status Menu.
3.7 Useful Functions During a Call
3-7-1. Mute
Press the MUTE button to prevent the other party from hearing your voice. If you want to release
mute, press MUTE button again.
3-7-2. Privacy
Press the PRIVACY button to keep your image from being
displayed to the other party. In privacy mode, instead of your
image, a logo image is displayed on the other party’s screen. If
you want to release privacy mode, press the PRIVACY button
again.
3-7-3. Volume Control
To adjust the volume during a call:
“ ” Lowers the volume
“ “ Raises the volume
Press the MENU button
• Select Volume Control by using the Navigation buttons
“ ”
• Press the OK button
• Use ” ” to adjust volume
• Press the BACK button to return to the previous menu
3-7-4. Brightness Control
In order to control the LCD Brightness during a call:
• Press the MENU button
• Select Brightness Control by using the Navigation buttons
“ ”
• Press the OK button
• Use “ “ to adjust
“ ” Decreases the Brightness
“ “ Increases the Brightness
3-7-5. Hold
You can place a call on hold by pressing the HOLD button
during a call. The LCD screen will become dark. To resume your
call, press the HOLD button again.

IRIS 3000® DIGITAL VIDEO PHONE USER MANUAL
10
3-7-6. Conference Call
If you wish to conference another party into an existing phone
call, press HOLD during the call. This places the existing caller on
HOLD.
Caller screen Hold Person called screen On Hold
Dial the number of the third person and press CALL.
When the third party answers, press CONFERENCE.
If the conference originator hangs up during the call, it will hang up the call for all three parties on the
digital video phone.
3-7-7. Call Waiting
You will hear a call waiting tone to indicate “Incoming Call signal” and the Caller ID information will be
displayed.
• To accept the incoming call, press “1” (the current call will be placed on hold).
• To reject the call, press “2” (the new caller will receive a voice mail Busy Greeting).
• Once the incoming call is completed, press HOLD again to reconnect to the original
caller.
If the calling party hangs up, you will be automatically connected to the original caller.
4. SET-UP
4.1 Menu
Press MENU to display the Main Menu.
To navigate the menu screens, press the Navigation buttons “ “ until you reach the desired menu item.
Then press the OK button.

IRIS 3000® DIGITAL VIDEO PHONE USER MANUAL
11
Main Menu Selections
Phonebook • Store contact names and phone numbers for frequently called numbers
• Search for phone numbers by name and number
• Place a call directly from this menu
Call Log • View recent calls including total calls, answered, dialed and missed calls
• Place a call directly from this menu
Settings • Provides access to a variety of settings including System Settings, Time Setting, Upgrade and Administrator
Settings
• In the System Settings Menu, you can set the parameters for Network, Factory Reset, Sound and Display options.
• In the Network Menu, you can set your Net Settings, (NAT model or Bridge Model) interface (DHCP, PPPoE or Fixed IP).
• In the Sound Menu, you can set your ringtones, ring volume, sound eect type, sound volume and audio output.
• The Display Menu allows you to select your Video Output, set LCD brightness, upload bandwidth and use
picture capture, which captures and stores picture from live video conversation. This menu is also where you
can adjust settings for self view, power saving, wallpaper, digital photo frame, language options and more.
• The Time Setting Menu allows you to set the time parameters such as NTP, D.S.T. and G.M.T.
• In the Upgrade Menu, you can set the upgrade server address and the upgrade method.
• The Administrator Menu provides access to more complex settings, such as SIP, A/V Codec setting, DNS, Proxy
and LAN settings. Please do not attempt to adjust items in the Administrator Menus. Please contact IRIS
3000® Digital Phone Service Customer Support for assistance – 1-866-619-6444.
Digital Photo Frame • Digital Photo Frame allows you to view pictures stored on a SD card or USB ash drive inserted into your
digital video phone.
Information • The Information page shows you the main system settings on your digital video phone
4.2 Using Keypad in Set-Up
Numeric Keys • Used for character input
CAPS Key • Enables you to select the type of characters to enter (Numeric/Lowercase/Capital)
BACK Key • Enables you to return to the previous menu
OK Key • Used to select and enter selections
Navigation Buttons • Used to navigate between menus
• Directs you to edit mode or set values for selected items
4.3 Entering Numbers and Characters
Press the CAPS button to select the input mode (Numeric/Lowercase/Capital) you wish to use. The current input type is indicated on left
top of LCD screen, shown by an icon representing the current input type:
1 Indicates you are entering “Numbers”
a Indicates you are entering “Lowercase” letters
A Indicates you are entering “Capital” letters

IRIS 3000® DIGITAL VIDEO PHONE USER MANUAL
12
English Numeric
Small Capital
1 Key : @ / : @ / 1
2 Key abc ABC 2
3 Key def DEF 3
4 Key ghi GHI 4
5 Key jkl JKL 5
6 Key mno MNO 6
7 Key pqrs PQRS 7
8 Key tuv TUV 8
9 Key wxyz WXYZ 9
0 Key - . _ - . _ 0
* Key ***
# Key # . # . # .
Forward Space Forward Space Forward Space
BACK Key Backspace Backspace Backspace
4-3-1. Entering Numbers
Example: To Enter “123”
• Press the CAPS button until the 1 appears in the upper left side of the screen
• Press the buttons 1, 2, 3 consecutively
4-3-2. Entering Letters
Press the CAPS button until the A appears in the upper left side of the screen
You will press the corresponding key until the desired letter appears. Example: To enter “SKY”
• Press the CAPS button to set input mode to A
• Press buttons ‘S’, ‘K’, ‘Y’ consecutively (7, 7, 7, 7 5, 5 9, 9, 9 )
4-3-3. Entering Numbers and Letters
Example: To enter “123.com” You will press the corresponding key until the desired letter appears
• Press the “CAPS” button to set input mode to 1
• Press buttons 1, 2, 3 and the # key
• Press the “CAPS” button to set input mode to A
• To spell out “com”, press buttons 2, 2, 2, 6, 6, 6 consecutively, pause and press 6 again
4.4 Phonebook
The Phonebook enables you to save frequently used phone
numbers and place phone calls directly from the Phonebook.
Up to 300 contacts can be stored in the Phonebook.
Select “Phonebook”
in the main menu and Press OK
Phonebook Menu
4-4-1. All Contacts
“All Contacts” lists all the contacts you have saved in the Phonebook. You can edit and save or delete contact information here.
Select “Phonebook”
in the main menu and Press OK
Select “All Contacts” in the
Phonebook Menu and Press OK
All Contacts List
Key
Mode

IRIS 3000® DIGITAL VIDEO PHONE USER MANUAL
13
4-4-1-1. Add New Entry
You can add new contact information (such as name or phone number), set up a corresponding ring tone or post a picture of the contact.
Once you enter the information, select “Save” to save the data in the Phonebook. If you don’t want to save the information, select “Cancel”.
Select “Phonebook” in the
Main Menu and Press OK
Select “All Contacts” in the
Phonebook Menu and Press OK
Select “Add New Entry” in the All
Contacts Menu and Press OK
Enter information in “Add New
Entry” window and select “Save”
4-4-1-2. Make Call
You can make a call to anyone listed in your “All Contacts” list by selecting the name and the phone number you wish to call.
Select “Phonebook”
in the Main Menu and Press OK
Select “All Contacts” in the
Phonebook Menu and Press OK
Select the contact in the All Contacts
List and Press OK
Select “Make Call” option
in the Menu and Press OK
Select desired type of number in the
phone number list and Press OK

IRIS 3000® DIGITAL VIDEO PHONE USER MANUAL
14
4-4-1-3. Edit Contact
You can edit information such as phone number, name, ring tone and the picture of the contact. Once you have edited the information,
select “Save” to save the data. If you don’t want to save, select “Cancel”.
Select “Phonebook” in the Main
Menu and Press OK
Select “All Contacts” in the
Phonebook Menu and Press OK
Select the contact in the All Contacts
List and Press OK
Select “Edit” option in the menu
and Press OK
Enter information in Edit Entry window
and select “Save” and Press OK
4-4-1-4. Delete Contact
You can delete contact information that you do not need anymore.
Select “Phonebook”
in the Main Menu and Press OK
Select “All Contacts” in the
Phonebook Menu and Press OK
Select the contact in the All Contacts
List and Press OK
Select “Delete” option in the menu
and Press OK
Select “Yes” to delete the contact
and Press OK
4-4-2. Search Contact
You can search for a contact stored in the Phonebook by name or phone number. When you locate the desired information, you can
make a call, edit or delete the contact information.
Select “Phonebook” in the Main
Menu and Press OK
Select “Search” in the
Phonebook Menu and Press OK
Select “Search by name” or
“Search by number” in the Search
Menu

IRIS 3000® DIGITAL VIDEO PHONE USER MANUAL
15
4-4-2-1. Search by Name
You can search for a contact by name in the Phonebook by selecting “Search by name”.
Select “Phonebook”
in the Main Menu and Press OK
Select “Search” in the
Phonebook Menu and Press OK
Select “Search by name” in the
Search Menu and Press OK
Enter the name that you wish to find
and Press OK then Press OK to search
The contact information will be
displayed. Press OK and select “Make
Call” and select the number you wish
to call.
4-4-2-2. Search by Phone Number
You can search for a phone number that has been saved.
Select “Phonebook”
in the Main Menu and Press OK
Select “Search” in the
Phonebook Menu and Press OK
Select “Search by number” in the
Search Menu and Press OK
Enter the phone number you wish
to find in the “Search by number”
window and Press OK then Press OK
to search
The contact information will be
displayed. Press OK and select “Make
Call” and select the number you wish
to call.
4-4-3. Delete All
You can “Delete All” of the information in the Phonebook. If you want to “Delete All”, select “Yes” after selecting “Delete All”.
WARNING: SELECTING “YES” WILL AUTOMATICALLY DELETE ALL ENTRIES IN YOUR PHONEBOOK. YOU WILL NOT BE GIVEN A SECOND
WARNING AND WILL NOT BE ABLE TO RETRIEVE THESE ENTRIES AFTER YOU SELECT “YES”.
Select “Search by name” in the
Search Menu and Press OK
Select “Delete All” in the
Phonebook Menu
Select “YES” in the Delete
All Menu and Press OK

IRIS 3000® DIGITAL VIDEO PHONE USER MANUAL
16
4.5 Call Log
The user can see all of the calls answered, dialed or missed by the digital video phone. A call can be placed by selecting a number from
the “Call Log” or selected entries can be saved or deleted from the Phonebook.
Note: A total of 300 calls (answered, dialed or missed) will be stored on
the digital video phone. The oldest calls will be deleted rst.
Select “Call Log” from the Main
Menu and Press OK
Call Log Menu
4-5-1. Total Calls
Total calls answered, dialed or missed are listed in “Total Calls”. You can make a call by selecting the desired number.
Select “Call Log” from the Main
Menu and Press OK
Select “Total Calls” from the Call Log
Menu and Press OK
Select the number or contact name
and Press OK
Select “Make A Call”
and Press OK
Your digital video phone makes a call
4-5-2. Viewing Answered Calls
“Answered” lists all calls recently answered. You can see numbers of recently received calls, make a call by the number selected and
record the number in Phonebook.
Select “Call Log”
from the Main Menu
Select “Answered” in the
Call Log Menu and Press OK
Select the number or contact name
in the Answered Calls window and
Press OK
Select “Make A Call” in the menu
and Press OK
Your digital video phone makes a call

IRIS 3000® DIGITAL VIDEO PHONE USER MANUAL
17
4-5-3. Dialed Calls
You can see all the numbers of recently dialed calls, make a call by the number selected and save the number in Phonebook.
Select “Call Log”
from the Main Menu
Select “Dialed” in the Call Log Menu
and Press OK
Select the number or contact name
in the Dialed Calls window and
Press OK
Select “Make A Call” in the menu
and Press OK
Your digital video phone makes a call
4-5-4. Missed Calls
You can see all the numbers of recent calls which were missed and make a call by the number selected and record the number in Phonebook.
Select “Call Log” from the Main Menu
and Press OK
Select “Missed” in the Call Log Menu
and Press OK
Select the number in the Missed Calls
window and Press OK
Select “Make A Call” in the menu
and Press OK
Your digital video phone makes a call
4-5-5. Making a Call, Saving or Deleting a Number from the Call Log
You can make a call to a selected number in the Call Log menu as well as save or delete it.
Making a Call
Select “Call Log” from the Main Menu
and Press OK
Call Log Menu Select the type of call from the Call
Log Menu and Press OK
Select the desired number
and Press OK
Select “Make A Call” in the menu
and Press OK
Your digital video phone makes a call

IRIS 3000® DIGITAL VIDEO PHONE USER MANUAL
18
Saving a Phone Number from the Call Log Menu
Select “Call Log” from the Main
Menu and Press OK
Select the type of call from the Call
Log Menu and Press OK
Select the desired number from the
list to save
Select “Save This Number” in the
menu and press OK
Edit information if desired, select Save
and Press OK
Deleting a Phone Number from the Call Log Menu
Select “Call Log” from the Main
Menu and Press OK
Select the type of call from the Call
Log Menu and Press OK
Select the desired number from the
list to delete
Select “Delete” in the menu
and Press OK
Select “YES” to delete the phone
number and Press OK
4.6 Settings
In this menu, you can control the settings for your digital video phone for the system, time, upgrade and Administrator. Always press the
BACK button to save and exit the menu. After each entry, you will see a screen asking you to verify your changes. Select “Yes” or “No” and
hit the OK button .
Select “Settings” in the Main Menu
and Press OK
Setting Menu

IRIS 3000® DIGITAL VIDEO PHONE USER MANUAL
19
4-6-1. System Settings
You can set up the network and control the sound and display settings for your digital video phone here.
Select “Settings” in the Main Menu
and Press OK
Select “System Settings” in the
Settings Menu and Press OK
System Setting Menu
4-6-1-1. Network
The Network settings of your digital video phone are pre-set to allow calls through the Internet.
Select “Settings” in the Main Menu
and Press OK
Select “System Settings” in the
Settings Menu and Press OK
Select “Network” from the System
Settings Menu
and Press OK
Select the “Net Settings”
or “Interface”
PLEASE DO NOT ATTEMPT TO ADJUST ITEMS IN THE NETWORK MENUS. PLEASE CONTACT IRIS 3000® DIGITAL VIDEO PHONE
CUSTOMER SUPPORT FOR ASSISTANCE – 1-866-619-6444.
4-6-1-2. Factory Reset
You can reset your digital video phone to pre-set Factory Settings. If your digital video phone is initialized, all congurations you previously
saved are deleted.
Select “Settings” in the Main Menu
and Press OK
Select “System Settings” in the
Settings Menu and Press OK
Select “Factory Reset” from the
System Setting Menu and Press OK
Select “Start Factory Reset” or
“Factory Reset” in field provided
PLEASE DO NOT ATTEMPT TO ADJUST ITEMS IN THE FACTORY RESET MENUS. PLEASE CONTACT IRIS 3000® DIGITAL VIDEO
PHONE CUSTOMER SUPPORT FOR ASSISTANCE – 1-866-619-6444.

IRIS 3000® DIGITAL VIDEO PHONE USER MANUAL
20
4-6-1-3. Sound
You can select the sound settings for ring tones, sound eects and volume controls.
Select “Settings” in the Main Menu
and Press OK
Select “Systems Settings” in the
Settings Menu and Press OK
Select “Sound” in the System
Settings Menu and Press OK
Use the Navigation buttons to choose
the “Ring Tone”
Use the Navigation buttons to control
the “Ring Volume”
Use the Navigation buttons to choose
the “Sound Eect Type”
Use the Navigation buttons to
choose the “Eect”
Use the Navigation buttons to control
the “Sound Volume”
Select the “Audio Output” as Internal
or External (External Output allows
you to use external speakers.)
Use the Navigation buttons to adjust
the “Speaker Volume”
Use the Navigation buttons to adjust
the “Handset Volume”
To save your settings press the BACK
button then Select “Yes” and Press OK
Always press the BACK button to save and exit the menu. After each entry, you will see a screen asking you to verify your changes. Select
“Yes” or “No” and select OK to save your settings.
4-6-1-4. Display
You can set-up the Video Output Device, LCD Brightness, Picture Capture, Self View, Power Saving, Wallpaper, Digital Photo Frame On/O,
Digital Photo Frame Delay, Language, Upload Bandwidth, Screen Size, Frame Rate and Video Codec Display from menu.
Select “Settings” in the Main Menu
and Press OK
Select “System Settings” in the
Settings Menu and Press OK
Select “Display” in the System Set-
tings Menu and Press OK
Your digital video phone gives you the exibility to move your digital video phone’s visual image to an external monitor. You can set the
Video Output device to activate this option. Always press the BACK button to save and exit the menu. After each entry, you will see a
screen asking you to verify your changes. Select “Yes” or “No” and select OK to save your settings.
Other manuals for IRIS 3000
5
Table of contents
Other ACN IP Phone manuals