Acoustic Research XM50 User manual

MODEL XM50 OWNER’S MANUAL
VERSIONV1.0 Page1of20
AM/FM RADIO WITH XM RADIO
AND iPod CAPABILITY
Model XM50
Owner’s Manual

MODEL XM50 OWNER’S MANUAL
VERSIONV1.0 Page2of20
1.0 Function of Controls and Indicators
1 Power On/Off Button 11. VOL (Up) Button
2 DISP (Display) Button 12. MODE Button
3 DIRECT Button 13. Infrared (IR) Receiver Window
4 SETUP Button 14. LCD Display
5 CAT (Down) / iPod Fast Reverse Button 15. ALARM 2 Button
6 CAT (Up) / iPod Pause/Play Button 16. SLEEP Button
7 CH (Down) / iPod Fast Forward Button 17 ALARM 1 Button
8 CH ( Up ) Button 18. Speaker
9 SELECT Button 19. SNOOZE/MUTE Button
10 VOL ( Down ) Button 20. Number Buttons (1-10)
DISP
DIRECT
SETUP
MODE
1
2
3
4
5
6
7
8
9
10
CAT CAT CH CH
SELECT
VO L
VO L
1
2
3
4
5
678
9
10
11
12
13
14
15
16
17
18
19
20
SNOOZE/MUTE

MODEL XM50 OWNER’S MANUAL
VERSIONV1.0 Page3of20
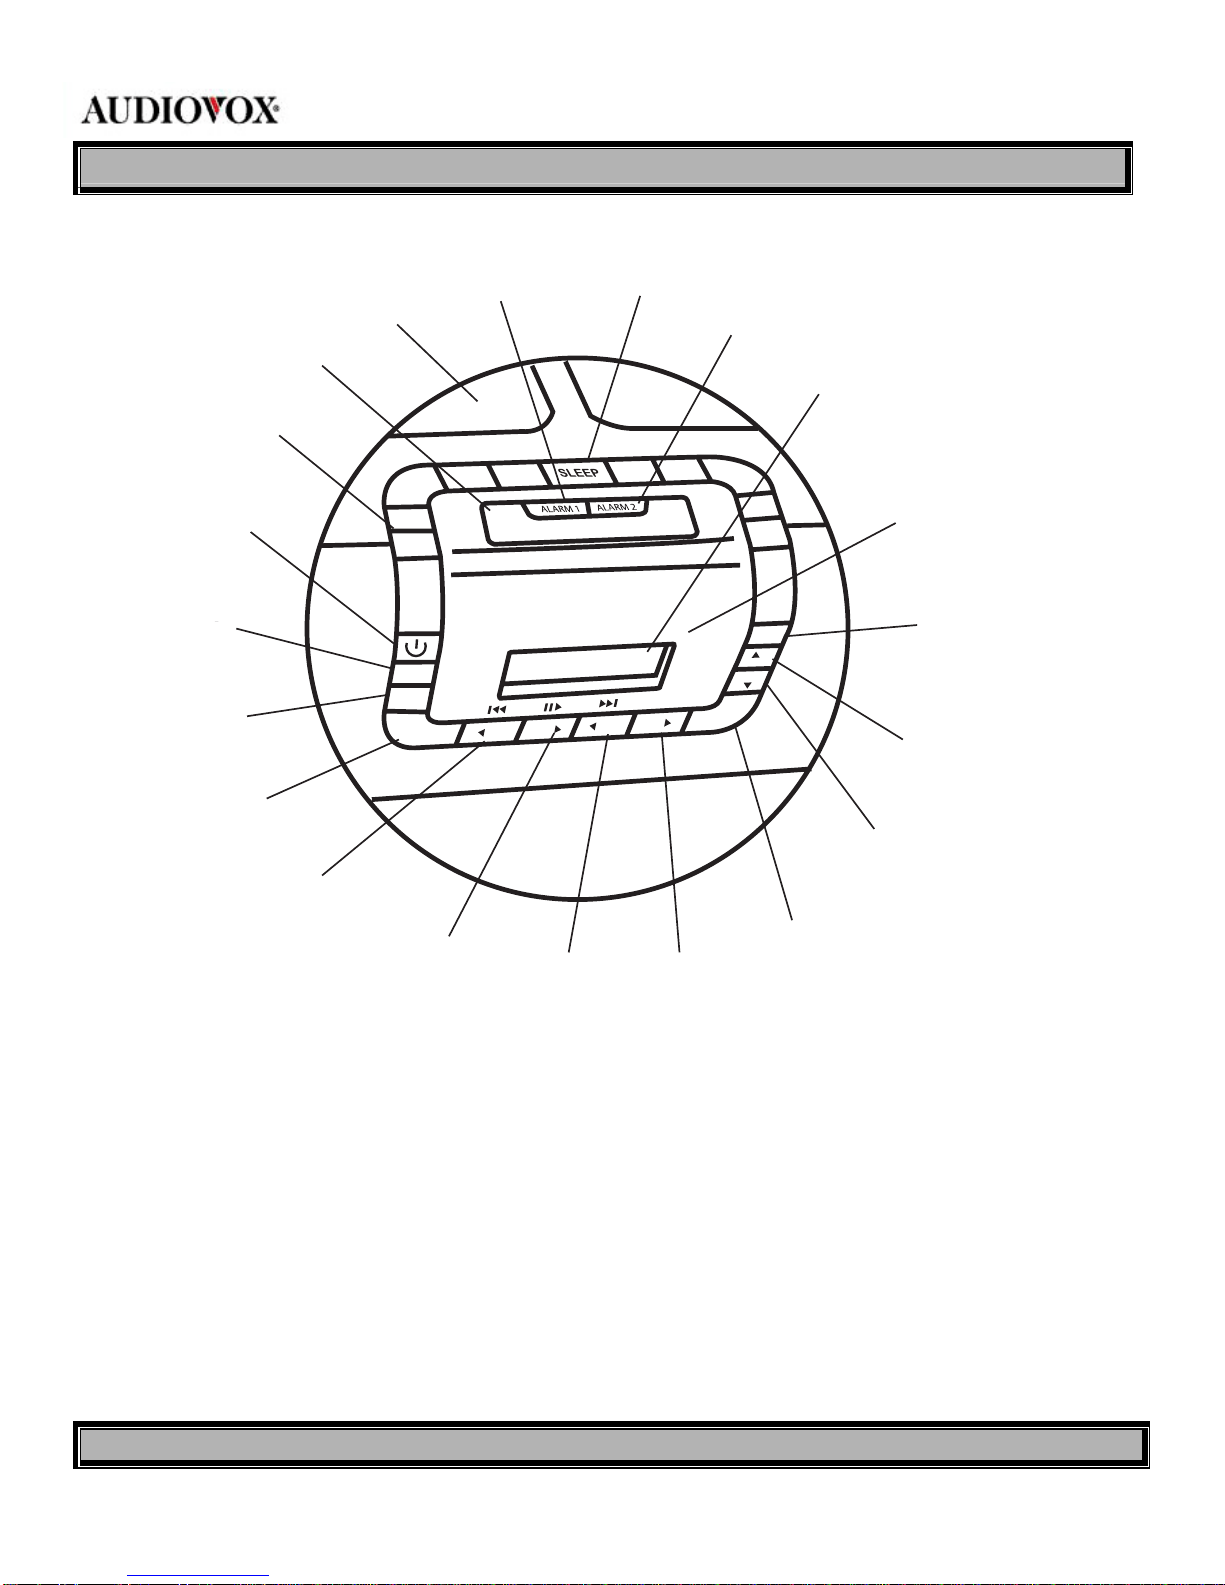
2.0 Unit Description
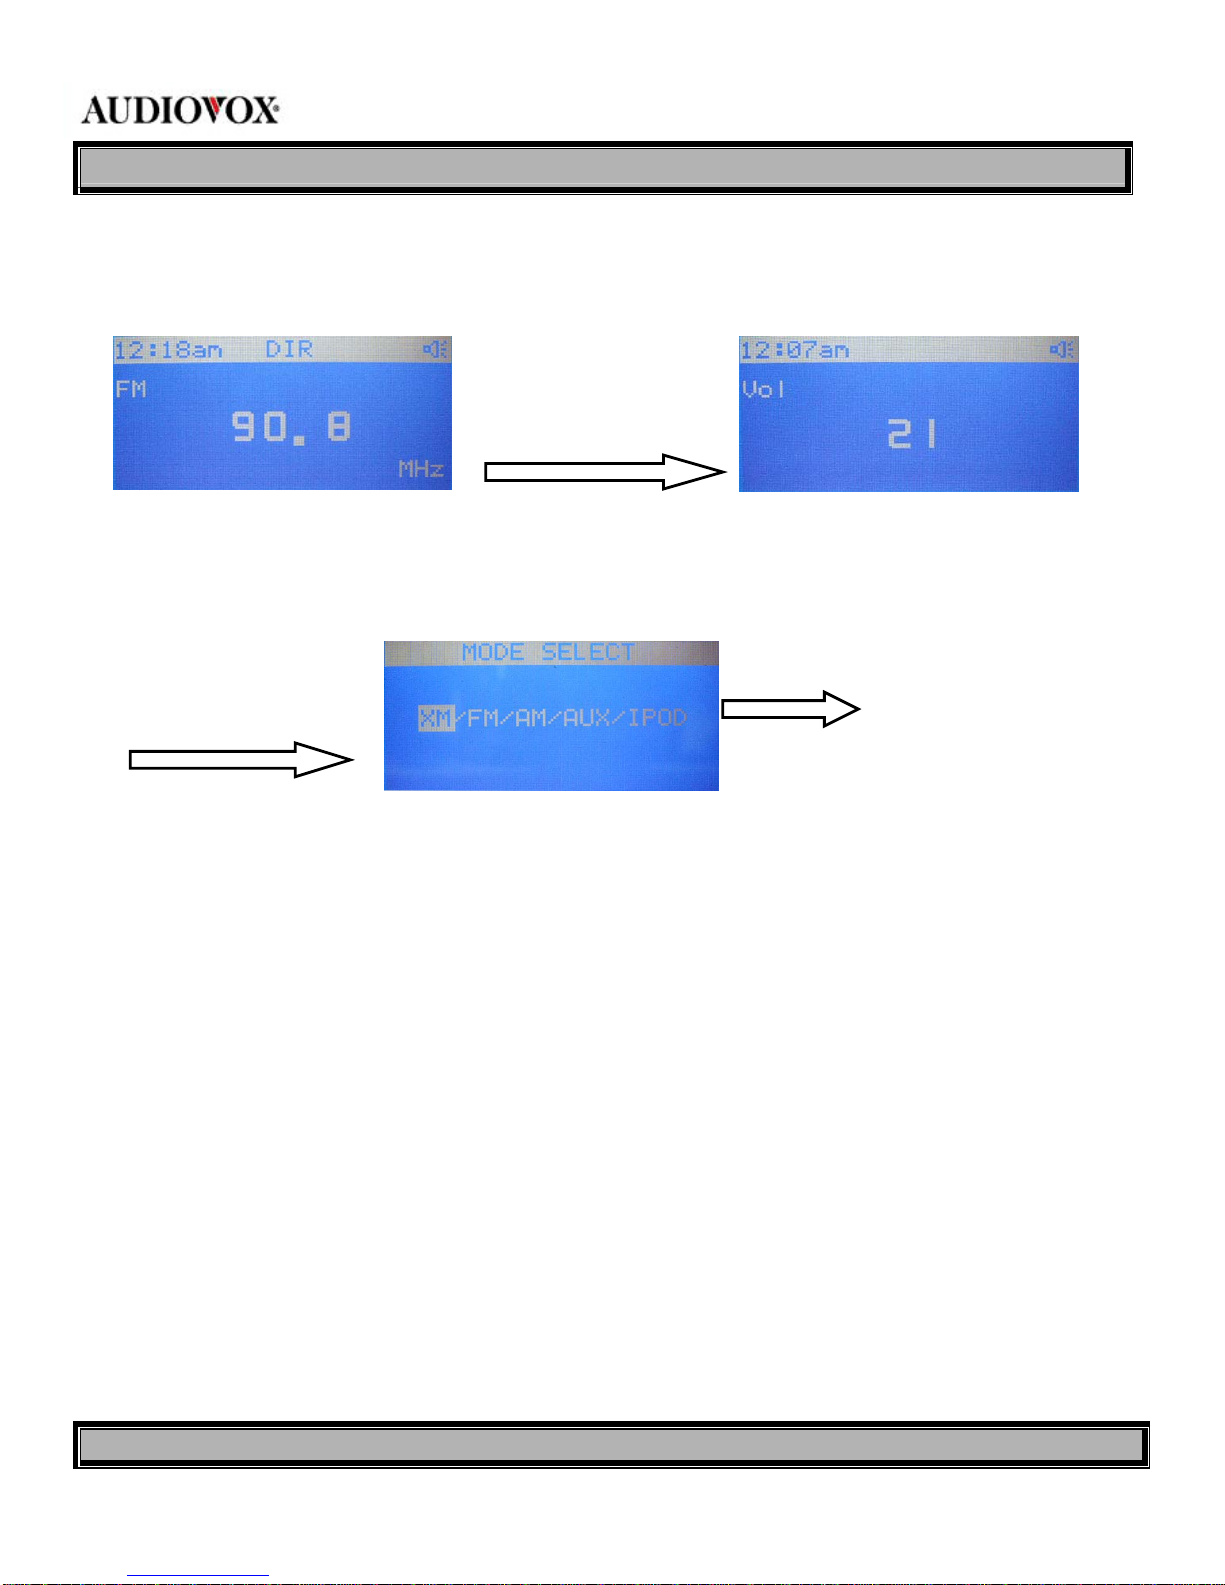
2.1 Power On/Off Button ( )
When this button is pressed, power is applied to the radio circuits from the standby mode, and the unit enters into the
play mode (XM/FM/AM/AUX/iPod). When pressed again during any play mode, power is removed from the radio circuits
and the unit reverts to the standby mode. The default play mode is XM.
2.2 MUTE Button
When pressed during normal play mode (XM/FM/AM/AUX/iPod), the audio output is muted or disabled as indicated by
the speaker icon in the upper right corner of the display screen. When pressed again, the mute function is canceled and
audio is restored.
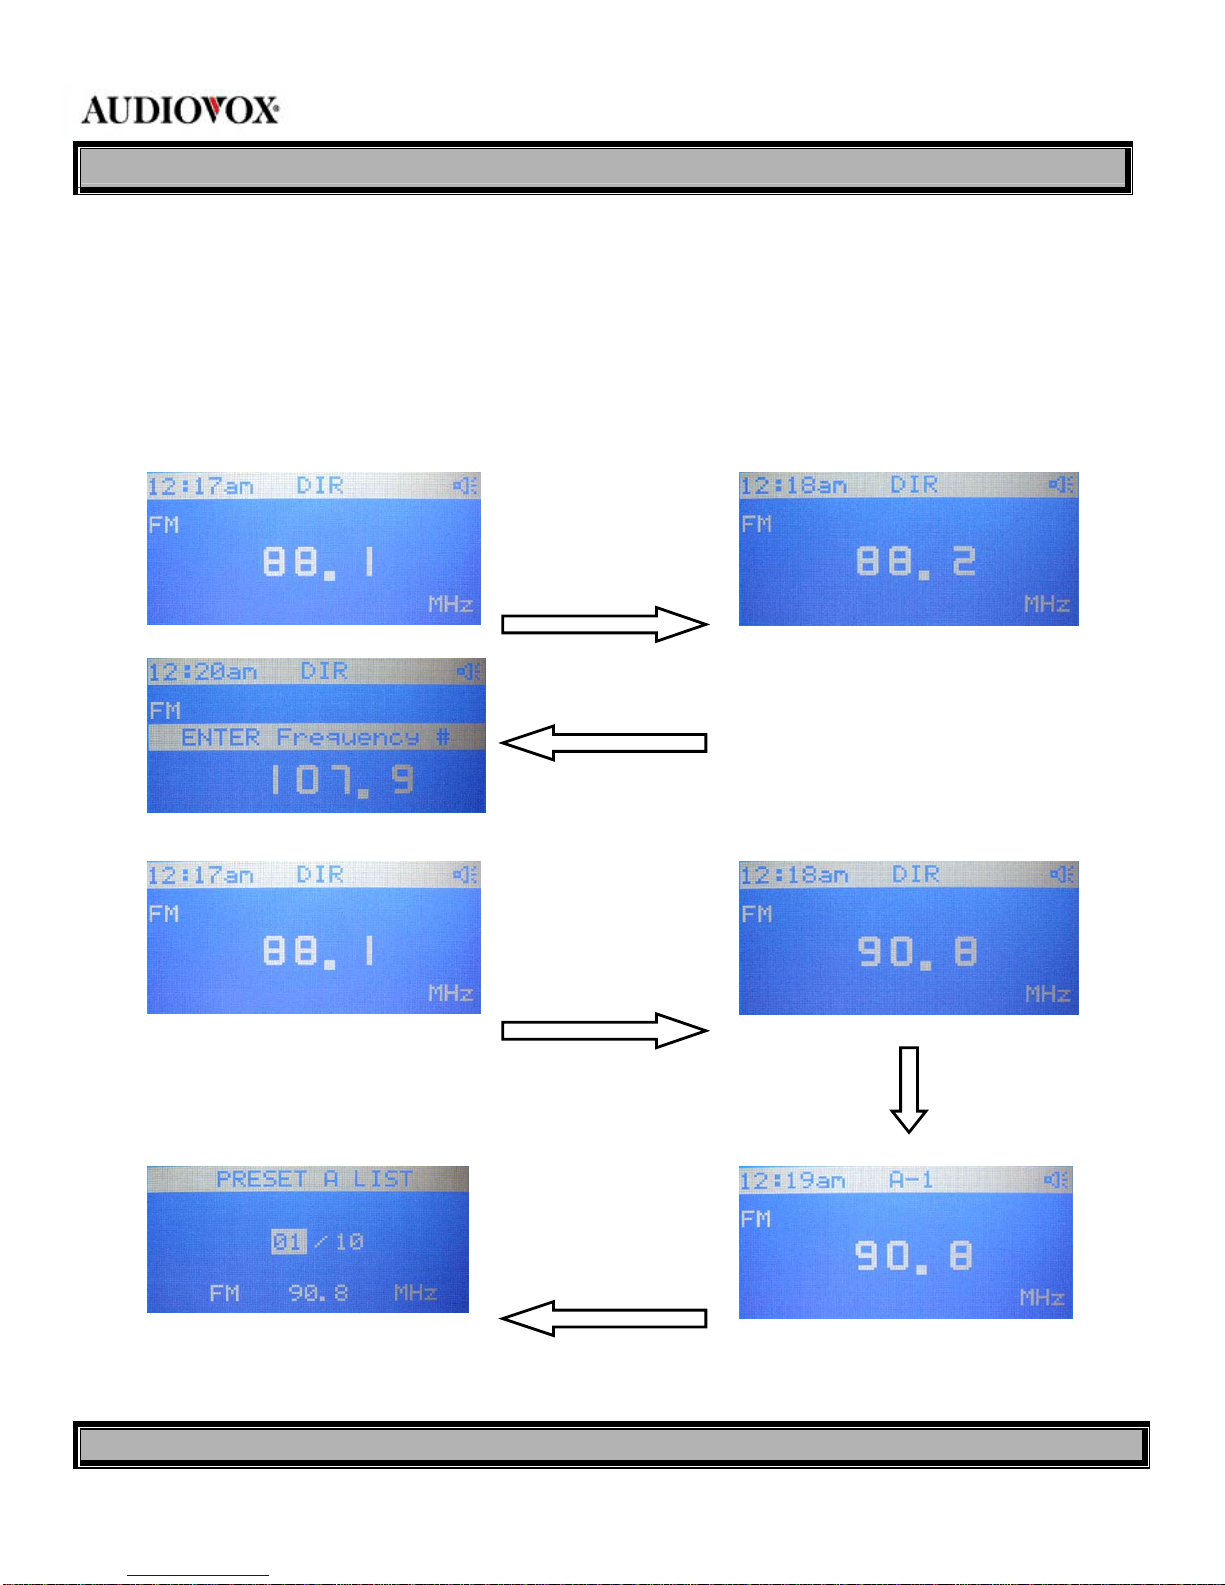
2.3 DIRECT Button (Preset)
During normal operation, direct selection of the radio frequency in the XM, FM orAM radio modes is possible. To change FM or
AM frequency, use the CH Up/Down buttons or directly enter desired frequency using the number (1-10) buttons. To search radio
frequencies in FM/AM modes, press the CAT Up/Down buttons. In XM mode, the CAT Up/Down buttons provide a jump to the
various broadcast categories or genres. When the DIRECT button is pressed, Direct (DIR) disappears on the display, and is
replaced with preset bankA, B or C. Each bank is capable of storing up to 10 radio frequencies in memory. The frequency is stored
by pressing number buttons 1-10, thus permitting memory storage of 30 frequencies. When this button is pressed and held, the list
of stored frequencies in the current band can be viewed.
Press this button to enter into
play mode from standby mode
Press this button to return
to standby mode from any
play mode
Press this button to mute
play mode audio
Press this button again to
cancel the mute function

MODEL XM50 OWNER’S MANUAL
VERSIONV1.0 Page4of20
2.3.1 FM/AM Radio Ranges
In DIRECT mode, the FM radio band ranges from 87.5 to 107.9MHz, while the AM band ranges from 530 to
1710kHz.
2.3.2 Changing FM/AM Radio Frequencies
FM and AM radio frequencies can be changed by using the CH Up/Down buttons; each button press changes the
frequency in 100kHz steps. Pressing the CAT Up or Down button enters the frequency search mode.
Press the CAT +/- buttons to
auto search for desired FM or
AM frequency; press select
Press and hold number
button over 1 second to
store station frequency in
memory bank A
Press and hold DIRECT button
over 1 second to display list of
stored frequencies in current
bank
Press the CH +/- buttons to
change frequency in 100kHz
steps; press select
OR
Press the number buttons to
directly enter frequency; press
select

MODEL XM50 OWNER’S MANUAL
VERSIONV1.0 Page5of20
2.4 SETUP Button
When MENU is pressed, a list of menu items appears on the display. Select the desired item using the Channel Up
(
CH ) and Channel Down ( CH ) buttons to highlight the item; then press the SELECT button to enable
adjustment of the selected parameter.
Setup Item: -SOFTWARE VERSION
FACTORY DEFAULT
LCD SETTING
AUDIO SETTING
XM SETTING
CLOCK SETTING
2.4.1 SOFTWARE VERSION: When selected, this item displays the software version and XM version installed in this
unit.
2.4.2 FACTORY DEFAULT: When selected, this item returns all user presets to factory default parameters.
2.4.3 LCD DISPLAY SETTING: When selected, this item enables adjustment of the display contrast within the range
0~10. The factory default setting is 3.
During any play mode,
press the setup button;
then press CH+/- to
highlight this item
Then press
select
During any play mode,
press the setup button;
then press CH+/- to
highlight this item
Press CH+/-
to highlight
this item; then
press select

MODEL XM50 OWNER’S MANUAL
VERSIONV1.0 Page6of20
2.4.4 AUDIO SETTING: When selected, this item enables adjustment of the BASS and TREBLE parameters, each
within a range of -5 to +5, and also enables activation of SURROUND sound (ON/OFF).
2.4.5 XM SETTING: When selected, this item provides the capability of setting up XM options for display of
information such as sports teams, current scores, etc., or stock information. Press SETUP to access the menu options
display; scroll up/down to XM SETTING using the CH +\- buttons and press SELECT.
During any play
mode, press the
setup button; then
press CH+/- to
highlight this item
and press select
Press CH+/- to
highlight this item;
then press select.
Adjust contrast
range using CH+/-
During any play
mode, press the
setup button;
then press CH+/-
to highlight this
item
Then press select.
Adjust BASS/TREBLE
range and
SURROUND SOUND
ON/OFF using CH+/-
During any play
mode, press the
setup button;
then press CH+/-
to highlight this
item
Press select
button for Info
Extra
Press select button for
Stock Ticker

MODEL XM50 OWNER’S MANUAL
VERSIONV1.0 Page7of20
2.4.6 CLOCK SETTING: When selected, this item sets the current time in either the 12 or 24 hour system.
2.5 CAT/CAT Buttons
In AM and FM modes, these buttons enable up/down radio station auto-search. In XM mode, the category buttons
enable category search by skipping genres to access a desired category with its associated menu.
2.6 CH/CH Buttons
These buttons enable frequency selection up or down in the XM, FM and AM radio modes. In FM and AM mode, each
press of the channel button(s) provides a frequency step of 100kHz/10kHz. In XM mode, radio station frequency is
selected up or down or, when in station preset, provides up or down frequency selection from the frequency items stored
in any of the preset memory banks.
2.7 SELECT Button
This button provides selection of various menu and submenu items in the XM/FM/AM/AUX/iPod modes after the desired
item has been highlighted using the CH+/- and/or CAT+/- buttons. During auto-search in the FM and AM modes,
pressing the Select button cancels the search function.
During any play
mode, press the
setup button; then
press CH+/- to
highlight this item
Then press select
In FM mode, press CH+/- to
change channel frequency in
100kHz steps.
In AM mode, press CH+/- to
change channel frequency in
100kHz steps.

MODEL XM50 OWNER’S MANUAL
VERSIONV1.0 Page8of20
2.8 VOL/VOL Buttons
These buttons are used to adjust the speaker volume in the XM/FM/AM/AUX/iPod modes within the range of 0~30. The
factory default is at mid-range (15).
2.9 MODE Button
This button enables selection of one of five play modes in a sequential wrap-around format (XM/FM/AM/AUX/iPod).
2.10 Infrared (IR) Receiver Window
This window detects the IR signal from the remote control to select operating modes and feature functions.
2.11 LCD Display
Displays operating modes, menus and other related information on the LCD screen.
2.12 Speaker
Provides the audio output level as set by the VOL / VOL buttons.
2.13 SLEEP Button
Press this button to set a sleep time of 30, 60 or 90 minutes; use the CH/CH buttons to scroll through and
highlight the available sleep times, then press select. The radio will turn off automatically when the sleep time has
expired.
Press these buttons to adjust the
output volume in any mode
Press this button in any play
mode; the current mode is
highlighted
Press the mode button again to
select desired source; then press
select

MODEL XM50 OWNER’S MANUAL
VERSIONV1.0 Page9of20
2.14 Number Buttons 1-10
These buttons are used to directly input radio station frequency/channel number in XM, FM and AM modes. They are
also used to store a desired frequency in memory when the station preset function is active.
2.15 ALARM1/ALARM2 Buttons
These buttons set the alarm function. Two kinds of alarms are provided: ALARM 1 can be set to (XM, FM, XM, IPOD or
TONE MODE), while ALARM 2 can be set to (XM, FM, XM, IPOD or TONE MODE).
2.16 SNOOZE Button
This button sets the Snooze time between 1 and 20 minutes after the alarm sounds. When the alarm goes on with
radio activation, press this button repeatedly to set Snooze time; each press advances the time in 1-minute
increments.
Press this button
in any play
mode
Highlight the desired sleep
time, then press select
Press this
button in any
play mode
After pressing select, set
time and start mode (XM,
FM, XM, IPOD or TONE
MODE)
Activate alarm
to ON and
observe Bell
icon on display
Press the Snooze
button in Alarm
mode

MODEL XM50 OWNER’S MANUAL
VERSIONV1.0 Page10of20
3.0 iPod Docking Station
This station provides docking accommodations for an external iPod. When properly installed, iPod operation can be
controlled using its associated remote control unit.
3.1 Using the iPod Dock
1. Swing up the protective cover door to access the iPod/XM receiver system connector bay.
2. Choose the compatible adapter/holder for your iPod model and install it in the bay.
Note: The XM50 comes equipped with an iPod adapter. Most iPods come with their own (original) adapters which can
also be used if necessary.
3. Install the iPod carefully onto the iPod connector and press down lightly until the iPod bottoms into the recess. The
iPod will be inclined slightly to the rear of the XM50.
4. Press the MODE button until iPod is highlighted; press select and observe the following display screens:

MODEL XM50 OWNER’S MANUAL
VERSIONV1.0 Page11of20
4.0 XM Docking Station
This station provides docking accommodations for an external mini XM receiver. (Refer to the figure on the previous
page.)
4.1 Using the XM Docking Station
1. Swing up the protective cover door to access the iPod/XM receiver system connector bay.
2. Install the mini receiver carefully onto the receiver connector and press down lightly until the receiver bottoms into the
recess.
Note: The receiver can be inserted in one way only; the XM logo should face toward the front of the unit.
3. Press the MODE button until XM is highlighted; observe the following display screens:
If a receiver fault occurs or
if the receiver is
improperly installed, the
following message screen
If an XM antenna
fault occurs, the
following message
screens may appear:
Use the number (1-10) buttons
to directly select a channel
Select the Category using the
CAT+/- buttons; select channel
within the category using the
CH+/- buttons

MODEL XM50 OWNER’S MANUAL
VERSIONV1.0 Page12of20
5.0 Connector Functions
5.1 Beeper Connector
This connector provides for beeper alarm output.
5.2 DC IN Jack
This jack connects to the 15 V DC output of the AC/DC adapter supplied with the radio.
5.3 AUX IN Jack
This 3.5mm stereo headphone type jack accepts an external audio input from an MP3 player, CD player, etc.
5.4 Headphone Jack
This 3.5mm jack provides an audio output to external stereo headphones.
5.5 XM Antenna Connector
This jack provides input connection for the external SMB type XM antenna
Press DIRECT to access
memory bankA; enter
channel number using
the number buttons
Press and hold DIRECT
to access preset channel
list in memory bank A

MODEL XM50 OWNER’S MANUAL
VERSIONV1.0 Page13of20
5.6 AM Antenna Connector
This jack provides input 3.5mm connection for a stereo headphone type AM antenna
5.7 FM Antenna Jack
This connector provides input for a 75ΩF-connector type FM antenna.
5.8 Port Tube
This port on the bottom of the unit provides a heat exhaust for the speaker.
6.0 Remote Control
The remote control provides remote commands for both the radio and for an iPod, when installed in the iPod connector
bay. Items 1-12 apply to the radio, while items 13-21 apply to iPod operation.

MODEL XM50 OWNER’S MANUAL
VERSIONV1.0 Page14of20
1. POWER Button: Same function as radio power on-off.
2. SLEEP Button: Same function as radio; sets sleep time.
3. ALARM Button: Same function as radio; sets alarm time.
4. MUTE Button: Same function as radio; sets audio mute on-off.
5. MODE Button: Same function as radio; switches play mode (XM/FM/AM/AUX/iPod).
6. SETUP Button: Same function as MENU on radio; displays menu items for parameter setup.
7. DISPLAY Button: In XM mode, sequential presses of this button initiate a display of the STOCK ticker info with scrolling
artist/song title, the EXTRAS ticker (latest INFO EXTRAS or STOCK TICKER as selected from MENU) with scrolling
artist/song title, and stationary ARTIST/SONG title info currently playing.
8. JUMP Button: In XM mode, pressing the JUMP button initiates an immediate return to the previous category, or genre,
without having to press the SELECT button
9. 1-10 Button: Same function as radio; used to directly input station frequency, and for selecting station number for
memory storage.
10. Volume /Button: Same function as radio; used to control speaker volume.
11. Direct Button: Same function as radio; used to directly enter station frequency and to store frequencies in memory
banks A, B or C for later recall by the user.
12. CAT/Buttons: Same function as radio; used for station auto-search in AM and FM modes; provide category search
in XM mode.
13. SELECT Button: Same function as radio; provides selection of highlighted screen items and also confirms input
selections. In AM and FM modes, during station frequency auto-search, if search doesn’t stop automatically, pressing
SELECT halts the auto-search function.
14. CH/Buttons: Same function as radio; used to select radio station frequency in radio mode, and also highlights menu

MODEL XM50 OWNER’S MANUAL
VERSIONV1.0 Page15of20
mode items for adjustment. Also used to control selection of iPod menu items.
15. SHUFFLE Button: Press this button to play iPod songs in a completely random manner.
16. REPEAT Button: When pressed once, current iPod song is repeated; when pressed a second time, current song is
played continuously.
17. Fast Reverse ( ) Button: Press this button to fast reverse through current playing song.
18. Play/Pause ( ) Button: This button controls the play and pause functions of the iPod. When pressed during play
mode, song play is paused; when pressed again, song play is resumed.
19. Stop ( ■) Button: Press this button to stop current song play.
20. Fast Forward ( ) Button: Press this button to fast forward through the current playing song.

MODEL XM50 OWNER’S MANUAL
VERSIONV1.0 Page16of20
7.0 Initial Use* and Battery Replacement
*When purchased the remote control has a battery installed with a plastic insert to prevent battery discharge. Remove
the plastic insert before attempting to use the remote.
1. Remove the battery holder. Refer to the drawing.
2. Insert the battery into the battery holder and insert the battery holder into the remote. Be sure to observe the correct
polarity
3. For best results, aim the remote directly at the remote receiver window within 10 feet, and angles not exceeding 60
degrees.
4. The path between the remote control and remote sensor should be free of obstructions.
5. Under normal use the battery will last for approximately one year.
6. Remove the battery if the remote is not going to be used for a long time or during storage.

MODEL XM50 OWNER’S MANUAL
VERSIONV1.0 Page17of20
NOTES

MODEL XM50 OWNER’S MANUAL
VERSIONV1.0 Page18of20
NOTES

MODEL XM50 OWNER’S MANUAL
VERSIONV1.0 Page19of20
NOTES

MODEL XM50 OWNER’S MANUAL
VERSIONV1.0 Page20of20
© 2008 Audiovox Electronics Corporation, 150 Marcus Blvd., Hauppauge, NY 11788
128-8282
Table of contents
Other Acoustic Research Radio manuals

Acoustic Research
Acoustic Research ARIRC600i User manual

Acoustic Research
Acoustic Research ARIR150 User manual

Acoustic Research
Acoustic Research ARIR201 User manual

Acoustic Research
Acoustic Research ART7 User manual

Acoustic Research
Acoustic Research ARIRC200 User manual

Acoustic Research
Acoustic Research ARIR600i User manual

Acoustic Research
Acoustic Research ARIR201 User manual

Acoustic Research
Acoustic Research ARIRC200 User manual

Acoustic Research
Acoustic Research ARIR600i User manual

Acoustic Research
Acoustic Research ARIR150 User manual