ACT iCHARGE i70 User manual

WE MAKE BATTERIES BETTER™
iCHARGE™
INSTRUCTION MANUAL
BEDIENUNGSANLEITUNG
MANUAL DE INSTRUCCIONES
MANUEL D’INSTRUCTIONS
English Deutsch Espanol Francais
Advanced Charger Technology, Inc.
6060 McDonough Drive, Suite J
Norcross, GA 30093, USA
Tel: (770) 263-6337 / Fax: (770) 263-9155
email: [email protected]
ACT (UK) Ltd
Top Riley, Eyam
Hope Valley, Derbyshire, S32 5QZ
United Kingdom
Tel: (01433) 63-93-43 / Fax: (01433) 63-90-73
email: [email protected]
ACT solutions GmbH
HaupstraBe 119-121
AltluBheim, D-68804
Germany
Tel: (06) 205-3948-0 / Fax: (06) 205-37560
email: [email protected]
www.actcharge.com

SAVE THESE INSTRUCTIONS
This manual contains important safety and operating
instructions for your battery charger.
Before using your battery charger, read all instructions and
cautionary markings on the charger, adapter, and battery
carefully.
CAUTION: To reduce the risk of injury,
charge only rechargeable-type batteries.
Other types of batteries may burst, causing
personal injury and damage.
TABLE OF CONTENTS
Preparation
Safety Precautions
Connecting Adapters
Connecting Power
Operation
Charging
Reconditioning
Maintainor™ Feature
Light (LED) Sequence
Troubleshooting
Specifications
Warranty
Connecting an adapter
Your iCHARGE unit has been designed with interchangeable adapters. Please identify the
correct adapter for your specific battery type.
WARNING: Charging battery types not specified on the adapter may result in personal
injury and damage.
(1) Align the adapter over the shrouded-pin connector. (see diagram)
(2) Press adapter down gently.
(3) Fasten securely, using two mounting screws provided. (see diagram)
Connecting power
Caution: To ensure safe and damage-free operation.
• Always plug the AC wall plug/power connector into the iCHARGE unit BEFORE you plug it into a
standard AC outlet.
• Always remove the AC wall plug from the outlet BEFORE you unplug it from the iCHARGE unit.
• Do not operate charger in temperatures exceeding 40º C (104º F).
•Do not operate if charger has been dropped or damaged, or if the cord has been damaged.
•
Do not disassemble or attempt to modify unit. This action will automatically void your warranty.
(1) Verify that the iCHARGE 6/6M (models
i60/i65/i70/i75) 115V/220V switch is set to the
correct voltage (see diagram).
(2) Place charger on a clean, flat, dry surface.
Note: Charger is not suitable for outdoor use.
iCHARGE™ Benefits
• Fastest charge available
• Extended battery life with no memory effect
• Powered by enrev technology to condition as it charges
• Microprocessor controlled
• No complicated charging rules
• Precise termination with no “top off” or trickle charge
• User-friendly: Green light = GO!
iCHARGE 6: Charge up to six NiCd or NiMH batteries
conditions as it charges with no memory effect
iCHARGE 6M: Same great benefits and optional emergency
maintenance mode keeps batteries in peak condition
iCHARGE: Fast, user-friendly rapid charging with deep conditioning
at the touch of a button.

(3) Insert the barrel plug/power connector into the iCHARGE jack.
(4) Plug the other end into a standard AC outlet.
Note: Do not alter the AC cord/power connector or transformer plug provided.
Charging
(1) Remove battery from radio.
(2) Insert battery into the iCHARGE adapter. (see diagram)
Note: You may remove charged battery for use any time.
For maximum capacity, wail until green READY light has illuminated before removing battery.
Reconditioning
(1) Place NiCd battery onto single bay iCHARGE models i10 and i30 unit.
Note: Reconditioning feature is for NiCd batteries only.
(2) Press the RECONDITION button.
Result: The RECONDITION light will illuminate, and the unit will automatically discharge
and recharge the battery.
Note: The RECONDITION cycle may take up to 5 hours.
Maintainor Feature - iCHARGE 6M models i65 and i75
Your iCHARGE 6M is designed to keep your reserve batteries fully charged and ready for use. The
iCHARGE 6M will automatically discharge and recharge each battery independently every 14 days.
iCHARGE light (LED) sequence
Solid Green: Charge Complete
Flashing Green: Standby Mode (iCHARGE 6M models i65 and i75 only).
Solid Amber: Charging
Fast Flashing Amber: Hot or Cold Battery Present - Unit will charge when battery
reaches a safe temperature.
Slow Flashing Amber: Discharging (iCHARGE 6M models i65 and i75 only).
Amber RECONDITION: Standby Mode (iCHARGE 6M models i10 and i30 only).
Red: Fault - Please refer to Troubleshooting #1.
Green/Amber/Red/All: LED-Check Sequence when power is supplied.
All Lights: Adapter is inserted incorrectly or is not present.
No Lights: When a new adapter is installed, allow 30-60 seconds for adapter identification.
If the adapter has not been changed, please refer to Troubleshooting #2.
Trémoins lumineux du iCHARGE
Vert permanent: La charge est terminée.
Vert clignotant: Mode veille (uniquement sur les iCHARGE 6M, modéles i65 et i75).
Jaune permanent: Charge en cours.
Jaune clignotant rapidement: La batterie est trop chaude ou trop froide (elle sera
echargé lorsqu’elle sera á une termérature sécuritaire).
Jaune clignotant lentement: Décharge en cours (uniquement sur les iCHARGE 6M,
modéles i65 et i75).
Jaune avec inscription RECONDITION: Décharge en cours (uniquement sur les iCHARGE
6M modéles i10 et i30).
Rouge: Panne (veuillez vous reporter au conseil de deepannage nº 1).
Vert/jaune/rouge
(tout les témoins s’allument)
: Procédure de vérification des témoins
lors de la mise sous tension.
Tous les témoins demeurent allumés: L’adapteur est absent ou mai inséré.
Aucun témoin: Lorsqu’un nouvel adapteur est installé, il faut prévoir de 30 á 60 secondes
pour l’identification de l’adaptateur. Si l’adapteur n’a pas été remplacé,
veuillez vous reporter au conseil de dépannage nº 2.
Dépannage
1. Le témoin de panne (FAULT) clignote ou demeure allumé sure l’appareil.
-
Enlevez la batterie pour voir s’il y a des dommagtes visibles ou une interférence avac les contacts.
- Veerifiez lle type de la batterie et les compatibilités sur l’appareil.
- Replacez la batterie et veerifiez la qualité de la connexion.
- Si le témoin de panne est toujours allumé, le systéme indique que votre batterie n’est plus
bonne et qu’elle est trop usée.
2. Aucun trémoin ne s’allume lorsque la batterie est ineérée dans l’appareil.
- Assurez-vous que le connecteur d’alimentation avec fiche cylindrique est bien enfoncee dans
la prise de l’appareil.
- Assurez-vous que la prise murale est sous tension et vérifiez si l’adapteur secteur est bien
enfoncé dans la prise.
- Assurez-vous que l’adaptateur est correctement installé.
- Verifiez la tension de la batterie pour voir si elle peut encore étre utilisée.
Spécifications
• Produit homologué UL et CE
• Entrée: 120/240 VAC, 60 Hz
• Courant de charge maximum: 2.4A per baie
• Courant de dépolarisation maximum: 12A per baie
• Plage de tension de fonctionement: 10º - 40º C
• Dimensions et poids: 178 x 140 x 51 mm, 1.4 kg (iCHARGE modéles i10 et i30)
457 x 229 x 165 mm, 4.5 kg. (iCHARGE 6/6M, modéles i60/i65/i70/i75)
Garantie limitée
La société Advanced Charger Technology garantit ce produit contre tout deefaut de matériaux ou de
maind’œuvre, et ce, pendant une année á compter de sa date d’achat. Si le produit s’avére
défectueux, la société Advanced Charger Technology le réparera ou le remplacera sans frais. Cette
garantie exclusive est votre seul recours. La société Advanced Charger Technology ne peut être tenue
responsable de qulque dommage indirect ou fortuit découlant du non-respect d’une garantie expresse
ou implicite associée á ce produit. Puisque certaines juridictions interdisent les limitations et restric-
tions relativement aux dommages indirects ou fortuits, il est possible que la restriction ci-dessus ne
s’applique pas á vous. Cette garantie vous accorde des droits juridiques précis, mais il est possible que
vois ayez égalemenet d’autres droits selon votre lieu de résidence. Pour demander une réparation sous
garantie, veulliez contracter ACT (Europe) Ltd. au +353 (0) 21 311372 ou á www.atcharge.com.
Copyright © 2001 Advanced Charger Technology, Inc. All rights reserved.

Troubleshooting
1. Unit displays a constant or blinking FAULT light.
- Remove battery to check for visible damage or interference with the contacts.
- Verify the battery type and/or chemistry listed on the adapter for compatibility.
- Replace battery and ensure proper connection.
- If FAULT light persists, the system is indicating that your battery has reached the end of
its useful life.
2. No lights when battery is placed on unit.
- Make sure barrel plug/power connector is properly seated in unit.
- Check wall socket for power and verify that AC adapter is properly seated in outlet.
- Make sure adapter is properly installed.
- Check battery voltage to determine if battery is still useful.
Specifications
• UL & CE approved
• Input 120/240 VAC, 60 Hz
• Max charge current: 2.4A per bay
• Max depolarization current: 12A per bay
• Operating temperature range: 10º - 40º C
• Dimensions & Weight: 7 x 5.5 x 2” (178 x 140 x 51 mm), 3lbs. (1,4Kg.) (iCHARGE models i10
and i30) 18 x 9 x 6.5” (457 x 229 x 165 mm), 12lbs. (4Kg.) (iCHARGE 6/6M models
i60/i65/i70/i75
Limited warranty
Advanced Charger Technology, Inc. warrants this product against defects in material or
workmanship for one (1) year from your purchase date. If this Product is determined to be
defective, Advanced Charger Technology will replace or repair the Product at no charge to your.
This limited warranty contains your exclusive remedy. Advanced Charger Technology shall not be
liable for any incidental or consequential damages for breach of any express or implied warranty
on this product. Some states and provinces do not allow the exclusion of limitation of incidental
or consequential damages, so the above limitation may not apply to you. This warranty gives your
specific legal rights, which vary from state to state or province to province. To obtain warranty
service, please contact Advanced Charger Technology at 770-263-6337 or at www.actcharge.com.
In the United Kingdom please contact ACT (UK) Ltd. at 44 (0) 1433 639343.
Copyright © 2001 Advanced Charger Technology, Inc. All rights reserved.
DIESE ANLEITUNG AUFHEBEN
Diese Anleitung enthält wichtige Sicherheits- und
Bedienanweisungen für lhr Batterieladegerät.
Bevor Sie lhr Batterieladegerät in Betrieb nehmen, bitte
alle Anweisungen und Vorsichtshinweise auf dem
Ladegerät, dem Adapter und der Batterie sorgfältig
durchlesen.
VORSICHT - Um Verletzungsgefahr zu mindern, nur
Batterien laden, die dafür geeignet sind. Nicht
wieder aufladbare Batterien können platzen. Es
besteht Verletzungs- und Beschädigungsgefahr.
INHALTSVERZEICHNIS
Vorbereitung
Sicherheitsmaßnahmen
Anschließen eines
Adapters
Netzstrom
Betrieb
Laden
Konditionieren
Maintainor™
Leuchtfolge (LED)
Fehlersuche
Technische Daten
Garantie
(3) Insérez le connecteur d’alimentation avec fiche cylindrique dans la prise de iCHARGE.
(4) Branchez l’autre extrémité dans une prise secteur standard.
Remarque: Il ne faut jamais tenter de modifier le connecteur d’alimentation ou la fiche du
transformateur fourni.
Procédure de recharge
(1) Enlevez la batterie de l’appareil radio.
(2) Insérez la batterie dans l’adapteur iCHARGE (voir le schéma).
Remarque: Vous pouvez enlever la batterie chargée á tout moment.
Ou, pour avoir une charge maximum, attendez que le eémoin vert de batterie soit allumé
avant d’enlever la batterie.
Reconditionnement
(1) Placez la batterie dans un appareil iCHARGE aá une seule baie (modéles i10 et i30).
Remarque: La procédure de recharge ne sápplique que pour les batteries NiCd.
(2) Appuyez sur le bouton RECONDITION.
Résultat: Le témoin RECONDITION s’allumera, puis l’appareil déchargera et rechargera
automatiquement la batterie.
Remarque: Le cycle de reconditionnement peut durer jusqu’á cinq heures.
Fonction Maintainor - Appareil iCHARGE 6M, modéles i65 et i75
Votre appareil iCHARGE 6M a été conçu pour maintenir vos batteries de réserve entiérement
chargées et prétes á l’emploi. Tous les 14 jours, le iCHARGE 6M déchargera et rechargera
automatiquement chaque batterie indépendamment.

Anschließen eines Adapters
Ihr iCHARGE Ladegerät verfügt über austauschbare Adapter. Bitte stellen Sie sicher, dass Sie den
richtigen Adapter für Ihren speziellen Batterietyp verwenden.
WARNUNG: Beim Laden von Batterien, die nicht auf dem jeweiligen Adapter angegeben
sind, besteht Verletzungs- und Beschädigungsgefahr.
(1) Den Adapter über dem abgeschirmten Stiftverbinder ausrichten. (Siehe Diagramm)
(2) Den Adapter sanft nach unten drücken.
(3) Den Adapter mit zwei Schrauben (im Lieferumfang enthalten) befestigen. (Siehe Diagramm)
Netzstrom
Vorsicht: Um einen sicheren und defektfreien Betrieb sicherzustellen.
• immer zuerst den Netzstecker in das iCHARGE Ladegerät stecken, BEVOR der Netzstecker in
die Wechselstrom-Steckdose gesteckt wird.
• immer zuerst den Netzstecker aus der Wechselstrom-Steckdose abziehen, BEVOR der
Netzstecker am anderen Kabelende vom iCHARGE Ladegerät abgezogen wird.
• das Ladegerät nicht bei Temperaturen über 40º C betreiben.
• das Ladegerät nicht verwenden, wenn es fallengelassen oder beschädigt wurde oder das Kabel
beschädigt wurde.
•
das Ladegerät nicht auseinanderbauen oder
verändern. Dadurch erlischt automatisch die Garantie.
(1) Sicherstellen, dass der 115-V/220-V- Schalter des
iCHARGE 6/6M (Modelle i60/i65/i70/i75) auf die
richtige Spannung eingestellt ist (Siehe Diagramm).
(2) Das Ladegerät auf eine saubere, flache, trockene Oberfläche stellen.
Hinweis: Das Ladegerät nicht im Freien verwenden.
(3) Den Stecker in die iCHARGE Buchse stecken.
(4) Das andere Ende des Netzkabels in eine genormte Wechselstrom-Steckdose stecken.
Hinweis: Die im Lieferumfang enthaltenen Wechselstrom-Netzanschlüsse nicht verändern.
SAVE THESE INSTRUCTIONS
This manual contains important safety and operating
instructions for your battery charger.
Before using your battery charger, read all instructions and
cautionary markings on the charger, adapter, and battery
carefully.
Avant d’utiliser votre chargeur de batterie, lisez
attentivement toutes les instructions et les avis de
sécurité apparaissant sur le chargeur, sur
l’adaptateur et sur la batterie.
TABLE DES MATIÉRES
Préparation
Consignes de sécurité
Connexion des adaptateurs
Connexion du bloc
d’alimentation
Utilisation
Procédure de charge
Reconditionnement
Fonction Maintainor™
Témoins lumineux
Dépannage
Spécifications
Garantie
Connexion de l’adaptateur
Votre appareil iCHARGE e été conçu pour une utilisation avec des adaptateurs interchangeables.
Veuillez repérer l’adapteur convenant á votre type de batterie.
AVERTISSEMENT: Si vous essayez de charger une batterie d’un type non indiqué sur
l’adaptateur, vous risquez de provoquer des blessures et des dommages matériels.
(1) Alignez l’adaptateur sur le connecteur á broches caréné (voir schéma).
(2) Enfoncez délicatement l’adaptateur.
(3) Fixez-le solidement, á l’aide des deux vis de montage fournies (voir schéma).
Connexion du bloc d’alimentation
Mise en garde: Afin de minimiser les risques pour l’utilisateur et les équipements.
• Il faut toujours brancher le connecteur d’alimentation secteur sur l’appareil iCHARGE AVANT
de le brancher sur une prise secteur murale.
• Il faut toujours débrancher le connecteur d’alimentation de la prise secteur murale AVANT de
le débrancher de l’appareil iCHARGE.
• Il ne faut jamais utiliser le chargeur lorsque la température dépasse 40º C (104º F).
• Il ne faut pas utiliser le chargeur ‘il est eombé ou s’il e été endommagé, ni si le cordon d’ali-
mentation a été abîmé.
•
Il ne faut jamais démonter ni tenter de modifier cet appareil, ce qui en annalerait
automatiquement la garantie.
(1) Asssurez-vous que le commutateur de tension 115V/220V du
iCHARGE 6/6M (modéles i60/i65/i70/i75) est réglé á la
bonne tension (voir le cchéma).
(2) Placez le chargeur sur une surface séche, propre et plane.
Remarque: Ce Chargeur n’est pas conçu pour une
utilisation á l’extérieur.

Laden
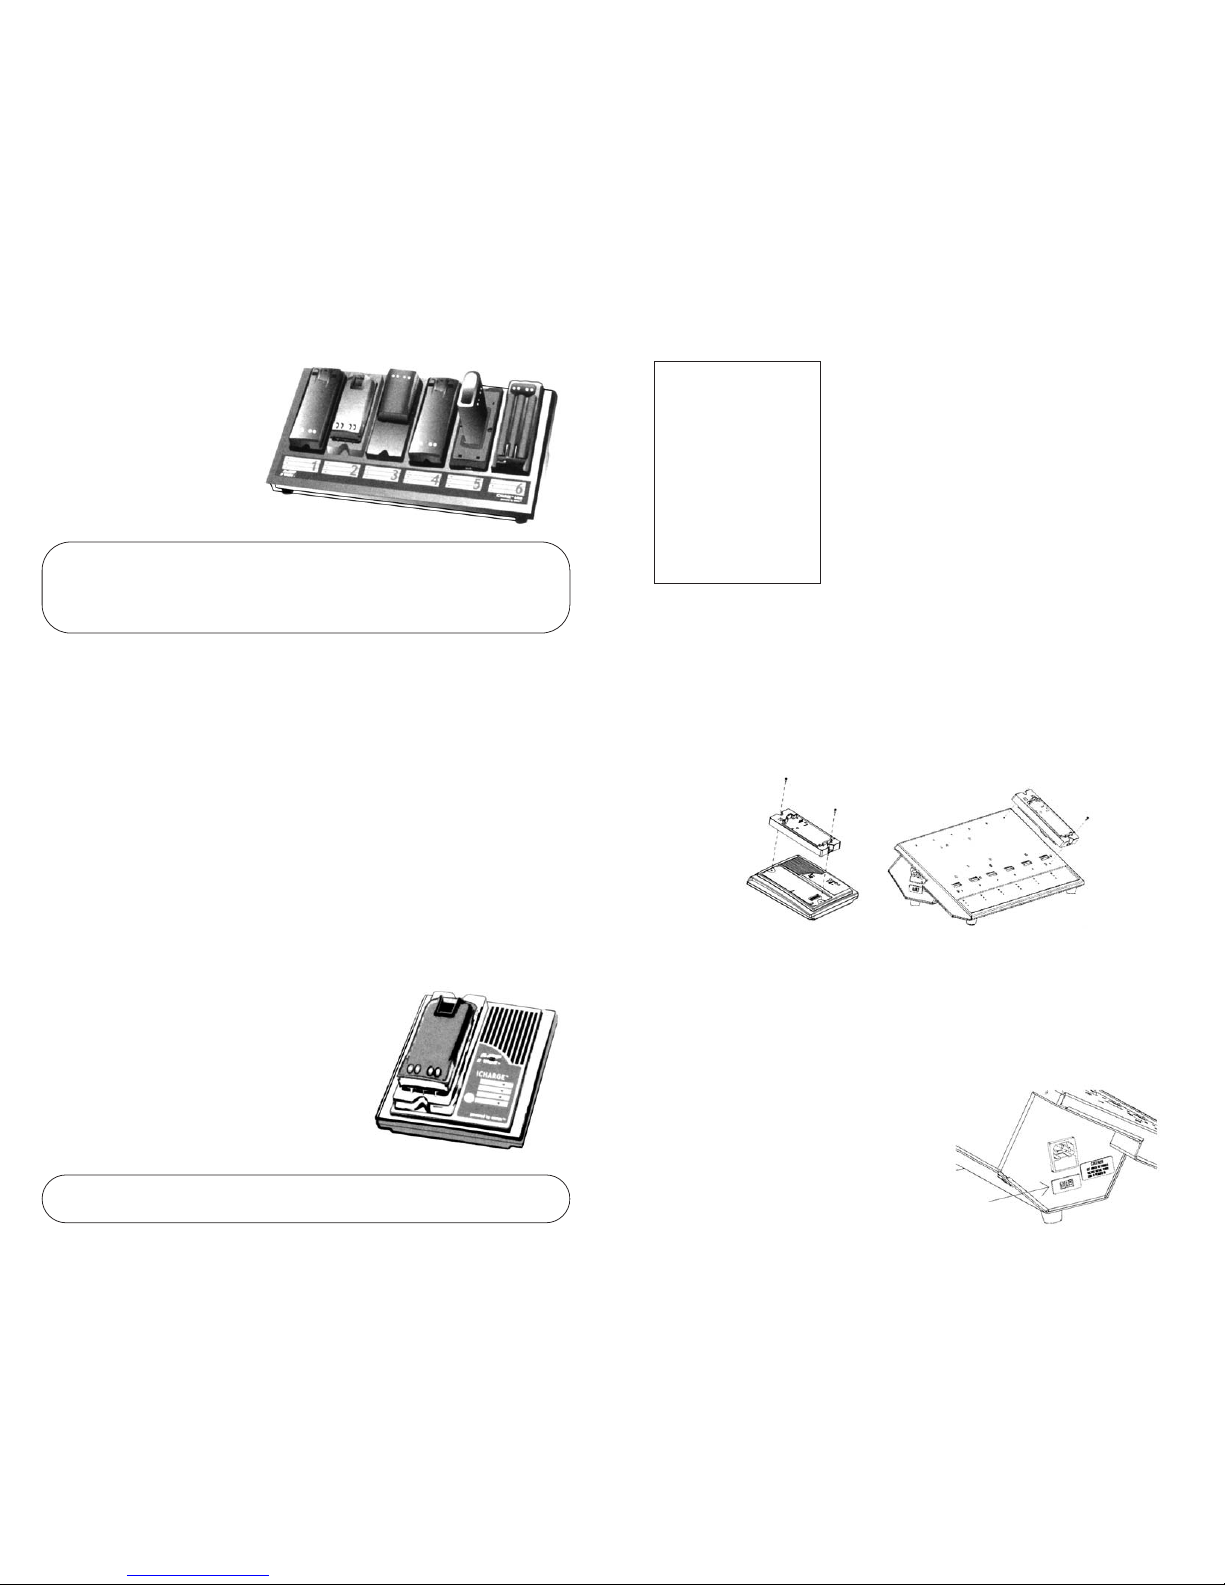
(1) Die Batterie aus dem Funkgerät nehmen.
(2) Die Batterie in den iCHARGE Adapter stecken. (Siehe Diagramm)
Hinweis: Die geladene Batterie kann jederzeit entnommen werden.
Für max, Aufladung warten, bis die grüne Leuchte Fertig/Geladen aufleuchtet, bevor die Batterie
entfernt wird.
Konditionieren
(1) Die Batterie in ein iCHARGE Modell i10 oder i30 Einfach-Ladegerät einsetzen.
Hinweis: Konditionieren der Merkmale ist nur für NiCd Batterien möglich.
(2) Die Taste KONDITIONIEREN drücken.
Ergebnis: Die Leuchte KONDITIONIEREN leuchtet auf und das Ladegerät entlädt automatisch
die Batterie, bevor es sie wieder auflädt.
Hinweis: Das KONDITIONIEREN kann bis zu 5 Stunden dauern.
Funktion ”Maintainor“ - iCHARGE 6M Modelle i65 und i75
Ihr iCHARGE 6M soll Ihre Batterie vollgeladen und einsatzbereit halten. Der iCHARGE 6M entlädt
jede Batterie alle 14 Tage automatisch separat und lädt sie dann wieder auf.
iCHARGE Leuchtfolge (LED)
Dauergrün: Mit Laden fertig.
Grün blinkend: Standby-Betrieb (nur iCHARGE 6M Modelle i65 and i75).
Dauergelb: Laden.
Gelb blinkend (schnell): Heiße oder kalte Batterie vorhanden - Ladegerät lädt, sobald
Batterie sichere Temperatur erreicht hat.
Gelb blinkend (langsam): Entladen (nur iCHARGE 6M Modelle i65 und i75).
Gelb = KONDITIONIEREN: Entladen (nur iCHARGE 6M Modelle i10 und i30).
Rot: Fehler - siehe Fehlersuche 1.
Grün/gelb/rot/alle: LED-Prüffolge bei Netzanschluss.
Alle Leuchten: Adapter ist falsch eingesetzt oder ist nicht vorhanden.
Keine Leuchten: Wenn ein neuer Adapter eingesetzt wird, braucht er 30 bis 60
Sekunden, um sich zu identifizieren. Wurde der Adapter nicht
gewechselt, siehe Fehlersuche 2.
Fehlersuche
1. Leuchte FEHLER des Ladegerätes ist an oder blinkt.
- Die Batterie herausnehmen und auf sichtbare Beschädigung oder fehlenden Kontakt an den
Polen überprüfen.
- Sicherstellen, dass der Batterietyp bzw, ihr chemischer Inhalt auf dem Adapter für
Verträglichkeit aufgeführt ist.
- Die Batterie wieder einsetzen und richtigen Kontakt sicherstellen.
- Bleibt die Leuchte FEHLER an, bedeutet das, dass die Batterie das Ende ihrer
Nutzungsdauer erreicht hat.
2. Keine Leuchte geht an, wenn die Batterie in das Ladegerät eingestzt wird.
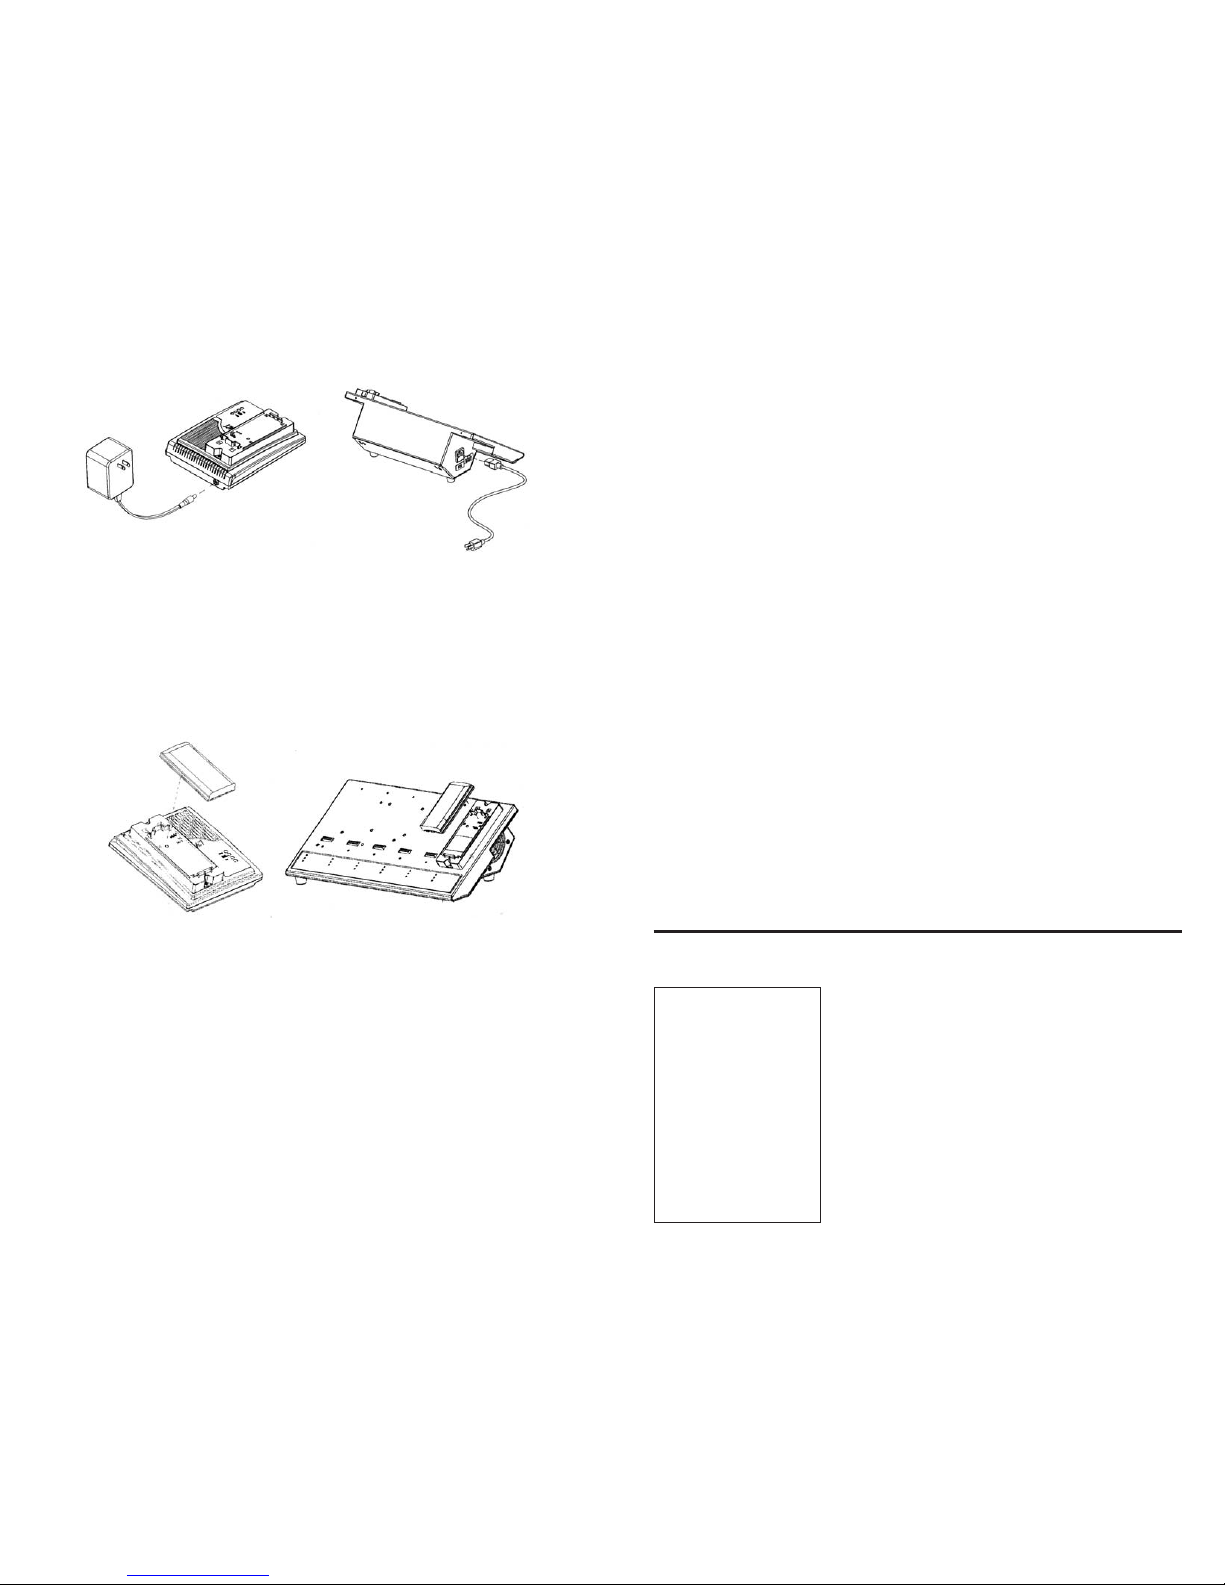
- Sicherstellen, dass der Stecker richtig im Ladegerät sitzt.
- Die Wandsteckdose auf Stromzufuhr überprüfen und sicherstellen, dass der Wechselstrom-
Stecker richtig in der Dose sitzt.
- Sicherstellen, dass der Adapter richtig eingebaut ist.
- Die Batteriespannung überprüfen um festzustellen, ob die Batterie noch einsatzfähig ist.
Secuencia de la luz del indicador de LED
Verde fija: Carga completada.
Destellos verdes: Modo en espera (Sólo iCHARGE 6M modelos i65 e i75).
Ambar fija: Cargando
Destellos ámbar rápidos: Hay una bateria caliente o fria - La unidad cargará cuando la
batería alcance una temperatura segura.
Destellos ámbar lentos: Descargando (Sólo iCHARGE 6M modelos i65 e i75).
Ambar RECONDITION: Descargando (Sólo iCHARGE 6M modelos i10 e i30).
Rojo: Falla - Por favor, refiérase a la Localización y solución de fallas Nº 1.
Verde/Ambar/Roja/Todas: Secuencia del indicador de LED al suministrar alimentación
eléctrica.
Todas las luces: El adaptor está insertado incorrectamente o no hay adaptado.
Sin luces: Cuando se instala un adaptador nuevo, permita entre 30 y 60 segundos para
identificación del adaptador. Si el adaptador no se cambió, por favor
refiérase a la Localización yu solución de fallas Nº 2.
Localización y solución de fallas
1. La unidad muestra la luz FAULT (falla) fija o a destellos.
- Retire la bateria para verificar daños visibles o interferencia con las contactos.
- Verifique que el tipo y/o composición química de la bateria esté en el listado en el adaptador.
- Reemplace la bateria y asegure una conexión adecuada para compatibilidad.
- Si persiste la luz FAULT, el sistema está indicando que su bateria ha llegado al fin de su vida útil.
2. No se ilumina ninguna luz cuando la bateria se coloca en la unidad.
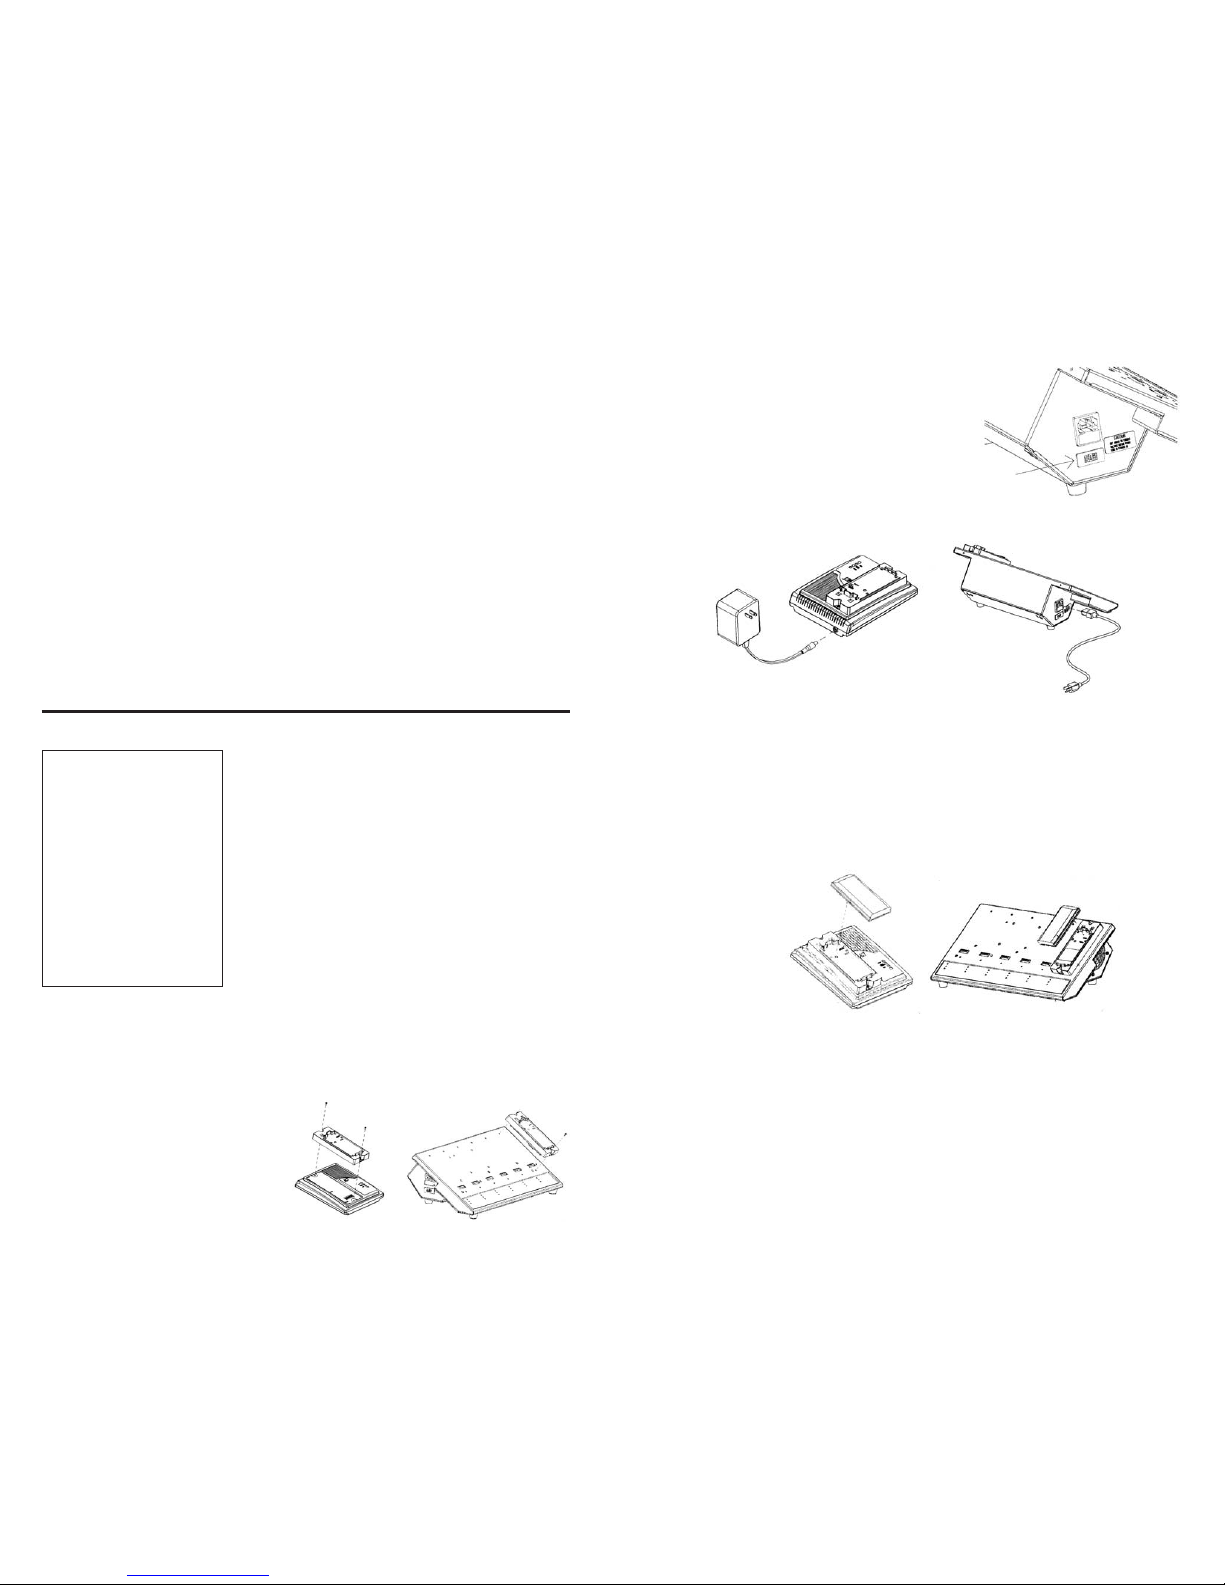
- Asefúrese de que la ficha de conexión de alimentación eléctrica asiente bien en la unidad.
- Verifique que haya alimentación en el receptáculo de pared y que el adaptador de CA
asiente adecuadamente en el receptáculo.
- Asegúrese de que el adaptador esté instalado adecuadamente.
- Verifique el voltaje de la bateria para determinar si la bateria aún es útil.
Especificaciones
• Aprobado por el laboratorio UL y la CE
• Entrada 120/240 VAC, 60 Hz
•Corriente de carga máx.: 2,4A por posición de carga
• Corriente de despolarización máx.: 12A por posición de carga
• Gama de temperaturas de funcionamiento: 10 a 40º C
• Dimensiones y peso: 178 x 140 x 51 mm (7 x 5,5 x 2 pulg.), 1,4 kg (3 lbs.) (iCHARGE modelos
i10 e i30) 457 x 229 x 165 mm (18 x 9 x 6,5 pulg.), 5,4 kg. (12 lbs.) (iCHARGE 6/6M modelos
i60/i65/i70/i75)
Garantia limitada
Advanced Charger Technology garantiza este producto contra defectos en el material y la mano de
obra durante un (1) año desde la feche de compra. Si se determina que este producto tiene
defectos, Advanced Charger Technology reemplazará o reparará el producto sin cargo para usted.
Esta garantía limitada contiene su única solución. Advanced Charger Technology no será respons-
able pos daños indirectos o resultantes de incumplimiento de ninguna garantía expresa o implicita
de este producto. Algunos estados y provincias no permiten la exclusión de daños indirectos o
resultantes, por lo que la limitación precedente puede no aplicarse a su caso. Esta garantia le
confiere derechos legales especificos que varian de estado a estado o de provincia a provincia.
Para obtener el servicio de garantia, por favor tome contacto con ACT (Europe) Ltd. en el teléfono
+353 (0) 21 311372 o en www.actcharge.com.
Copyright © 2001 enrev™ Corporation. Todas los derechos registrados.

Technische Daten
• UL u. CE zugelassen
• Eingang 120/240 V AC, 60 Hz/50 Hz
• Max. Ladestrom: 2,4 A pro Station
•Max. Depolarisationsstrom: 12 A pro Station
• Betriebstemperaturbereich: 10º - 40º C
• Abmessungen u. Gewicht: 178mm * 140mm * 51mm, 1,36 kg (nur iCHARGE Modelle i10 und i30)
457mm * 229mm * 165mm, 5,44 kg (iCHARGE 6/6M Modelle i60/i65/i70/i75)
Eingeschränkte Garantie
Advanced Charger Technology garantiert, dass dieses Gerät für ein (1) Jahr ab Kaufdatum frei von
Material- und Verarbeitungsfehlern ist. Wenn dieses Gerät für defekt befunden wurde, wird
Advanced Charger Technology dieses Gerät kostenlos ersetzen oder reparieren. Diese
eingeschränkte Garantie ist Ihr einziger Regressanspruch. Advanced Charger Technology haftet
nicht für beiläufig enstandenen oder Folgeschäden unter Garantie, ausdrücklich oder
stillschweigend, für dieses Gerät. Einge Staaten lassen keine Ausschließung oder Einschränkung
von beiläufig entstandenen oder Foigeschäden zu, so dass die abengenannten Einschränkungen
für Sie nicht gelten müssen. Diese Garantie gibt Ihnen spezifische Rechte, die je nach Land
unterschiedlich sein können. Für Service unter Garantie wenden Sie sich bitte an Advanced
Charger Technology unter der +49 (0)89-60.58.16 oder www.actcharge.com.
Copyright © 2001 enrev™ Corporation. Alle Rechte vorbehalten.
GUARDE ESTAS INSTRUCCIONES
Este manual contiene importantes instruccioned de
seguridad y operación para su cargador de baterias.
Antes de utilizar su cargador de baterias, lea cuidadosa-
mente todas las instrucciones y las marcas precautorias en
el cargador, adaptador y bateria.
PRECAUCION: Para reducir el riesgo de
lesiones, cargue solamente baterias tipo
recargables. Los otros tipos de baterias
pueden explotar, causando lesiones y daños.
TABLA DE CONTENIDO
Preparación
Precacauciones de seguridad
Conexión del adaptador
Conexión de la alimentacíon
Operacíon
Carga
Reacondicionamiento
Función Maintainor™
Secuencia de luces del indicador
de LED
Localización y solución de fallas
Especificaciones
Garantia
Conexión del adaptador
Se unidad iCHARGE ha sido diseñada con adaptadores intercambiables. Por favor, identifique el
adapter correcto para su tipo especifico de bateria.
ADVERTENCIA: Cargar tipos de baterías no especificados en el adaptador puende producir
lesiones y daños.
(1) Alinee el adaptor sobre el connector de
terinales con gualdera. (Vea el diagrama)
(2) Presione suavemente el adaptador hacia
abajo.
(3) Fijelo con seguridad utilizando dos
tornillos de montaje provistos.
(Vea el diagrama)
Conexión de la alimentación
(1) Verifique que el commutador 115V/220V de la unidad
iCHARGE 6/6M (modelos i60/i65/i70/i75) esté configurado
para el voltaje correcto (vea el diagrama).
(2) Coloque el cargador sobre una superficie limpia,
plana y seca.
Nota: El cargador no es apropiado para uso en exteriores.
(3) Inserte la ficha de la conexión de alimentación eléctrica dentro de la ficha hembra de la
unidad iCHARGE.
(4) Enchufe el otro extremo en un receptáculo de CA estándar.
Nota: No altere el enchufe del cable de alimentación eléctrica de CA o el enchufe del
transformador provisto.
Carga
(1) Quite la bateria de la radio.
(2) Inserte la bateria dentro del adaptador iCHARGE. (Vea el diagrama)
Nota: Puede retirar la bateria para usaria en cualquier momento.
O, para tener máxima capacidad, espere hasta que se ilumine la luz verde READY (lista)
antes de retirar la bateria.
Reacondicionamento
(1) Coloque la bateria en una unidad iCHARGE modelos i10 e i30 con una sola posición de carga.
Nota: La característica de reacondicionamiento es sólo para baterias NiCd.
(2) Presione el botón RECONDITION (reacondicionamiento).
Resultado: Se ilumina la luz RECONDITION y la unidad descarga y carga la bateria
automáticamente.
Nota: El ciclo RECONDITION puede durar hasta cinco horas.
Función Maintainor - unidad iCHARGE 6M modelos i65 e i75
Su unidad iCHARGE 6M esta diseñada para mantener sus baterias de reserva completamente cargadas
y listas para el uso. La unidad iCHARGE 6M descarga y carga cada bateria independientemente y
automáticamente cada 14 dias.
This manual suits for next models
3
Table of contents
Other ACT Batteries Charger manuals