Activox XYC100B-P4L User manual

Manufactured & Distributed by
www.InovaLabs.com
Operator’s Manual
FOR USE WITH MODEL:
XYC100B-P4L
®
®
Copyright © 2015 Inova Labs, Inc. All rights reserved.
No part of this document may be reproduced or
transmitted in any form or by any means, electronic,
mechanical, photocopying, recording, or otherwise,
without prior written permission from Inova Labs Inc.
Inova Labs Inc.
3500 Comsouth Drive
Suite 100
Austin, TX 78744 USA
Phone: 1.512.617.1700
Toll-Free: 1.800.220.0977
www.InovaLabs.com
Represented in Europe by:
QNET BV
Hommerterweg 286
6436 AM Amstenrade
The Netherlands

TABLE OF CONTENTS
Introduction 2
Application/Indications For Use 2
Symbol Descriptions 3
Warnings 3
Contraindications 4
Adverse Events/Hazards 4
Standard Package Contents 5
User Controls 6
Part Names 8
Operating Instructions 9
Battery Life Timetable 12
Battery Recharge Timetable 12
Repressurization Technology 12
Operating Procedure 13
Normal Operation Indicators 14
Alarm Indicators 15
Carry Case Configuration Instructions 16
Flying With Your POC 16
Routine Cleaning and Maintenance 17
Service Life 18
Technical Support 18
Disposal 18
Specifications 19
Oxygen Concentration Over Altitude and Flow Rate 19
Accessories 20
Warranty 21
EMC Information 25

2
INTRODUCTION
This Operator’s Manual will provide familiarity with the LifeChoice®
Activox®Portable Oxygen Concentrator (POC) model XYC100B-P4L
and its accessories. Be sure to read all of the enclosed information in its
entirety before using the device.
The device is an internally powered, Type BF device when powered
by the Internal Battery and a Class II, Type BF device when connected
to the external AC Power Supply, DC Power Supply or rechargeable
External Battery. The essential performance of the device is to
provide oxygen at a volume that remains within tolerance (the
tolerance was defined based on technical judgment from within the
manufacturer’s expertise in this specific medical application). In
addition, the device’s ability to detect certain error conditions (such
as low purity or no breath) and create an alarm is also considered a part
of essential performance.
APPLICATION/INDICATIONS FOR USE
This manual applies to the LifeChoice Activox POC XYC100B-P4L.
INDICATIONS FOR USE: The LifeChoice Activox Oxygen Concentrator
is used on a prescriptive basis by adult patients who are diagnosed as
requiring supplemental oxygen. This oxygen concentrator will
provide supplemental, high concentration oxygen to these patients. It is
not life-supporting nor life-sustaining. It may be used continuously in a
home, institution or travel environment. The LifeChoice Activox is also
portable.
This device should be used only when prescribed by a physician.

3
WARNINGS
SYMBOL DESCRIPTIONS
Symbol Description Symbol Description Symbol Description
Caution
Consult
instructions for
use
No smoking
No open flame No oil or grease Do not
disassemble
Temperature
limit
Humidity
limitation Keep dry
This side up Fragile, handle
with care
Compliant with
WEEE
Manufacturer Date of
manufacture
Class II
equipment
Type BF applied
part
Device that
has conductive
contact with
patient
Catalogue
number
CE Marking
of Conformity
Representative
Gas flow Prescription
only Radio frequency
Rechargeable
battery Portable
Oxygen
Concentrator
Connection
Authorized
representative
in the European
Community
Serial number
1. U.S. Federal law restricts this device to sale by or on the order of a physician.
2. It is the responsibility of the patient and/or provider to make back-up
arrangements for an alternative oxygen supply.
3. Availability of an alternate source of oxygen is required in case of power
outage or mechanical failure.
4. The device is to be operated in the approved carry case provided.
5. The device should be located as to avoid pollutants or flames.
6. Portable and mobile RF communications equipment can affect medical
electrical equipment.
7. The device should not be used adjacent to or stacked with other equipment.
8. When traveling by air, the device and External Battery must be transported
as carry-on (not checked) baggage.
9. The device and External Battery contain lithium-ion batteries that are subject
to special shipping regulations. If shipping either the device or External
Battery, notify the shipper that the shipment will contain lithium-ion batteries.
10. In the event of a battery’s cell leaking, do not allow the liquid to come in
contact with the skin or eyes. If contact has been made, wash the affected
area with copious amounts of water and seek medical advice.

4
CONTRAINDICATIONS
1. The device is not intended to be life-sustaining or life-supporting.
2. In certain circumstances, oxygen therapy can be hazardous. Please
seek medical advice before using this device.
3. The device is designed to provide a flow of high purity oxygen
up to 4 LPMeq pulse. The device should only be used by patients
prescribed oxygen therapy within this range.
4. As the device will alarm through audio and visual indicators, patients
who are unable to communicate discomfort, hear, see and/or
understand the alarms may require additional monitoring.
Inova Labs Inc. assumes no liability for persons choosing not to
adhere to manufacturer’s recommendations. Failure to adhere to the
statements below may impair performance of the device and will void
all warranties.
1. DO NOT use oil, grease or petroleum-based products on or near
the device as the use of such products may damage the electronic
components of the device.
2. DO NOT use power supplies or accessories other than those that
came with the device as the use of non-specified accessories may
impair performance.
3. DO NOT allow smoking or open flames within 10 ft. (3 m) of the device
as the device produces enriched oxygen gas which accelerates
combustion.
4. DO NOT operate the device in the accessory bag or any other
enclosed bag as improper ventilation will impair performance.
5. DO NOT submerge or expose the device to liquids as it may
damage the electronic components of the device.
6. DO NOT operate or expose the device to temperatures and humidity
levels outside of the specified operational environment conditions listed
in the Specifications section on page 19. Extreme temperatures and
humidity levels may damage the device.
7. DO NOT press the Control Panel buttons or screen with any hard,
sharp and/or small object as it may damage the surface.
8. DO NOT dismantle, open or shred secondary cells or batteries.
9. DO NOT expose cells or batteries to heat or fire and avoid storage in
direct sunlight.
ADVERSE EVENTS/HAZARDS
5
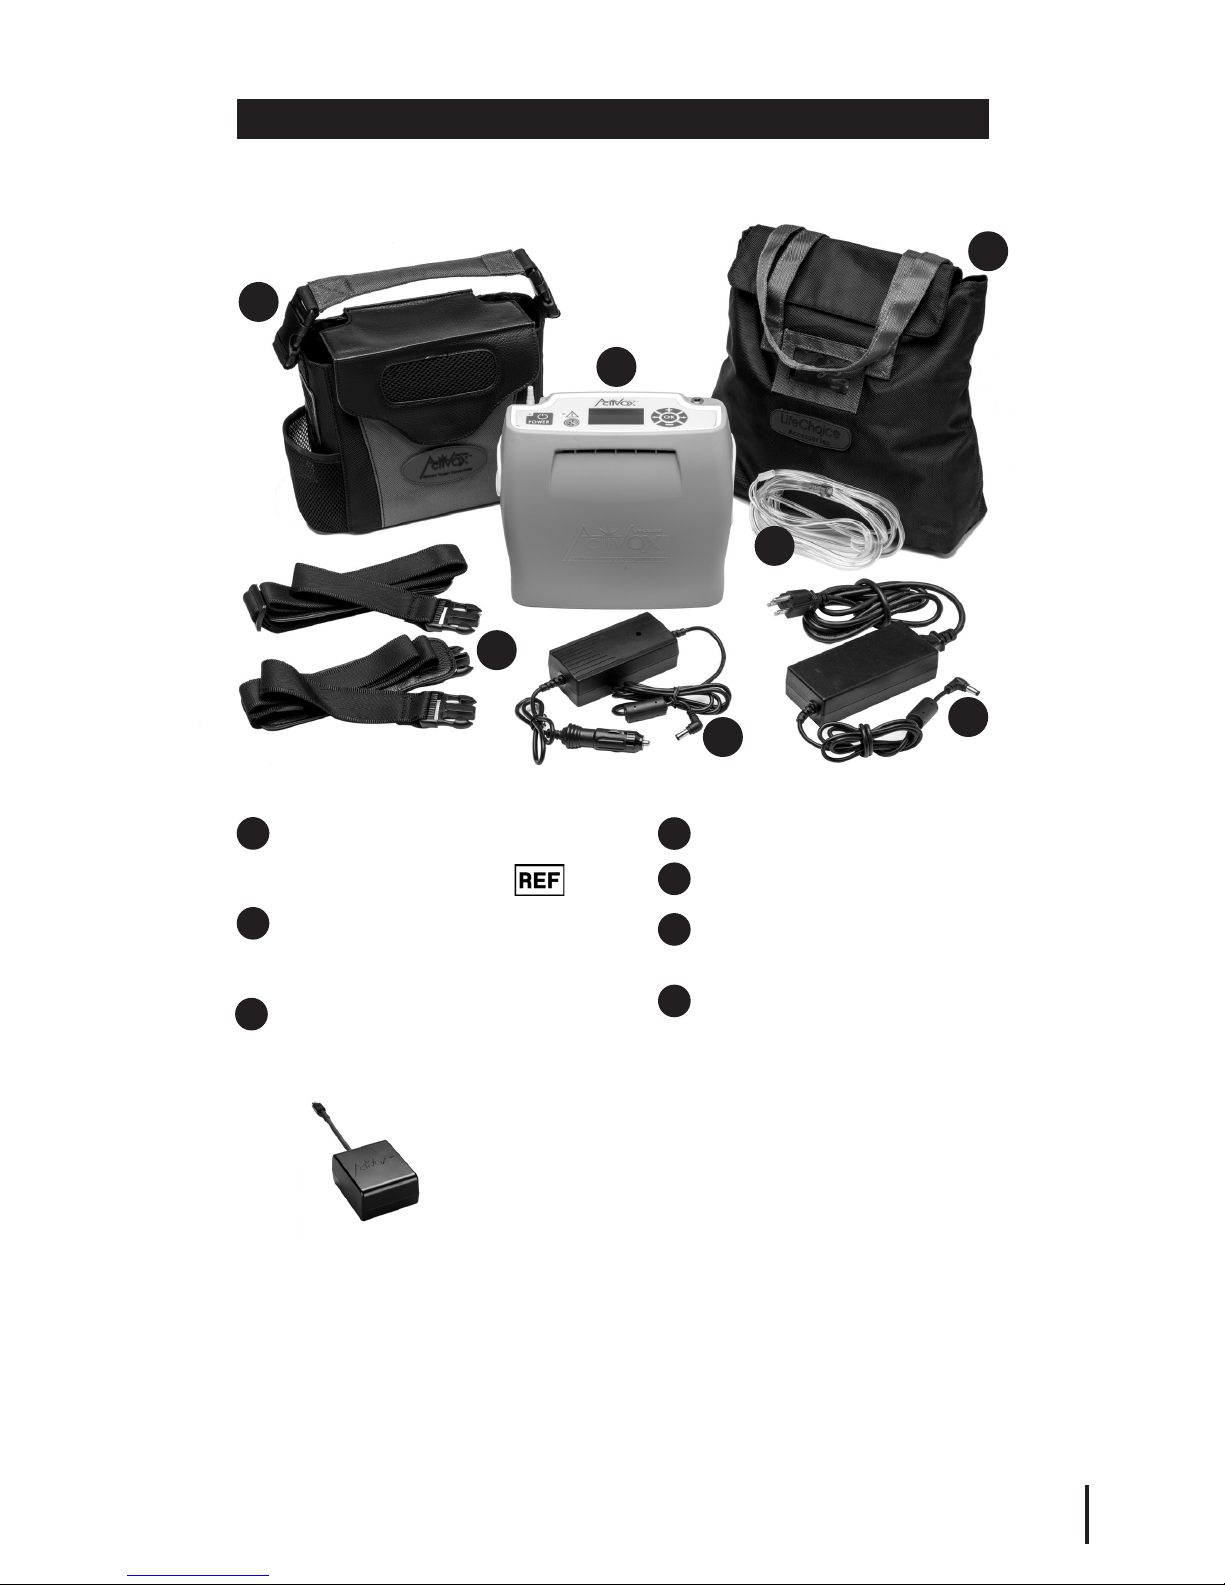
STANDARD PACKAGE CONTENTS
DC Power Supply
AC Power Supply
Standard 7-Foot (2-meter)
Single Lumen Nasal
Cannula*
Accessory Bag
LifeChoice Activox 4L POC
Model identified on device and
packaging labels. See .
4-Way Carry Case
Use as a backpack, shoulder bag,
waist pack or briefcase
Adjustable Straps
For use with 4-Way Carry Case
7
1
2
5
6
7
3
4
1
2
5
4
6
3
An optional External Battery (not included
in the Standard Package) is available for
purchase which provides up to 4.75 hours of
additional battery time.
*Nasal cannula may not be included. Based on international requirements.See
your doctor for compatibility of other accessories (CPAP, BiPAP, etc.).

Alarm Indicator: A red LED will illuminate and an audible signal (tone)
will sound if there is a change in operating status or a condition occurs
that may need response (alarm).
Display Screen: Displays operational indicators. (Reference Display
Screen diagram on page 7.)
Mute Button: Disables audible alarm signals during operation. If an
alarm has been muted, the Mute symbol will appear on the Display
Screen. (Reference Display Screen diagram on page 7.)
CAUTION: Please use the Mute function appropriately as it silences
important audio signals regarding the status of the device.
Navigation Controls: The Plus, Minus, Right Arrow, Left Arrow and OK
buttons enable navigation within operating menus.
Plus/Minus Buttons: Adjust the Pulse Setting (1, 2, 3 or 4 LPMeq).
OK Button: Press once to illuminate the screen. Press and hold
down to display the serial number and hours of operation.
Right/Left Arrow Buttons: Press once to illuminate the screen.
Service personnel will also use these buttons to access maintenance
menus for troubleshooting.
Power Button: To turn on, briefly press the Power Button. To turn off,
press and hold down the Power Button until you hear a tone.
Power Indicator: A green LED will illuminate when the POC is turned
on and in use.
6
Control Panel
USER CONTROLS
Power Indicator
Power Button
Alarm Indicator Navigation Controls
Mute Button Display Screen
4

7
Mute Symbol
INT and EXT
Battery Bars
Flow Setting
Level
Auto Mode Setting
Message Field
Auto Mode Setting: There are two inhalation sensitivity modes on
the device: Active and Rest, which automatically adjust based on your
breathing patterns. The activated Auto Mode setting will appear on the
display.
External Power Symbol: This symbol is displayed only when the unit
is connected to an external power supply (AC or DC).
Flow Setting Level: Represents the selected Pulse Setting (1, 2, 3 or 4
LPMeq). Use the Plus and Minus Buttons to adjust the Pulse Setting up
or down.
INT and EXT Battery Bars: Represent the charging level of the Internal
(INT) and External (EXT) Batteries.
Message Field: Displays the title of an alarm if activated. (Reference
Alarm Indicators section on page 15.)
Mute Symbol: Appears only when the Mute Button has been pressed.
Operating Status Field: This field will indicate if the device is
“Running” or “Charging” the INT or EXT Battery. When the battery is
fully charged, “Charging INT” or “Charging EXT” will disappear from
the display.
PULSE-WAVE®Breath Detection Symbol: Appears when a breath is
detected and the device delivers a pulse of oxygen.
Display Screen
PULSE-WAVE™Breath
Detection Symbol
Operating Status
Field
External
Power Symbol
Each Battery Bar is divided into 4 segments
that represent 25% charge levels. As the
charge level of the device increases, more
segments will appear until full.
100%
75%
50%
25%
4

8
Fan Inlet Vent
Cannula
Nozzle Fitting
Fan Outlet
Vent
External
Battery Port
Cannula Nozzle Fitting: Connect the nasal cannula to this fitting at the top
of the device.
Charger Port: Connect the AC or DC Power Supply to this port on the
device.
Control Panel: All user controls are located on this panel. (Reference User
Controls section on page 6 for details.)
External Battery Port: Connect the External Battery, if purchased, to this
port. The flat end of the External Battery plug should be facing upwards
when plugging into the port on the device.
Fan Inlet Vent: Cooling air is drawn in through this opening.
Fan Outlet Vent: Processed air is exhausted through this opening.
Nasal Cannula: A standard single lumen nasal cannula or equivalent must
be used with the device to provide oxygen from the concentrator.†The
maximum length recommended for use is 7-feet (2-meter). For a replacement
cannula, please contact your local medical equipment provider. Follow
cleaning and care instructions provided with the nasal cannula.
CAUTION: Use of some accessories and/or service equipment not specified
for use with this oxygen concentrator may impair the performance.
† Nasal cannula may not be included. Based on international requirements. See your doctor for
compatibility of other accessories (CPAP, BiPAP, etc.).
PART NAMES
Control Panel
Charger Port

9
OPERATING INSTRUCTIONS
The LifeChoice Activox POC must be operated and stored in its carry case
at all times.
BEFORE FIRST USE:
1. Fully charge the device. It can take up to 4 hours to reach a full
charge on the Internal Battery. Begin charging by connecting
the AC Power Supply to the Charger Port on the device and an
electrical outlet.
2. Verify that the INT Battery Bar, the External Power Symbol and the
message “Charging INT” appear on the display. This indicates that
the system recognizes the external power source and is charging the
Internal Battery.
If an External Battery was purchased, connect it to the External
Battery Port. By design, the External Battery will begin charging after
the Internal Battery has reached a full charge. When connected, the
External Battery Bar, the External Power Symbol and the message
“Charging EXT” appear on the display. It can take up to 2 hours to
fully charge the External Battery.
CAUTION: Never use an external battery that is not authorized by
Inova Labs Inc.
POWERING YOUR POC
The device can be powered from four different sources: (1) Internal
Battery, (2) AC Power Supply, (3) DC Power Supply, and (4) External
Battery (optional, sold separately from the Standard Package).
1. Internal Battery: A rechargeable internal battery is located within
each device. When the device is being powered from the Internal
Battery, the display will read “Running INT” and the INT Battery
Bar will appear.
A fully charged Internal Battery
can provide up to 10.25 hours of
runtime depending on breath rate.
(Reference Battery Life Timetable
on page 12.)
If not connected to the AC or DC Power Supply, the Internal
Battery will slowly discharge over time even when not in use.
Always check the battery level prior to use to ensure adequate charge
level.
The Internal Battery is maintenance-free and can only be replaced at
the factory or by an authorized repair facility.
4

2. AC Power Supply: This power supply allows the device to be powered
and charged from a standard 100-240 VAC,
50/60 Hz electrical outlet. When using this
option, power from the AC outlet powers
the unit and recharges the Internal and/
or External Battery. The External Power
symbol will also appear on the display
screen when connected to this power
supply.
NOTE: Using an AC Power Supply that is not specified by Inova Labs
may damage the device and will void all warranties.
3. DC Power Supply: This power supply can be connected from the device
to a vehicle’s (car, boat, motor home, etc.)
standard 12 VDC outlet. When the system
is connected to this option, power from the
vehicle battery powers the device and
recharges the Internal and/or External
Battery. The External Power symbol will
also appear on the display screen when
connected to this power supply.
NOTE: The 12 VDC outlets in some vehicles will not provide sufficient
current to operate the device and charge the battery at the same time.
Verify that a DC outlet can provide at least 10 amps at 12 VDC. Car
auxiliary power varies significantly; therefore, the rate of charging will
vary. It is recommended that the vehicle be turned on before plugging
the DC Power Supply into the device.
4. External Battery: This power supply connects directly into the device’s
External Battery Port. When the system is connected
to this option, the display will read “Running EXT”
and the EXT Battery Bar will appear. A fully charged
External Battery can provide up to 4.75 additional
hours of power to the device depending on breath
rate.
The External Battery is maintenance-free
and replacements can be purchased
from your equipment provider.
10
OPERATING
INSTRUCTIONS
continued
4
11
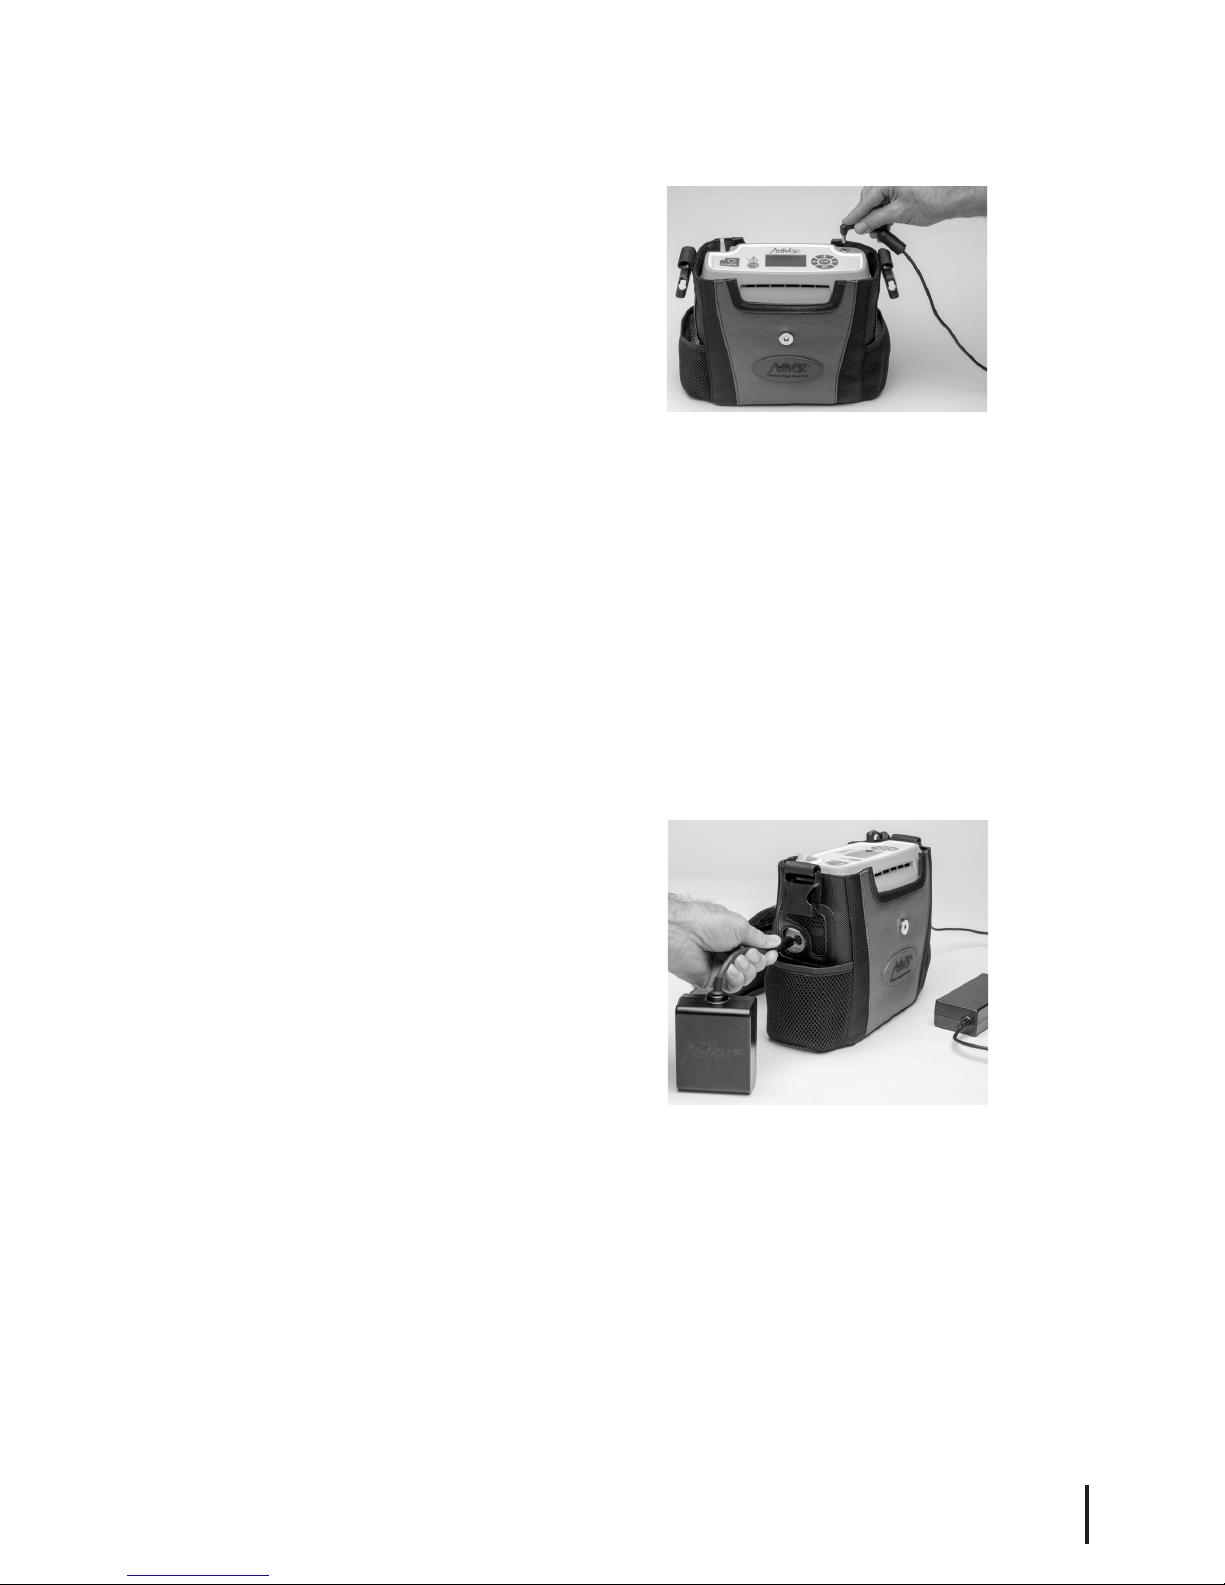
CHARGING YOUR POC
INTERNAL BATTERY CHARGING
1. Connect the device to either
an AC or DC Power Supply and
corresponding charger to a suitable
outlet.
2. Verify that the INT Battery Bar, the
External Power Symbol and the
message “Charging INT” appear on
the screen.
3. It can take a fully discharged Internal Battery up to 4 hours to reach a
full charge. Refer to the INT Battery Bar on the display screen to check
the charging progress. Each segment in the Battery Bar represents
25%. When the Internal Battery is fully charged, the message
“Charging INT” will disappear from the display screen.
NOTE: It is recommended to recharge the Internal Battery,
even if only partially depleted as often as possible. The Internal
Battery cannot be overcharged, so it is okay to leave the device
plugged into an external power supply continuously.
EXTERNAL BATTERY CHARGING
1. Connect the External Battery to
the External Battery Port. The flat
end of the External Battery plug
should be facing upwards when
plugging into the port on the
device. Then connect the device to
either an AC or DC Power Supply
and corresponding charger to a
suitable outlet. To prolong battery
life and maintain communication
with the POC, it is recommended
to charge the External Battery when
you charge the Internal Battery.
2. Verify that the EXT Battery Bar, the External Power Symbol and the
message “Charging EXT” appear on the display.
NOTE: By design, the Internal Battery will charge first. The External
Battery will not start charging until the Internal Battery reaches a full
charge.
NOTE: If the EXT LED doesn’t illuminate after the Internal Battery
charge is complete, the External Battery isn’t communicating with the
POC. To enable communication: a) Power off the POC and connect
the POC to the AC or DC charger. b) Use two fingers to push and hold
down both the “MUTE” and “OK” buttons at the same time; When the
OPERATING
INSTRUCTIONS
continued

“BATTERY CHECK” LEDs start flashing, immediately release the buttons.
The “BATTERY CHECK” LEDs will flash in sequence as the POC makes
communication attempts with the External Battery. If communication
is established, the EXT LED will illuminate solid green and the External
Battery will begin charging. If no communication is established, the LEDs
will flash for two minutes and then stop flashing. If this occurs or this
procedure doesn’t work for you, please call Inova Labs Customer Care at
512.617.1744 for assistance.
3. It can take up to 2 hours for a fully discharged External Battery to reach
a full charge. Refer to the EXT Battery Bar on the display screen to check
the charging progress. Each segment in the Battery Bar represents 25%.
When the External Battery is fully charged, the message “Charging EXT”
will disappear from the display screen.
NOTE: By design, the External Battery will power the device when
plugged in. Once the External Battery depletes, the device will switch
to Internal Battery power. If both the Internal and External batteries
are fully discharged, it can take up to 6 hours to achieve a full charge
in both batteries.
In the event the power supply is interrupted to the device when the AC or DC
Power Supply is connected, a two-second audible alarm will sound and the
compressors will transition from external to internal power.
NOTE: If the POC is powered off and either the AC or DC Power
Supply is connected, the internal fans will continue to operate until the
temperature inside the unit is sufficiently cooled.
12
OPERATING
INSTRUCTIONS
continued
* Hours are approximate and based on breaths per minute. As batteries age, charge times and
runtimes may change.
BATTERY LIFE TIMETABLE
Battery Type
Pulse Setting
1 LPMeq 2 LPMeq 3 LPMeq 4 LPMeq
Internal Battery* 10.25 Hours 8.25 Hours 5 Hours 4 Hours
External Battery* 4.75 Hours 3.75 Hours 2.75 Hours 2.25 Hours
BATTERY RECHARGE TIMETABLE
Battery Type Hours
Internal Battery* 4
External Battery* 2

13
OPERATING PROCEDURE
1. Position the device so that the Fan Inlet Vent and Fan Outlet Vent are
not obstructed and in a well-ventilated space.
2. Briefly press the Power Button to
turn the device on. The Display
Screen and green Power Indicator
will illuminate. This indicates that
the device is powered on, ready for
use, and the settings may now be
changed.
NOTE: After powering on the device, allow 3 minutes for the system
to reach stated performance. If used routinely, the Pulse Setting last
used will appear on the display after powering on.
3. Use the Plus/Minus Buttons to select
the Pulse Setting prescribed by your
doctor (1, 2, 3 or 4). To change a
setting at any time, use the Plus and
Minus buttons.
4.Place the nasal cannula onto the Cannula Nozzle Fitting on the
device and the cannula prongs into your nasal passages and
breathe normally. When the device senses inhalation, oxygen is
supplied through the cannula. The duration and size of the pulse
is dependent upon the Pulse Setting selected.
NOTE: The device utilizes PULSE-WAVE Delivery which delivers
oxygen congruent with your inhalation rate. Because this type of
delivery is very gentle, you may not feel the pulse of oxygen.
To verify that oxygen is being delivered, reference the symbol
next to your selected Pulse Setting on the display. This symbol will
flash every time a breath is detected.
5. Check to make sure the batteries are fully
charged before venturing out with the
device.
6. To turn the device off, press and hold the
Power Button until you hear an audible tone.
REPRESSURIZATION TECHNOLOGY
If the unit has not been used for a period of one or more days, it will
automatically re-pressurize itself. During this time, you may hear the
compressors running for a few seconds. There is no action required
on your part, this feature is intended to prolong the life of the device.

14
NORMAL OPERATION INDICATORS
During normal operation, the Control Panel and Display Screen
should appear as described below:
OPERATION DESCRIPTION
Active or Rest Mode
Activitated
The word “Active Mode” or “Rest Mode” will appear next to your selected
pulse setting. If “Active Mode” is displayed it means your breath rate is
typical for an active user. If “Rest Mode” is displayed it means your breath
rate is slower than your normal active breath rate.
Alarm Muted
The audible alarm signal will be muted and the Mute symbol will
display on screen. The red alarm LED will remain illuminated on the
Control Panel and the alarm title will remain on the display.
Breath Detected
The PULSE-WAVE Breath Detection Symbol will flash as you breathe.
This is confirmation the device is delivering a dose of oxygen with each
inhaled breath.
If you stop breathing through the nasal cannula (mouth breathing),
the unit will begin delivering doses of oxygen automatically without
the PULSE-WAVE symbol. After 75 seconds, the unit will provide a
“NO BREATH DETECTED” alarm and will continue to automatically
provide doses of oxygen until normal breathing resumes. When the
unit detects normal breathing, the “NO BREATH DETECTED” alarm
will cease and the PULSE-WAVE symbol will indicate detection of your
breath.
Charging Status
The following messages will appear on the display depending on the
battery being used or charged.
“Charging INT” means the Internal Battery is charging.
“Charging EXT” means the External Battery is charging.
“Running INT” means the Internal Battery is in use.
“Running EXT” means the External Battery is in use.
NOTE: By design, the device will preserve the Internal Battery charge as
long as possible. This means that the External Battery will deplete before
the Internal Battery and the Internal Battery will charge before the External
Battery when connected.
Power Interruption
The device will emit a two second audible tone if the AC or DC Power is
interrupted or intentionally unplugged. The unit will automatically switch
to battery operation. If the power was not intentionally removed, check
all connections between the unit and the power source to ensure all are
secure and firmly plugged in. If the power indicator icon does not show
on the display, switch to another power source (AC or DC) or source of
oxygen and contact your equipment provider.
Powered On The Power Indicator is illuminated green and the Display Screen is on.
Setting Selected “1”, “2”, “3” or “4” will appear under “Setting” on the Display Screen.

15
ALARM INDICATORS
The device will alarm to inform you of conditions that may require
your attention or action. Each alarm will trigger:
• A repeating audible tone (1 second ON, 2 seconds OFF) sounds
• Illuminated red Alarm Indicator on the Control Panel
• Alarm title displayed in the Message Field (unless noted
differently below)
ALARM TITLE DESCRIPTION & CORRECTIVE ACTION
Low Battery
This alarm is triggered when the Internal Battery has approximately
less than 15% charge remaining. Connect the device to the AC or DC
Power Supply. Ensure all your charger connections are secure and the
message “Charging INT” and the External Power symbol appear on
the display. The device will begin charging and the alarm should stop.
If the alarm persists, switch to another source of oxygen and call your
equipment provider.
Low Oxygen Purity
This alarm can be triggered when the oxygen purity falls below 82%.
This can occur if you are breathing at a high breath rate that exceeds
the oxygen production capacity of the device or if the device requires
sieve bed replacement. Take slow deep breaths until your breath rate
recovers.This allows the device time to restore purity levels. If the alarm
stops, the device is safe to use. If the alarm persists for an extended
period of time after you have recovered your breath, change to another
source of oxygen and contact your equipment provider.
No Breath Detected
This alarm can be triggered by a kinked cannula, unattached cannula
or shallow and/or mouth breathing. Check the cannula connection and
hose for kinks and fix if found. If the cannula was not impaired and is also
attached properly, the alarm could be caused by shallow and/or mouth
breathing. Breathe deeply through your nasal cannula and the alarm
should stop. If the alarm persists, switch to another source of oxygen and
contact your equipment provider.
High Temperature
This alarm is triggered when the internal temperature of the device
exceeds 140°F (63°C). When this alarm is activated, the device will
power off and the audible alarm will cease. The red Alarm Indicator and
the alarm title remain until the device sufficiently cools. Move the device
away from any potential heat source and change to another source of
oxygen. After allowing sufficient time to cool, turn on the device. If the
alarm persists, continue to use another source of oxygen and contact
your equipment provider.
Reset Required
This alarm can be triggered when the device experiences a sudden
spike in current from an external power supply. The Display Screen
will be blank when this alarm is activated. Follow the Electronic Reset
directions on page 17 to reset the device to default factory settings. If the
alarm continues immediately after the reset, switch to another source of
oxygen and contact your equipment provider.

16
CARRY CASE CONFIGURATION INSTRUCTIONS
The Carry Case can be configured as a shoulder bag, backpack,
waist pack or briefcase using the adjustable straps and/or briefcase
handle. Below are instructions for configuring the backpack.
BACKPACK
1. Adjust each strap to make sure they are the same length.
2. Unfold the snaps that are tucked into the mesh pocket on the
backside of the Carry Case.
3. Attach one strap to the top left and bottom right snaps on the Carry
Case making sure the shoulder pad is near the top clip.
4. Attach the second strap to the top right and bottom left snaps on the
Carry Case making sure the shoulder strap is near the top clip.
5. Form an “X” with the straps at the top and slide arms into the configuration
as if putting on a backpack. Assistance may be required with this step.
6. Adjust straps as needed. Assistance may be required with this step.
The LifeChoice Activox POC is approved by the FAA for use on
commercial aircraft. The FAA-approved POC list shows “Inova Labs
LifeChoice Activox.” This approval is listed as a part of the labeling
on the bottom panel of the device. As every airline has specific
information required for traveling with oxygen you should review
your airline’s specific requirements in addition to following the
instructions below.
1. Two weeks prior to your trip, verify that the Internal and, if
purchased, External Battery runtimes will provide you with enough
battery life for the trip. Typically, airlines require you to have
enough battery life for 1.5 times the flying duration.
2. Fully charge the Internal and, if purchased, External Battery
within 24 hours of a trip. Keep the device connected to a power
supply until you leave.
3. Pack all required accessories (AC and DC Power Supplies,
Operator’s Manual, small extension cord, etc.)
4. Download and complete the “Physician Statement” from
www.InovaLabs.com. Bring the signed and completed Physician
Statement to the airport and be ready to provide it to the airline if
requested.
FLYING WITH YOUR POC
17
ROUTINE CLEANING AND MAINTENANCE
The device was designed to minimize the amount of routine
maintenance that is required. There are no end-user repairable parts.
Aside from the preventative maintenance outlined below, all other
maintenance must be performed by qualified service personnel.
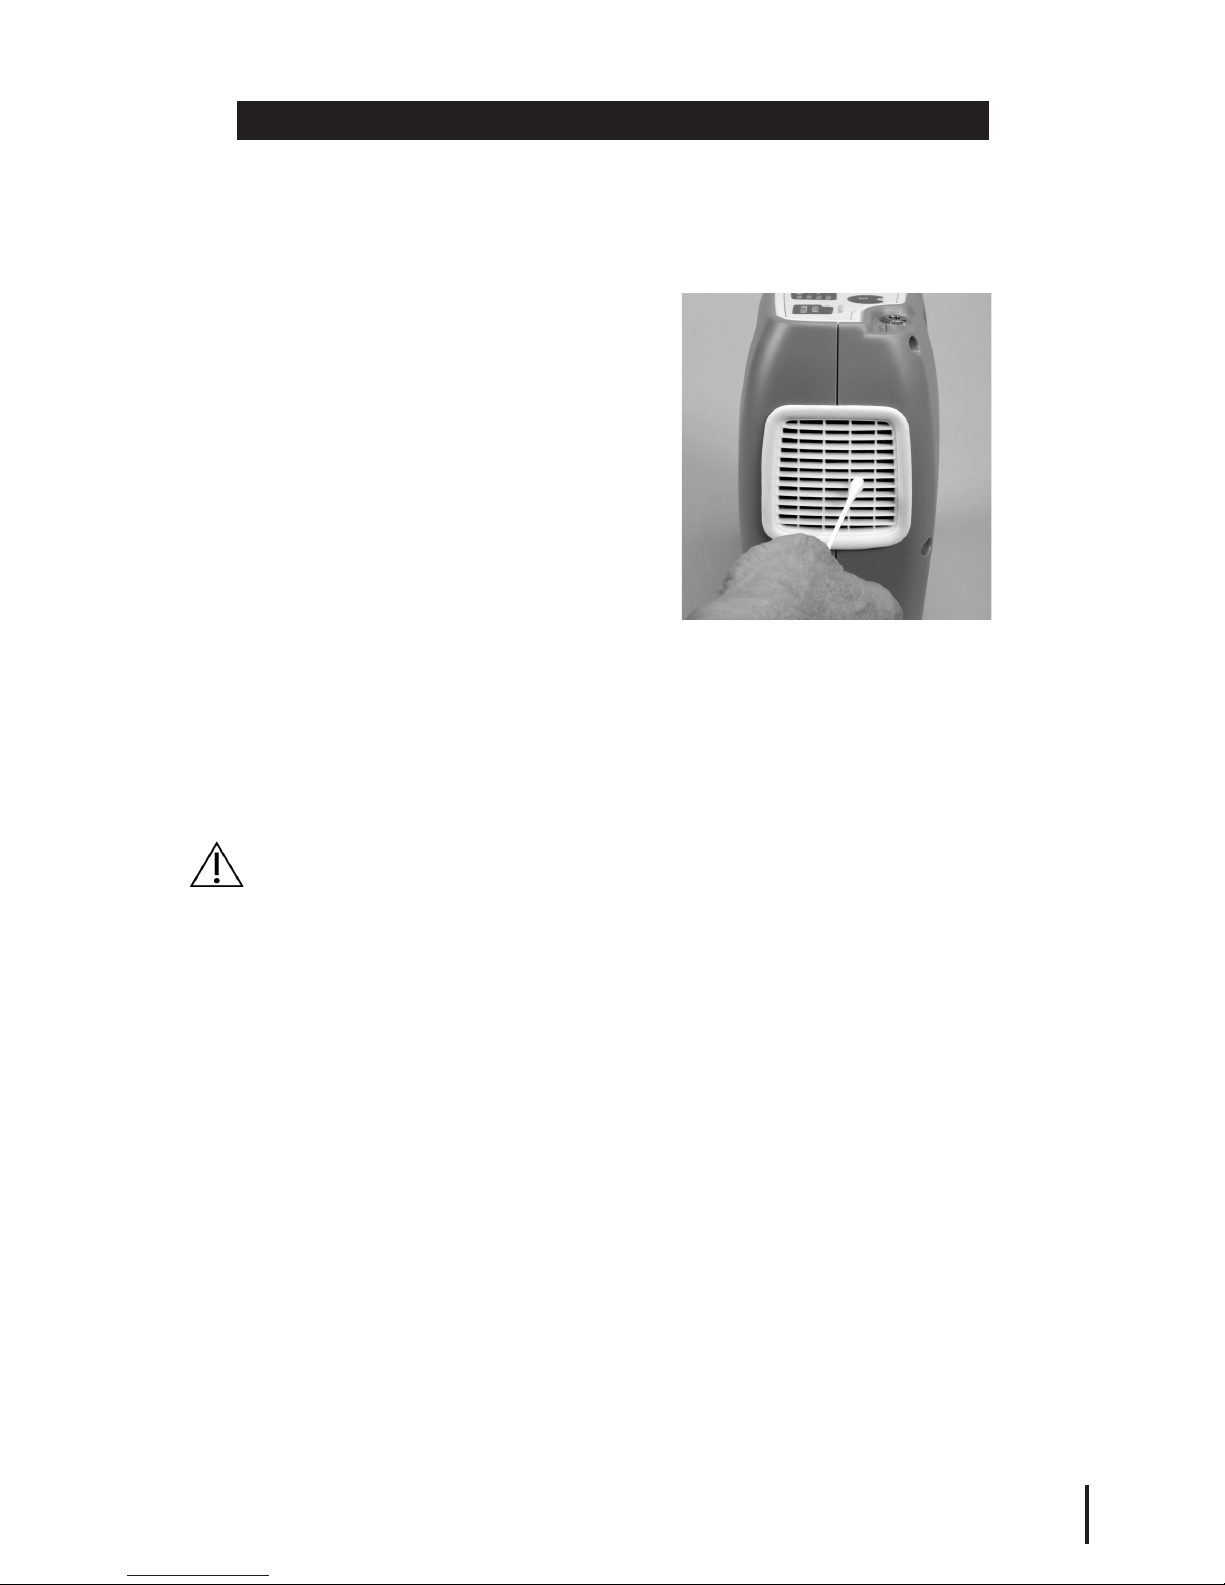
Fan Inlet Vent Cleaning: There is
one inlet vent located on the right
side (facing the unit) of the device.
The carrying case for the unit has
mesh material corresponding to the
location of the Fan Inlet Vent. You
should visually check to ensure that
there is no buildup of lint, hair or
other materials that could obstruct
the flow of air into the unit’s fan inlet
vent. At least once a month inspect
the grille of the intake vent and if it
appears dirty, use a dry cotton swab (Q-Tip or similar) to clean it.
Device and Carrying Case Cleaning: If it is necessary to clean the
deviceand/orcarryingcase,useonly warmwaterand amildliquid dish
detergent. Dampen a cloth in the solution and carefully wipe the
outside surfaces of the device and/or carrying case. Allow sufficient
time to dry before placing the device back in the case.
CAUTION: DO NOT use alcohol, solvents, polishes or any oily
substances as they may be flammable.
Nasal Cannula Inspection: At least once a week, visually inspect
the nasal cannula. Make sure there are no kinks or obstructions.
Replace as needed with a standard 7-foot. (2-meter) single lumen
nasal cannula from your equipment provider.
Reserve Oxygen Supply: Your local equipment provider should
provide or suggest an alternative source of supplemental oxygen
therapy in case there is a mechanical failure or power outage.
Electronic Reset: If the Display Screen does not appear as described
on page 7 or the Reset Required alarm is activated, follow the steps
below to reset the device to default factory settings:
1. Turn the device off.
2. After the device has turned off, press and hold the Power button
until the Greeting Screen stops flashing and the display turns
blank. Once the display is blank, release the Power button.
3. Allow approximately 15 seconds for the device to cycle through a
short sequence. During this time the device will power on and off.
4. Power the device back on. Verify that the Display Screen is
appearing as described on page 7. If this reset does not resolve
the issue, contact your equipment provider.

18
DISPOSAL
Inova Labs expects end users to dispose of the device in an
environmentally friendly way and in accordance with local laws and
regulations. Electrical and electronic equipment is labeled with the
crossed-out wheeled bin symbol indicating that the equipment should
be disposed of by the end user separate from other types of waste.
The device contains lithium-ion batteries, and end users should
contact Inova Labs or their local distributor for disposal, collection
and recycling options and terms and conditions for their country.
In 2002, the European Union introduced the Directive on Waste
Electrical and Electronic Equipment (WEEE). The main aim of the
Directive is to ensure that WEEE is collected and treated separately.
WEEE items may contain hazardous substances that should not end
up in the human environment and can have adverse effects on it if
they do.
TECHNICAL SUPPORT
Please contact the local medical equipment company that provided or
sold you the device for any technical or emergency support.
If any additional information is needed, Inova Labs’ Customer
Care Team can be reached Monday-Friday, 7:00AM-7:00PM CST at
1.512.617.1744 or toll-free at 1.800.220.0977.
SERVICE LIFE
The service life of this device and it’s major components is dependent
on operating and environmental conditions. Daily use of the device
may actually extend the replacement time for some of these items
(i.e., sieve bed). It is recommended that the device be powered on
and run for a few hours, if it is has not been used on a daily basis.
Should your device indicate an alarm that requires you to contact your
equipment provider, the provider may determine the device must be
sent in for service.
The manufacturer recommends that you have an alternative source of
supplemental oxygen in the event of power outage, alarm condition or
mechanical failure. Although the Activox concentrator will operate 24
hours/7 days per week, daytime/nighttime, (as long as it is charged/
powered), in order to preserve the life of the POC this type of use
should be limited to situations when you are traveling, on vacation, or
other short term situations where your primary oxygen source is not
immediately available.
Other manuals for XYC100B-P4L
1
Table of contents
Other Activox Medical Equipment manuals


Popular Medical Equipment manuals by other brands

Hico Medical Systems
Hico Medical Systems HICO-VARIOTHERM 550 Instructions for use

Speakman
Speakman GRAVITYFLO SE-4400 instructions

Biosite
Biosite Triage MeterPro user guide

Sizewise
Sizewise Bari Rehab Platform 3 Series user manual

Carestream HEALTH
Carestream HEALTH DRX-1 System Hardware user's guide

Belmont
Belmont FMS2000 Service manual


