ACU-RITE 384 User manual

Instruction Manual
SAVE THIS MANUAL FOR FUTURE REFERENCE.
Questions? Contact Customer Support at
(877) 221-1252 or visit www.AcuRite.com.
CONTENTS
Unpacking Instructions ........... 2
Package Contents .................. 2
Product Registration ............... 2
Features enets ensor..... 2
Features enets ispa.... 3
Setup .................................... 4
Sensor Setup ......................... 4
ispa etup ........................ 5
nteiime® oc................... 6
et the ime, ate nits ...... 6
acight ettings................... 6
acement uideines ............. 7
sing the hermometer........... 8
roubeshooting ..................... 9
Care & Maintenance.............10
Repace nteiime
®
atter ..10
pecications........................10
FCC Information ...................10
Customer Support .................11
arrant..............................11
Thermometer
mode

2
ongratuations on our ne AcuRite product. o ensure the best
possibe product performance, pease read this manua in its entiret
and retain it for future reference.
Unpacking Instructions
Remove the protective m that is appied to the screen prior to using this
product. ocate the tab and pee off to remove.
Package Contents
. ispa ith abetop tand
2. Outdoor Sensor
. oer Adapter
. nstruction anua
Features & Benets
4
3
2
1
5
OUTDOOR SENSOR
1. Integrated Hanger
For eas pacement.
2. Wireless Signal Indicator
Fashes hen data is being sent to the
dispa.
3. Battery Compartment
4. A-B-C Switch
ID code that must match display’s A-B-C
switch to ensure units synchronize.
5. Battery Compartment Cover
PRODUCT REGISTRATION
Register onine to receive ear arrant protection
www.AcuRite.com
IMPORTANT R RR
R ARRAN R

3
DISPLAY FRONT
1. Backlight Button
For momentary backlight and dimmer settings.
2. Current Outdoor Temperature
Arrow icon indicates direction temperature
is trending.
3. Sensor Signal Strength
4. HIGH Indicator
Indicates today’s HIGH records are being viewed.
5. LOW Indicator
Indicates today’s LOW records are being viewed.
6.
auto
Icon
Indicates display is in auto-dimming brightness
mode. (see page 6)
7. Day of the Week
8. Date
9. Moon Phase
10. Current Indoor Temperature
Arrow icon indicates direction temperature
is trending.
11. Current Indoor Humidity
Arrow icon indicates direction humidity is trending.
12. Display Low Battery Indicator
13. Intelli-Time® Clock
Automatically updates itself for Daylight
Saving Time.
14. Current Outdoor Humidity
Arrow icon indicates direction humidity is trending.
15. Sensor Low Battery Indicator
DISPLAY BACK
1
6. In
tegrated Hang Hole
For easy wall mounting.
17. A-B-C Switch
ID code that must match sensor’s A-B-C switch to
ensure units synchronize.
18. Battery Compartment
19. Intelli-Time Battery Compartment Cover
20. Plug-in for Power Adapter
21. Button
For setup preferences and viewing HIGH records.
22. SET Button
For setup preferences.
23. Button
For setup preferences and viewing LOW records.
24. Battery Compartment Cover
(not shown)
Features & Benets
16
18
17
19
23
21
20
22
5
6
7
8
9
10
5
11
4
12
13
15
14
4
3
2
1

4
SETUP
Sensor Setup
Set the A-B-C Switch
he A sitch is ocated inside
the batter compartment. t can
be set to A, or . oever,
ou must seect the same etter
choices for both the sensor and
the dispa in order for the units
to snchronize.
Install or Replace Batteries
AcuRite recommends high quait
aaine or ithium batteries in
the outdoor sensor for the best
product performance. eav
dut or rechargeabe batteries
are not recommended.
he sensor requires ithium
batteries in o temperature
conditions. od temperatures
can cause aaine batteries
to function improper. se
ithium batteries in the sensor for
temperatures beo F .
. ide off the batter
compartment cover. ae
note of the A sitch
setting inside the batter
compartment for dispa
setup.
. nsert AA batteries into
the batter compartment, as
shon. Foo the poarit
diagram in the batter
compartment.
. Repace the batter cover.
2
1
1A-B-C Switch
set to match
dispa
2Install Batteries
AA batteries
A B C

5
PLEASE DISPOSE OF OLD OR DEFECTIVE BATTERIES IN AN ENVIRONMENTALLY SAFE
WAY AND IN ACCORDANCE WITH YOUR LOCAL LAWS AND REGULATIONS.
BATTERY SAFETY: Clean the battery contacts and also those of the device prior to battery installation. Remove batteries from equipment which is not to be
used for an extended period of time. Follow the polarity (+/-) diagram in the battery compartment. Promptly remove dead batteries from the device. Dispose of used
batteries properly. Only batteries of the same or equivalent type as recommended are to be used. DO NOT incinerate used batteries. DO NOT dispose of batteries in fire,
as batteries may explode or leak. DO NOT mix old and new batteries or types of batteries (alkaline/standard). DO NOT use rechargeable batteries. DO NOT recharge
non-rechargeable batteries. DO NOT short-circuit the supply terminals.
Display Setup
Set the A-B-C Switch
ocate the A sitch inside
the batter compartment. et
the A sitch to A, or .
ou must seect the same etter
choices for both the dispa and
the sensor in order for the units
to snchronize.
Install or Replace Backup
Batteries optiona
. Remove the batter
compartment cover.
. nsert AAA aaine
batteries into the batter
compartment, as shon.
Foo the poarit
diagram in the batter
compartment.
. Repace the batter cover.
Plug in Power Adapter
For the best performance, pug
in the power adapter as the main
power source for this product.
1
2
RAN atteries are
a bacup poer source to
preserve records in the event of
a power outage. Power adapter
is recommended as the primary
power source to enjoy the full
functionality of this product.
2Install Batteries
AAA batteries
optiona
1A-B-C Switch
Set to match
sensor.
A B C
3
Plug in
Power Adapter
3

6
Intelli-Time®Clock
nteiime products are preprogrammed ith the correct time and date.
nteiime technoog instructs the time and date to set themseves. A ou
need to do is seect our ime one and aight aving ime preferences. he
coc i then automatica set itsef and change for aight aving ime.
Set the Time, Date & Units
ress and reease the button, ocated on the bac of the dispa, to enter
. nce in , the preference ou are current setting i
bin on the dispa.
o adust the current seected ashing item, press and reease the or
buttons press and to fast adust.
o save our adustments, press and reease the button again to adust
the net preference. he preference set order is as foos
aight aving ime N or FF
N A A N A
R
N
ANAR N
ANAR A
ANAR AR
RAR N F or
f ou ive in an area that observes , shoud be set to N, even if it is
not current aight aving ime.
ou i automatica eit if no buttons are pressed for seconds.
nter at an time b pressing the button.
Display Backlight Settings
his eather stations coor dispa features three different ighting settings
igh brightness, edium brightness and o brightness.
sing batter poer aone, the bacight is avaiabe momentari for
seconds b pressing the bacight button.
hen dispa is poered ith the poer adapter, bacight remains on at
brightness. ress bacight button once to dim to brightness press
again to dim to , press a rd time to enter A mode.
AUTO DIM MODE: Automatica adusts dispa brightness based on time of da ear.
AR NR a.m. p.m. brightness
p.m. a.m. brightness
NR AR a.m. p.m. brightness
p.m. a.m. brightness

7
Placement for Maximum Accuracy
AcuRite sensors are sensitive to surrounding environmenta conditions. roper
pacement of both the dispa and outdoor sensor are critica to the accurac
and performance of this product.
Display Placement
ace the dispa in a dr area free of dirt and dust. ispa stands
upright for tabetop use or is amountabe
Outdoor Sensor Placement
ensor must be paced outside to observe outdoor conditions. ensor
is ater resistant and is designed for genera outdoor use, hoever,
to etend its ife pace the sensor in an area protected from direct
eather eements.
ang the sensor using the integrated hang hoe or hanger, or b
using string not incuded to hang it from a suitabe ocation, ie a
e covered tree branch. he best ocation is to feet above the
ground ith permanent shade and pent of fresh air to circuate
around the sensor.
Important Placement Guidelines
o ensure accurate temperature measurement, pace units out of direct
sunight and aa from an heat sources or vents.
ispa and outdoor sensor must be ithin ft m of each other.
o maimize ireess range, pace units aa from arge metaic items, thic
as, meta surfaces, or other obects that ma imit ireess communication.
o prevent ireess interference, pace both units at east ft . m aa
from eectronic devices , computer, microave, radio, etc..
(100 meters)
(330 feet maximum)
Setup is Complete
he sensor i no snchronize ith the dispa. t ma tae a fe minutes for
snchronization to compete. ease refer to the troubeshooting section of this
manua if anthing appears to be functioning improper.

8
Using the Thermometer
High & Low Records
odas high and o records are dispaed for indoor and outdoor
temperature and humidit. odas records automatica cear at am
midnight ever da. ie todas high or o records b pressing the or
buttons. ress and reease again to vie current readings.
o manua cear a of todas recorded vaues, press and reease the
button to vie o records, then press and the button for
seconds. ashes i dispa to conrm ou have ceared the records.
o manua cear a of todas recorded vaues, press and reease the
button to vie high records, then press and the button for
seconds. ashes i dispa to conrm ou have ceared the records.
Moon Phase
rac the phases of the moon, conveed through simpe unar phase icons
OPERATION

9
Troubleshooting
No outdoor sensor
reception
no bars
f the ireess signa indicator shos no bars
Reocate the dispa andor the outdoor sensor. he
units must be ithin ft m of each other.
ae sure both units are paced at east feet
. m aa from eectronics that ma interfere ith
the ireess communication such as s, microaves,
computers, etc.
se standard aaine batteries or ithium batteries in
sensor hen temperature is beo F. o not
use heav dut or rechargeabe batteries. N t
ma tae up to a fe minutes for dispa and sensor
to snchronize after batteries are repaced.
Display screen
not working
hec that the batteries are instaed correct.
atteries ma need to be repaced.
Outdoor
temperature
is ashing or
showing dashes
Fashing of the outdoor temperature is genera an
indication of ireess interference.
. ring both the sensor and dispa indoors and
remove at east one batter from each.
. ae sure the A sitch on both units match.
. Reinsta the batteries in the outdoor sensor.
. Reinsta the batteries in the dispa.
. et the units sit ithin a coupe feet of each other
for a few minutes to gain a strong connection.
Inaccurate
temperature
or humidity
ae sure both the dispa and sensor are paced out
of direct sunight and aa from an heat sources or
vents (see page 7).
ae sure both units are positioned aa from
moisture sources (see page 7).
If your AcuRite product does not operate properly after trying
the troubleshooting steps, visit www.AcuRite.com or call
(877) 221-1252 for assistance.

10
CR2032
3V
Care & Maintenance
Display Care ean ith a soft, damp coth. o not use caustic ceaners or
abrasives. eep aa from dust, dirt and moisture. ean ventiation ports
reguar ith a gente puff of air.
Outdoor Sensor Care ean ith a soft damp coth. o not use caustic
ceaners or abrasives.
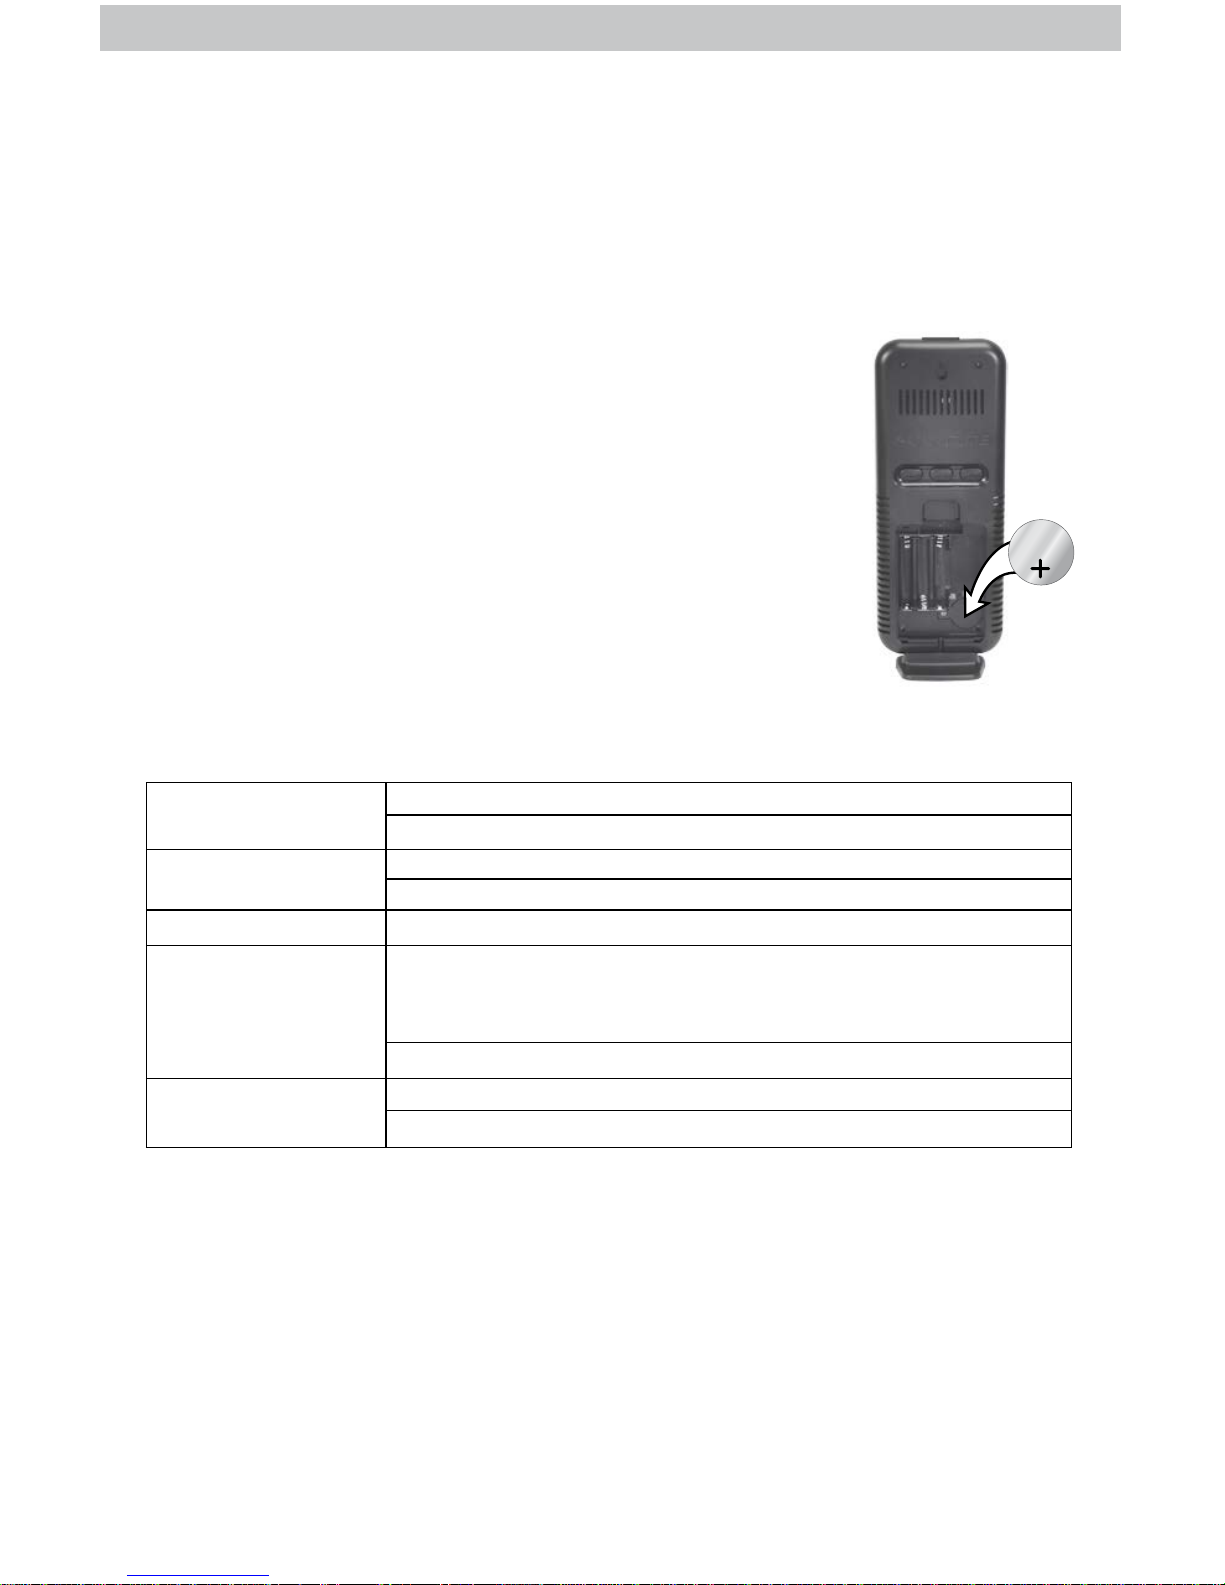
Replace Intelli-Time Battery
nteiime technoog is poered b a preinstaed coince
batter that stores the time and date settings. he batter has
a shef ife of severa ears. ime and date i need to be
entered after repacing nteiime batter.
o repace the nteiime batter
. ocate the coin ce batter compartment door in the
batter compartment of the dispa. nscre and remove
the compartment cover.
. nsert R coin ce batter into the batter
compartment, as shon. nsta batter ith positive
termina facing .
. cre in the batter cover.
Specications
TEMPERATURE RANGE utdoor ºF to 158ºF ºC to 70ºC
ndoor ºF to 122ºF ºC to 50ºC
HUMIDITY RANGE utdoor to
ndoor to
WIRELESS RANGE ft m depending on home construction materias
POWER
DATA REPORTING utdoor seconds
ndoor seconds
ensor AA aaine or ithium batteries
ispa , mA poer adapter
AAA aaine batteries optiona
R coin ce batter
FCC Information
his device compies ith part of F rues. peration is subect to the fooing to conditions
his device ma N cause harmfu interference, and
his device must accept an interference received, incuding interference that ma cause undesired operation.
ARNN hanges or modications to this unit not epress approved b the part responsibe for compiance coud void the users
authorit to operate the equipment.
N his equipment has been tested and found to comp ith the imits for a ass digita device, pursuant to art of the F rues.
hese imits are designed to provide reasonabe protection against harmfu interference in a residentia instaation. his equipment generates,
uses and can radiate radio frequenc energ and, if not instaed and used in accordance ith the instructions, ma cause harmfu interference
to radio communications. oever, there is no guarantee that interference i not occur in a particuar instaation. f this equipment does
cause harmfu interference to radio or teevision reception, hich can be determined b turning the equipment off and on, the user is
encouraged to tr to correct the interference b one or more of the fooing measures
Reorient or reocate the receiving antenna.
ncrease the separation beteen the equipment and the receiver.
onnect the equipment into an outet on a circuit different from that to hich the receiver is connected.
onsut the deaer or an eperienced radio technician for hep.
N he manufacturer is not responsibe for an radio or interference caused b unauthorized modications to this equipment. uch
modications coud void the user authorit to operate the equipment.

11
Customer Support
AcuRite customer support is committed to providing ou ith bestin
cass service. For assistance, pease have the mode number of this
product avaiabe and contact us in an of the fooing as
(877) 221-1252
isit us at .AcuRite.com
► nstaation ideos ► Register our roduct
► nstruction anuas ► Support User Forum
► Repacement arts ► ubmit Feedbac deas
Limited 1 Year Warranty
AcuRite is a wholly owned subsidiary of Chaney
Instrument Company. For purchases of AcuRite
products, AcuRite provides the benets and services set
forth herein. For purchases of Chaney products, Chaney
provides the benets and services set forth herein.
We warrant that all products we manufacture under this
warranty are of good material and workmanship and, when
properly installed and operated, will be free of defects for a
period of one year from the date of purchase.
Any product which, under normal use and service, is proven
to breach the warranty contained herein within ONE YEAR
from date of sale will, upon examination by us, and at our sole
option, be repaired or replaced by us. Transportation costs and
charges for returned goods shall be paid for by the purchaser.
We hereby disclaim all responsibility for such transportation
costs and charges. This warranty will not be breached, and we
will give no credit for products which have received normal
wear and tear not affecting the functionality of the product,
been damaged (including by acts of nature), tampered,
abused, improperly installed, or repaired or altered by others
than our authorized representatives.
Remedy for breach of this warranty is limited to repair or
replacement of the defective item(s). If we determine that repair
or replacement is not feasible, we may, at our option, refund
the amount of the original purchase price
THE ABOVE-DESCRIBED WARRANTY IS THE SOLE WARRANTY
FOR THE PRODUCTS AND IS EXPRESSLY IN LIEU OF ALL OTHER
WARRANTIES, EXPRESS OR IMPLIED. ALL OTHER WARRANTIES
OTHER THAN THE EXPRESS WARRANTY SET FORTH HEREIN
ARE HEREBY EXPRESSLY DISCLAIMED, INCLUDING WITHOUT
LIMITATION THE IMPLIED WARRANTY OF MERCHANTABILITY
AND THE IMPLIED WARRANTY OF FITNESS FOR A PARTICULAR
PURPOSE.
We expressly disclaim all liability for special, consequential,
or incidental damages, whether arising in tort or by contract
from any breach of this warranty. Some states do not allow the
exclusion or limitation of incidental or consequential damages,
so the above limitation or exclusion may not apply to you.
We further disclaim liability from personal injury relating to
its products to the extent permitted by law. By acceptance of
any of our products, the purchaser assumes all liability for the
consequences arising from their use or misuse. No person, rm
or corporation is authorized to bind us to any other obligation
or liability in connection with the sale of our products.
Furthermore, no person, rm or corporation is authorized
to modify or waive the terms of this warranty unless done in
writing and signed by a duly authorized agent of ours.
In no case shall our liability for any claim relating to our
products, your purchase or your use thereof, exceed the
original purchase price paid for the product.
Applicability of Policy
This Return, Refund, and Warranty Policy applies only to
purchases made in the United States and Canada. For
purchases made in a country other than the United States or
Canada, please consult the policies applicable to the country in
which you made your purchase.
Additionally, this Policy applies only to the original purchaser
of our products. We do cannot and do not offer any return,
refund, or warranty services if you buy products used or from
resale sites such as eBay or Craigslist.
Governing Law
This Return, Refund, and Warranty Policy is governed by the
laws of the United States and the State of Wisconsin. Any
dispute relating to this Policy shall be brought exclusively in the
federal or State courts having jurisdiction in Walworth County,
Wisconsin; and purchaser consents to jurisdiction within the
State of Wisconsin.
PRODUCT REGISTRATION
Register onine to receive ear arrant protection
www.AcuRite.com
IMPORTANT R RR
R ARRAN R

©Chaney Instrument Co. All rights reserved. AcuRite is a registered trademark of the
Chaney Instrument Co., Lake Geneva, WI 53147. All other trademarks and copyrights
are the property of their respective owners. AcuRite uses patented technology.
Visit www.AcuRite.com/patents for details.
Printed in China
00384 INST 061316
It’s more than accurate, it’s
AcuRite offers an etensive assortment of precision instruments,
designed to provide ou ith information ou can depend on to
an our da ith condence™.
www.AcuRite.com
Weather
Stations
emperature
umidit
Weather
Aert Radio
itchen
hermometers
imers
ocs
Other manuals for 384
1
Table of contents
Other ACU-RITE Thermometer manuals

ACU-RITE
ACU-RITE 00611 User manual

ACU-RITE
ACU-RITE 782 User manual

ACU-RITE
ACU-RITE 536 User manual

ACU-RITE
ACU-RITE 278 User manual

ACU-RITE
ACU-RITE 00891A User manual

ACU-RITE
ACU-RITE 00381 User manual

ACU-RITE
ACU-RITE 411 User manual

ACU-RITE
ACU-RITE 00603 User manual

ACU-RITE
ACU-RITE 00826 User manual

ACU-RITE
ACU-RITE 02084 User manual

ACU-RITE
ACU-RITE 616 User manual

ACU-RITE
ACU-RITE 02044W User manual

ACU-RITE
ACU-RITE 00606 User manual

ACU-RITE
ACU-RITE 00782 User manual

ACU-RITE
ACU-RITE 604 User manual

ACU-RITE
ACU-RITE 00801A2 User manual

ACU-RITE
ACU-RITE 1523 User manual

ACU-RITE
ACU-RITE 305 User manual

ACU-RITE
ACU-RITE 799 User manual

ACU-RITE
ACU-RITE 384 User manual