Adalit L-3000 User manual

User Instructions
Bedienungsanleitung
Manual de Usuario
Instructions d’utilisation
Manual do Utilizador
II 1G Ex ia IIC T4 Ga IP67
II 1D Ex ia IIIC T85 oC Da
Technology
HIGH


Components List
1 Main Features
2 First Steps
3 On | Off Button
4 Menu Button
5 Charging System
6 Maintenance
7 Warranty
Technical Features (at the end of User Instructions)
Index
Bestandteile-Liste
1 Wichtigste Eigenschaften
2 Erste Schritte
3 AN / AUS Knopf
4 MENÜ Knopf
5 Ladevorgang
6 Wartung
7 Gewährleistung
Technische Merkmale
(am Ende der Bedienungsanleitung)
Index
Listado de componentes
1 Características principales
2 Primeros pasos
3 Pulsador On | Off
4 Pulsador Menu | Mapa de consumo
5 Sistema de Carga
6 Mantenimiento
7 Garantía
Especificaciones Técnicas (final del manual)
Índice
Liste des pièces de rechange
1 Caractéristiques principales
2 Les premiers pas
3 Bouton On | Off
4 Bouton Menu
5 Système de charge
6 Entretien
7 Garantie
Spécifications techniques
(à la fin des instructions d’utilisation)
Index
Lista de componentes
1 Principais características
2 Primeiros passos
3 Botão On | Off
4 Botão Menu
5 Sistema de carregamento
6 Manutenção
7 Garantia
Especificações técnicas (final do manual)
Índice

Components List
Bestandteile-Liste
Listado de componentes
Liste des pièces de rechange
Lista de componentes
L.3000
Complete torch | Komplette Leuchte | Linterna completa
Lampe complète | Lanterna completa
L3.10
Closing ring and protection glass | Verschlussring und Schutzglas
Aro y lente de protección | Anneau et lentille de protection
Aro e lente de protecção
L3.11
“O Ring” for closing ring
O-Ring für Verschlussring
Junta tórica para aro
Joint torique pour anneau
O-ring para aro
L3.20
LedEngine | LedEngine | Óptica LedEngine
Óptica LedEngine | LedEngine
L3.30
PCB with display | Elektronik-Platine mit display
Placa control display | Carte électronique | Placa controlo visor
L3.40
Complete head with turning axle
Leuchtenkopf mit Schwenkachse
Pieza de cabeza montada con eje de giro
Pièce de tête montée avec axe de tour
Peça da cabeça aplicada com eixo
L3.49
Screw | Schraube | Tornillo | Vis | Parafuso
L3.480
Clip | Halte-Clip | Gancho completo
Crochet de fixation | Clip completo
L3.54
Rubber battery protection | Gummischutz für Akku
Protector de goma batería | Protection caoutchouc de la batterie
Protetor de borracha da bateria
L3.55
Torch body “O ring” | Dichtung für Leuchtenkörper
Junta tórica para cuerpo | Joint torique | O-ring para o corpo
L3.50
Torch body including charging PCB
Leuchtenkörper mit Ladekontakten
Cuerpo de la linterna con placa de carga
Corps de la lampe avec contrôle de charge
Corpo lanterna com placa de carregamento
L3.530
Torch body screw with ring
Gehäuseschrauben mit O-Ring für Leuchtenkörper
Tornillo de cierre cuerpo con junta
Vis de fermeture corps avec joint
Parafuso de fecho do corpo com junta
L3.60
Battery pack | Akku-Pack | Pack de baterías
Pack de la batterie | Conjunto de baterias
WL.117
Fuse 1A | Sicherung 1 A | Fusible 1A | Fusible 1A | Fusivel 1A


English
Congratulations, you have chosen a product that has
been developed with state-of-the-art technology.
Adalit L.3000 torch is a high performance professio-
nal safety torch that combines high intensity LEDs,
a revolutionary optic, a large digital display and an
elegant design.
1 Main Features
• 2 LEDs of 135 lumens each in a double optic with
different light beams.
• LedEngine technology with a step light system.
• Only focused light on, “Booster” function to illumi-
nate long distances with greater penetrating light
beam.
• Two button switches of soft touch material, ergo-
nomic and oversized in order to guarantee easy
pushing.
• 3 different burning intensities in order to select in
every moment the remaining burning time.
• Battery level indication in hours and minutes by
means of a digital display.
• Swivelling head with 3 positions: 0o| 45o| 90o
• Torch body made of high resistance thermoplas-
tic resin to the impacts, extreme temperatures
and corrosion.
• Best ATEX certificate acc. to zone 0.
2 First Steps
Before using the torch for the first time, it is highly re-
commended to charge the battery completely.
In order to get the maximum perfomance and life
span of the battery, a complete discharge/charge
cycle should be done at least once per month.
The user can activate:
• The two LEDs at the same time - all the power is
shared between the two light beams that enables
wide and spot light simultaneously.
• Only FLOOD light on - the outspread light gives
the user ample light for short distances. This optic
includes the unique “step lighting system” to light
the ground area just ahead user’s feet.
• Only FOCUSED light on - “BOOSTER” function
to illuminate long distances with a greater pene-
trating light beam.
• Only FOCUSED light on in strobe mode. Up to
five different intermittences can be activated.

1
2
2”
Maximum
intensity
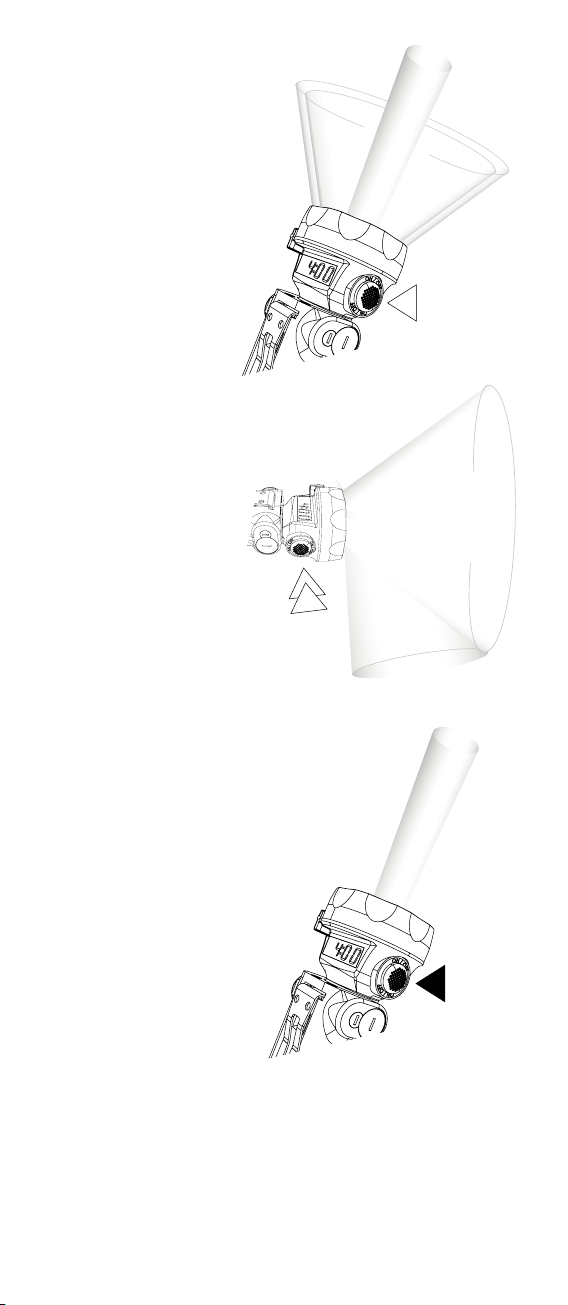
3 On | Off Button
First pulsation
The two LEDs on at the
same time which ena-
bles wide and spot light
simultaneously. At the
same time, the display
turns on indicating the
remaining burning time.
Second pulsation
Only the LED situated
on the flood optic is
on and the light gets a
greater opening angle.
Thanks to the spe-
cial design of the Led
Engine Technology the
walking area near to the
bearer of the torch gets
illuminated.
Longer pulsation
BOOSTER function
Keeping pushed for
two seconds, the LED
situated on the focused
optic gets on. All power
is gathered in one single
LED and the light beam
reaches the maximum
distance and penetra-
tion. To return to the
previous position, push
again On | Off.

English
4”
5
4”
1
2
3
Longer pulsation
STROBE function
Five different strobe
modes. Keeping pushed
for four seconds On | Off
button, the LED situated
on the focused optic gets
on in strobe mode. Pres-
sing Menu button up to
five times you can select
the desired frequency.
The selected strobe
frequency will be stored.
To return to the previous
position, push again
On | Off button.
Third pulsation
The torch and the display
switch off.
4 Menu Button
Burning Time System
Longer pulsation
Pressing the button
“MENU” for 4 seconds
with the torch on, the
“Burning Time System”
gets activated which
allows the user to choose
the desired burning time
and the light intensity.
Meanwhile the display
flashes the user by pres-
sing the “menu” button
can choose between the
three different burning
times, 4, 6 and 8 at full
charge, adjusting the light
intensity level automa-
tically. Once the user
has chosen the desired
burning time, the display
will be flashing after 5
seconds.

5 Charging System
When the torch is placed on the charger, the light
turns off automatically (if the light is on). Charging of
the torch starts when the green LED on the charger
changes to red. An automatic reset takes care of
loading the batteries for max. 4h with highest light
intensity. The maximum charging time is 9 hours.
The time that appears after the letter
indicates the available burning time at
high intensity in the moment the torch is
taken from the charger and put into use.
At the end of charge, the display swit-
ches off and a letter “F” (full) followed by
the avalaible burning time will appear
on the display every 15 seconds.
If the charger is damaged, the display
shows the following error ‘E0:00’. But
thanks to the intelligent circuit board the
torch keeps protected from the possible
damages due to a faulty charger.
6 Maintenance
Cleaning
• Clean exclusively with a soft cloth using a neutral
PH detergent diluted in warm water. Do not use
alcohol or other chemical solvents. Do not sub-
merge the torch into water.
• Do not open the torch in hazardous areas.
• IN ORDER TO GET THE MAXIMUM PER-
FORMANCE AND LIFE SPAN OF THE
BATTERY , A COMPLETE DISCHARGE/
CHARGE CYCLE SHOULD BE DONE AT
LEAST ONCE PER MONTH.
7 Warranty
Lamp L3000 has a warranty of 2 years against any
fabrication default, for use under normal conditions
and in accordance with the present instructions. It
does not include the battery nor the LEDs which are
guaranteed for 1 year.

English
Clip replacement L3.480
1. Remove the two
upper screws
2. Remove the clip
3. Take out the two nuts
LED Engine Replacement
1. Unscrew the screw
ref. L3.49
2. Remove the closing
ring and the protection glass
ref. L3.10
3. Take out the LED engine
ref. L3.20
4. Disconnect the LED engine
Battery and/or
Protection Fuse Replacement
1. Unscrew the torch body
closing screws ref. L3.530
2. Separeate the torch body
from the torch ref. L3.50
3. Remove the fuse from
its position ref. WL.117


Deutsch
Herzlichen Glückwunsch, Sie haben sich für eine
Leuchte entschieden, entwickelt unter Berücksichti-
gung neuester Technologien.
Die ADALIT L.3000 Leuchte ist eine professionelle
ex-geschützte Sicherheits-Leuchte mit hoch intensi-
ven LEDs, exklusiver Spezialoptik, digitalem Display
und elegantem Design.
1 Wichtigste Eigenschaften
• 2 LEDs mit je 135 lm mit Lichtstrahlen für
Raum- und Distanzlicht.
• LEDEngine Technologie mit Ausleuchtung der
Wege zum Einsatz.
• Fokussierter Power-Lichtstrahl =
Booster-/Ver-stärker-Funktion für lange Distanzen.
• 2 ergonomische Druckknopf-Schalter zur
ein-fachen Bedienung.
• 3 verschiedene Leuchtstärken für 4, 6 oder 8 h
Leuchtdauer.
• Verbleibende Akku-Kapazität in Std./Min. auf
dem digitalen Display ablesbar.
• Schwenkbarer Kopf für 3 Positionen:
0o| 45o| 90o
• Gehäuse aus strapazierfähigem, antistatischem
Thermoplast. Besonders widerstandsfähig
gegen mechanische Belastungen, extreme
Temperaturen und Chemikalien.
• Höchste ATEX-Zertifizierung auch für Zone 0.
2 Benutzer Hinweise
Empfehlung: Vor erster Nutzung der Leuchte den
Akku komplett aufladen.
IWichtiger Hinweis: Zur Akku-Pflege empfehlen
wir, 1x monatlich einen kompletten Ent- u.
Aufladezyklus durchzuführen.
4 mögliche Lichteinstellungen:
• Power-Lichtstrahl und Raumlicht: beide LEDs
leuchten zeitgleich, für kurze und lange
Distanzen.
• Raumlicht: für kurze Distanzen in Räumen, an
Einsatzstellen oder um Wege auszuleuchten.
• Fokussierter Power-Lichtstrahl: für lange
Distanzen.
• Blinklicht: zur Warnung oder Absicherung,
ein-stellbar in 5 unterschiedlichen Intervallen.
1
2
2”
Maximum
intensity
3 AN / AUS Knopf
1x Drücken
Power-Lichtstrahl u.
Raumlicht leuchten
zeitgleich. Das Display
zeigt die verbleibende
Rest-Leuchtzeit an.
2x Drücken
Raumlicht für kurze
Distanzen und zum
Ausleuchten der
Wege.
Längeres Drücken des
AN/AUS-Knopfs
BOOSTER Funktion
Ca. 2 Sek. gedrückt
halten, fokussierter
Power-Lichtstrahl für
lange Distanzen ist ein-
geschaltet. Zurück zum
Hauptmodus: AN/AUS
1x drücken.

Deutsch
4”
5
4”
1
2
3
Längeres Drücken
des AN/AUS-Knopfs -
BLINK-Funktion
AN/AUS-Knopf 4 Sek.
drücken: fokussierter
Lichtstrahl blinkt.
MENÜ-Knopf 5x drücken
zur Einstellung des
gewünschten Blink-
Intervals. Dieser wird
gespeichert. Zurück zum
Hauptmodus: AN/AUS 1x
drücken.
3x Drücken des
AN/AUS-Knopfs
Leuchte und Display sind
ausgeschaltet
4 MENÜ-Knopf
Anzeige der
Rest-Leuchtzeit
Längeres Drücken des
MENÜ-Knopf
Druckknopf ca. 4 Sek.
gedrückt halten (bei
eingeschalteter Leuchte):
der Akku-Sparmodus
wird über ein Blinken des
Displays aktiviert. Bei
voller Akku-Kapazität (4
h) kann bei nochmaligem
Drücken 6 h oder 8 h
Leuchtdauer eingestellt
werden. Ein Blinksignal
des Displays bestätigt die
eingestellte Leuchtdauer.
Die Leuchtkraft passt
sich automatisch
entsprechend der
Leuchtdauer an.

7 Gewährleistung
Auf die L-3000 bieten wir eine Gewährleistung
von 2 Jahren auf Funktion und Material unter den
angegebenen Betriebs- und Wartungs-Bedingungen.
Die Gewährleistung schließt Verschleißteile wie
z.B. LEDs, Dichtungen oder Akkus nicht ein.
Die Gewährleistung erstreckt sich nicht auf die
Leuchte, die unsachgemäß verwendet, verändert,
vernachlässigt, durch Unfälle beschädigt oder
anormalen Betriebsbedingungen sowie der
unsachgemäßen Handhabung ausgesetzt wird.
5 Ladevorgang
Die Leuchte kann in ein- oder ausgeschaltetem
Zustand in das Ladegerät gestellt werden. Der Lade-
vorgang beginnt bei Umschalten der grünen auf rote
LED am Ladegerät. Es erfolgt automatisch ein Reset
auf 4 h Leuchtdauer bei höchster Lichtintensität. Die
max. Ladezeit beträgt 9 h.
Am Ende des Ladevorgangs schaltet
sich das Display aus. Bei Herausnahme
der Leuchte aus dem Ladegerät
er-scheint auf dem Display der
Buchstabe “F” (full) und die verfügbare
Leuchtkapazität (blinkt alle 15 Sek.).
Falls das Ladegerät defekt ist, wird
auf dem Display der Leuchte “E0:00”
angezeigt. Die Leuchte wird aufgrund
ihrer intelligenten Elektronik durch ein
defektes Ladegerät nicht beschädigt.
6 Wartung
Reinigung
• Zur Reinigung der Leuchte ausschließlich ein
weiches Tuch mit warmem Wasser anfeuchten
und mit etwas Seife (z.B. Spülmittel) verwenden.
Die Leuchte damit vorsichtig abreiben und nicht
in Wasser eintauchen.
• Die Leuchte darf nicht in explosionsgefährdeten
Bereichen geöffnet werden.
• WICHTIGER HINWEIS: ZUR AKKU-PFLE-
GE EMPFEHLEN WIR, 1X MONATLICH
EINEN KOMPLETTEN ENT- U. AUFLA-
DEZYKLUS DURCHZUFÜHREN.

Deutsch
Austausch des Halteclips L3.480
1. Entfernen der oberen
2 Schrauben
2. Halteclip abnehmen
3. 2 Muttern
herausnehmen
Austausch der LEDEngine
1. Lösen der Schraube M3
ref. L3.49
2. Verschlussring und Schutzglas
L3.10 entfernen
3. LEDEngine L3.20 herausnehmen
4. Trennen der LEDEngine
Austausch des Akkus
und/oder der Sicherung
1. Lösen der
Gehäuse-Schrauben
L3.530
2. Trennen des
Leuchten-Unterkörpers
L3.50 vom Gehäuse
3. Sicherung WL.117
entfernen


Español
Enhorabuena, ha adquirido un producto que ha sido
desarrollado con tecnología de vanguardia.
Adalit L3000 es una linterna profesional de alto ren-
dimiento que incorpora leds de gran potencia
lumínica, una revolucionaria óptica, amplio display
digital y un cuidado diseño.
1 Características principales
• 2 LEDs de 135 lúmenes de potencia en dos len-
tes con diferentes grados de apertura.
• Óptica LEDEngine integrada, con sistema de se-
guridad exclusivo de visión de paso e iluminación
de corta distancia.
• Led concentrador de alta intensidad con función
Booster para iluminación de gran alcance y alta
penetración.
• Pulsadores ergonómicos y sobre-dimensiona-
dos, fabricados en elastómero de alta calidad
con efecto “Soft Touch”.
• 3 niveles de intensidad de luz para ajustar, en
cada momento, la duración de la batería.
• Indicación de la duración de la batería en horas
y minutos mediante display digital de fácil visua-
lización.
• Cabezal pivotante a 0o| 45o| 90o
• Cuerpo de resina de alta resistencia al impacto,
a temperaturas extremas y sustancias corrosivas
• Máxima Certificación ATEX ZONA 0
2 Primeros pasos
Antes de utilizar la linterna por primera vez, realice
una carga completa de la batería.
Para alcanzar el máximo rendimiento y duración
de la batería, es necesario descargar y recargar
la linterna al menos una vez al mes.
El usuario puede activar:
• LosdosLEDsalavez–todalaenergíasedistri-
buye entre las dos fuentes luminosas, generando
gran potencia luminosa tanto en distancias lar-
gas como cortas
• LED difusor – optimiza la iluminación del área
próxima al usuario. Incluye el exclusivo “Sistema
de visión de paso” con un ángulo ideal para la
iluminación del área situada en el suelo a una
distancia de un paso del usuario.
• LEDconcentrador–función“Booster”-optimiza
la iluminación de la larga distancia con una ma-
yor penetración del haz luminoso.
• LED concentrador en modo Intermitencia. Se
pueden activar hasta cinco frecuencias distintas.

1
2
2”
Máxima
intensidad
3 Pulsador On | Off
Primera pulsación
Se encienden am-
bas ópticas a la vez.
Iluminación de gran
intensidad en distan-
cias cortas y largas.
Simultáneamente se
enciende el display que
indica la autonomía
disponible.
Segunda pulsación
Se activa el LED
situado en la óptica
de difusión, la luz
alcanza un mayor
ángulo de apertura.
Debido al especial
diseño de la óptica
LedEngine se ilumina
incluso la zona de paso
próxima al portador de
la linterna.
Pulsación prolongada
función BOOSTER
Pulsando durante dos
segundos, se activa el
LED situado en la óp-
tica de concentración.
Toda la energía se con-
centra en un sólo LED
y el haz de luz alcanza
la máxima distancia y
penetración.
Pulsando de nuevo
On | Off se retorna a la
posición anterior.
Other manuals for L-3000
1
Table of contents
Languages:
Other Adalit Flashlight manuals


Popular Flashlight manuals by other brands


Lumapower
Lumapower IncenDio XP-G2 R5 user manual

Ruimx
Ruimx SF-088 manual

Kodiak
Kodiak K-KRAKEN-4/8 Operating Instructions and Precautions

ANSMANN
ANSMANN 5816152 operating instructions

Abicor Binzel
Abicor Binzel ABIMIG SpinArc operating instructions

Lutron Electronics
Lutron Electronics DT-2249A Operation manual