Adam DA-SX User manual

DA-SX
D/A Converter
Operation Manual / Bedienungsanleitung
English / deutsch
Channel
S/PDIF
AES3
Word Clock In
Digital
Thru
Att.
Mode
DIGITAL INPUTS
Clock
XLR
-0dB -20dB
-10dB -30dB
-40dB
Coax Optical
L R

2
Table of contents
Introduction .......................................................3
1. Installation .........................................................4
1.1 Important Information .......................................4
1.2 Installation .........................................................4
2. Connections ......................................................5
2.1 AES3 (XLR) ........................................................5
2.2 SPDIF coaxial .....................................................5
2.3 AES3 optical (TOSLINK) .....................................5
2.4 Digital Thru (XLR) ...............................................5
2.5 Word Clock In ....................................................5
3. Operating Modes ...............................................7-8
3.1 Modes ................................................................7
3.2 Digital Inputs .....................................................7
3.3 Channel Options ................................................8
3.4 Synchronisation/Word Clock.............................8
4. Attenuation of the audio signal ..........................9
4.1 Attenuation settings ..........................................9
4.2 Notes on Level settings .....................................9
5. Trouble Shooting ................................................10
5.1 D/A LED glows, no signal ..................................10
5.2 D/A LED does not glow, no signal .....................10
5.3 Parasitic noises .................................................10
6. EU Declaration of Conformity ............................11
7. Limited Warranty ...............................................12
7.1 Terms and Conditions ........................................12
7.2 How to claim ......................................................12
8. Technical Data ...................................................13

3
DA-SX Manual / english
Introduction
Dear customer,
Thank you for choosing the ADAM Audio DA-SX Digital/Analog converter.
ADAM products are built for maximum quality reproduction and audio perfection. With
the DA-SX you have selected a D/A converter, which has been made to the highest
technical standards and excels both in musical accuracy and technical data.
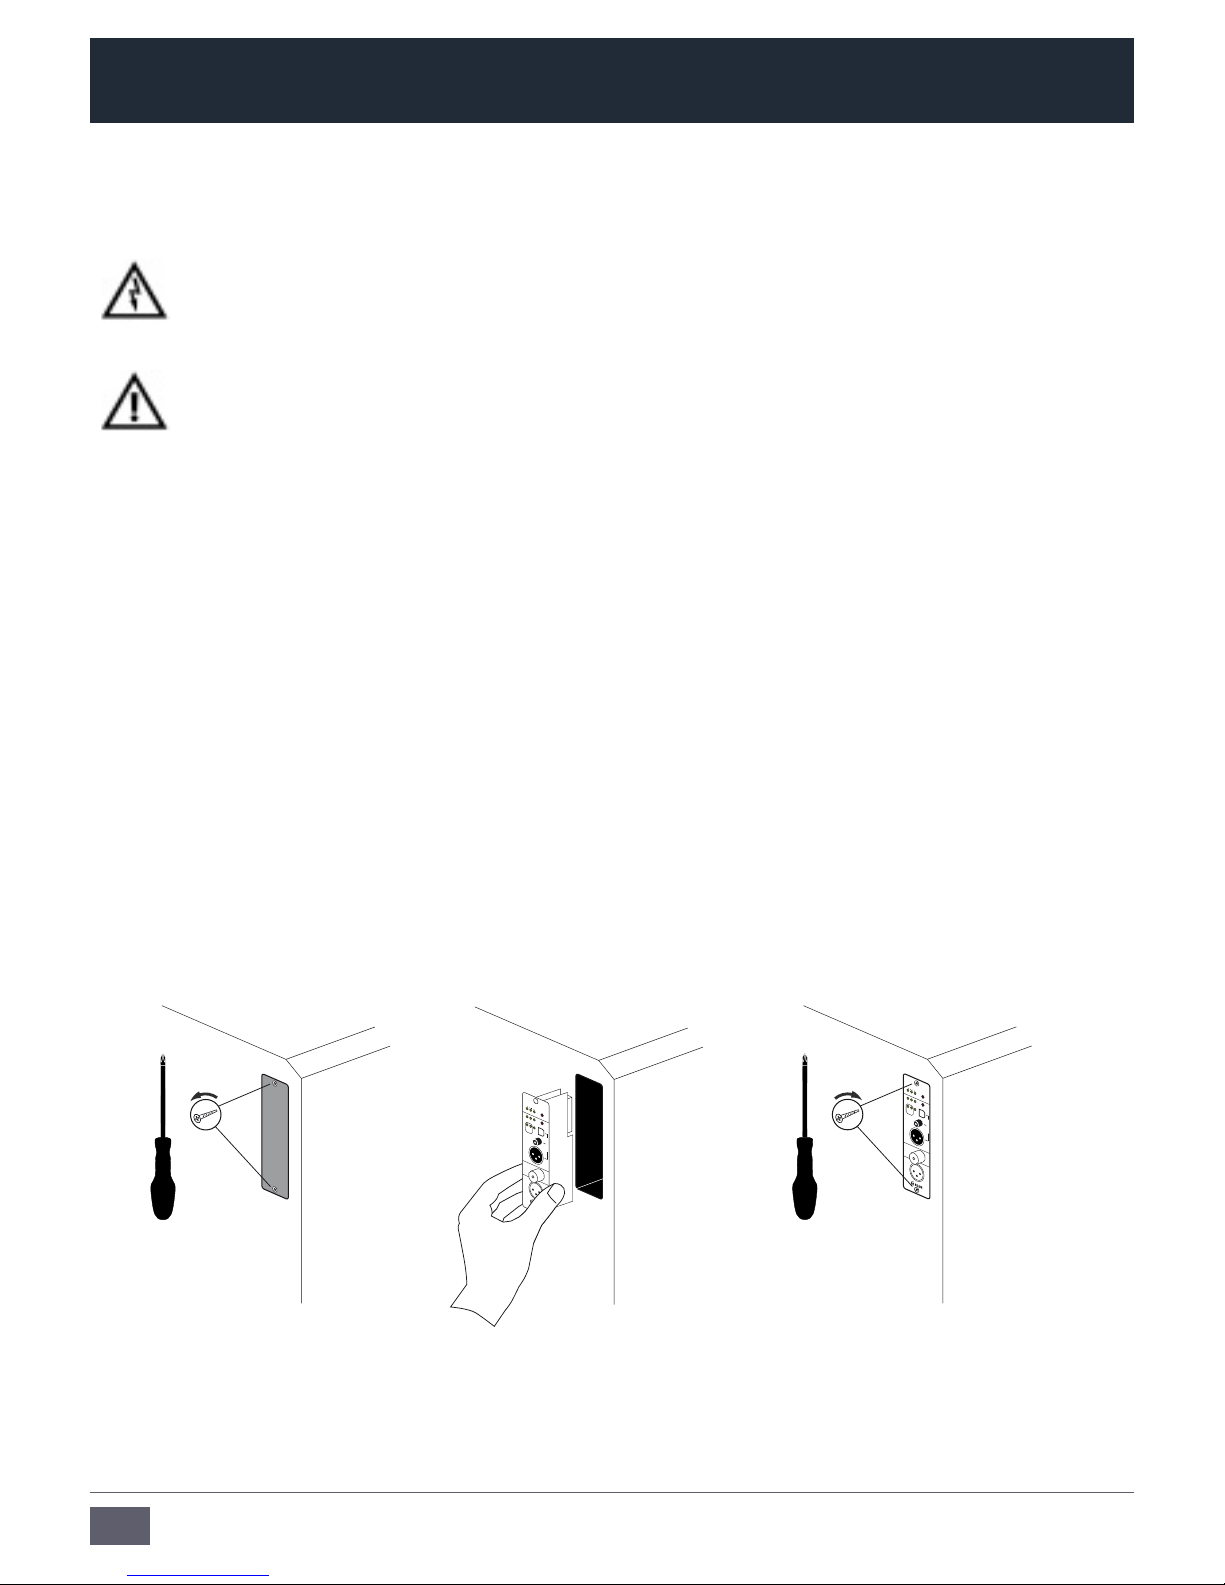
The ADAM DA-SX converter allows you to work directly from digital sources with your
SX monitor (S2X, S3X-H, S3X-V, S4X-H, S4X-V, S5X-H, S5X-V). The converter installs
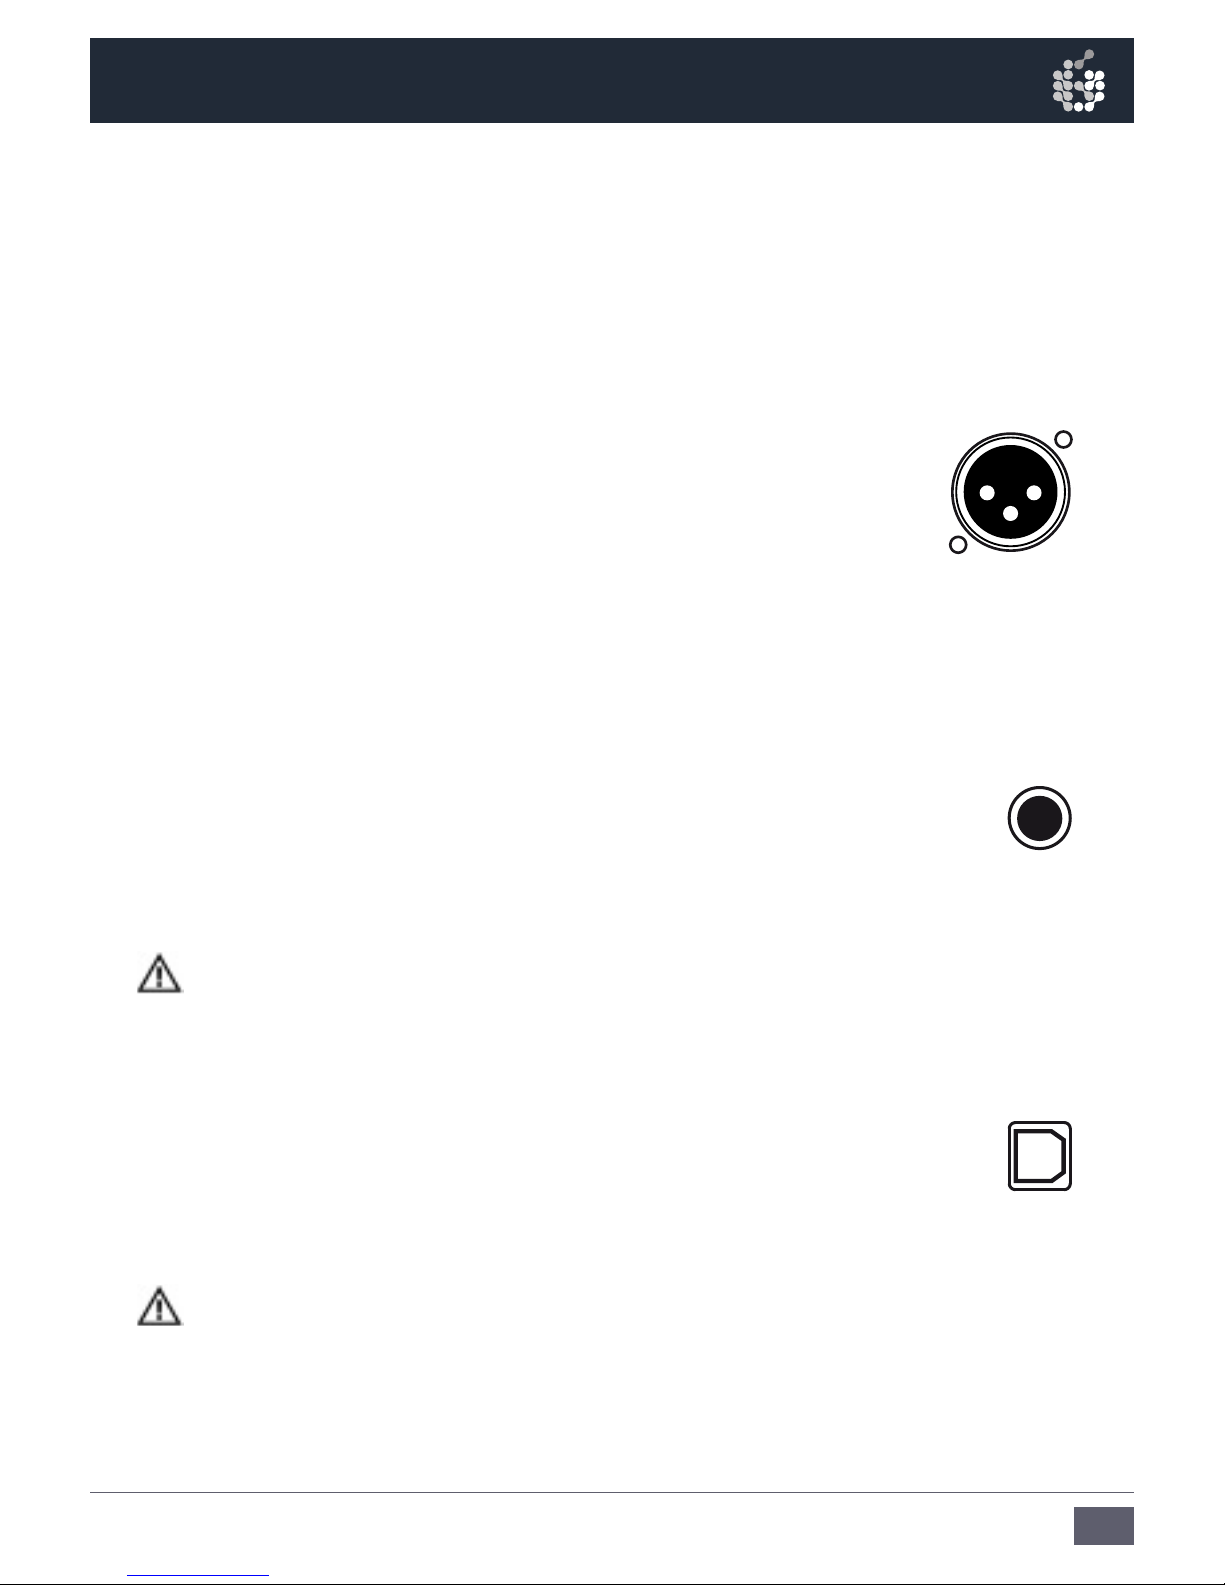
easily into the back of the amplifier module and is designed to handle both AES/EBU
and SPDIF signals (via RCA or TOSLINK). Additionally a word clock input allows external
synchronisation of the converter.
This manual is intended to provide you with information about your new ADAMs. It
contains important information regarding safety, setting up, handling, and
warranty. We request that you read these sections carefully to ensure easy set up and
prevent potential problems.
If you have any questions about this or any of our products, please don’t hesitate to
contact us – we will be happy to assist you.
For detailed information concerning ADAM’s technologies and products, complete
reviews, and a list of worldwide ADAM users and studios, please visit our website:
www.adam-audio.com
You are invited to share your experience with our products by joining us on Facebook
and also, if you don’t want to miss out on the latest info on ADAM Professional Audio,
come and follow us on Twitter!
We hope very much that you enjoy the new sound possibilities using the DA-SX converter
and we wish you many delightful hours with it.
The ADAM Audio Team

4
1.1 Important Information
Before you start to install the DA-SX, please make sure that the loudspeakers are
being switched off and also to unplug the power plug.
Please act with caution while installing the converter. It has been design to
perfectly fit into the slot. If you feel too much resistance when trying to insert
the DA-SX, do not use too much force. In case of problems please contact our
support team.
1.2 Installation
a) Unscrew the two screws of the blind plate on the rear side of your speaker. Take
off the blind plate.
b) Insert the DA-SX in the slot. If you feel a resistance, this could be caused by the
two capacitors in the slot. In this case, push them gently to the side.
c) Use your thumb to push in the converter all the way into the slot.
d) Use the two screws to screw in the panel tight.
1. Installation
Channel
S/PDIF
AES3
WordClock In
Digital
Thru
Att.
Mode
DIGITALINPUTS
Clock
XLR
-0dB -20dB
-10dB -30dB
-40dB
Coax Optical
L R
Channel
S/PDIF
AES3
WordClock In
Digital
Thru
Att.
Mode
DIGITALINPUTS
Clock
XLR
-0dB -20dB
-10dB -30dB
-40dB
Coax Optical
L R

5
DA-SX Manual / english
One of the most frequently asked questions are: Can I use the digital and the analog
inputs simultaneously? Yes you can. Both signals are being mixed together internally.
For highest quality and optimized signals, we recommend to use only one connection
at a time and to unplug the cable not being used.
2.1 AES3 (XLR)
Probably the most favored connection for long cable ways
up to 100 meters.
Please only use authentic “AES/EBU” digital audio cables,
which are balanced and have an 110Ω wave impedance.
Please do not use a ‘normal’ XLR microphone cable.
Please do neither extend nor shorten the cable.
2.2 SPDIF coaxial
For unbalanced 75Ω coaxial cables with RCA plugs.
Again, please use specified digital cables (up to about 10m) only,
no other RCA cables. Do not extend the cable.
Please note:
The RCA plug connection is mechanically less stable than other connections.
2.3 AES3 optical (TOSLINK)
For TOSLINK optical fiber cables. Maximum length depends
on the quality and/or used fiber technology, usually up to 10m.
Please note:
In principle, the TOSLINK connection is mechanically a rather fragile one.
2. Connections
Channel
S/PDIF
AES3
Word Clock In
Digital
Thru
Att.
Mode
DIGITAL INPUTS
Clock
XLR
-0dB -20dB
-10dB -30dB
-40dB
Coax Optical
L R
Channel
S/PDIF
AES3
Word Clock In
Digital
Thru
Att.
Mode
DIGITAL INPUTS
Clock
XLR
-0dB -20dB
-10dB -30dB
-40dB
Coax Optical
L R
Channel
S/PDIF
AES3
Word Clock In
Digital
Thru
Att.
Mode
DIGITAL INPUTS
Clock
XLR
-0dB -20dB
-10dB -30dB
-40dB
Coax Optical
L R

6
2.4 Digital Thru (XLR)
The input signal is being reproduced 1:1. This connection is
for connecting the second speaker through the first one (for
stereo reproduction).
Please only use authentic AES/EBU digital audio cables,
which are balanced and have an 110Ω wave impedance.
Please do not use a ‘normal’ XLR micro cable. Please do
neither extend nor shorten the cable.
Never plug a cable carrying a digital signal into an analog
connector or vice versa!
2.5 Word Clock In
This connection is for a Word Clock used in many studios.
The Word Clock needs to have the same frequency as the
sampling rate of the digital signal. Also, the two frequencies
need to be absolutely synchronous.
By default, the input is terminated with 75Ω. If you wish to time-phase externally
and/or to loop through the Word Clock circuit to another device, the time-phasing
can be deactivated by a jumper on the bottom side of the converter (please see
3.4).
However, we recommend to use a direct single connection between a Word Clock
splitter and a device since the external time-phasing and looping through requires
BNC-Tee pieces and BNC terminators. That makes it more susceptible to errors.
Cables: 75Ω coaxial cables with BNC plug-in connectors (as “Word Clock cable”
on the market).
2. Connections
Channel
S/PDIF
AES3
Word Clock In
Digital
Thru
Att.
Mode
DIGITAL INPUTS
Clock
XLR
-0dB -20dB
-10dB -30dB
-40dB
Coax Optical
L R
Channel
S/PDIF
AES3
Word Clock In
Digital
Thru
Att.
Mode
DIGITAL INPUTS
Clock
XLR
-0dB -20dB
-10dB -30dB
-40dB
Coax Optical
L R

7
DA-SX Manual / english
3.1 Modes
You can choose the operating mode by using the “Mode” button. They are in
circular order (i.e. after the last follows the first setting).
1. AES L (factory setting) 2. AES R
3. AES L WCLK 4. AES R WCLK
5. COAX L 6. COAX R
7. COAX L WCLK 8. COAX R WCLK
9. OPTICAL L 10. OPTICAL R
11. OPTICAL L WCLK 12. OPTICAL R WCLK
With the “Mode” button (operable with a pen or alike) you can set a certain
operating mode which can be a combination of the following possibilites.
3.2 Digital Inputs
• If XLR (AES3) is activated the “XLR” LED glows.
• If RCA (SPDIF-coaxial) is activated the “Coax” LED glows.
• If TOSLINK (SPDIF-optical) is activated the “Optical” LED glows.
Please note:
If a valid audio data stream is being received the blue D/A LED
on the frontpanel of your monitor glows.
3.3 Channel options
• If the left channel of the digital signal is selected, the “L” LED glows.
• If the right channel of the digital signal is selected, the “R” LED glows.
3. Operating Modes
Channel
S/PDIF
AES3
Word Clock In
Digital
Thru
Att.
Mode
DIGITAL INPUTS
Clock
XLR
-0dB -20dB
-10dB -30dB
-40dB
Coax Optical
L R
Channel
S/PDIF
AES3
Word Clock In
Digital
Thru
Att.
Mode
DIGITAL INPUTS
Clock
XLR
-0dB -20dB
-10dB -30dB
-40dB
Coax
Optical
L R
Channel
S/PDIF
AES3
Word Clock In
Digital
Thru
Att.
Mode
DIGITAL INPUTS
Clock
XLR
-0dB -20dB
-10dB -30dB
-40dB
Coax
Optical
L R
Channel
S/PDIF
AES3
Word Clock In
Digital
Thru
Att.
Mode
DIGITAL INPUTS
Clock
XLR
-0dB -20dB
-10dB -30dB
-40dB
Coax Optical
L
R
Channel
S/PDIF
AES3
Word Clock In
Digital
Thru
Att.
Mode
DIGITAL INPUTS
Clock
XLR
-0dB -20dB
-10dB -30dB
-40dB
Coax Optical
L
R

8
3.4 External Synchronisation to a Word Clock
If you operate several SX monitors and wish to make sure all speakers
get their sampling values simultaneously by being on the other hand
independent of digital cable lengths, using a Word Clock can be
advisable. In this case, the D/A converters do not need to reconstruct
the sampling rate from the stream of data (something that cannot be
done without small imprecisions concerning the timing). Instead, they
get a clean clock pulse ready to be used.
That is why the Word Clock needs to be in exact synchronicity with the
physical sampling rate of the incoming data stream. A real divergence is
not permitted. If the divergence becomes too big (more than one or two
samples) the D/A converter has to either double the samples or drop
them. This can result in increasing distortion or even in considerable
parasitic noises (Jitter). If you have to use asynchronic rates anyway,
you will need an external asynchronic resampling converter.
• If you do not have a Word Clock connected or do not wish to use a
Word Clock that is being connected, switch off the Word Clock (LED
is off).
• If you want to synchronise the D/A converter with a Word Clock please
activate the Word Clock input (LED is on).
Please note:
If the Word Clock input is activated but there either is no cable connected
to the input or the cable does not carry a signal, the converter works
exactly the same way as if the input were not activated. The converter
automatically switches to standard operating mode.
3. Operating Modes

9
DA-SX Manual / english
4.1 Attenuation settings
To alter the volume of the audio signal and to adapt it to
specific requirements, you can use the “Att.” button.
The attenuation works within 5 cyclic steps (after the last
step follows the first) and each step attenuates the signal
by 10 dB.
Setting LED
-40 dB (factory setting)
-30 dB
-20 dB
-10 dB
0 dB
4.2 Notes on Level settings
The settings from -40 dB to -20 dB are rather suitable for monitoring
finished mixes, already mastered musical pieces or final consumer
sound carriers, especially if they have been mastered at high volumes.
The settings from -20 dB to 0 dB will be preferred when it comes
to monitoring of unmastered (sub)mixes, raw single audio tracks or
signals, etc., where the dynamic range of a 24Bit sampling is not being
fully utilized.
The two volume controls on the frontpanel of your SX monitor are not
active (whereas the filters are active ) when you use the digital inputs.
Thus, a fine tuning of the volume other than the 10 dB steps has to be
done in the digital domain.
Please note:
Especially at attenuation steps of -20 dB to 0 dB it is possible that you
overdrive your SX monitor. We recommend utmost care when using the
digital settings.
4. Attenuation of the audio signal
Channel
S/PDIF
AES3
Word Clock In
Digital
Thru
Att.
Mode
DIGITAL INPUTS
Clock
XLR
-0dB -20dB
-10dB -30dB
-40dB
Coax Optical
L R
Channel
S/PDIF
AES3
Word Clock In
Digital
Thru
Att.
Mode
DIGITAL INPUTS
Clock
XLR
-0dB -20dB
-10dB -30dB
-40dB
Coax Optical
L R
Channel
S/PDIF
AES3
Word Clock In
Digital
Thru
Att.
Mode
DIGITAL INPUTS
Clock
XLR
-0dB -20dB
-10dB -30dB
-40dB
Coax Optical
L R
Channel
S/PDIF
AES3
Word Clock In
Digital
Thru
Att.
Mode
DIGITAL INPUTS
Clock
XLR
-0dB -20dB
-10dB -30dB
-40dB
Coax Optical
L R
Channel
S/PDIF
AES3
Word Clock In
Digital
Thru
Att.
Mode
DIGITAL INPUTS
Clock
XLR
-0dB
-20dB
-10dB -30dB
-40dB
Coax Optical
L R
Channel
S/PDIF
AES3
Word Clock In
Digital
Thru
Att.
Mode
DIGITAL INPUTS
Clock
XLR
-0dB -20dB
-10dB -30dB
-40dB
Coax Optical
L R

10
All ADAM products are designed and manufactured to the highest quality standards.
However, if any problems with your D/A converter card occur, we recommend to
proceed as follows:
5.1 Problem: The blue “D/A” LED on the frontpanel is glowing but there is no audio
signal:
• The “D/A” LED only glows when a valid digital audio data stream is being re-
ceived correctly. If there’s no audible signal, there probably is ‘digital silence’ (i.e.
the channel is muted via the mixing desk, etc.).
5.2 Problem: I have plugged in a cable that surely carries a valid audio data stream
but neither is the “D/A” LED glowing nor is there any audio signal:
• Have you chosen the correct input with your D/A converter?
• Are you using a specified digital cable, not longer than necessary and in one
piece?
• Have you accidentally plugged an AES/EBU digital cable into the analog input?
5.3 Problem: I can hear parasitic noises.
• If you are using word clock: a) Does its rate fit the digital signal and b) is it really
sample-synchronous to the digital signal?
• Some word clock splitters allow for multiples of the incoming frequency. Please
make sure that you have not accidentally set for a multiple.
5. Troubleshooting

11
DA-SX Manual / english
We,
ADAM Audio GmbH
whose registered office is situated at
Ederstr. 16, 12059 Berlin, Germany
declare under our sole responsibility that the product:
DA-SX
complies with the EU Electro-Magnetic Compatibility (EMC) Directive 89/336/EEC, in
pursuance of which the following standards have been applied:
EN 61000-6-1 : 2001
EN 61000-6-3 : 2001
EN 55020 : 2002
EN 55013 : 2001
and complies with the EU General Product Safety 2001/95/EC, in pursuance of which
the following standard has been applied:
EN 60065 : 2002.
This declaration attests that the manufacturing process quality control and product
documentation accord with the need to assure continued compliance.
The attention of the user is drawn to any special measures regarding the use of this
equipment that may be detailed in the owner’s manual.
Signed:
Klaus Heinz
Director ADAM Audio
6. EU Declaration of Conformity

12
ADAM Audio GmbH provides a five year limited warranty for this product.
7.1 Terms and Conditions
This warranty is limited to the repair of the equipment or, if necessary, the re-
placement of parts or the product and return shipping within the country of
purchase.
This warranty complements any national/regional law obligations of dealers or
national distributors and does not affect your statutory rights as a customer.
Neither other transportation, nor any other costs, nor any risk for removal, trans-
portation and installation of products is covered by this warranty.
Products whose serial number have been altered, deleted, removed or made illeg-
ible are excluded from this warranty.
The warranty will not be applicable in cases other than defects in materials and/or
workmanship at the time of purchase and will not be applicable:
a) for damages caused by incorrect installation, connection or packing,
b) for damages caused by any use other than correct use described in the user
manual,
c) for damages caused by faulty or unsuitable ancillary equipment,
d) if repairs or modifications have been executed by an unauthorized person,
e) for damages caused by accidents, lightning, water, fire heat, public disturbances or
any other cause beyond the reasonable control of ADAM Audio.
7.2 How to claim repairs under warranty
Should service be required, please contact the ADAM Audio dealer where the
product has been purchased.
If the equipment is being used outside the country of purchase, the international
shipping costs have to be paid for by the owner of the product.
Service may be supplied by your ADAM Audio national distributor in the country of
residence. In this case, the service costs have to be paid for by the owner of the
product whereas the costs for parts to be repaired or replaced are free of charge.
Please visit our website to get the contact details of your local distributor.
To validate your warranty, you will need a copy of your original sales invoice with
the date of purchase.
7. Warranty

13
DA-SX Manual / english
8. Technical Data
DA-SX D/A Converter
Input Formats AES/EBU (AES3), SPDIF, TOSLINK
Supported Sampling rates 32 kHz, 44.1 kHz, 48 kHz, 88.2 kHz, 96 kHz, 176.4 kHz, 192 kHz
Supported Bit Depth 16 - 24 Bit
THD+N @ 1 kHz, 0 dBfs, 24 Bit ≤ -104 dB (= ≤ 0,0006% at all sampling rates, bandwith: 20 kHz)
Signal to Noise ratio @ 0 dB Attenuation ≥ 114 dB
Warranty 5 years
Operating temperature 0° C to 40° C (32° F to 104° F)

Notes/Notizen
............................................................................................................
............................................................................................................
............................................................................................................
............................................................................................................
............................................................................................................
............................................................................................................
............................................................................................................
............................................................................................................
............................................................................................................
............................................................................................................
............................................................................................................
............................................................................................................
............................................................................................................
............................................................................................................
............................................................................................................
............................................................................................................
............................................................................................................
............................................................................................................
............................................................................................................
............................................................................................................
............................................................................................................
............................................................................................................
............................................................................................................
...........................................................................................................
...........................................................................................................
............................................................................................................
............................................................................................................
............................................................................................................
............................................................................................................
............................................................................................................
............................................................................................................

DA-SX
D/A Converter
Bedienungsanleitung
deutsch
Channel
S/PDIF
AES3
Word Clock In
Digital
Thru
Att.
Mode
DIGITAL INPUTS
Clock
XLR
-0dB -20dB
-10dB -30dB
-40dB
Coax Optical
L R

16
Inhalt
Einleitung ................................................17
1. Montage ..................................................18
1.1 Wichtige Hinweise ...................................18
1.2 Einbau .....................................................18
2. Anschlüsse ..............................................19-20
2.1 AES3 (XLR) ..............................................19
2.2 SPDIF coaxial ..........................................19
2.3 AES3 optisch (TOSLINK) ..........................19
2.4 Digital Thru (XLR) ....................................20
2.5 Word Clock In ..........................................20
3. Betriebsarten ..........................................21-22
3.1 Auswahl und Anzeige ..............................21
3.2 Digitaleingänge .......................................21
3.3 Kanalauswahl ..........................................21
3.4 Synchronisierung/Word Clock ................22
4. Absenkung des Ausgangspegels .............23
4.1 Absenkung/Anzeige ................................23
4.2 Hinweise zur Pegeleinstellung .................23
5. Fehlerbehebung ......................................24
5.1 D/A-Anzeige leuchtet, aber kein Signal ..24
5.2 D/A-Anzeige leuchtet nicht, kein Signal . . 24
5.3 Störgeräusche .........................................24
6. Konformitätsbescheinigung .....................25
7. Garantie ..................................................26
7.1 Garantiebedingungen ..............................26
7.2 Inanspruchnahme ...................................26
8. Technischen Daten ..................................27

17
DA-SX Bedienungsanleitung / deutsch
1. Einleitung
Sehr verehrte Kundin, sehr verehrter Kunde,
vielen Dank, dass Sie sich für den ADAM DA-SX Digital-/Analog-Wandler entschieden
haben. Er wurde konzipiert, um die ADAM Monitore der SX Serie (S2X, S3X-H, S3X-V,
S4X-H, S4X-V, S5X-H, S5X-V) direkt in eine digitale Signalkette einbinden zu können.
Er wird im rückwärtigen Slot des Verstärkereinschubs montiert und kann sowohl AES/
EBU- Signale als auch SPDIF und TOSLINK verarbeiten.
Bitte lesen Sie diese Bedienungsanleitung vor der Inbetriebnahme und beachten
Sie die Sicherheitshinweise und Garantiebestimmungen. Die nachfolgenden Tipps und
Überlegungen sollen Ihnen dabei helfen, die Fähigkeiten des Wandlers möglichst gut
zu nutzen.
Sollten Sie Fragen zu weiteren Einzelheiten haben oder Probleme auftauchen, zögern
Sie bitte nicht uns zu kontaktieren. Wir helfen gerne!
Detaillierte Informationen zu den ADAM-Technologien und Produkten, ausführliche
Testberichte und Hintergrundberichte finden Sie auf unserer Website:
www.adam-audio.com
Wenn Sie Ihre Erfahrungen mit unseren Produkten mit anderen ADAM-Usern teilen
wollen oder die aktuellsten Informationen suchen, besuchen Sie uns auf Facebook
und Twitter!
Wir wünschen Ihnen viele schöne Stunden mit Ihrem neu erworbenen ADAM-Produkt.
Ihr ADAM Audio Team aus Berlin

18
2. Montage
2.1 Wichtige Hinweise
Vergewissern Sie sich vor dem Einbau des DA-SX, dass sowohl die Lautsprecher
(Netzschalter) ausgeschaltet als auch deren Netzstecker gezogen sind.
Bitte lassen Sie beim Einbau des DA-SX Vorsicht walten. Sollte sich der Wandler
nicht ohne größere Widerstände einbauen lassen, wenden sie keine Gewalt an. Bei
Problemen kontaktieren Sie bitte unseren Service/Support.
2.2 Einbau
a) Nehmen Sie die Blindplatte von der SX-Rückwand ab, indem Sie die beiden
Schrauben entfernen.
b) Führen Sie den DA-SX an den Schienen entlang in den Schacht ein. Sollte ein
Widerstand zu spüren sein, drücken Sie die beiden Kondensatoren im Schacht
ganz leicht zu Seite.
c) Befestigen Sie das Panel mit mittlerem Daumendruck, bis ein bündiger Sitz er-
reicht wird.
d) Schrauben Sie das Panel fest.
Channel
S/PDIF
AES3
WordClock In
Digital
Thru
Att.
Mode
DIGITALINPUTS
Clock
XLR
-0dB -20dB
-10dB -30dB
-40dB
Coax Optical
L R
Channel
S/PDIF
AES3
WordClock In
Digital
Thru
Att.
Mode
DIGITALINPUTS
Clock
XLR
-0dB -20dB
-10dB -30dB
-40dB
Coax Optical
L R

19
DA-SX Bedienungsanleitung / deutsch
Eine besonders häufig gestellte Frage betrifft die Möglichkeit, ob man den analogen
und den digitalen Eingang gleichzeitig nutzen kann. Ja, denn die Signale von analogem
und digitalem Eingang werden intern zusammengemischt. Wir empfehlen jedoch, für
höchste Qualität und einen optimimalen Rauschspannungsabstand, immer nur eine
Eingangsart zu benutzen und das nicht benötigte Kabel abzuziehen.
3.1 AES3 (XLR)
Die bevorzugte Anschlussart auch für lange Kabelwege
bis 100m.
Bitte verwenden Sie nur echte AES/EBU-Digitalaudio-Kabel,
symmetrisch und mit 110Ohm Wellenwiderstand (kein normales
XLR-Mikrofonkabel) und vermeiden Sie es, Kabel zu verlängern
oder zu stückeln.
3.2 SPDIF coaxial
Für unsymmetrisches 75Ohm-Coaxialkabel mit RCA-Steckern
(Cinch-Stecker).
Bitte verwenden Sie auch hier nur spezifizierte Digitalkabel
(bis max. 10m) und vermeiden Sie es, diese zu verlängern.
Bitte beachten Sie:
Die RCA-Steckverbindung ist mechanisch weniger stabil als andere Anschlüsse.
3.3 AES3 optisch (TOSLINK)
Für TOSLINK-Lichtleiterkabel (mögliche Länge je nach
Qualität/Fasertechnologie bis zu 10m).
Bitte beachten Sie:
Prinzipbedingt ist die TOSLINK-Verbindung mechanisch leider recht fragil und stör-
anfällig und daher nur für kurze Kabelwege gut geeignet.
3. Anschlüsse
Channel
S/PDIF
AES3
Word Clock In
Digital
Thru
Att.
Mode
DIGITAL INPUTS
Clock
XLR
-0dB -20dB
-10dB -30dB
-40dB
Coax Optical
L R
Channel
S/PDIF
AES3
Word Clock In
Digital
Thru
Att.
Mode
DIGITAL INPUTS
Clock
XLR
-0dB -20dB
-10dB -30dB
-40dB
Coax Optical
L R
Channel
S/PDIF
AES3
Word Clock In
Digital
Thru
Att.
Mode
DIGITAL INPUTS
Clock
XLR
-0dB -20dB
-10dB -30dB
-40dB
Coax Optical
L R

20
3.4 Digital Thru (XLR)
Das Signal des ausgewählten Eingangs wird hier 1:1 wieder
ausgegeben, Sinn ist das Durchschleifen des Signals auf den
zweiten Lautsprecher für die Stereowiedergabe.
Bitte verwenden Sie nur echte AES/EBU-Digitalaudio-Kabel,
symmetrisch und mit 110Ohm Wellenwiderstand (kein normales
XLR-Mikrofonkabel) und vermeiden Sie es, Kabel zu verlängern
oder zu stückeln.
Bitte beachten Sie:
Stecken Sie nie ein Kabel mit einem Digitalsignal in einen analogen XLR-Eingang
oder umgekehrt!
3.5 Word Clock In
Hier lässt sich eine studioübliche WordClock anschließen,
die zum einen die gleiche Frequenz haben muss wie die Ab-
tastfrequenz (Samplerate) des digitalen Audiosignals und
zum anderen synchron zu dieser getaktet sein muss.
Standardmäßig ist der Eingang terminiert. Sollte dies nicht erwünscht sein (weil
extern terminiert wird und/oder die WordClock durchgeschliffen werden soll zu
einem weiteren Gerät), kann die Terminierung mit einem Jumper auf der Unterseite
der Baugruppe deaktiviert werden.
Wir empfehlen jedoch immer die direkte Einzelverbindung von einem WordClock-
verteiler zu jedem Gerät, weil das Weiterschleifen und externe Terminieren des
WorldClocksignals (immer am letzten Gerät) BNC-T-Stücke und BNC-Abschlusswi-
derstände erfordert und damit störungsanfälliger ist.
Kabel: 75Ohm-Coaxialkabel mit BNC-Steckverbindern (als „WordClock-Kabel“ im
Handel erhältlich).
3. Anschlüsse
Channel
S/PDIF
AES3
Word Clock In
Digital
Thru
Att.
Mode
DIGITAL INPUTS
Clock
XLR
-0dB -20dB
-10dB -30dB
-40dB
Coax Optical
L R
Channel
S/PDIF
AES3
Word Clock In
Digital
Thru
Att.
Mode
DIGITAL INPUTS
Clock
XLR
-0dB -20dB
-10dB -30dB
-40dB
Coax Optical
L R
Table of contents
Languages:
Popular Media Converter manuals by other brands

Terahertz Technologies
Terahertz Technologies TIA-1200 operating instructions

Hall Research Technologies
Hall Research Technologies EX-HDU-WP user manual

TR-Electronic
TR-Electronic CEV84M-8192/4096 EIP 36ZB10FL +ST manual

Enpirion
Enpirion EN6337QI user guide

Aurora
Aurora ASP-CTH user guide

Calpeda
Calpeda I-MAT 5,2 TT-A operating instructions