Adec Decade 1021 User manual

Owner's Guide
®
DECADE®
1021 VAC
BACK CHAIR
85-2625-00
2625 DB Cover/Back Page 10/15/99 7:30 AM Page 1

Printed in U.S.A .• Copyright © 1996 • All Rights Reserved
Warranty
A-dec warrants its products against defects in material or
workmanship for one year from time of delivery (except
for handpieces which have a warranty period of six
months). A-dec’s sole obligation under the warranty is to
provide parts for the repair, or at its option, to provide the
replacement product (excluding labor). The buyer shall
have no other remedy. (All special, incidental, and
coincidental damages are excluded.) Written notice of
breach of warranty must be given to A-dec within the
warranty period. The warranty does not cover damage
resulting from improper installation or maintenance,
accident or misuse. The warranty does not cover damage
resulting from the use of cleaning, disinfecting or
sterilization chemicals and processes. The warranty also
does not cover light bulbs. Failure to follow instructions
provided in A-dec’s Operation and Maintenance
Instructions (Owner’s Guide) may void the warranty.
NO OTHER WARRANTIES AS TO
MERCHANTABILITY OR OTHERWISE ARE MADE
®
All product names used in this document are trademarks or
registered trademarks of their respective holders.
2625 DB Cover/Back Page 10/15/99 7:30 AM Page 3
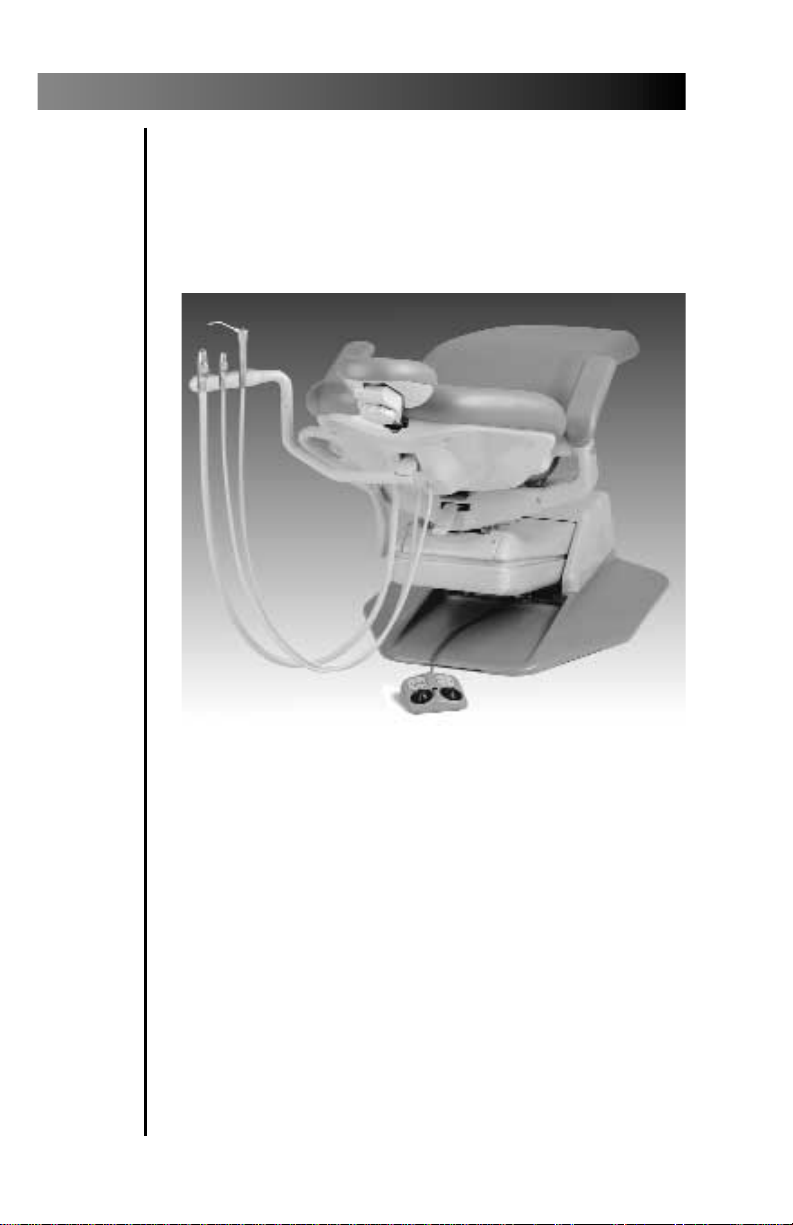
Decade 1021 Vac Back Chair
Decade 1021 Vac Back Chair
2625 DB Cover/Back Page 10/15/99 7:30 AM Page 4

About Your Decade 1021 Vac Back Chair ....... 2
Controls ............................................................ 2
Master On/Off Toggle ................................ 2
On/Off Indicator ........................................ 3
Instruments and Accessories ............................ 3
Care Instructions .............................................. 4
(Refer also to the Equipment Asepsis Owner's
Guide,Publication No. 85-0696-00)
Adjustments ..................................................... 5
Arm Adjustment ........................................ 5
Syringe Air and Water Pressure ................. 6
Troubleshooting ............................................... 7
1
CONTENTS
Decade 1021 Vac Back Chair
Operation
Maintenance
2625 DB Doc, 1021 Vac Back 10/15/99 7:29 AM Page 1

Your Decade 1021 Vac Back chair is available in
two configurations:
1. As part of an integrated delivery system that is
connected into the regulated air and water
supplies of an existing delivery system; or
2. As a free-standing delivery system that does
not require air and water connections to an
existing delivery system.
The Vac Back comes equipped with the following
instrumentation: autoclavable saliva ejector,
autoclavable high volume evacuator (HVE), auto-
clavable syringe, and solids collector.
The Master On/Off toggle turns the water to the
Vac Back chair ON or OFF. When the system is left
unattended or is no longer in use, the Master
On/Off Toggle should remain in the OFF position.
2
Decade 1021 Vac Back Chair
OPERATION
About Your Decade 1021 Vac Back Chair
Controls
Master On/Off Toggle
(Free Standing Configuration Only)
Figure 1. Master On/Off Toggle and Indicator
MASTER
ON/OFF TOGGLE
(shown in the
OFF position)
ON/OFF
INDICATOR
2625 DB Doc, 1021 Vac Back 10/15/99 7:29 AM Page 2

When the Master On/Off toggle is in the ON
position, the On/Off Indicator will be red, indicating
that the unit is pressurized. (This is not a lamp; the
indicator is operated by air pressure.)
The Master On/Off toggle and On/Off Indicator
are located on the top of the floor box (See Figure 1)
for free standing configurations only. For other
configurations, the Master On/Off toggle can be
found on the delivery system.
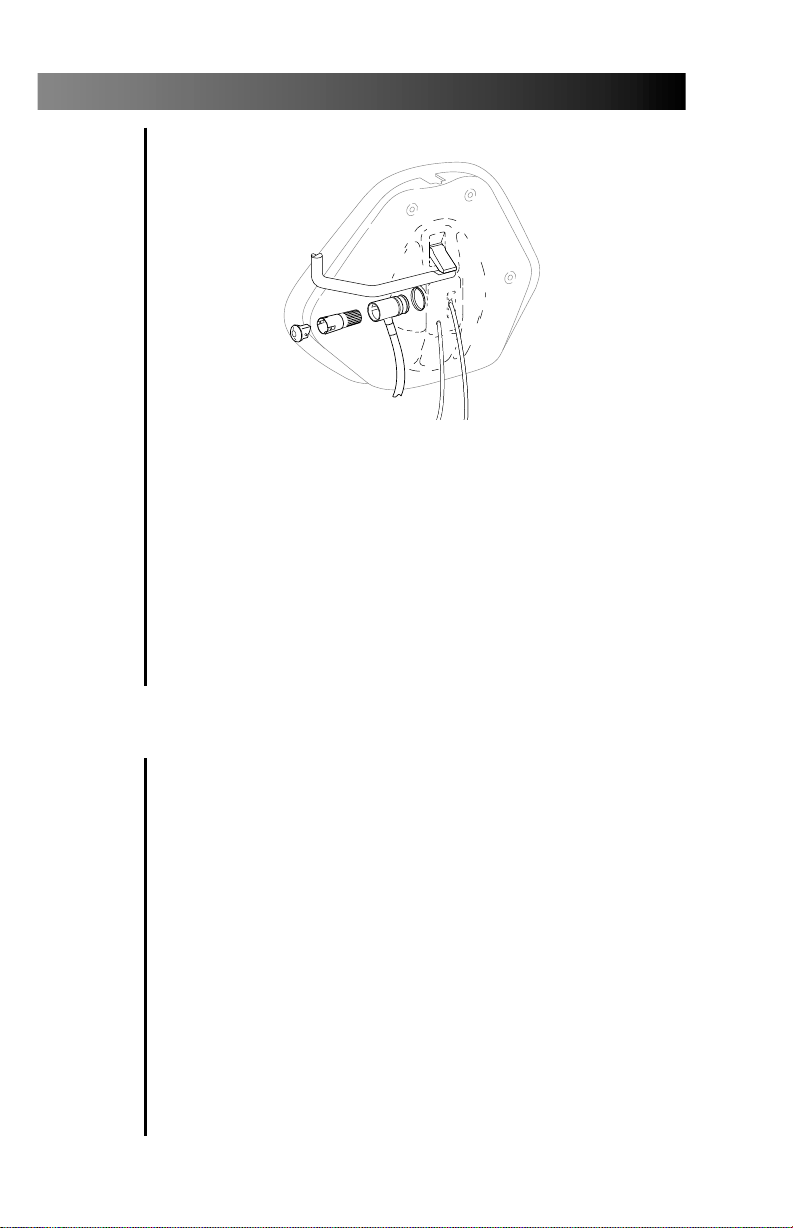
Autoclavable Syringe. The syringe on your Vac
Back Chair is A-dec’s autoclavable air and water
syringe (see Figure 2).
Autoclavable Saliva Ejector. The saliva ejector is
equipped with an on/off control valve (see Figure 2).
Autoclavable HVE. Your 1021 Vac Back comes
with one (standard) or two (optional) autoclavable
HVE(s) (see Figure 2).
3
Decade 1021 Vac Back Chair
On/Off Indicator
(Free Standing Configuration Only)
Instruments and Accessories
Figure 2. Assistant’s Instrumentation
AUTOCLAVABLE
HIGH VOLUME
EVACUATOR
(HVE)
AUTOCLAVABLE
SYRINGE AUTOCLAVABLE
SALIVA
EJECTOR
2625 DB Doc, 1021 Vac Back 10/15/99 7:29 AM Page 3
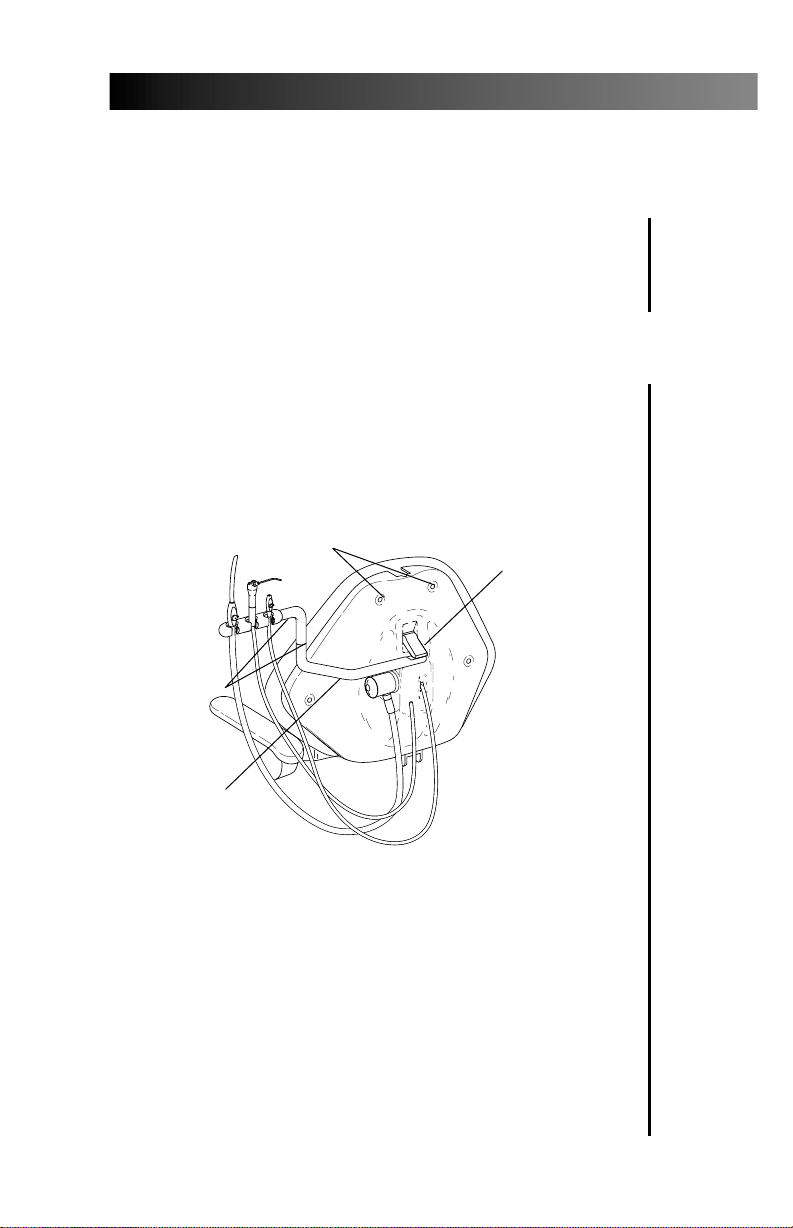
Solids Collector. The solids collector, located
on the chair back, collects solids and prevents
them from entering the central vacuum system
(see Figure 3).
For operating instructions, refer to your Assistant’s
Instrumentation Owner's Guide ( A-dec Publication
No. 85-2610-00).
Your A-dec autoclavable syringe and vacuum
instruments were designed for easy cleaning and
infection control.
For vacuum instrument and syringe asepsis, refer
to your Assistant’s Instrumentation Owner’s Guide
(A-dec Publication No. 85-2610-00) and your
Autoclavable Syringe Owner’s Guide (A-dec
Publication No. 85-0680-00)
For further asepsis instructions, refer to your
Equipment Asepsis Owner’s Guide (A-dec Publication
No. 85-0696-00).
4
Decade 1021 Vac Back Chair
Figure 3. Solids Collector
Care Instructions
2625 DB Doc, 1021 Vac Back 10/15/99 7:29 AM Page 4
For system air and water adjustments, refer to
your Floor Boxes Owner’s Guide (A-dec Publication
No. 85-2611-00).
If the instrument holder arm on your chair starts to
droop when all the instruments are in place, or if the
arm swings too freely, an adjustment is necessary.
To adjust the horizontal angle of the arm, lift
the arm up and evenly tighten the break-away
mechanism screws (see Figure 4) with a 5⁄32-inch
hex key. Adjust arm to the desired position.
To adjust the tension at the joints of the arm
(see Figure 4), use a 3⁄32-inch hex key and turn the
adjustment screws clockwise to increase the tension,
counterclockwise to reduce the tension.
5
Decade 1021 Vac Back Chair
Adjustments
Arm Adjustment
Figure 4. Arm Adjustment
CHAIR BACK
RETAINING SCREWS (4)
BREAKAWAY
MECHANISM
(adjustment
screws
underneath)
INSTRUMENT
HOLDER ARM
ARM JOINT
ADJUSTMENT
SCREWS
2625 DB Doc, 1021 Vac Back 10/15/99 7:29 AM Page 5
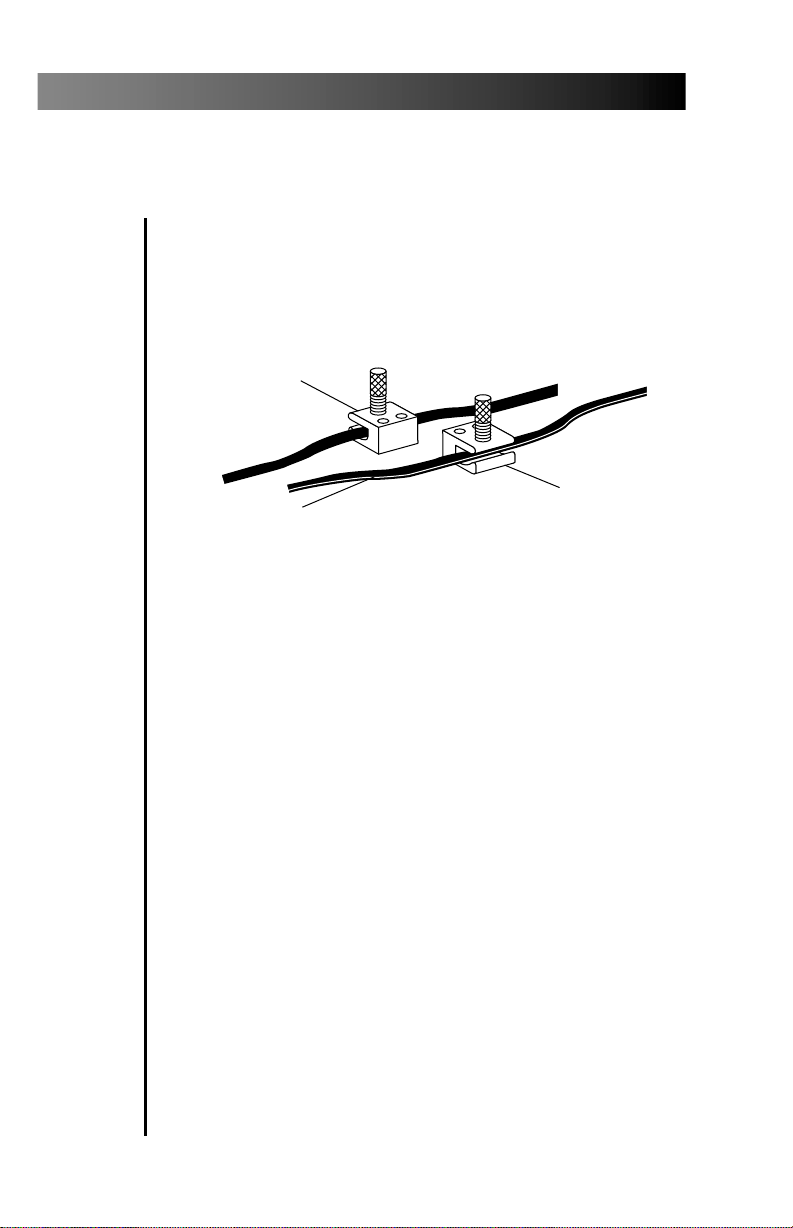
Syringe air and water flow are controlled by
two pinch valves in the chair back (see Figure 5).
Remove the four chair back cover screws, then
remove the cover to access the pinch valves
(see Figure 4 on page 5).
Move the Master On/Off toggle to the ON
position and make sure there is air and water
pressure to the syringe. To adjust the water flow,
press the left syringe button and turn the water
pinch valve clockwise to decrease flow or
counterclockwise to increase flow. A strong
water flow is recommended.
Push both syringe buttons (the spray position)
and adjust the air flow pinch valve to achieve the
desired spray.
6
Decade 1021 Vac Back Chair
Syringe Air and Water Pressure
Figure 5. Syringe Pinch Valves
WATER FLOW
PINCH VALVE
AIR FLOW
PINCH VALVE
TUBING WITH
RIB (air)
2625 DB Doc, 1021 Vac Back 10/15/99 7:29 AM Page 6

Given proper care, your Vac Back chair will
provide years of reliable service. In the event
that something does go wrong with the unit,
this troubleshooting guide will tell you what
to do before calling to have it serviced.
This guide is not intended to isolate every problem
that could arise. Rather it is designed so you can
quickly identify the problems that can be repaired
without special training or equipment.
If the following procedures do not identify and
correct the problem, then you should call your
authorized A-dec dealer. Any time you call your
dealer, be prepared to provide them with this
information:
1. Model number*
2. Serial number*
3. Symptoms of the problem
4. What action you have taken toward
correcting the problem
*The Vac Back chair model and serial number tag is
located under the seat/toeboard, beside the spring. In all
cases, the first four digits on the tag are the model number,
the rest of the digits are the serial number.
7
Decade 1021 Vac Back Chair
MAINTENANCE
Troubleshooting
2625 DB Doc, 1021 Vac Back 10/15/99 7:29 AM Page 7

No Air from the Syringe
1. Is the Master On/Off toggle in the ON position?
Yes: Proceed with Step 2.
No: Move the toggle to the ON position
and retest.
2. Is the air compressor ON and operating
properly?
Yes: Proceed with Step 3.
No: Correct any problems in the compressor,
then retest the unit.
3. Is the manual air shutoff valve in the floor box
fully OPEN (turned fully counterclockwise)?
Yes: Proceed with Step 4
No: Turn the valve fully counterclockwise,
then retest the unit.
4. Is the syringe air flow pinch valve
completely closed?
Yes: Turn the air flow adjustment screw
counterclockwise to the desired flow,
then retest the unit.
No: Look for pinched or crimped tubing
between the floor box and the syringe.
No Water from the Syringe
1. Does the Indicator on the floor box turn
red when the Master On/Off Toggle is in
the ON position?
Yes: Proceed with Step 2 on page 9.
No: Make sure signal air is reaching the air-
actuated water shutoff valve. Look for
pinched or crimped signal air tubing.
8
Decade 1021 Vac Back Chair
2625 DB Doc, 1021 Vac Back 10/15/99 7:29 AM Page 8

2. Is the manual water shutoff valve in the
floor box fully OPEN (refer to your Floor
Boxes Owner’s Guide, Publication No.
85-2611-00)?
Yes: Proceed with Step 3.
No: Turn the valve fully counterclockwise,
then retest the syringe.
3. Remove and inspect the water filter screen
(refer to your Floor Boxes Owner’s Guide,
Publication No. 85-2611-00). Is the screen
clogged?
Yes: Replace the filter and retest the syringe.
No: Look for pinched or crimped tubing
between the floor box and the syringe.
4. Is the syringe water flow pinch valve
completely closed?
Yes: Turn the water flow adjustment screw
counterclockwise to the desired flow,
then retest the unit.
No: Look for pinched or crimped tubing
between the floor box and the syringe.
Inadequate or No Vacuum
1. Is the central vacuum turned on?
Yes: Proceed with Step 2.
No: Turn on the central vacuum and retest.
2. Remove and inspect the solids collector
screen (refer to page 4). Is the screen clogged
with debris?
Yes: Clean the screen and retest.
No: The vacuum supply to the Decade 1021
Vac Back Chair is clogged. Contact your
authorized A-dec dealer for assistance.
If the preceding steps failed to correct the
problem, contact your authorized A-dec dealer
for further recommendations.
9
Decade 1021 Vac Back Chair
2625 DB Doc, 1021 Vac Back 10/15/99 7:29 AM Page 9

10
Decade 1021 Vac Back Chair
Notes
2625 DB Doc, 1021 Vac Back 10/15/99 7:29 AM Page 10

Printed in U.S.A.
Copyright © 1996
All Rights Reserved
Made with 50% waste paper
2601 Crestview Drive
Newberg, Oregon 97132 U.S.A.
Telephone 1-800-547-1883
(503) 538-7478
Fax (503) 538-0276
®
85-2625-00
12/96 Rev B (6879)
2625 DB Cover/Back Page 10/15/99 7:31 AM Page ii
Table of contents
Other Adec Dental Equipment manuals


Popular Dental Equipment manuals by other brands

TKD
TKD TITANUS E operating instructions

Woodpecker
Woodpecker WP-1L Repair manual

Belmont
Belmont BELRAY II 097 installation instructions

Anthogyr
Anthogyr MONT BLANC 10000XL Instructions for use

Biosonic
Biosonic Suvi Elite quick start guide

Guilin Woodpecker Medical Instrument
Guilin Woodpecker Medical Instrument HL11-M4 instruction manual


