Adexa VS5490 User manual

VS5490 VACUUM SEALER
INSTRUCTIONS

IMPORTANT SAFEGUARDS
When using this electrical appliance, safety precautions
should always be observed, including the following:
READ ALL INSTRUCTIONS
1. Carefully read all of the instructions before using this appliance and
save for future reference.
2. Before plugging cord into wall outlet, or disconnecting, make sure
that the cover of the machine is in unlocked condition, and unplug
from outlet when not in use or before cleaning.
3. This appliance is not a toy, when used by or near children, close
attention is necessary, and store this appliance to a safe place, out
of the reach of children.
4. Do not use any bags or attachments not recommended or appointed,
and don’t use this appliance for other purpose except its intended
use.
5. Stop using the machine immediately if the cord is damaged and
have it replaced by a professional.
6. Keep away from moving parts.
7. Do not contact the hot sealing element located on edge of the top
housing of this machine. It is hot and may get burn.
8. Do not try to repair this appliance by yourself.
9. Don't use the appliance if it has fallen or appeared to be damaged.
10. Avoid to do the following: pull or carry by the cord, use cord as a
handle, close a door on cord, or pull cord around sharp edges or
corners. Do not operate appliance over cord or cord / plug is wet.
11. Keep away from hot gas, heated oven, electric burner or any other
hot surfaces. Do not use this appliance on wet or hot surface or near

- 1 -
a heat source.
12. It’s better not to use an extension cord with this unit. However, if one
is used, it must have a rating equal to or exceeding the fating of this
appliance.
13. When disconnect, to avoid any injury, please unplug by grasp the
plug, not the cord.
14. Before plugging appliance in or operating, make sure your hands are
dry and safe to do the actions.
15. When it In “ON” or working position, always be on a stable surface,
such as table or counter.
16. It’s no need to use any lubricant, such as lubricating oils or water, on
this appliance.
17. Do not immerse any part of this appliance, power cord or plug in
water or any other liquid.
18. Do not use this appliance outdoors or on a wet surface, it’s
recommended for household, indoor use only.
19. This appliance is not intended for use by persons (including children )
with reduced physical, sensory or mental capabilities, or lack of
experience and knowledge, unless they have been given supervision
or instruction concerning use of the appliance by a person
responsible for their safety.
20. Children should be supervised to ensure that they do not play with
the appliance.
21. If the supply cord is damaged, It must be replaced by the
manufacturer, its service agent or similarly qualified persons in
order to avoid a hazard.
22. Cleaning and user maintenance shall not be made by children
without supervision.

- 2 -
CAUTION:
SAVE THESE INSTRUCTIONS
FOR HOUSEHOLD USE ONLY
AB:1MIN PER CYCLE
CONSTRUCTION AND FUNCTIONS
1. AUTO VAC/SEAL-DRY: At stand-by condition, it starts the automatic
operation of vacuuming the bag and then automatically seals the
bag when vacuum is complete; this function for dry bags and items
without moisture, with a shorter heat sealing time.
2. AUTO VAC/SEAL-MOIST: At stand-by condition, it starts the automatic
operation of vacuuming the bag and then automatically seals the
bag when vacuum is complete; this function for wet bags or foods
with a little moisture, with a longer heat sealing time.
3. PULSE :Press this button, and the device starts vacuuming; undo, it will stop.
This process can be repeated. Then press “SEAL ONLY” when
meet desired pressure, turn to seal. Different pressure according
to different type of foods can be chosen.

- 3 -
4. SEAL ONLY: This button provides two functions:
⚫To seal the open end of a bag, used to make a bag from a bag roll;
⚫When the automatic “Vacuum &seal”function is in operation, this button
stops vacuuming the bag and immediately starts to seal the bag so that
less vacuum pressure inside the bag can be controlled by the operator
to avoid crushing for delicate items.
⚫The motor pump will operate a few second for this function.
5. PROGRESS : This screen is the LED display apparatus and show the
operation progress functions.
●show that the progress of vacuuming.
●show that the progress of sealing.
●show that the progress of marinate.
●When “CLOSE LID”is light, show lid is no lock, put down the handle to lock
the cover, “READY”will be light, then you can start the
operation. When “COMPLETE”is light, the operation is
complete.
6.MARINATE: Press to marinate food in a marinator bowl. Press this button , the
specific marinating cycle begins. This operation no need to lock the cover.

- 4 -
7.CANISTER: To start vacuuming for canisters, jar lids, wine stoppers or other
accessories through a hose. This operation no need to lock the cover.
8. ACC PORT: To insert the hose for canister and wine stopper before
“marinates”or “canister”operations.
9. CANCEL : At working condition, it stops the machine.
10. FRONT HANDLE: Hold the center portion of the handle and press
down to lock the cover.And lift to open the cover.
11. POWER SWITCH: Power ON/OFF.
12.BAG CUTTER: Press and slide in one direction or another to cut
bags to a desired size.
13. CUTTER RACK:Support the cutter to slide along.
14. BACK COVER: Bag storage room cover.
- 5 -
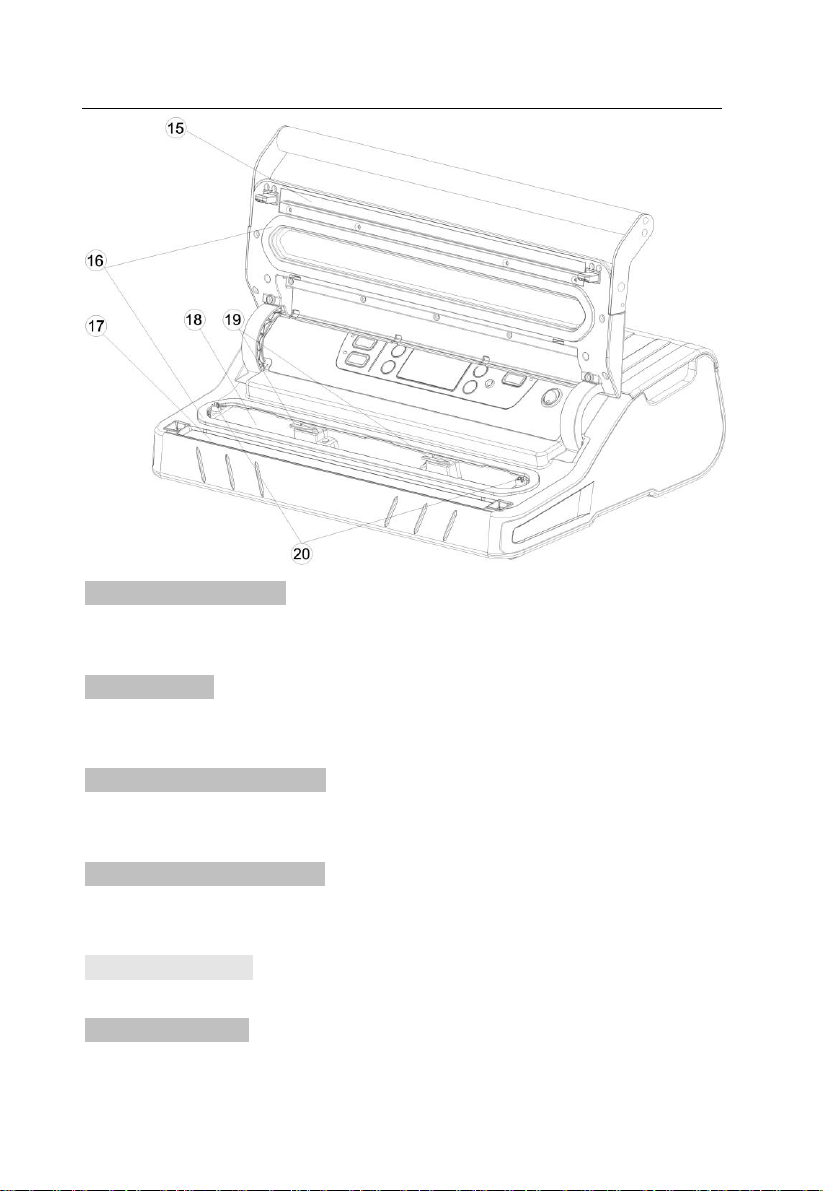
15. SEALING STRIP: Place the bag to be sealed over this strip. Clean and dry or
replace it when distorted or broken.
16. GASKET: Keep air away by forming vacuum chamber with upper and lower
gasket. Clean and dry or replace it when distorted or broken.
17. SEALING ELEMENT: Teflon-coated heating element which is hot and seals
the bag.
18.VACUUM CHAMBER: Position the open end of the bag inside the chamber,
draws air out of bag and catches any liquid overflow from the bag
19. BAG FIXER : to hold the open end of a bag for the placement of the bag.
20. AIR INTAKE: Air intake connects with vacuum chamber and pump. Do not
cover this intake when placing bag for vacuum&Seal operations.

- 6 -
21. POWER CORD FIXER : Storage the power cord.
22. POWER CORD : Power cord.
23. DOOR : ACC pipe storage room door.
24. ROOM : Storage the acc pipe.

- 7 -
OPERATING INSTRUCTIONS
I. Making a bag with bag roll
1. Open the back cover .
2. Make sure the bag cutter is on one end of the cutter rack, Then put
the cutter rack to the back.
3.Pull out the bag to the suitable length you want.
4.Put down the cutter rack and make sure it is on the right place of the
bags, then slide the cutter from one end to the other end to cut the bag.
5. Put one end of the bag on top of the sealing Element, the open end of
the bag on the lower gasket.
6. Close the top cover and press front handle to lock the top cover, you
should hear a “bee”tone, LED screen will display “ready”.
7. Press “Seal only”button to start sealing the bags, LED screen will
show the sealing progress.
8.When you hear a “bee”tone and LCD screen display “complete”, then
lift the handle to open the cover and take the bag out of the machine.
The bag is then done and is ready for vacuum sealing.
II. Vacuum packaging with a bag
1. Put the items inside the bag. Use only the special designed vacuum
bags supplied by us with vacuum channels.
2. Clean and straighten the open end of the bag, make sure no dust,
wrinkle or ripples.
3. Place the open end of the bag within the vacuum chamber area, make
sure the air intake is not covered by the bag.
4. Put the top cover down and press front handle to lock the top cover, you
should hear a “bee”tone, LED screen will display “ready”.
5. Choose the “dry”or “moist”auto vacuum seal button according to the
type of food; LED screen will show the vacuum and sealing progress.

- 8 -
NOTE: This product provides very high vacuum pressure during vacuum
packaging with a bag, in order to avoid crushing of the delicate item by
the high vacuum pressure, observe the status of the vacuum pressure
inside the bag and switch the “MANUAL SEAL”button immediately
when the desired vacuum pressure is achieved. The pump will stop and
change to heat-seal the bag.
6. When you hear a “bee”tone and LCD screen display “complete”, then
lift the handle to open the cover and take out the packed bags.
NOTE:
⚫For best vacuum and sealing effect, Wipe out any excess liquid
or food residue in the vacuum chamber after each bag
packaged.
⚫Your appliance can work only on the specific bags provided by
us. Do not attempt to use other bags not intended for vacuum
packaging. .
⚫Cut the bag straight across with scissors to open a sealed bag.
Ⅲ. Vacuum packaging with a bag using Pulse Vacuum
1.This function is preferred for vacuum packing, when you want a
slight vacuum effect such as e.g. tomatoes, chips or similar. Or, if you
have moist raw materials or a sauce, where you just want to drain air
from the bag and then stop the appliance before the liquid is
compressed.
2. Press Pulse button, the unit start to vacuum the bag , observe the
status of the vacuum pressure inside the bag . loose the Pulse button
immediately when the desired vacuum pressure is achieved.
3.Press the “seal only”button when the Vacuuming have been
completed, the unit start to seal the bag automatically.
Note: When you loose the pulse button, if you no press the seal
only button in 15 second, then the bag will loose the vacuum
and operation complete.

- 9 -
Ⅳ. Vacuum package in a Canister & Vacuum Bowl
1.Wipe canister cover, canister base and ensure they are clean and dry.
2.Put the items into the canister and do not fill up too full so that the
cover can be in good contact with the canister bowl rim. Clean the cover
rim of the canister and bottom seal gasket of the canister cover;
3. Insert one end of the hose into theACC port on the unit and another
end of the hose into the center hole of the canister cover.
4. Press the canister button to start vacuuming. To ensure there is no air
leaking between the cover and the canister, use your hand to push
down the cover at the beginning of the vacuuming work. The machine
will stop automatically when enough vacuum pressure is achieved.
5. Take out the hose tube from the canister or bowl immediately first after
the job is completed.
Note: When moist food are under vacuuming, moisture will be
stored in adaptor. Remember to clean up the adaptor if there is
water before vacuuming.
Open Canister after vacuum packaging
In order to open the canister, you need to press the “Release “button on
the canister cover.
Note:
⚫At the beginning of the vacuum packaging in a canister or a vacuum
bowl, slightly press down the cover or on the hose adaptor to ensure
no loose of the hose and to avoid air leaking through the gap
between the cover and the canister top rim for a few seconds.
⚫To test vacuum, simply tug on the cover. It shall not move;
⚫Different canisters are available in the market and also from Bigland.
The operation procedure will be a little different. Please refer to the
individual manual for the specific canister.
Ⅴ. Marinate meat with a marinate Bowl
1.Take out the hose accessory from side cover, insert it to canister port
on unit and the center hole of canister cover.

- 10 -
2.Press Marinate button to start working. The indicator LED will be light
and the screen will be show the progress. It will release air automatically
after finished vacuum, this is for 1 working cycle, this machine will total
working for 5 cycles. It takes about 6 minutes to finish the process.
3.When the indicator light crush out, then the screen show the
“complete”, the marinate process is completed. Pull off the hose
accessory from canister port and canister cover.
Note:
⚫At the beginning of the vacuum packaging in a canister, slightly
press down the canister cover or on the hose adaptor to ensure no
loose of the hose and to avoid air leaking through the gap between
the cover and the canister top rim for a few seconds.
⚫To test vacuum, simply tug on the cover. It shall not move;
⚫Do not press any button to interfere with the whole process
Ⅵ.Cord storage box
1.Put the power cord into the storage fixer when not use the machine
which is in the back of the machine. Do not wrap the cord around the
appliance.
CLEANING AND MAINTENANCE
Vacuum sealer
1. Always unplug the unit before cleaning.
2. Do not immerse in water or any other liquid.
3. Avoid using abrasive products or material to clean the unit, for
they will scratch the surface.
4. Use a mild dishwashing soap and a warm, damp cloth to wipe
away food residue or around components.
5. Dry thoroughly before using again.
Note: The foam gaskets around the vacuum chamber should be
dried thoroughly before re-assembling, when re-assembling,

- 11 -
is careful to prevent any damage, and assemble as original
position to ensure no vacuum leaking.
Vacuum bags
1. Wash bags in warm water with a mild dishwashing soap
2. When wash bags in dishwasher, turn bags inside out and spread
them over top rack of dishwasher, so entire surface is exposed to
the washing water.
3. Dry thoroughly before reusing.
IMPORTANT: To avoid possible illness, do not reuse bags
after storing raw meats, raw fish or greasy
foods. Do not reuse bags that have been
microwaved or boiled.
Accessories
Washing all vacuum accessories in warm water with a mild dishwashing
soap, But do not immerse cover in water.
1. Canister bases (not lids) are top rack dishwasher safe. But
canister cover should be wiping down with a damp cloth.
2. Ensure the accessories to be dry thoroughly before reusing.
3. Canister and cover is not allowed to use in microwave or freezer.
Storing Your Vacuum Sealer:
1. -Keep the unit in a flat and safe place, out of the reach of
children.
2. Do remember to make sure the lid of appliance is unlocked
when not in use and in storage. Keep the cover locked will
distort the foam gaskets causing leaking.
TROUBLE SHOOTING

- 12 -
Troubleshooting
Problem
Solution
Vacuuming but
seal function
is not good
Check if the edge of the bags has liquid, oil stain or any chippings?
If yes, please clean the edge of bags and try again.
Check if the heating element damage and good setting or not?
If damaged, please exchange the heating element and make sure it is well
installed.
Check if the sealing strip damage or well installed?
If damaged, please exchange the sealing strip and make sure it is well
installed.
Check if the edge of the bag has wrinkled?
If yes, please take out some foods so that the bags have enough space for
sealing and smooth the bag mouth and try again.
Seal function
is good but
can not
vacuuming
Check if the bags is placed into the vacuum chamber?
If not, please put the edge of bags into the vacuum chamber.
Check if the food with sharp angel?
If yes, please packing the angel with safe paper before vacuuming the food
Check if the edge of bag covered the suction hole?
If yes, please put the bag into the correct position.
Check if the gasket is deformed?
If deformed, replace it and try again.
Bag inflation
after
vacuuming
Check if the good is belong to easy corrosion foods?
All the easy corrosion goods are need to be frozen or refrigerated after
vacuuming so that it can prolong it’s shelf life. But vacuuming doesn’t
guarantee the foods will never spoil.

- 13 -
Check if you packed the fresh vegetables or fruit and seed food?
All fresh vegetables or fruit and seed are not suitable to storage under room
temperature after vacuumed, they have photosynthesis and respiration.
Suggest to storage them in refrigerated.
DISPOSAL OF THE DEVICE
PROTECTION OF THE ENVIRONMENT
At the end of the life of your product, it should go to a specially
adapted waste-recycling centre.
ENVIRONMENT PROTECTION FIRST
1. The symbol on the product or on its packaging indicates that
this product may not be treated as household waste. Instead it
should be handed over to the applicable. Collection point for the
recycling of electrical and electronic equipment.
2. By ensuring this product is disposed of correctly, you will help
prevent potential negative consequences for the environment and
human health, which could otherwise be caused by inappropriate
waste handling of this product .For more detailed information about
the recycling of this product, Please contact your local council
office or your household waste disposal service.

- 14 -
FOOD PRESERVATION GUIDELINES
Classificatio
n
Food Items
Temperature
Normal
Preservation
Vacuum
Preservation
Refrigerant
Fresh Raw Meat
5±3℃
2~3days
8~9days
Fresh Fish/ Sea
Food
5±3℃
1~3days
4~5days
Cooked Meat
5±3℃
4~6days
10~14days
Vegetables
5±3℃
3~5days
7~10days
Fruit
5±3℃
5~7days
14~20days
Eggs
5±3℃
10~15days
30~50days
Frozen
Meat
-16~-20℃
3~5months
>1yeas
Fish
-16~-20℃
3~5months
>1yeas
Sea Food
-16~-20℃
3~5months
>1yeas
Normal
condition
Bread
25±2℃
1~2days
6~8days
Biscuit
25±2℃
4~6months
>1yeas
Rice/ Flour
25±2℃
3~5months
>1yeas
Peanut/Legume
25±2℃
3~6months
>1yeas
Medical Material
25±2℃
3~6months
>1yeas
Tea
25±2℃
5~6months
>1yeas
Table of contents
Other Adexa Food Saver manuals


