Adhesive Dispensing 6oz Size User manual

6oz Size
Barrel Filler
USER GUIDE

Introduction
Thank you for purchasing the 900-60 Syringe Barrel Filling
Station. Our syringe barrel filling systems are built and pre-
assembled using high uality parts to ensure that your time is
spent where it belongs, on productivity. The 900-60 is built to
accept all 6oz (180cc) cartridges. You can use pre-filled 6oz
supplied cartridges or empty cartridges from us. This user
guide will answer most of the most common uestions and
help you to maximise the benefits from your new syringe barrel
filling station.
This version incorporates an industrial grade pressure vessel
retainer with air cap, adjustable stand and all accessories
re uired to achieve results. Designed for use on a work bench
and as part of a production process, we keep the syringe
barrel filling process clean, simple and fast. This is a simple
system for setup straight out of the box for direct connection to
a pneumatic dispenser or regulated air supply.
To achieve maximum performance from Adhesive Dispensing
e uipment, please read the instructions carefully.
After completing this guide, please do not hesitate to contact
the technical team at Adhesive Dispensing Ltd or contact your
authorised Adhesive Dispensing Ltd reseller.
Tel. 00 44 845 652 0058
Fax. 00 44 845 652 0059

Table of Contents
………………………………………………………………………………………………………………
Page
Specifications …………………………………………………………………………………………… 4
First Steps ……………………………………………………………………………………………… 5
Setup ……………………………………………………………………………………………………… 6
Reservoir Filling ………………………………………………………………………………………… 8
Component Selection Guide ……………………………………………………………………… 10
Troubleshooting ………………………………………………………………………………………… 11
Warranty ………………………………………………………………………………………………… 12
Our Pledge
We offer you the assurance that our products will operate and perform to your
satisfaction. Our goal is to provide the highest quality products for use with your
industrial applications.
If for any reason you feel that you are not satisfied with our products, we would be
grateful if you would write or call us to discuss.
We strive to develop strong partnerships by delivering cost effective solutions that
provide savings in assembly time and raw materials. So your confidence and trust in
Adhesive Dispensing td is of the utmost importance to us.
Thank you.

Specifications
Capacity: 180cc, 180ml (6oz)
Initiation: Pneumatic Dispenser
Air Input: 0 to 100psi (0 to 6.9 bar)
Pressure Vessel: Anodised Aluminium
Pressure Cap: Cast Aluminium
Base Stand: Steel and Stainless Steel Rod
Weight: 1.2kg (without filled cartridges)
4

First Steps
Step 1:
Unpack the shipping box and use the supplied checklist to make sure all items are
present. If any items are missing, please contact us immediately.
Step 2:
Ensure the area where you are setting up the equipment has access to compressed
air. Air pressure should be between 0 and 100 psi (0 and 6.9 bar). If connecting to a
pneumatic dispenser, ensure that the dispenser itself is connected to a mains air
supply of at least 75 psi (5.0 bar).
Step 3:
Activate your one (1) year no fault warranty by filling in and returning the postage
paid warranty card.
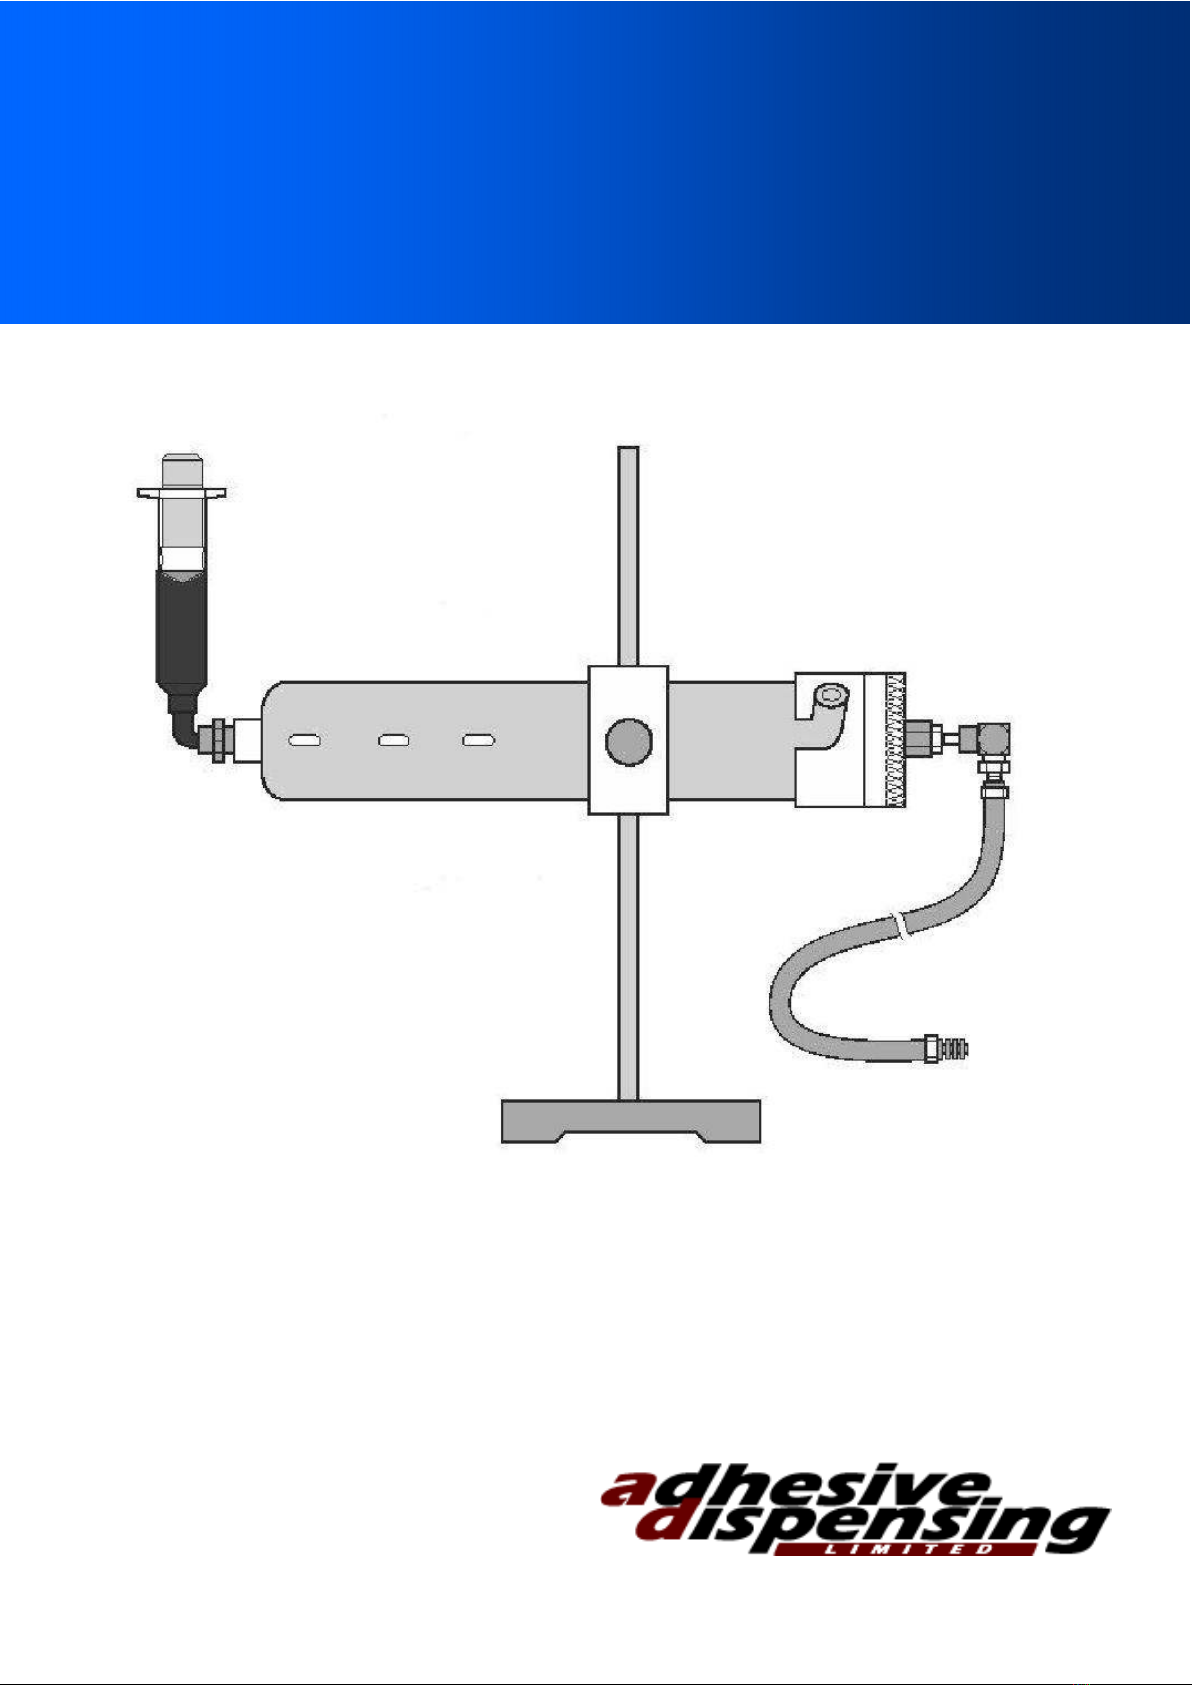
Assemble Stand: (Stand position can vary from drawing)
Unpack the shipping box and use the supplied checklist to make sure all items are
present. If any items are missing, please contact us immediately.
Place the stand on a flat surface/ work bench.
Thread the pole (1) into the base (2) by using the
supplied nut. Turn clockwise and tighten.
Slide the rod clamp (3) onto the pole (1) to your
suitable height and tighten the locking nut (4).
Attach cartridge mounting bracket with rod (16) to
the rod clamp (3) and tighten. Position the arm to
hold the reservoir horizontally as pictured.
Review the setup and adjust to the suitable height
for your application.
The base stand and upright rod part number is
918-033-000 and is built specifically to handle the
weight of a filled cartridge. Please ensure all screws
are tight before inserting the filled cartridge.
Setup
5

Setup Continued
Assemble Fl id Reservoir:
ocate the 6oz metal retainer and remove the cap (5) by
twisting counter clockwise (bayonet fitting).
Insert a 6oz size cartridge reservoir that is pre-filled
with your assembly fluid, in the retainer (7). Remove the
red storage cap from the large end of the cartridge if its
been attached.
Re-attach the reservoir black air cap by aligning the
slots in the cap with the slide bolts on the retainer
pushing down and turning clockwise until tight.
Slide the assembled metal retainer into the reservoir bracket (16). Centre the retainer
so the weight is evenly balanced in the bracket and tighten the screw to secure.
Assemble 90 Degree Elbow:
Remove the red threaded end cap from the polyethylene cartridge reservoir (if fitted).
ocate the white cartridge adapter (part TSD931-7) and thread it into the filled 6oz
polyethylene cartridge reservoir (part TS60C) by turning clockwise.
ocate the 90-degree elbow (TSD931-28N) and twist it into the cartridge adapter by
turning clockwise. Make sure the open end of the adapter is pointed out when fin-
ished. This is the part that accepts the syringe barrel when filling
Assemble Air In Line:
ocate the air hose on the cartridge air cap with the black male quick connect fitting
at end. Connect this fitting to your air source or push and twist into the pneumatic
dispenser front connector. (Dispenser such as 1000T, AD 810, TS250).
Take empty syringe barrel and push down piston/ plunger leaving a 1mm gap at the
bottom. Attach the syringe barrel to the luer lock female fitting. Using the dispenser,
adjust the air pressure gauge and ensure the mode is steady (not timed) - sometimes
called purge. Press the foot pedal and increase air pressure to suit.
As air pressure pushes down on the 6oz cartridge plunger, material will be forced
from the cartridge end and into the syringe.
Note: If not using a dispenser, the air source must be switched on then quickly off before
the syringe is 2/3 full. When using a dispenser, start with a low pressure and increase to
impro e the flow or when filling with iscous pastes.
6

Typical Setup
This system is designed to work with a manual or timed pneumatic dispenser
for the ON/OFF control. Fittings are supplied to connect to most dispensers.
Part 1. Upright steel mounting rod
Part 2. Base unit
Part 16. Cartridge bracket
Part 13. Airline clear hose
Part 14. Male black quick connect fitting (to dispenser)
Part 5. Air cap
Part 7. 6oz slotted cartridge retainer
Part 10. Threaded fitting white polypro
Part 13. uer elbow fitting
7

Syringe Filling
Pressurise the reservoir pressure chamber (15) by turning the
knob on your air dispenser pressure regulator clockwise. Adjust
to a pressure that is appropriate to the fluid you are filling.
Some common settings are as follows:
5psi for low viscosity fluids
80psi for high viscosity fluids.
Caution: Over pressurising the reservoir pressure chamber may
cause the empty syringe reservoir to fill very rapidly with the
possibility of fluid overflow. To avoid this start with a relatively
low pressure setting and test. If nothing happens increase the
pressure in small increments and repeat testing until you
optimise your fill time.
ocate an empty syringe barrel and the matching wiper piston
and insert the piston to the bottom of the barrel.
Attach the empty reservoir to the 90-degree elbow by turning
clockwise.
Press the foot pedal on your dispenser until material starts to
flow and the piston moves up the barrel toward the top. Release
the foot pedal when the piston is approx 3/4 up the syringe
barrel. Enough space needs to be left so an air adapter can be
attached without touching the piston.
Remove the filled syringe by turning anti clockwise, attach a tip
cap to the dispensing end and an end cap to the top end.
Repeat steps 1 to 7 for your next syringe barrel.
Plastic pistons work best with most materials. If the piston is
not pushed down to the bottom of the syringe, an air pocket will
appear.
All fittings and components are silicone free plastics so will not
contaminate materials being used.
Insert piston to
the bottom of
the barrel.
Twist on the
barrel to the
elbow fitting.
8

Dispense Co ponent Selection Guide
Available in: Clear for regular
fluids; Black for visible light
cure fluids; Amber for UV
cure fluids. Each package
contains same amount of
barrels and pistons.
Size Clear UV Opaque Quanty
Amber Black Per Pack
Syringe Barrels and
Pistons
Syringe Barrel
Reservoirs Only
Available in: Clear for regular
fluids; Black for visible light
cure fluids; Amber for UV
cure fluids. Supplied in sealed
packs.
Size Clear UV Opaque Quanty
Amber Black Per Pack
Syringe Wiper Pistons
Only
Available in: White for general
purpose; Blue for improved
control over most fluids; Red
for very thick pastes. Supplied
in sealed packs.
Size White Red Blue Quanty
Per Pack
Cartridge Reservoir
Kits
Size Part
Syringe Sealing Caps
End Cap
Size Part Qty
Tip Cap
White Black Orange
9

Dispense Co ponent Selection Guide
Cartridge Reservoir
Each cartridge system comes with an air cap and retainer
Part # Part Size A B
918-031-000 Retainer 6oz 11-3/4” 1-3/4”
918-001-004 Cap 6oz Part of above dimensions
Accessories
Each cartridge system comes with an air cap and retainer
Part # Description
TSD931-7 uer ock Adapter White 1/4” NPT
TSD931-7C uer ock Adapter Clear 1/4” NPT
TSD931-28A 90-Degree Elbow Fitting Female Clear PP
TSD931-28N 90-Degree Elbow Fitting Female White Nylon
TSD800-6FR 5 Micron Filter Regulator 0-100psi
918-000-002 Air Hose 5ft ong with Quick Connectors
534 1/4” Female Fitting Quick Connect for Cap
918-001-007 Replacement Air Cap Rubber Gasket
TSD931-28P Metal Plug Cap for Elbow Fitting
TN00DKIT Tip Kit Assortment 145 Tips
10

Troubleshooting
Problem Possible Sol tion
No Fl id Flow Check that air supply is properly connected.
Check air in from mains supply and air feed from
dispenser to syringe filling system.
Air pressure is too low. Gradually increase the air
pressure until fluid flows.
Air Press re Leaking Check all connections to make sure they are
secure.
Add some Teflon tape thread to the air connection
to assist in sealing.
Fl id Leaking From Adapter Tighten all seals.
Add some Teflon tape thread to the fluid
connection threads to assist in sealing.
Fill Time Too Slow Increase air pressure.
If you require further assistance, please call us on 0800 094 9058 or +44 (0) 845
652 0058. Or email us at [email protected].
11

Warranty
One Year Limited Warranty
12
Table of contents
Other Adhesive Dispensing Dispenser manuals