Adidas ADH1167 User manual

2
CHRONOGRAPH TWO EYE OS11
TIME SETTING
1. Pull crown out to position 3.
2. Turn crown to set the desired time.
3. Return crown to position 1.
DATE SETTING
1. Pull crown out to position 2 (the watch continues to run).
2. Turn crown until yesterday’s date appears.
3. Pull crown out to position 3 (the watch stops).
4. Turn crown until correct date appears.
5. Continue to turn crown until correct time appears.
6. Return crown to position 1.
CHRONOGRAPH OPERATION
1. Press
A to start/stop the chronograph.
2. Press B for reset.
ADJUSTING THE CHRONOGRAPH
1. Pull crown to position 3.
2. Press
A to reset the second hand to “0.”
3. Press B to reset the chronograph minute hand.
4. Return crown to position 1.
ENGLISH
Minute hand
Chronograph
minute hand
Chronograph
second hand
Hour hand
Date
321
Second
hand
A
B
NOTE: If you do not find your watch movement here, please go to www.
adidas.com/watches.
321
A
B

3
CHRONOGRAPH OS62
SETTING THE TIME
1. Pull crown out to position 3, so that the second hand stops at the zero position.
2. Turn crown to set hour and minute hands.
3. When crown is pushed back to position 1, in synchronization with a time signal,
small second hand begins to run.
321
A
B
Hour Hand
Chrono Hour Hand
Chrono Second Hand
Minute Hand
Chrono Minute Hand
Date
1/20 Second Chrono Hand
CHRONOGRAPH STOPWATCH OS10 (no date - OS30)
(1 crown/2 pushers)
TIME SETTING
1. Pull crown out to position 3.
2. Turn crown to set the desired time.
3. Return crown to position 1.
DATE SETTING
1. Pull crown out to position 2.
2. Turn crown counter-clockwise until the correct date is shown in the date window.
3. Return crown to position 1.
CHRONOGRAPH OPERATION
1. Press
A to start/stop the chronograph.
2. Press B for reset.
ADJUSTING THE CHRONOGRAPH
1. Pull crown to position 3.
2. Press
A to reset the second hand to “0.”
3. Press B to reset the chronograph minute and hour hands.
4. Reset the watch to the current time and return crown to position 1.
321
A
B
Minute Hand
Hour Hand
Second Hand

4
SETTING THE DATE
1. Pull crown out to position 2.
2. Turn crown counter-clockwise to set the date.
NOTE: If the date is set between the hours of around 9:00 PM and 1:00 AM, the date
may not change on the following day.
3. After the date has been set, push crown back to position 1.
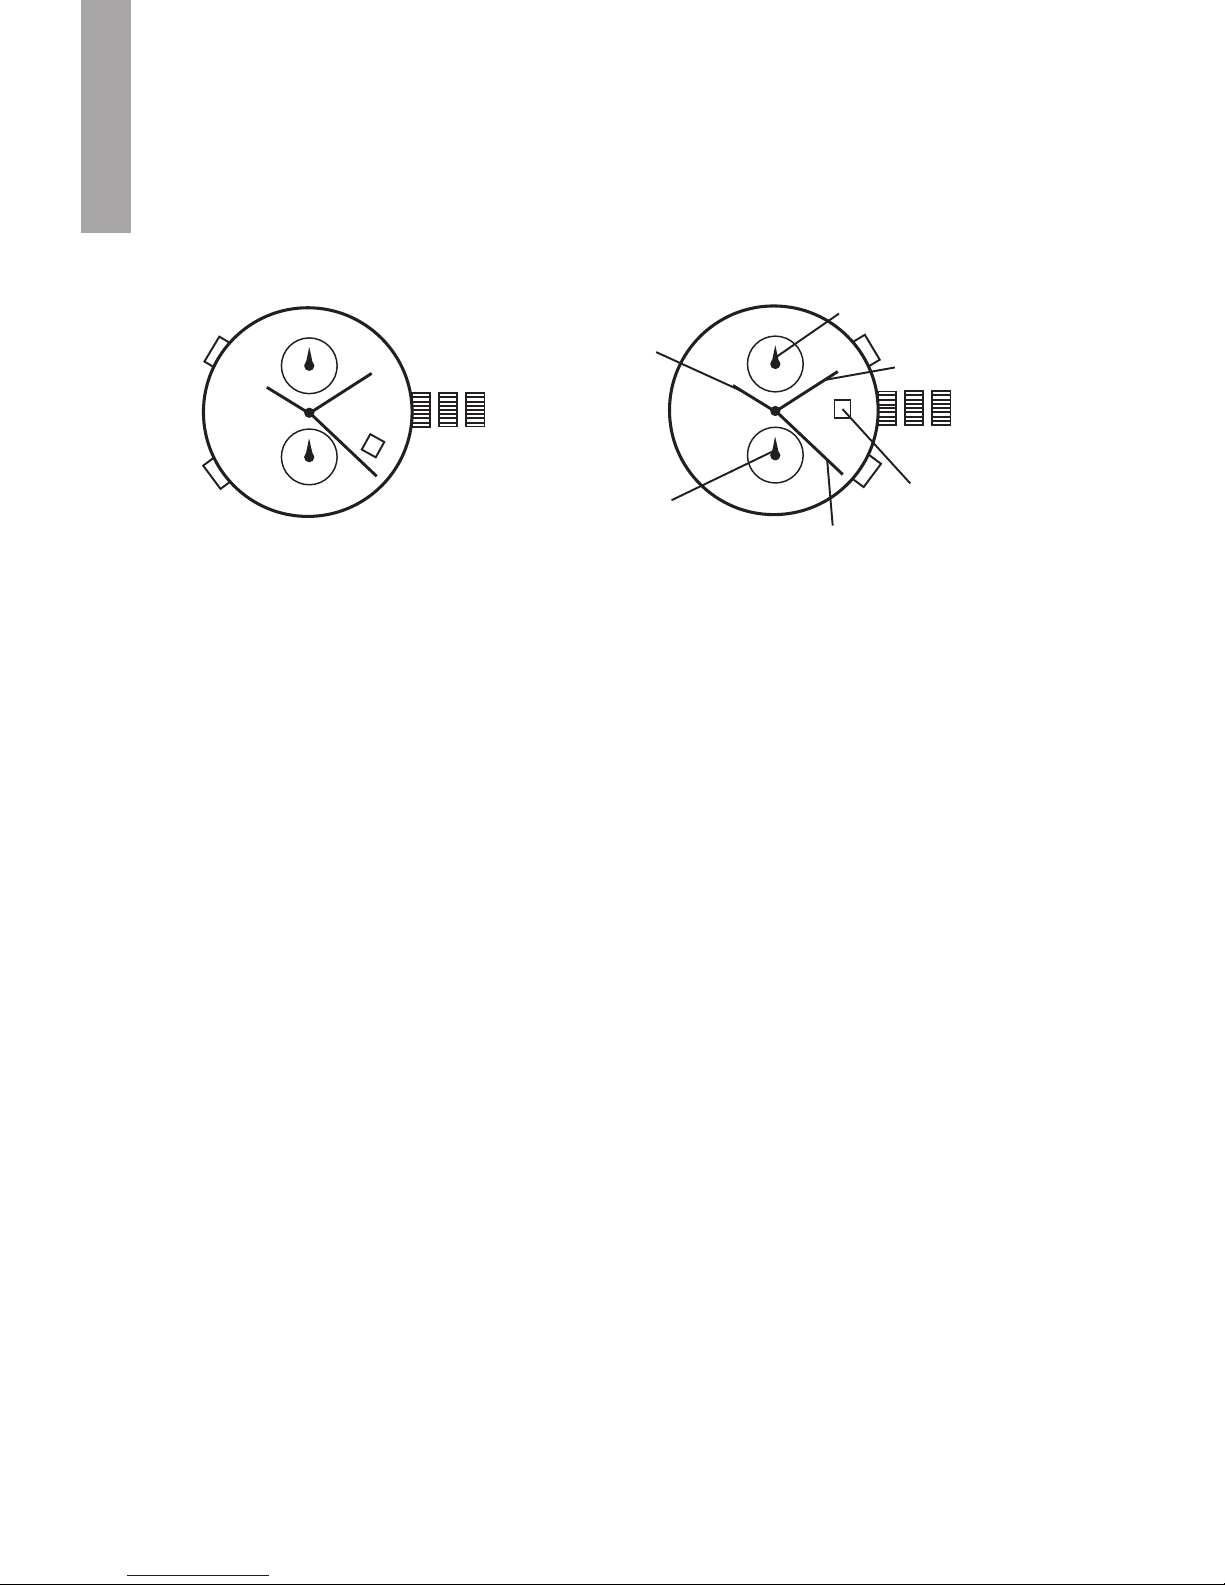
USING THE CHRONOGRAPH
This chronograph is able to measure and display time in 1/20(1/1) second united up
to maximum of 12 hours. The retrograde chronograph 1/20(1/1) second hand runs
continuously for 60 seconds after starting, and then stops at the zero position.
Measuring time with the chronograph
1. Press B to change the watch to chronograph mode. The second hand stops at zero,
and changes to the chronograph 1/20(1/1) second hand.
2. The chronograph can be started and stopped each time A is pressed. The
chronograph 1/20(1/1) second hand stops at zero, 60 seconds after starting. When
A is pressed to stop the chronograph, the chronograph 1/20(1/1) second hand
advances rapidly to display the measured time.
3. Pressing B resets the chronograph and all hands return to their zero positions.
NOTE: Moving of the retrograde chronograph is a demo. Actual measurement will be
shown when it is stopped / STOP button is pushed.
CHRONOGRAPH RESET (including after replacing battery)
This procedure should be performed when the chronograph second hand and
chronograph 1/20(1/1) second hand do not return to zero after the chronograph has
been reset, and including after the battery has been replaced.
1. Pull crown out to position 3.
2. Press A to set the chronograph second hand to zero.
3. Press B to set the chronograph 1/20 second hand to zero. The chronograph hands
can be advanced rapidly by continuously pressing A or B.
4. Once the hands have been set to zero, reset the time and return the crown to
position 1.
5. Press B to check that the chronograph hands are reset to zero.
NOTE: Do not return crown to position 1 while chronograph second hand and 1/20
chronograph second hand are returning to zero. Each hand stops on the way when
crown is returned to position 1, and these positions are recognized as zero positions.

5
LED DIGITAL
TIME AND DATE MODE
1. Press A to view time.
NOTE: Animation will be displayed for 2
seconds before time is shown.
2. With time shown, press A to view date.
TIME SETTING
1. Press A to view time.
2. With time shown, press and hold B for 2 seconds.
3. Press A to select 12 or 24 hour format.
4. Press B for next setting field.
5. Press A to set value.
6. Repeat steps 4 and 5 until desired time is reached.
7. Press B to exit time setting mode.
DATE SETTING MODE
1. Press A to view time. With time shown, press A again to view date mode.
2. With time shown, press and hold B for 2 seconds.
3. Press A to set value.
4. Press B for next setting field.
5. Repeat steps 3 and 4 until desired time is reached.
6. Press B to exit date setting mode.
MULTIFUNCTION THREE EYE VX3NE1
(1 crown)
DAY AND TIME SETTING
1. Pull crown out to position 3.
2. Turn clockwise to advance hour and
minute hands. The hand showing days of
the week will also move with the hour and
minute hands. Keep turning until you have
reached the desired day.
DATE SETTING
1. Pull crown out to position 2.
2. Turn counter-clockwise to advance the date hand.
3. Return crown to position 1.
24-HOUR SUB-DIAL SETTING
The 24-hour hand moves correspondingly with the hour and minute hands. When
setting the time be sure to check that the 24-hour hand is set properly.
321
Day
24-Hour
Date
A
B
Mode
Set

6
DATE/TIME ANALOG-DIGITAL
SWITCHING DISPLAYS
1. Press A to advance from time mode to
calendar mode.
2. Press A again to return to time mode.
TIME/CALENDAR SETTING
1. In normal time display, Press B to enter
setting mode; year will begin flashing.
2. Press A to increase setting value.
3. Press B to set and advance to next setting value.
4. Setting sequence is year, month, date, 12/24-hour time, hour, minute, second.
5. Press nothing for 30 seconds, to automatically exit time/calendar setting mode.
10 LAP MEMORY DIGITAL FL145GB
REAL TIME DISPLAY MODE
1. Press A for EL in any mode.
2. Press C to toggle between Time 1 and Time 2.
3. Press and hold C to set Time 1 or Time 2 as
the default timer.
4. Press D to toggle chime on/off.
TIME/CALENDAR SETTING
1. In normal time display, press and hold A to enter setting mode; chime will begin
flashing.
2. Press C to increase setting value. Press D to decrease setting value.
3. Press B to set and advance to next setting value.
4. Setting sequence is chime, 12/24-hour time, hour, minute, second, year, month,
date, Auto EL.
5. Press A to save data and exit setting mode.
CHRONOGRAPH MODE
1. Press B to change to chronograph mode.
2. Press C to start chronograph; press D for lap when the chronograph is running.
3. Press D to change views while chronograph is running.
4. Press C to stop chronograph.
NOTE: When running, there is a maximum of 10 laps, afterward last lap will be
overwritten each time additional lap is recorded.
A
B
C
D
A
B
This manual suits for next models
202
Table of contents
Other Adidas Watch manuals
Popular Watch manuals by other brands

Casio
Casio QW 5513 Operation guide

Piaget
Piaget 560P Instructions for use

Armitron
Armitron pro sport MD0346 instruction manual

West Marine
West Marine BlackTip 13411293 Instruction Booklet and Care Guide

Jaeger-leCoultre
Jaeger-leCoultre HYBRIS MECHANICA CALIBRE 184 manual

FOREVER
FOREVER iGO PRO JW-200 user manual