ADJ PIXIE STRIP 30 User manual
USER MANUAL
PIXIE STRIP
30, 60, & 120

©2020 ADJ Products, LLC all rights reserved. Information, specications, diagrams, images, and
instructions herein are subject to change without notice. ADJ Products, LLC logo and identifying
product names and numbers herein are trademarks of ADJ Products, LLC. Copyright protection
claimed includes all forms and matters of copyrightable materials and information now allowed by
statutory or judicial law or hereinafter granted. Product names used in this document may be
trademarks or registered trademarks of their respective companies and are hereby acknowledged.
All non-ADJ Products, LLC brands and product names are trademarks or registered trademarks of
their respective companies.
ADJ Products, LLC and all aliated companies hereby disclaim any and all liabilities for property,
equipment, building, and electrical damages, injuries to any persons, and direct or indirect economic
loss associated with the use or reliance of any information contained within this document, and/or as
a result of the improper, unsafe, insucient and negligent assembly, installation, rigging, and opera-
tion of this product.
Europe Energy Saving Notice
Energy Saving Matters (EuP 2009/125/EC)
Saving electric energy is a key to help protecting the enviroment. Please turn o all electrical products when
they are not in use. To avoid power consumption in idle mode, disconnect all electrical equipment from power
when not in use. Thank you!
DOCUMENT VERSION
Due to additional product features and/or enhancements, an updated version of this document
may be available online.
Please check www.adj.com for the latest revision/update of this manual before beginning
installation and/or programming.
08/12/20 1.0 1.0 Not Applicable Initial Release
Date Document
Version
Software
Version > DMX Channel Mode Notes
ADJ Products, LLC - www.adj.com - Pixie Strip 30 / 60 / 120 User Manual Page 2

ADJ Products, LLC - www.adj.com - Pixie Strip 30 / 60 / 120 User Manual Page 3
Pixie Strip 30 / 60 / 120 Table of Contents
Introduction 4
Features | Warranty Registration 5
Safety Guidelines 6
Overview 7
Installation 8
Limited Warranty 11
Dimensional Drawings 12
Specications 14
Accessories 15

ADJ Products, LLC - www.adj.com - Pixie Strip 30 / 60 / 120 User Manual Page 4
Introduction: Congratulations on your purchase of the ADJ Pixie Strip! This device has been designed
as part of a series of versatile pixel battens combining vibrants LEDs with intelligently-designed hous-
ings to create a powerful and versatile system. These devices are intended specifically for use in con-
junction with the ADJ Pixie Driver 2000, and should perform reliably for years when the guidelines
in this booklet are followed. Please read and understand the instructions in this manual carefully and
thoroughly before attempting to operate this device. These instructions contain important information
regarding safety during use and maintenance.
Please keep this manual with the unit for future reference.
Customer Support: Contact ADJ Service for any product related service and support needs. Also visit
forums.adj.com with questions, comments or suggestions.
Parts: To purchase parts online visit:
http://parts.adj.com (US)
http://www.adjparts.eu (EU)
ADJ SERVICE USA - Monday - Friday 8:00am to 4:30pm PST
ADJ SERVICE EUROPE - Monday - Friday 08:30 to 17:00 CET
ADJ PRODUCTS LLC USA
6122 S. Eastern Ave. Los Angeles, CA. 90040
323-582-2650 | Fax 323-532-2941 | www.adj.com | info@adj.com
ADJ SUPPLY Europe B.V
Junostraat 2 6468 EW Kerkrade, The Netherlands
+31 (0)45 546 85 00 | Fax +31 45 546 85 99
ADJ PRODUCTS GROUP Mexico
AV Santa Ana 30 Parque Industrial Lerma, Lerma, Mexico 52000
+52 (728) 282-7070
WARNING! To prevent or reduce the risk of electrical shock or re, do not expose this unit to rain or
moisture.
CAUTION! There are no user serviceable parts inside this unit. Do not attempt any repairs yourself,
doing so will void your manufacturer’s warranty. In the unlikely event your unit may require service,
please contact ADJ Products, LLC.
Do not discard the shipping cartoon in the trash. Please recycle when ever possible.
Pixie Strip 30 / 60 / 120 Introduction

Pixie Strip 30 / 60 / 120 Features
• Lightweight aluminum housing
• Magnetic end caps
• Integrated adjustable mounting bracket
• Safety cable loop
Included Items:
• Round frosted cover (x1)
• Square froster cover (x1)
• Round smoked cover (x1)
• Square smoked cover (x1)
• 4-pin power/data cable (x1)
Pixie Strip 30 / 60 / 120 Warranty Registration
The Pixie Strip 30 / 60 / 120 carries a 2 year limited warranty. Please fill out the enclosed warranty
card to validate your purchase. All returned service items,whether under warranty or not, must be
freight pre-paid and accompanied by a return authorization (R.A.) number. The R.A. number must be
clearly written on the outside of the return package. A brief description of the problem as well as the
R.A. number must also be written down on a piece of paper included in the shipping carton. If the unit
is under warranty, you must provide a copy of your proof of purchase invoice. You may obtain anR.A.
number by contacting our customer support team. All packages returned to the service department
not displaying anR.A. number on the outside of the package will be returned to the shipper.
ADJ Products, LLC - www.adj.com - Pixie Strip 30 / 60 / 120 User Manual Page 5

ADJ Products, LLC - www.adj.com - Pixie Strip 30 / 60 / 120 User Manual Page 6
Pixie Strip 30 / 60 / 120 Safety Guidelines
For Your Own Personal Safety, Please Read and Understand This Manual Completely Before
You Attempt To Install Or Operate This Unit!
• Be sure to save the packing carton in the unlikely event the device may have to be returned for
service
• Do not spill water or other liquids into or on to the device.
• Be sure that the local power outlet matches the required voltage for the device
• Do not open up the device under any conditions. There are no user serviceable parts inside
• Disconnect the device’s main power when left unused for long periods of time
• Never connect this device to a dimmer pack
• Do not attempt to operate this device if it has been damaged in any way
• Never operate this device with the cover removed
• To reduce the risk of electrical shock or re, do not expose this device to rain or moisture
• Do not attempt to operate this device if the power cord has been frayed or broken. Do not attempt
to remove or break o the ground prong from the electrical cord. This prong is used to reduce the
risk of electrical shock and re in case of an internal short
• Disconnect from main power before making any type of connection
• Never block the ventilation holes. Always be sure to mount this device in an area that will allow
proper ventilation. Allow about 6” (15cm) between this device and a wall
• This unit is intended for indoor use only. Use of this product outdoors voids all warranties
• Always mount this unit in a safe and stable matter
• Please route your power cord out of the way of foot trac. Power cords should be routed so they
are not likely to be walked on, or pinched by items placed upon or against them
• Keep ammable materials away from this xture!
• IP20 Rating: Fixture is protected against solids approximately the size of an adult nger, or
larger. FIXTURE IS NOT PROTECTED AGAINST LIQUID INTRUSION OF ANY KIND!
• The device should be serviced by qualified service personnel when:
A. The power-supply cord or the plug has been damaged.
B. Objects have fallen on, or liquid has been spilled into, the device.
C. The device has been exposed to rain or water.
D. The appliance does not appear to operate normally or exhibits a marked change in performance.
ADJ Products, LLC - www.adj.com - Pixie Strip 30 / 60 / 120 User Manual Page 7
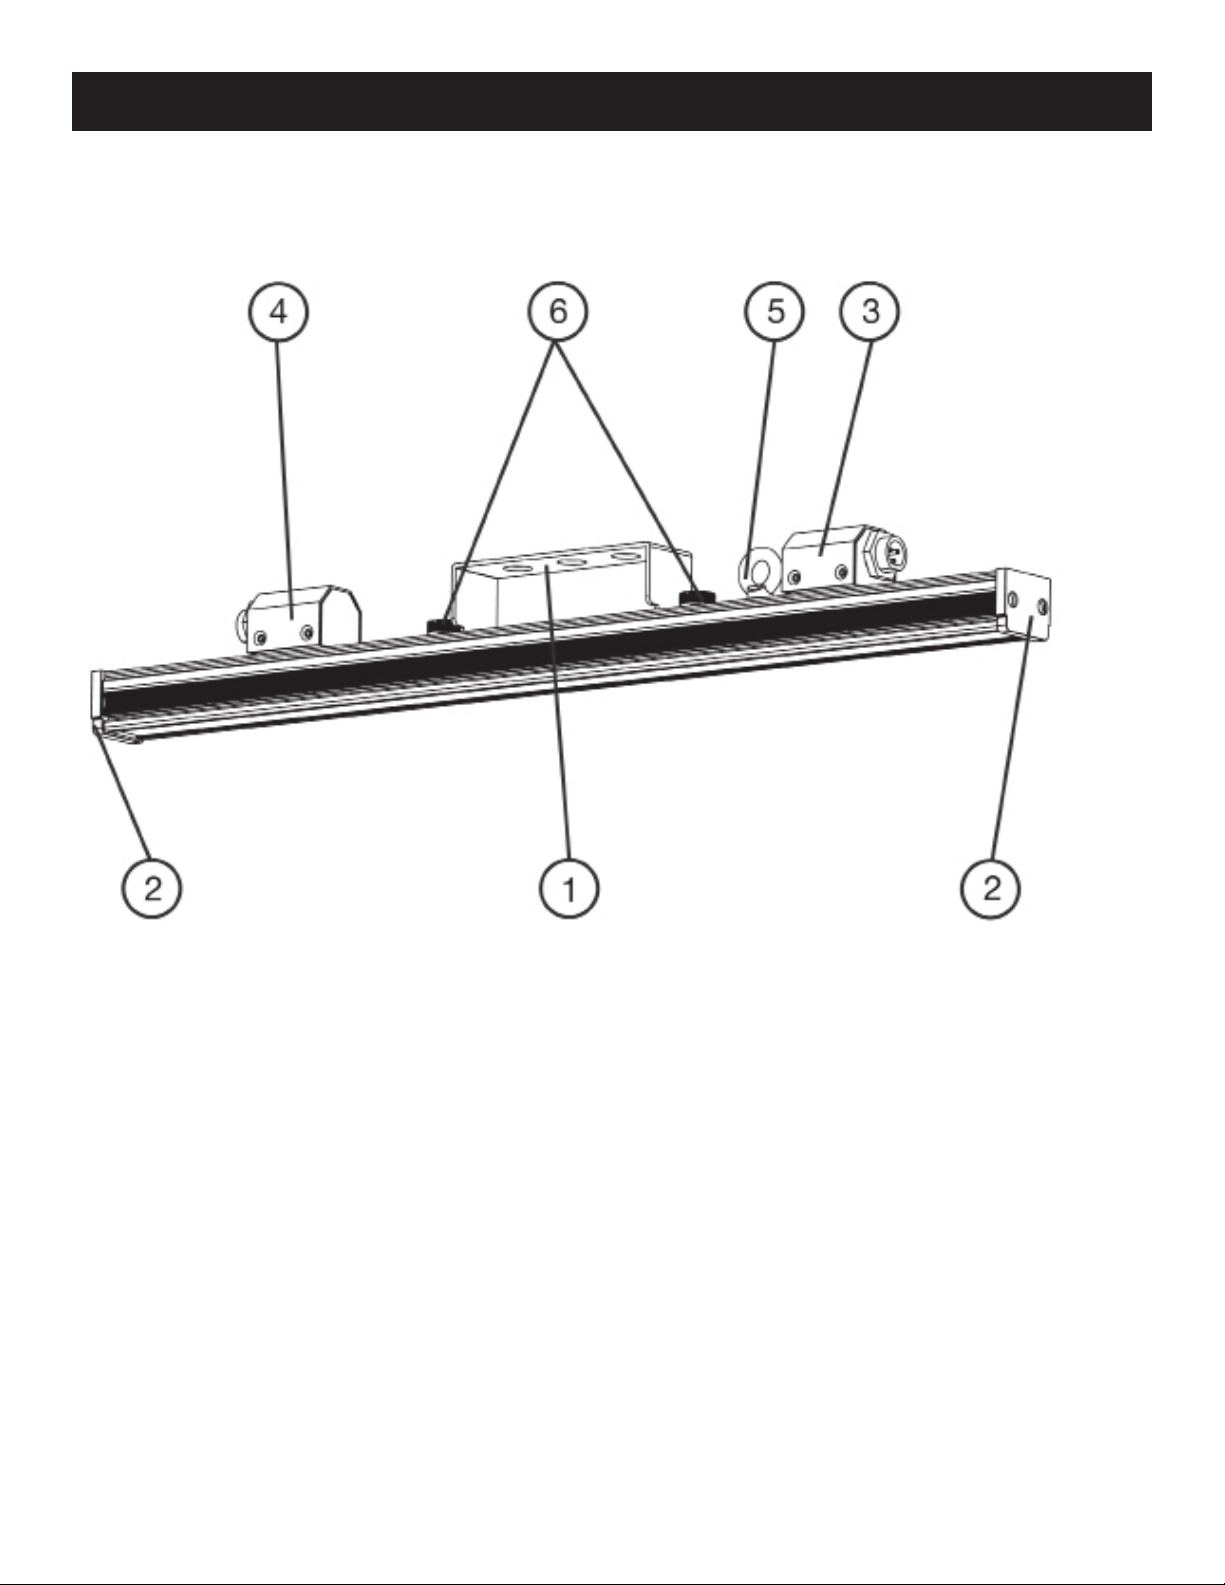
Pixie Strip 30 / 60 / 120 Overview
1. Mounting Bracket
2. Magnetic End Cap
3. Power/Data In
4. Power/Data Out
5. Safety Cable Attachment Point
6. Mounting Bracket Adjustment Screws
NOTE: The specic model shown in the above image is the Pixie Strip 30, but the features listed as well as their locations on the
device are applicable to all Pixie Strip models.

ADJ Products, LLC - www.adj.com - Pixie Strip 30 / 60 / 120 User Manual Page 8
Pixie Strip 30 / 60 / 120 Installation
FLAMMABLE MATERIAL WARNING!
Keep drive a minimum of 5.0 feet (1.5m) away from ammable material and/or pyrotechnics.
ELECTRICAL CONNECTIONS
A qualied electrician should be used for all electrical connections and/or installations.
DO NOT INSTALL THE DEVICE IF YOU ARE NOT QUALIFIED TO DO SO!
The device MUST be installed following all local, national, and country commercial electrical and
construction codes and regulations.
Before rigging or mounting a single xture or multiple interconnected xtures for custom matrix
designs to any metal truss or structure or placing the xture(s) on any surface, a professional equip-
ment installer MUST be consulted to determine whether the metal truss, structure, or surface is
properly certied to safely support the combined weight of the xture(s), clamps, cables, and any
other accessories.
Fixture(s) should be installed in areas outside walking paths, seating areas, or away from areas
where unauthorized personnel might be able to reach the device by hand.
NEVER stand directly below the xture(s) when rigging, removing, or servicing. Overhead xture
installation must always be secured with a secondary safety attachment, such as an appropriately
rated safety cable (not included) that meets all local, national, and country codes and regulations.
Allow approximately 15 minutes for the xture to cool down before servicing.
SOCKET PIN CONFIGURATION
This device features two (2) output sockets on the back side, which may be used to connect the
device to the desired lighting xtures. The pins for each output socket are congured as shown in
the image below. Please consult a qualied electrician for all electrical connections and/or
installations.
Pin 1: Power (+)
Pin 2: Data
Pin 3: CLK (clock pin)
Pin 4: Power (-)

ADJ Products, LLC - www.adj.com - Pixie Strip 30 / 60 / 120 User Manual Page 9
Pixie Strip 30 / 60 / 120 Installation
CLAMP INSTALLATION
This xture features a sliding, adjustable mounting bracket (some models feature multiple mounting
brackets), as well as a safety cable attachment point on the main body of the xture (see illustration
below). When mounting this xture in a suspended environment, be sure to secure an appropriately
rated clamp (not included) to the mounting bracket, and attach a separate SAFETY CABLE (not
included) to the safety cable attachment point.
SAFETY CABLE
Always attach a safety cable whenever installing this xture in a suspended
environment in order to ensure the xture will not fall if the clamp fails!
RIGGING
Overhead rigging requires extensive experience, including but not limited to: calculating working
load limits, understanding the installation material being used, and periodic safety inspection of all
installation material and the xture itself. If you lack the qualication, do not attempt the installation
yourself. Improper installation can result in bodily injury.

Pixie Strip 30 / 60 / 120 Installation
MULTIPLE FIXTURES
Multiple xtures may be daisy chained together via the Power/Data In and Power/Data Out ports
located on each xture. The maximum number of xtures that may be daisy chained together and
connected to a single driver output port is determined by a combination of the driver output limita-
tions and the RGB pixel control conguration.
Please see the Driver Output Limitation section and the RGB Pixel Control sections of the manual
for the ADJ Pixie Driver 2000 for details on these limitations and how to congure these settings to
best accommodate your desired lighting setup.
The ADJ Pixie Driver 2000 that has been designed to work with these lighting xtures has been pro-
grammed not to allow Pixie Strip xtures to be added in such a way that the driver port output limita-
tions will be exceeded. This is done by limiting the number of Pixie Strip units that can be selected in
the System Menu of the driver based on what has already been set up. Please see the Driver Output
Limitations section of the Pixie Driver 2000 manual for more detailed information.
ADJ Products, LLC - www.adj.com - Pixie Strip 30 / 60 / 120 User Manual Page 10
ALLOWABLE CABLE LENGTHS
12-AWG 4-pin extension cable or 16-AWG 4-pin extension cable may be used to link multiple de-
vices. However, please take note of maximum allowable cable lengths, as listed below:
- Max length of cable connecting a controller and a device: 59 feet (18m)
- Max length of cable connecting two devices: 32 feet (10m)
- Max total cable length in a single chain: 213 feet (65m) for 12-AWG / 98 feet (30m) for 16-AWG
This manual suits for next models
2
Table of contents
Popular Work Light manuals by other brands


PowerSmith
PowerSmith PWLD080T Operator's manual

MaxLite
MaxLite 73683 installation instructions

Heitronic
Heitronic Trend 27867 Installation and operating instructions

Monzana
Monzana Gore MZCL10 manual

EINHELL
EINHELL TE-CL 18/2000 LiAC Original operating instructions

Bayco
Bayco NIGHTSTICK Dual-Light Xtreme Lumens... instruction manual