Adrian Steel 1BRS-B Quick start guide
ADRIAN STEEL COMPANY WWW.ADRIANSTEEL.COM 906 JAMES STREET ADRIAN, MI 49221 800-677-2726
Publication Number: 40296 Revision Level: CECN Release: 14949
Assembly/Installation Instructions and Owners Manual
PAGE
Assembly/Installation Instructions and Owners Manual
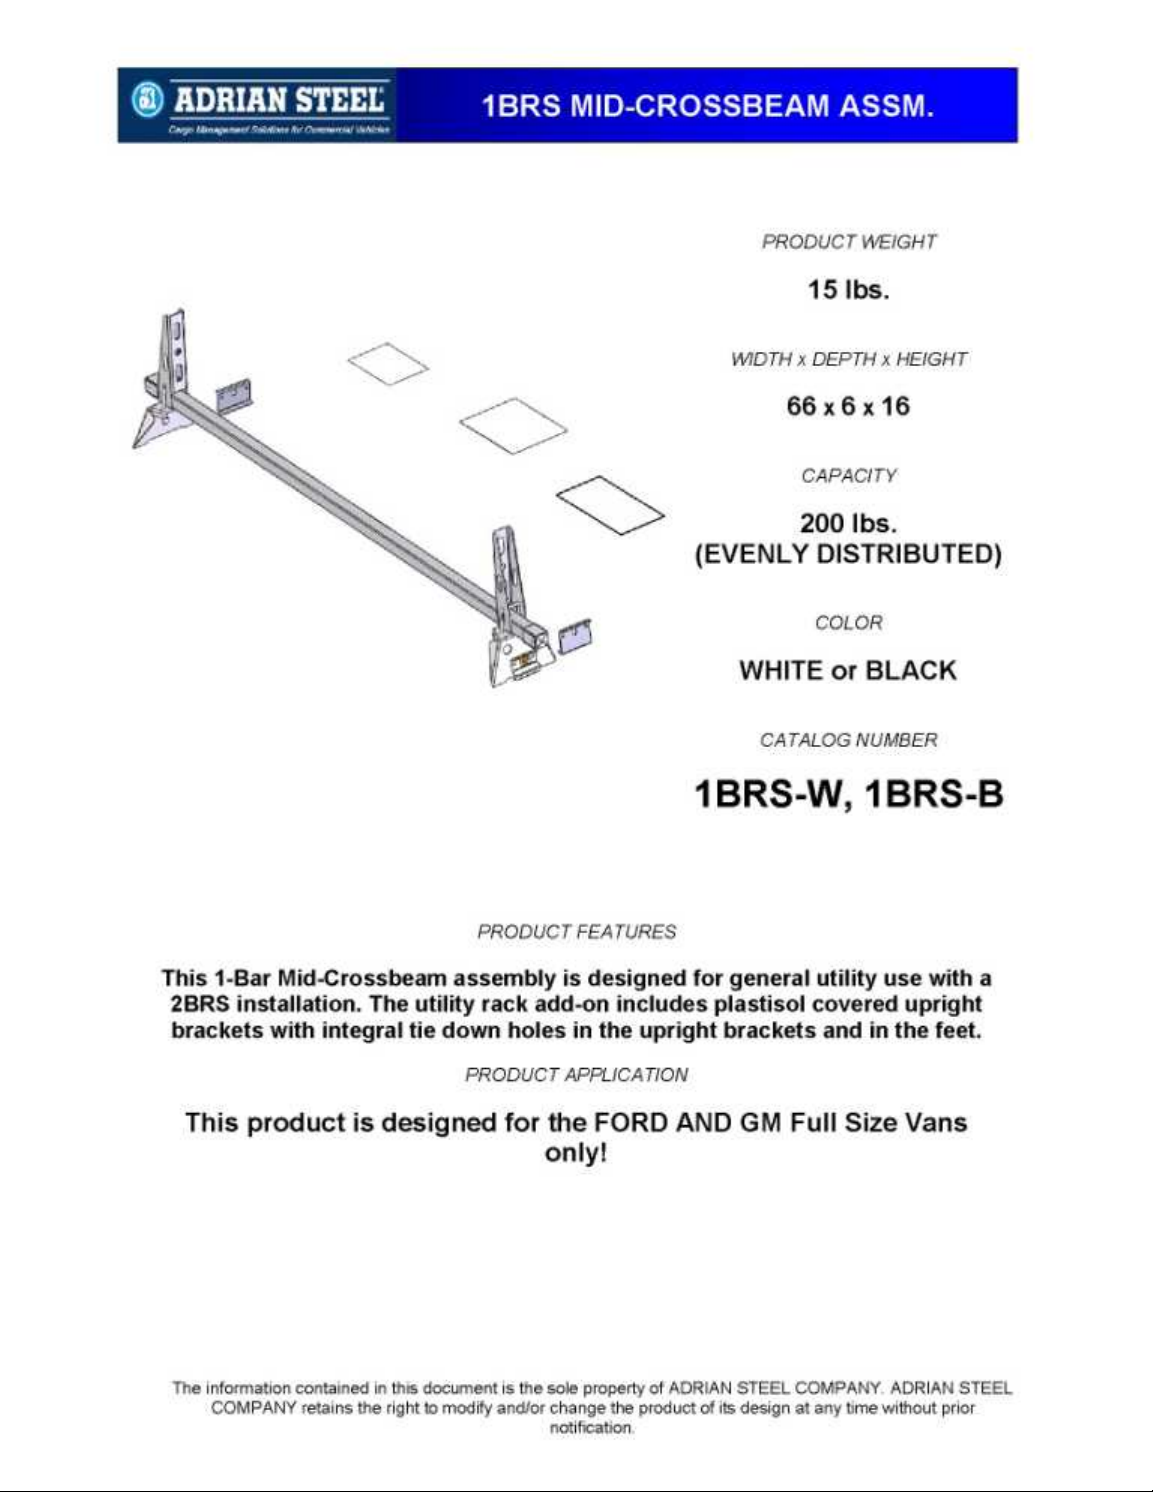
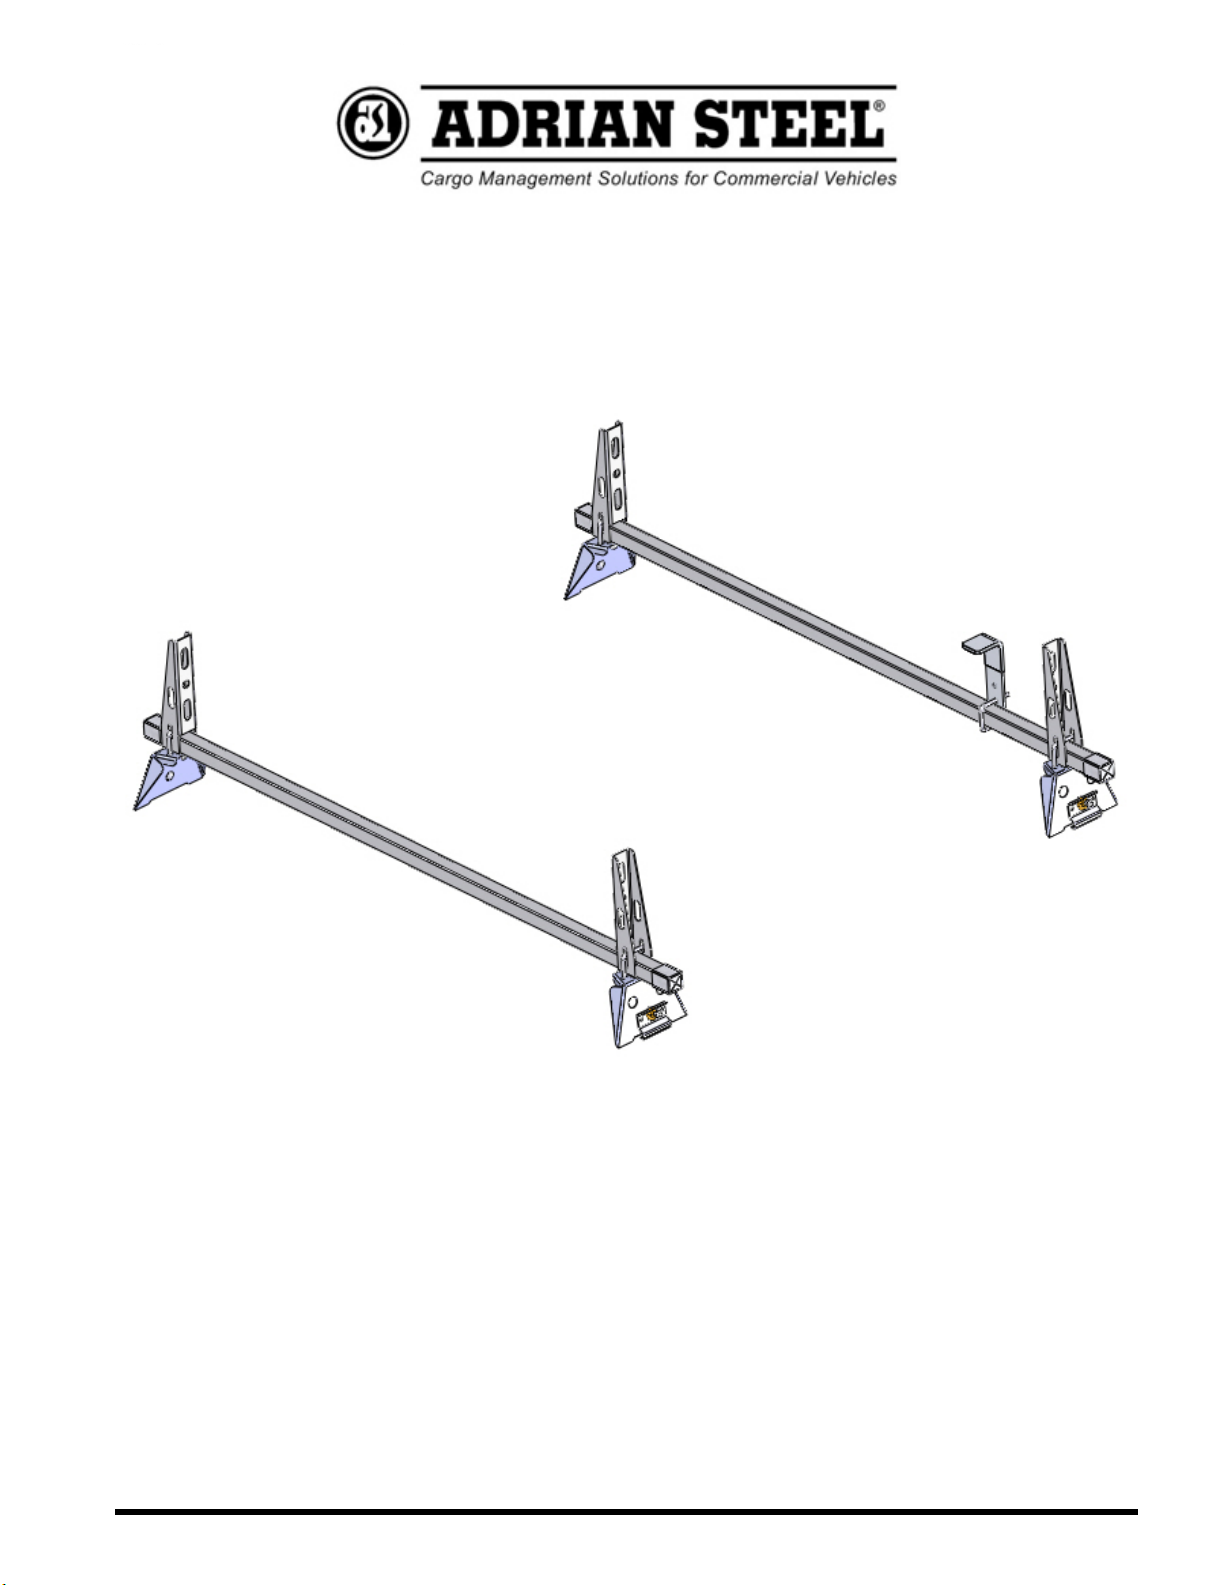
1BRS-B, -W, 2BRS-B, -W
UTILITY RACKS FOR FULL SIZE VANS
COVER
2BRS-W SHOWN
ADRIAN STEEL COMPANY WWW.ADRIANSTEEL.COM 906 JAMES STREET ADRIAN, MI 49221 800-677-2726
Publication Number: 40296 Revision Level: CECN Release: 14949
Assembly/Installation Instructions and Owners Manual
PAGE 2
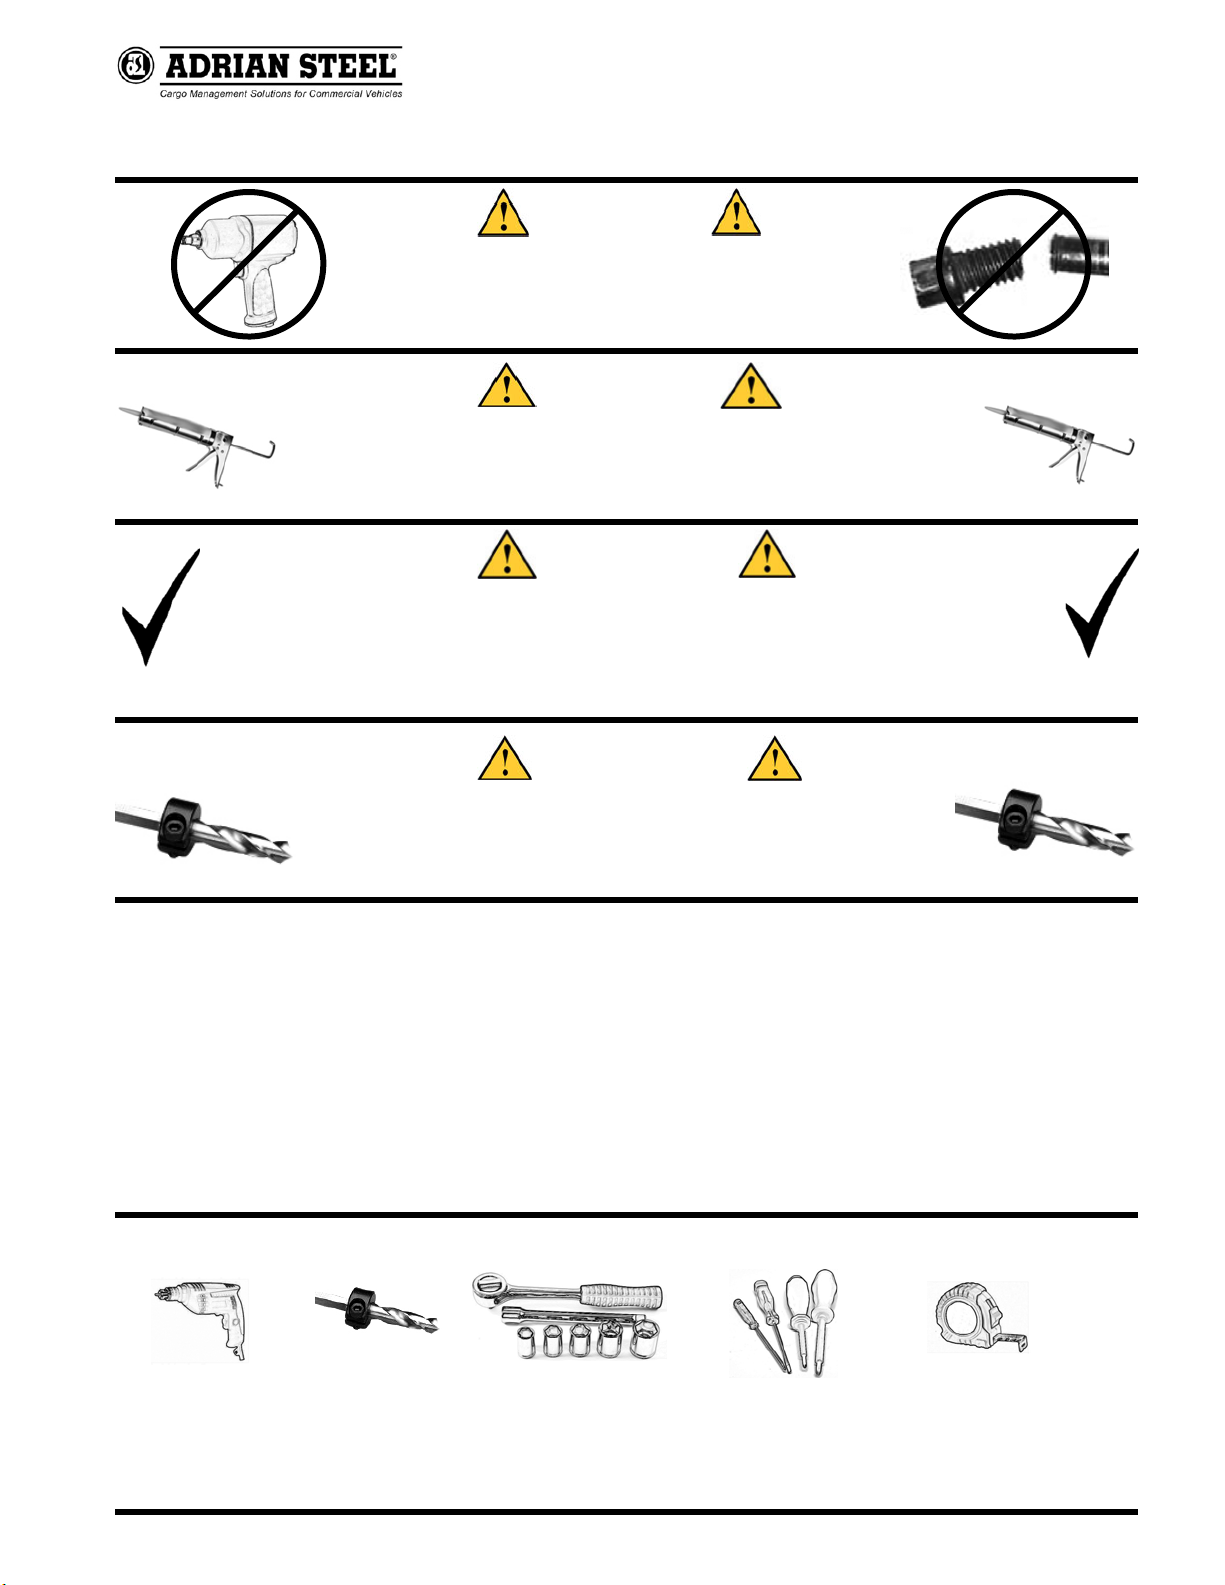
CAUTION
THE USE AIR IMPACT TOOLS CAN
OVER-TORQUE FASTENERS AND
CAUSE FASTENER FAILURE!
CAUTION
ALL INSTALLATION HOLES SHOULD BE SEALED
WITH SILICON OR BUTYL SEALANT TO PREVENT
EXHAUST FUMES FROM ENTERING THE VEHICLE!
- PRECAUTIONS -
DANGER
INSPECT FOR FUEL TANK, FUEL LINES, BRAKE LINES, HIGH
VOLTAGE BATTERIES AND ELECTRICAL LINES PRIOR TO
DRILLINGTO AVOID DAMAGING CRITICAL VEHICLE SYSTEMS
OR INJURY TO INSTALLER DURING INSTALLATION PROCESS!
CAUTION
TO AVOID DAMAGING THE VEHICLE ALWAYS
USE DRILL STOPS WHEN DRILLING ANY IN-
STALLATION HOLES!
1. SUBSTITUTING ADRIAN STEEL SPECIFIED FASTENERS FOR ASSEMBLY AND/OR INSTALLATION
WILL VOID YOUR PRODUCT WARRANTY.
2. ALL HOLES DRILLED INTO VEHICLE SHOULD HAVE THE RAW METAL EDGES SEALED WITH A SELF
-ETCHING PRIMER TO RESIST CORROSION AND POTENTIAL FASTENER POINT FAILURE.
3. ALL FASTENERS USED IN THE INSTALLATION OF THIS PRODUCT SHOULD BE TIGHTENED TO THE
TORQUE(S) SPECIFIED IN THESE INSTRUCTIONS.
4. THESE INSTRUCTIONS SHOULD BE KEPT WITH THE VEHICLE.
- IMPORTANT WARRANTY REQUIREMENTS -
THE BASIC TOOLS NEEDED FOR MOST INSTALLATIONS
DRILL DRILL BIT WITH
STOP RATCHET, SOCKETS
AND/OR WRENCHES SCREWDRIVERS MEASURING TAPE
ADDITIONAL TOOLS MAY BE NEEDED FOR THIS INSTALLATION AND THEY WILL BE IDENTIFIED IN THE STEPS THAT FOLLOW.
ADRIAN STEEL COMPANY WWW.ADRIANSTEEL.COM 906 JAMES STREET ADRIAN, MI 49221 800-677-2726
Publication Number: 40296 Revision Level: CECN Release: 14949
Assembly/Installation Instructions and Owners Manual
PAGE 3
Step
01
Optional
If your vehicle contains carpet or a rubber floor
mat you will need to prepare the mounting loca-
tions. (if not, skip to STEP 02)
Position the product to be installed into the vehi-
cle and once your are satisfied with the mount-
ing locations, mark the mounting locations. Us-
ing a 1-3/16” diameter carpet cutter. Select the
appropriate floor spacers as shown in the illus-
tration to the left. Set those aaside for use later
into the installation process.
Once you have prepared the carpet/floor mat for
Step
02
Prepare
Mounting
Locations
Using a drill and drill bit (see table at top of page
for correct size) drill the mounting holes in the
vehicle sheet metal to prepare for installing the
plusnuts.
If you are thru-bolting at any of the locations
simply drill a hole that is 1/16” larger than the
bolt size(s) for those locations.
Once you have drilled the holes into the vehicle,
the raw metal edges should be sealed using a
self-etching primer to resist corrosion and po-
tential fastener point failure.
Step
03
Setting
Plusnuts
Use a Air Powered Plusnut Setting Gun to “set the plusnut” or if in-
stalling manually with hand tools, assembly the following.
1/4-20UNC Plusnut (FAS0052)
FAS0080 SCREW, HXHD, 1/4-20UNCx2.00, G8
FAS0067 WASHER, FLAT, 1/4”ID
22200-0 PLUSNUT TOOL
5/16-18UNC Plusnut (FAS0091)
FAS0095 SCREW, HXHD, 5/16-18UNCx2.00”, G8
FAS0086 WASHER, FLAT, 5/16”ID
22200-0 PLUSNUT TOOL
Place barrel of the plusnut body in sheet metal thru hole until flange is
flush with sheet metal.
Using a 9/16” combination wrench of plusnut tool body and a second
hand wrench, ratchet, or air tool, rotate the hex bolt head CW to draw
plus nut flanges up (set the plusnut).
Remove hex bolt, washer, and plusnut. Inspect installation.
WHEN INSTALLING PLUSNUTS MAKE SURE YOU USE THE CORRECT DRILL
BIT WITH A STOP!
PLUSNUT SIZE DRILL BIT SIZE
¼-20 PLUSNUT, FAS0052 USE A 3/8” DIAMETER DRILL BIT WITH A STOP.
5/16-18 PLUSNUT, FAS0091 USE A 1/2” DIAMETER DRILL BIT WITH A STOP.
NOTE: If your vehicle contains carpet or a rubber
floor mat you will need to prepare the mounting
locations using a 1-3/16” carpet cutter.
1-3/16” DIAMETER
CARPET CUTTER
P.N. 31183-0.
NOTE: A PLUSNUT SETTING TOOL IS REQUIRED FOR PLUSNUT INSTALLATION
AND IS NOT SUPPLIED WITH THIS KIT. ORDER PLUSNUT TOOLS FROM ADRIAN
STEEL (P.N. 22200-0)OR USE AN AIR POWERED PLUSNUT SETTING GUN.
OR

ADRIAN STEEL COMPANY WWW.ADRIANSTEEL.COM 906 JAMES STREET ADRIAN, MI 49221 800-677-2726
Publication Number: 40296 Revision Level: CECN Release: 14949
Assembly/Installation Instructions and Owners Manual
PAGE 4
INSERT U-BOLT INTO UP-
RIGHT AND SLIDE ONTO
BAR. PLACE FOOT ONTO
U-BOLT AND INSTALL
LOCKNUTS (DO NOT FUL-
LY TIGHTEN AT THIS
TIME).
REPEAT ON BOTH ENDS
OF THE CROSSBAR(S).
InstructionsforStep04
PARTSYOUWILL
USEFOR
STEP
04
CROSSBAR TUBE
(1) REQUIRED UPRIGHT
(2) REQ’D PER BAR FOOT
(2) REQ’D PER BAR
FAS0248 5/16-18 LOCK-
NUT
(4) REQ’D PER BAR
FAS0598 U-BOLT
(2) REQ’D PER BAR
This manual suits for next models
4
Other Adrian Steel Automobile Accessories manuals


Popular Automobile Accessories manuals by other brands


ULTIMATE SPEED
ULTIMATE SPEED 279746 Assembly and Safety Advice

SSV Works
SSV Works DF-F65 manual

ULTIMATE SPEED
ULTIMATE SPEED CARBON Assembly and Safety Advice

Witter
Witter F174 Fitting instructions

WeatherTech
WeatherTech No-Drill installation instructions

TAUBENREUTHER
TAUBENREUTHER 1-336050 Installation instruction