Advanced Bionics Naida CI CI-5605 User manual
029-M517-85 Rev A
Manufactured by:
Advanced Bionics LLC
California, U.S.A.
+1 661 362 1400
AdvancedBionics.com
© 2015 Advanced Bionics AG. All Rights Reserved.
Advanced Bionics AG
Laubisrütistrasse 28
8712 Stäfa, Switzerland
+41 58 928 78 00
POWERCEL™ CHARGER
CI-5605
instructions for use
English, Français, Español, Deutsch, Nederlands, Português
2013

1
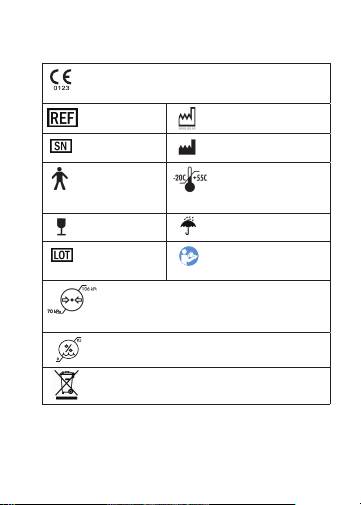
Labeling symbols and their meanings:
European Community Mark of
Conformity. Authorized to affix the CE Mark in
2013
Model
number Date of
manufacture
Serial
Number Manufacturer
Type of
Protection: B Store at temperatures
between -20˚C (-4˚F)
and +55˚C (131˚F)
Fragile Do not get wet
Lot Number See Instructions
for Use
Suitable for atmospheric range between
70kPa and106kPa, which is equivalent to
3000m above sea level to 380m below
sea level.
Suitable for exposure to relative humidity
between 0-95%
Dispose of in accordance with applicable
national and local regulations
0
95

2
Warnings and Cautions
• Your PowerCel charger for your lithium ion batteries
comes with a power supply designed for the
specifications of the charger. Do not use any other
power supply unless it is supplied by Advanced
Bionics. If needed call Advanced Bionics for a power
supply replacement.
• Do not allow children to play with the PowerCel
charger.
• Do not allow children to place charger in the mouth.
Naída CI PowerCel™ Charger
The Naida CI PowerCel Charger is designed to recharge
up to 4 PowerCel batteries simultaneously. It is compat-
ible with the Naida CI PowerCel 110, 170 and 230, as
well as the Naida CI PowerCell 110 Mini and 170 Mini
rechargeable batteries. DO NOT connect the Zn-Air
Battery Pak to the charger (disposable battery cartridge).
The charger is to be used with the rechargeable Lithium
Ion PowerCels only.
It takes approximately 4-5 hours to fully recharge a
depleted PowerCel. This will vary slightly for different
PowerCel types.
3
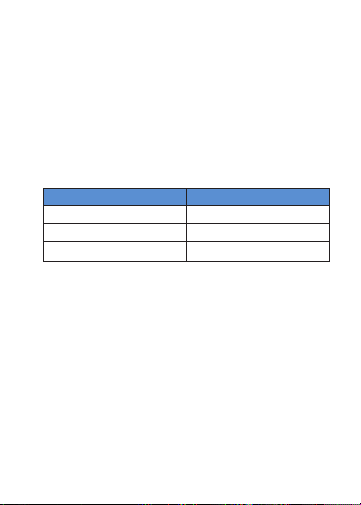
Charger LED (Light Emitting Diode) Indicators
The charger has different indicator lights that are
located at the base of each PowerCel charging port, as
well as where the power cable enters the charger. If the
light on the charger around the power cable is lit and
green in color, it means the charger is connected to a
power source and ready to charge the PowerCels.
The LEDs, located at the base of each PowerCel
charging port, have 3 color options.
Color Indication
Blue PowerCel is charging
Green PowerCel fully charged
Red Fault condition*
*Try to reinsert the PowerCel and if the red LED
illuminates again, contact your implant center.
There is a rare condition where the PowerCel port LED
turns off (or may show a faint blue if the room is very
dark). This LED off behavior indicates either a fully
charged battery or battery with an error condition. The
user should wait at least 1 full minute, if the LED does
not turn green, then the battery should be considered as
having an error and the user should contact Advanced
Bionics for a replacement. If the LED turns green, then
the battery is fully charged and ready for use.

4
Assembling the PowerCel Charger
The charging system consists of the charger, power
supply and power adapters. The charger can also be
used with the power supply removed from the cable,
exposing the USB jack so it can be powered from any
USB port.
To use the Charger with a Wall Outlet for Charging:
• Place the charger on a flat surface.
• Select the Charger Power Supply adapter appropri-
ate for your location.
• Connect the adapter to the Naída CI PowerCel
Charger Power Supply. Connect the micro HDMI end
of the cable from the power supply into the charger.
To use the Charger with a USB port for Charging:
• Place the charger on a flat surface.
• Remove the Charger Power Supply to expose the
USB jack.
• Insert the USB jack into a USB port (on a computer,
in a car, etc).
• Connect the micro HDMI end of the cable from the
power supply into the charger.

5
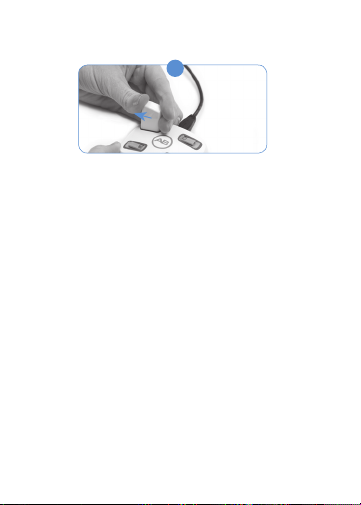
Inserting the PowerCels into the Charger
1
Locate the slide tracks on the charger.
Position the PowerCel so that the battery contact
is facing down toward the base of the charger.
2
Slide the PowerCel along the tracks until it engages. The
charger is designed so the PowerCels can only be inserted
in one direction.
Note: if you place a partially charged PowerCel in the
charger, the PowerCel may be fully charged in a shorter
period of time. You can remove the PowerCel at any
time. The charger and the PowerCels will not be
damaged or lose charge potential if the PowerCels
remain in the charger longer than the required
charging time.
6
Removing the PowerCels from the Charger
1
Gently slide the PowerCel out of the slide tracks of the
charger, toward the outer edge of the charger.
Cleaning
The charger contacts should be kept free from dirt and
dust. Dirty contacts can result in charger malfunction.
Clean the contacts at least once a month using a dry
cotton swab.
NOTE: Do not attempt to service or modify the Naida
CI or its accessories. Doing so may compromise system
performance and will void the manufacturer’s warranty.
Products should be serviced only at Advanced Bionics.

7
Recommended Operating and Storage
Temperature Ranges
Condition Minimum Maximum
Operating Temperature 0°C (32°F) 45°C (115°F)
Storage Temperature -20°C (-4°F) 55°C (131°F)
Naída CI External Equipment and Accessories
The products listed below are compatible
Description Model Number
Naída CI Q90
Sound
Processor* †
CI-5280-120, CI-5280-130, CI-5280-140,
CI-5280-150, CI-5280-160, CI-5280-170,
CI-5280-190, CI-5280-110, CI-5280-220,
CI-5280-230, CI-5280-240
Naída CI Q70
Sound
Processor* †
CI-5245-110, CI-5245-120, CI-5245-130,
CI-5245-150, CI-5245-160, CI-5245-170,
CI-5245-140, CI-5245-190, CI-5245-220
Naída CI Q30
Sound
Processor* †
CI-5260-120, CI-5260-140, CI-5260-150
Universal
Headpiece
(UHP)*
CI-5305
Concave
UHP* †CI-5307
Naída CI
PowerCel
Charger
CI-5605
Charger
Power
Supply
CI-5615

8
RF Cable*CI-5415-301, CI-5415-302, CI-5415-303,
CI-5415-304, CI-5415-305, CI-5415-201,
CI-5415-202, CI-5415-203, CI-5415-204,
CI-5415-205, CI-5415-401, CI-5415-402,
CI-5415-403, CI-5415-404, CI-5415-405,
CI-5415-501, CI-5415-502, CI-5415-503,
CI-5415-504, CI-5415-505
PowerCel
110*CI-5511-110, CI-5511-120, CI-5511-130,
CI-5511-140, CI-5511-150, CI-5511-160,
CI-5511-170, CI-5511-190, CI-5511-220
PowerCel
170*CI-5517-110, CI-5517-120, CI-5517-130,
CI-5517-140, CI-5517-150, CI-5517-160,
CI-5517-170, CI-5517-190, CI-5517-220
PowerCel
230*CI-5523-110, CI-5523-120, CI-5523-130,
CI-5523-140, CI-5523-150, CI-5523-160,
CI-5523-170, CI-5523-190, CI-5523-220
PowerCel 110
Mini*CI-5521-120, CI-5521-130, CI-5521-140,
CI-5521-150, CI-5521-160, CI-5521-170,
CI-5521-190, CI-5521-110, CI-5521-220,
CI-5521-230, CI-5521-240
PowerCel 170
Mini*CI-5527-120, CI-5527-130, CI-5527-140,
CI-5527-150, CI-5527-160, CI-5527-170,
CI-5527-190, CI-5527-110, CI-5527-220,
CI-5527-230, CI-5527-240
*Applied part per IEC 60601-1
†Only available in markets where regulatory approval
has been received and the product has been made
commercially available. Contact Advanced Bionics for
more information.
NOTE: model number extensions denote variants related
to product color, size, and/or length.
9
Symboles d'étiquetage et leur signification :
Marquage de conformité de la Communauté
Européenne. Autorisé à apposer le marquage
CE en 2013
Numéro
de modèle Date de fabrication
Numéro
de série Fabricant
Type de
protection : B À stocker à une
température comprise
entre -20 ˚C (-4 ˚F)
et +55 ˚C (131 ˚F)
Fragile Éviter toute exposition
à l'eau
Numéro
de lot
Consulter les
instructions
d'utilisation
Peut être utilisé à une pression atmosphérique
comprise entre 70 kPa et 106 kPa, soit entre
3 000 m au-dessus du niveau de la mer et
380 m au-dessous du niveau de la mer.
Peut être utilisé à une humidité relative
comprise entre 0 et 95 %
Mettre au rebut selon les règlements
nationaux et locaux en vigueur
0
95
Table of contents
Languages:
Other Advanced Bionics Batteries Charger manuals


