ADVENOR X-BIKE Supplement

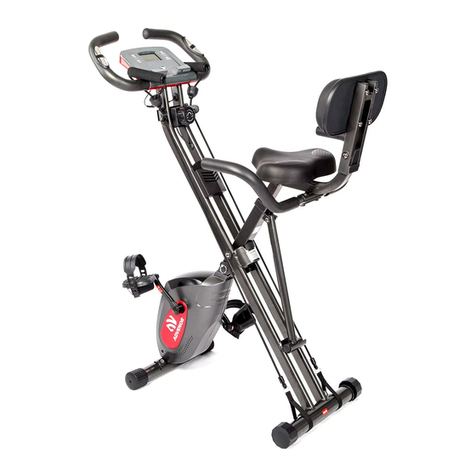
ADVENOR X-BIKE
Assembly & Operation Manual
Scan to view assembly video or visit
https://youtu.be/_w0t-wt-yf0

1
Read Before Assembly
1.After opening the package, please check all the parts, hardware tools and wires. All
screws, nuts and bolts have been pre-assembled in place. Some hardware may be
scattered in the packing box during transportation. Please check carefully before dis-
carding the packing box. When installing the pedals, please make sure that you install
each pedal to the corresponding crank by checking L or R labels. ADVENOR shall not
take the responsibility for the damages of the pedal which was installed to the
unmatching crank by customers.
2.Please avoid assembling, using or storing the exercise bike in wet / dusty environ-
ment or on sloping/ uneven/excessively smooth floor. It is recommended to place a
carpet on the floor before assembly to avoid scratches. Please also avoid exposure to
the sun.
3.To use the monitor, please connect the cables manually and install two AAA batteries.
Do not pull the cables forcibly during operation. Please avoid keeping the monitor
close to a fire source. Please remove the battery if it will not be used for a long time.
4.Pregnant women, patients with heart disease or high blood pressure and people with
knee injuries are prohibited from using this exercise bike. The elderly, children and
people with intellectual disabilities can only use the exercise bike in the presence of
another person who can give assistance.
5.Please use the exercise bike in good physical condition and wear suitable clothes and
shoes for fitness. Please pay attention to safety when getting on and off the exercise
bike, do not use it while standing.
6.Before beginning any exercise program consult your physician. This is especially
important for the people who are over 35 years of age or who have pre-existing health
problems.
7.The product can be cleaned with a soft clean damp cloth. Do not use abrasives or
solvents on the plastic parts. Wipe your perspiration off the product after each use. Be
careful not to get excessive moisture on the console display panel as this might cause
an electrical hazard or electronics to fail.
8.It is recommended to warm up for 5-10 minutes before using the exercise bike, ride it
for 20 to 40 minutes each time and 3 to 5 times a week in order to achieve scientific and
efficient fitness goals.
9.If you have any inquiries or require further assistance, please contact
ADVENOR customer support by
Phone: +1 323-686-3277
Email: service@advenorfitness.com

1. Name of Parts
RIGHT STRAP
RIGHT PEDAL
FRONT STABILIZER
TRANSPORTATION WHEEL
TENSION KNOB
LEFT STRAP
LEFT PEDAL
SAFETY PIN
ANTI-SKID ENDCAP
HANDLE BAR
ADJUSTING KNOB
SEAT
REAR STABILIZER
MONITOR
MAIN FRAME
2

2. Parts in the Package
Main Frame X1
Front Stabilizer X1
(With transportation wheels)
Monitor X1 Hardware Tool
A X2
B X1
Front Back
Handle bar X1
Seat X1 Seat Post X1
Front Back
Pedal & Strap
Left X1 Right X1
Rear Stabilizer X1
B2
A2
A3
A4
A1
A2
A3
A4
A1
B1
NOTE: The two screws in Picture 10 which have
been pre-assembled to the back of the monitor.
NOTE: The two spring washers and screws have
been pre-assembled.
NOTE: The three washers and nuts have been
pre-assembled on back of the seat.
NOTE: The four washers and domed nuts have been pre-assembled on both of the
front and rear stabilizers.
3

3. Assembly Instruction
Tip: Please wear gloves and assemble in the order listed in the manual.
1.Unfold the main frame by adjusting the safety pin from position A to position
B as shown in the picture 1. (To adjust the position of safety pin, please press
the small spring button and pull the ring on the other side simultaneously to
remove from position A and insert the safety pin at the position B)
2. Please adjust the direction of anti-skid endcaps to ensure their stability on
the floor as the pictures show.Use Tool A1 to remove the four washers and
domed nuts which have been pre-assembled on both of the front and rear
stabilizers. (See Picture 2)
AB
Picture 1
Picture 2
Front Rear
A1
EXPANDED
4

3. Use Tool A1 to attach the main frame with matching front and rear
stabilizers.
Tip: Please put the washers before installing the domed nuts, and then tighten
the domed nuts with Tool A1. (See Picture 3)
4. Use Tool A2 to install the left and right pedals to the matching cranks corre-
spondingly. ADVENOR shall not take the responsibility for the damages of the
pedal which was installed to the unmatching crank by customers.
Steps:
① Confirm the labels marked as L and R on the pedals and cranks as shown in
the picture 4 before assembly. (See Picture 4)
Picture 3
Front Rear
A1
Picture 4
5

5.Use Tool A to install the seat post to the seat.
Steps:
①In order to prevent the wearing of the seat cushion edge on the back during
assembly, please put a cloth or gloves on it as shown in Picture 6.
②Please use Tool A1 to remove the three washers and nuts which have been
pre-assembled on back of the seat and then install the seat post to the seat.
Please put the washers first before tighten the nuts. (See Picture 6)
② The cranks are pre-assembled to the exercise bike. Only the connection of
pedals and cranks is required. Please install each pedal to the matching crank
and use Tool A2 to tighten the connecting screws in the direction of the arrow
on the crank indications. (See Picture 5)
③Please be sure that each pedal is connected to the correct crank. Otherwise,
the screw thread will be worn causing permanent damage to the exercise bike.
Picture 5
Left Right
Picture 6 6
A2
A1

6. Install the seat post to the seat tube
Steps:
① Remove the adjusting knob which has been pre-assembled on the seat tube
by rotating anticlockwise. (See Picture 7)
② Install the seat post to the seat tube while paying attention to the
max-height mark on the seat post. (See Picture 8)
③ Insert the adjusting knob and tighten to the maximum by rotating clockwise
when the holes on the seat post and seat tube align. (See Picture 9)
7.Install the handle bar to the main frame
Steps:
① Remove the elastics which have been used to prevent the two spring wash-
ers and screws from scattering from handle bar and then remove the spring
washers and screws as well.
② Put the handle bar onto the main frame as shown in the picture 10 and then
tighten the screws by Tool B1. Please put the spring washers first before tighten
the screws. (See Picture 10)
Picture 7 Picture 8 Picture 9
① ②
7

9.Connect the cables
Steps:
① Identify two kinds of connectors.
8.Install the monitor to the handle bar
Steps:
① Use Tool B2 to remove the two screws in Picture 11 which have been pre-as-
sembled to the back of the monitor.
② Put the monitor on the supporting mental piece of the handle bar and use
Tool B2 to tighten the screws as shown in the picture 12.
Picture 10
Picture 11
B2
Picture 12
Connector A
Front View Bottom view
Connector B
Front View Bottom view
③ ④
B1
8

② Identify the cables on different parts.
③ Connect the Connector A with Connector B as shown in the Picture 13.
10. Install two AAA batteries into the monitor and then put the lid on. (See Pic-
ture 14)
Tip: Please change the battery once the monitor stops working.
Picture 13
Picture 14
One cable with connector B
on the main frame
Two cables with connector As
on the handle bar
Three cables with one
connector A and two
connertor Bs on the back
of the monitor
B
B
B
B
BB B
B
B
A A
A
AA
A A
AA
9

4. Operation Instruction
※ Please use the exercise bike in good physical condition and wear suitable clothes and
shoes for fitness.
※ Check all the screws and nuts are tightened and adjust the seat to the suitable height
before getting on.
※ Adjust the strap to stabilize your feet on the pedal.
※ Turn the tension-adjusting knob as shown in the picture 15 to the suitable resistance level
among 8 options. Turning clockwise will increase the resistance level while turning counter-
clockwise will decrease.
※ Press the red button to start the monitor display.
Functions on the monitor listed from left to right under the screen.(See Picture 16):
Actual pointers blink order while riding the exercise bike
* Pointer for SCAN⸺Consistently.
* Pointer for other functions goes:
and repeats round by round.
Press the Red Button to check the data for the particular function.
The monitor will automatically shut down after four minutes when the exercise bike stops
working.
※ Do not stand up while riding. Holding the handle bar is recommended.
※ Please release the strap and pay attention to safety when getting off.
※ It is recommended to warm up for 5-10 minutes before using the exercise bike, ride it for
20 to 40 minutes each time and 3 to 5 times a week in order to achieve scientific and effi-
cient fitness goals.
Scan [Automatically]: The pointer for Scan keeps blinking as riding.
Speed: It shows the speed for every second. The highest speed is 99.99 km/h
Dist (Distance): It ranges from 0.00 km to 99.99 km and increases by 0.01 km.
Time: It shows from 0’0’’ to 99’99’’
Cal (Calories): It ranges from 0 to 9999 and increases by 1 cal.
Odo (Odometer): It shows the total distance calculating from the first tome use and ranges from 0.00 km
to 99.99 km and increases by 0.01 km.
Pulse (Heart Rate): Hold the sensor on the handle bar and the real-time heart rate will be presented.
Picture 15 Picture 16
1. Speed 2. Dist 3. Cal 4.Odo 5.Pulse 6.Time
10

5. Storage and Move
① For space-saving storage, Advenor exercise bike can be folded by adjusting
the safety pin from position B to position A as shown in the picture 17.
② To easily move the exercise bike, please hold the handle bar and move with
the transportation wheels as shown in the picture 18.
Picture 17
AB
Picture 18
11

Acknowledgements
Dear customer,
Thank you for choosing ADVENOR. We commit to provide the
best products and services to every customer.
If you have any inquiries or require further assistance, please
contact ADVENOR customer support by
Phone: +1 323-686-3277
Email: service@advenorfitness.com
Your feedback and suggestions are always important and
valuable to us.
Kindest regards,
Company Founder
Scan to view assembly video or visit
https://youtu.be/_w0t-wt-yf0
Other manuals for X-BIKE
1
Table of contents
Other ADVENOR Fitness Equipment manuals