ADWA AD 130 User manual

AD 130
pH/mV/Temperature
PortableMeter
USERMANUAL
www.adwainstruments.com
MANAD130R2 05/09
ADWA HUNGARY Kft.
Alsókikötõ sor 11, 6726 Szeged, Hungary
Tel.+3662317878
Fax+3662550610
www.adwainstruments.com

Dear Customer,
Thank you for choosing an Adwa product.
Please read carefully this manual before starting
operations.
Thisinstrument isincompliance withtheEMC Directive
89/336/EEC and Low Voltage Directive 73/23/EEC for
electrical equipments.
For additional technical information, please e-mail us at

3
TABLE OF CONTENTS
Introduction ............................................................... 4
Technical Data .......................................................... 5
Front and Top Panels ................................................ 8
OperationalGuide ................................................... 10
Hold and Memory Recall Functions ....................... 16
pHCalibration ......................................................... 17
Setup Menu............................................................. 23
Battery Replacement .............................................. 25
LCD Message Guide .............................................. 27
pH Electrode Conditioning & Maintenance ............ 29
Electrodes, Probes and Solutions ............................ 31
TroubleshootingGuide............................................. 32
Warranty ................................................................. 34
34
WARRANTY
Adwa warrants this product to be free of defects in
material and workmanship as stated in the operating
manual. If repair or adjustment is necessary and has not
been the result of abuse, misuse or improper handling
within the warranty period, please contact your dealer
or the nearestAdwa Office for the RGA(Return Goods
Authorization) number to put on the outside of your
package.Warrantedservicewill bemade withoutcharge.
Themeteris warrantedfor aperiodof 3years, while
probes are warranted for 6 months. The warranty
period commences from the original date of sale.
Warranty is only valid when the product is used under
normal conditions and in accordance with the instruc-
tionmanual.
The warranty is void if the instrument is repaired or ser-
viced by unauthorized personnel, not used in accor-
dance to the instructions, or if non-Adwa accessories
such as buffer solutions, probes, etc. are used in con-
junction with the meter. Adwa will not be held respon-
sible for any accident whether directly or indirectly,
caused by the use of this instrument.

4
INTRODUCTION
AD130 is a heavy-duty portable pH meter designed to
providelaboratory resultsand accuracy evenunder harsh
industrialconditions.
Main features include:
• 7memorized buffersforpH calibration (pH1.68,4.01,
6.86, 7.01, 9.18, 10.01 and 12.45)
• Messages on the LCD to make the calibration easy
and accurate
• pH readings with manual or automatic temperature
compensation
• pH calibration using pH buffers with 0.01 resolution
• Temperature range from -20 to 120°C (-4 to 248°F)
using AD5006 probe
AD130 can also use ORP electrodes to measure mV,
with a resolution up to 0.1 mV.
SYMPTOM
Display shows
blinking battery
symbol.
Meter does not
workwith
temperature probe.
Meter fails to
calibrate or gives
faulty readings.
"WRONGCAL"is
displayed during
pH calibration
procedure.
Meter shuts off.
"Er0,Er1,Er2"
message at start
up.
"Clr" message at
start up.
PROBLEM
Low battery
level.
Broken
temperature probe.
BrokenpH
electrode.
Wrong or
contaminated
buffer.
Dead batteries or
auto-off feature is
enable (in this case,
meter shuts off
after 20 minutes of
non-use).
EEPROMerror.
Loaded default pH
calibration values.
SOLUTION
Change batteries.
Replace the
temperature probe.
Replace electrode.
Check that buffer
solution is correct
and fresh.
Change batteries
or press ON/OFF.
Contact your
dealeroranyAdwa
service center.
PerformpH
calibration.

5
AD130 is supplied complete with:
•AD2005B/1 pH electrode with Epoxy body, tip pro-
tection bottle, BNC connector and 1 m cable
•AD5006 stainless steel temperature probe, 1 m cable
• pH4.01, pH7.01 andpH10.01 buffers(100 mlbottle)
• Electroderinsing solution,100 mlbottle
• Holders for pH electrode and temperature probe
• 1.5VAA alkaline batteries (4 pcs)
• User manual
•Rugged carrying case
32
TROUBLESHOOTING GUIDE
SYMPTOM
Slow response/
excessive drift.
Reading
fluctuate up and
down (noise).
The display
shows blinking
full scale value.
mV scale out
of range.
Display shows
blinking°Cor°F.
PROBLEM
Dirty pH electrode.
Clogged/dirty
junction.
Reading out of
range.
Drymembraneor
dry junction.
Temperature probe
is not connected or
out of order.
SOLUTION
Soak the electrode
tipinAD6050
solution for 30
minutes and then
follow the storage
procedure.
Clean the electrode.
Check that sample
is within measurable
range. Check
electrolyte level and
general electrode
status.
Soak electrode in
AD6060 storage
solution for at least
30minutes.
Connect or replace
temperature probe.

6
TECHNICAL DATA
Range -2.00 to 16.00 pH
±1999 mV
-20.0 to 120.0°C (-4.0 to 248.0°F)
Resolution 0.01 pH
0.1 mV (±699.9 mV) / 1 mV (outside)
0.1°C (0.1°F)
Accuracy ±0.01 pH
(@20°C/68°F) ±0.2 mV up to ±699.9 mV
±1 mV (outside)
±0.4 °C (±0.8°F) (excluding probe error)
pH Calibration 1 or 2 point calibration,
7 standard buffers available
(pH 1.68, 4.01, 6.86, 7.01, 9.18, 10.01, 12.45)
Temperature Manual or automatic,
Compensation -20.0 to 120.0°C (-4.0 to 248.0°F)
pH Electrode AD2005B/1
Temperature Probe AD5006
Input Impedance 1012 Ohm
Battery Type 4x1.5VAAsize, alkaline
Battery Life Approx. 500 hours of continuous use
Auto-off User selectable: 20 minutes or disabled
ELECTRODES, PROBES AND SOLUTIONS
AD2005B/1 pH electrode with Epoxy body, tip pro-
tection bottle, BNC connector and 1 m
cable
AD2015B/1 ORPelectrodewith Epoxybody,tip pro-
tection bottle, BNC connector and 1 m
cable
AD5006 Stainless steel temperature probe with
1 m cable.
AD6004B pH 4.01 buffer, 20 ml sachet, 25 pcs
AD6004-100 pH 4.01 buffer, 100 ml bottle
AD6007B pH 7.01 buffer, 20 ml sachet, 25 pcs
AD6007-100 pH 7.01 buffer, 100 ml bottle
AD6010B pH 10.01 buffer, 20 ml sachet, 25 pcs
AD6010-100 pH 10.01 buffer, 100 ml bottle
AD6060-100 Electrodestorage solution, 100mlbottle
AD6050B Electroderinsing solution, 20 mlsachet,
25 pcs
AD6050-100 Electroderinsing solution,100ml bottle
AD9315 Electrode holder

7
Environment 0 to 50 °C (32 to 122 °F)
RH max. 95%
Dimensions 188 x 96 x 70 mm
Weight 460 g
30
PERIODIC MAINTENANCE
Inspect electrode and cable. The cable used for con-
nection to the meter must be intact and there must be no
points of broken insulation on the cable or cracks on the
electrode stem or bulb. If any scratches or cracks are
present, replace the electrode.
Rinse off any salt deposits with water.
Connectors must be perfectly clean and dry.
CLEANING PROCEDURE
Soak the electrode tip in AD6050 cleaning solution for
approximately 30 minutes.
IMPORTANT:After performing a cleaning procedure,
rinse the electrode thoroughly with distilled water and
soak it in AD6060 storage solution for at least 1 hour
before taking measurements.

8
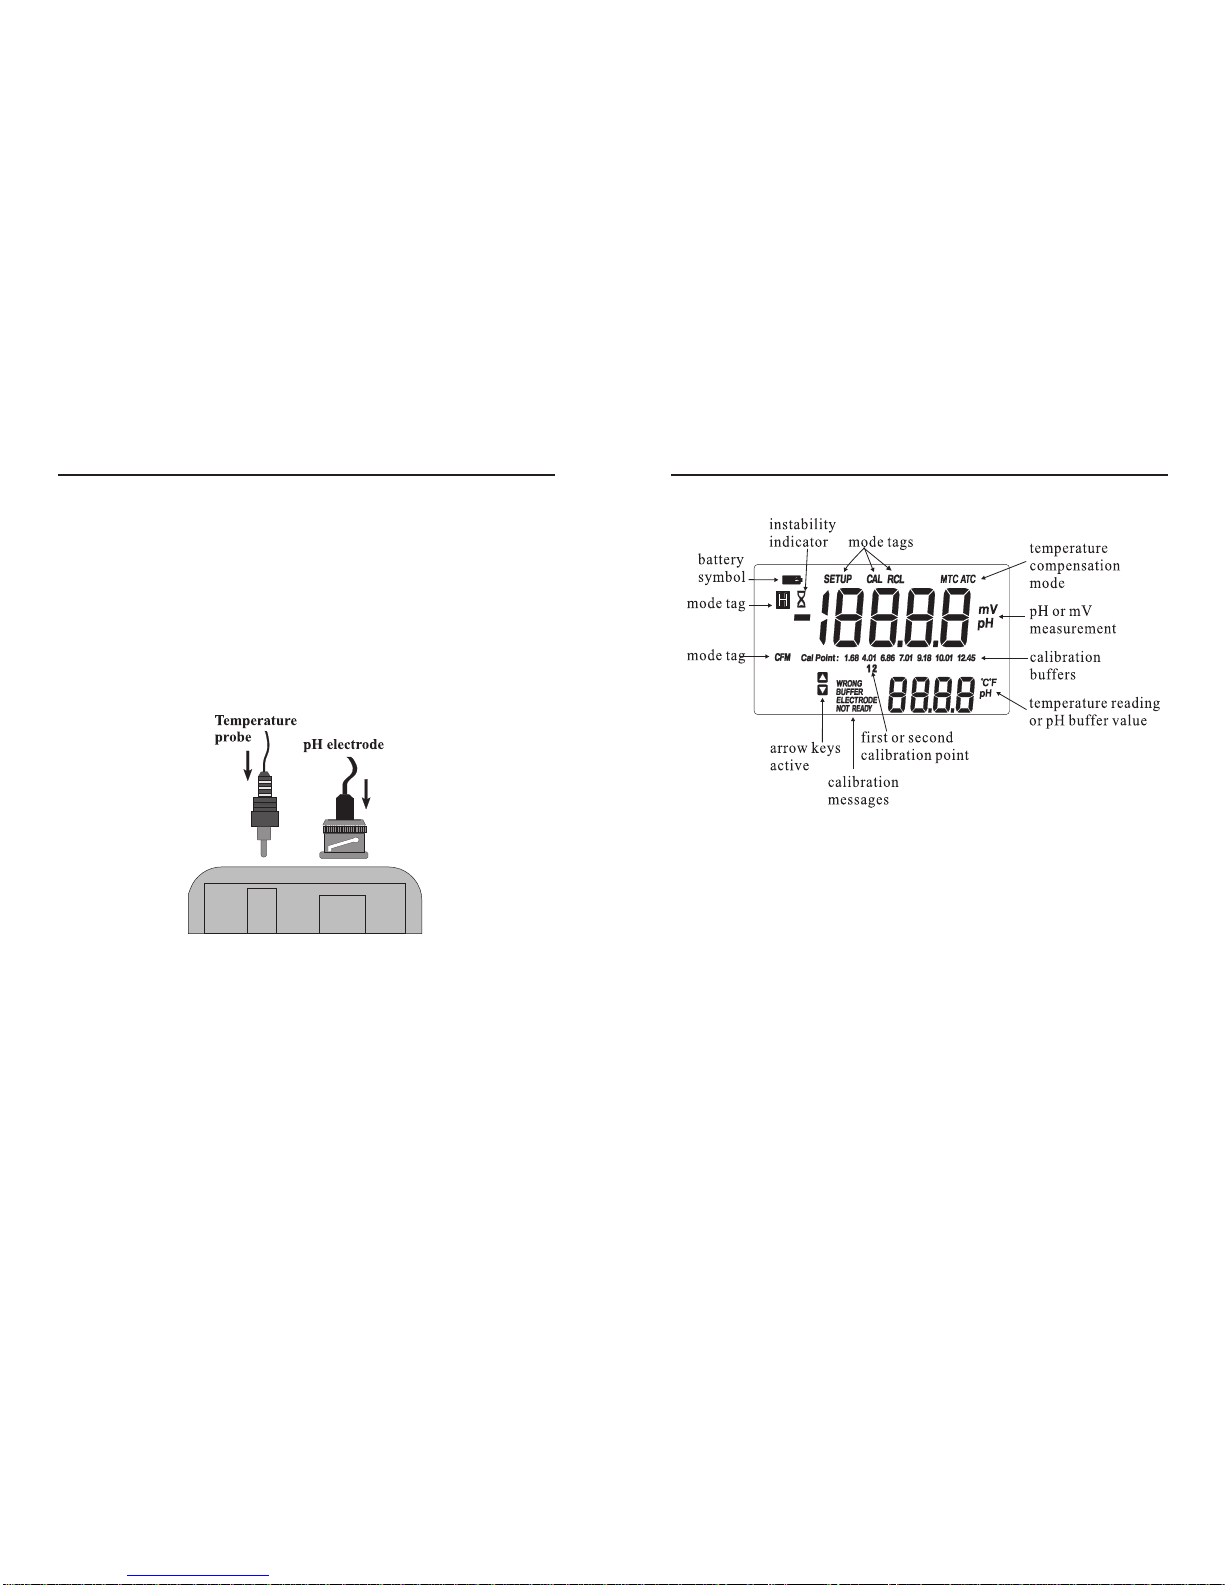
FRONT AND TOP PANELS pH ELECTRODE
CONDITIONING & MAINTENANCE
PREPARATION PROCEDURE
Remove the electrode tip protection bottle.
DO NOT BE ALARMED IF SALT DEPOSITS ARE
PRESENT.This is normal with electrodes and they will
disappear when rinsed with water.
During transport, tiny bubbles of air may form inside the
glass bulb. The electrode cannot function properly un-
der these conditions. These bubbles can be removed by
shaking down the electrode as you would do with a glass
thermometer.
If the bulb and/or junction are dry, soak the electrode in
AD6060 storage solution for at least one hour.
STORAGE PROCEDURE
To minimize clogging and ensure a quick response time,
the glass bulb and the junction should always be kept
moist.
When not in use, store the electrode with AD6060 stor-
age solution in the tip protection bottle.
NEVER USE DISTILLED OR DEIONIZED WATER
TO STORE THE ELECTRODE.

9
1. Temperature probe socket
2. Liquid Crystal Display (LCD)
3. ON/OFF key, to turn the meter ON and OFF
4. HOLD/CLR key, to freeze reading on display and
store it in the instrument memory, or to clear cali-
bration
5. CFM/SETUP key, to confirm calibration or enter
setup mode
6. MRCL key, to recall stored value
7. Up & Down arrow keys, for manual temperature
setting, entering menu parameters or changing
buffer value
8. CAL key, to enter/exit calibration mode
9. RANGE key, to select pH or mV reading
10. Secondarydisplay
11. Primarydisplay
12. BNC connector for pH or ORP electrodes
28
TEMPERATURE COMPENSATION MODES:
• MTC: manual compensation
•ATC: automatic compensation
BATTERYSYMBOLblinking: low battery condition.
Batteries should be replaced soon.
CALIBRATION MESSAGES:
• NOTREADY blinking:buffer has been recognized,
but reading is not stable
• READY on: buffer has been recognized and reading
is stable
• WRONG BUFFER and WRONG ELECTRODE
blinkingalternatively: wrongbuffer andelectrodenot
recognized
10
OPERATIONAL GUIDE
•The meter is supplied complete with four 1.5V AA
alkaline batteries. Remove the cover, unwrap the bat-
teries and install them while paying attention to their
polarity (also see “Battery Replacement” section).
• To prepare the instrument for use, connect pH elec-
trode and temperature probe to the BNC and tem-
perature sockets on the top of the instrument.
• The temperature probe is used in conjunction with the
pHelectrode toutilize themeter’sATC capability, but
it can also be used independently to take temperature
measurements. If the probe is disconnected, the tem-
perature can be set manually using the arrow keys
(see page 13 for details).
LCD MESSAGE GUIDE
MODE TAGS light up to indicate the corresponding
active mode, and blink for warning the user.
• SETUP on: setup menu mode has been entered
• CFMblinking:ask confirmation of calibration point
• CAL on: calibration mode has been entered
• CAL blinking: meter is not calibrated or calibration
is expired
• H symbol blinking: reading is frozen on display and
memorized
•Hsymboland RCLon:memorizedvalue is displayed

11
INSTRUMENT START-UP
• Turn the instrument on by pressing ON/OFF.
• At start-up the display shows all the used segments
for a few seconds (or while the button is held), fol-
lowed by the percentage indication of the remaining
battery charge, then enters the measurement mode.
• After measurement switch the meter off, clean the
electrode and store it with a few drops of AD6060
storage solution in the tip protection bottle.
• To save battery life, the auto-off feature turns the
meter off after 20 minutes with no button pressed.
This feature can also be disabled (see “Setup Menu”
section for details).
26
Battery replacement must
only take place in a safe
area and using the battery
type specified in this in-
struction manual.
To replace rundown batter-
ies, remove the battery
cover andsubstituteall four
1.5V AA alkaline batteries
with new ones, while pay-
ing attention to the correct
polarity.
Reattach and tighten the
battery cover making sure
that the gasket is in place.

BATTERY REPLACEMENT
If batteries become weak, the display will flash the bat-
terysymbolto advise theuserthatapproximately25hours
of working time are left. It is recommended to replace
the batteries soon.
Moreover, when the battery level is too low to ensure
reliable readings, the meter automatically turns off. At
start-up the display will show “0 bAtt” for a few sec-
onds and then the meter turns off.
pH MEASUREMENTS
Remove the electrode tip protection
bottle. Submerge the pH electrode tip
(4 cm) and the temperature probe into
the sample to be tested.
If necessary, press the RANGE key
until the display changes to the pH
mode.
Allow for the electrode to adjust and reading to stabilize
(hourglass symbol turns off).
The LCD will show the pH measurement together with
the temperature of the sample.
In order to take more accurate pH measurements, make
sure that the instrument is calibrated (see “pH Calibra-
tion” section for details).
12
.
13
It is recommended to keep the pH electrode always wet
and to rinse it thoroughly with some sample to be mea-
sured before use.
The pH reading is directly affected by temperature. In
order to measure the pH accurately, temperature must
be taken into consideration. If the sample temperature is
different from the temperature at which the pH elec-
trode was kept, allow a few minutes to reach thermal
equilibrium.
To use the meter’s automatic temperature compensa-
tion (ATC) capability, submerge the temperature probe
into the sample as close to the electrode as possible and
wait for a few minutes.
If manual temperature compensation (MTC) is desired,
the temperature probe must be disconnected.
The display will show the default temperature of 25°C
or the last set temperature together with the °C (or °F)
indicatorblinking.
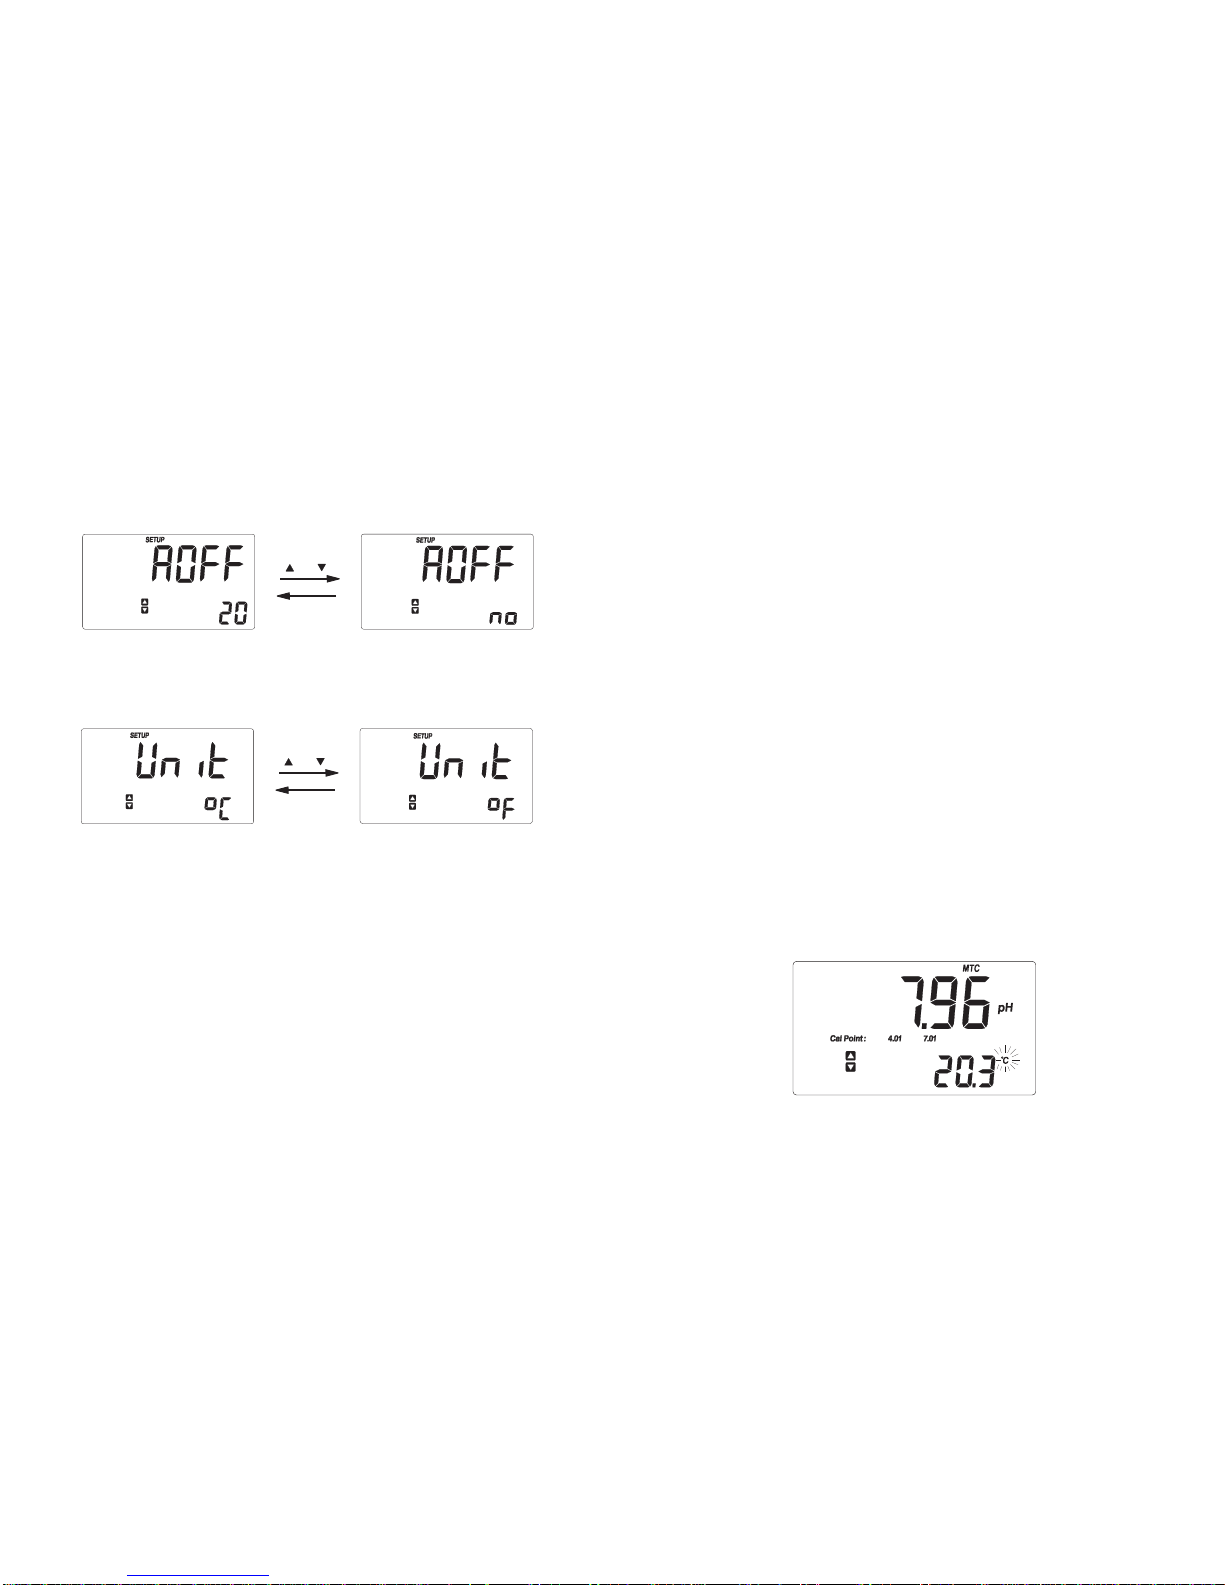
24
This is the sequence of programmable parameters:
1. Auto-off feature: 20 minutes (default) or disabled.
2. Temperature measure unit: °C (default) or ° F.
After setting the last parameter, pressing the CFM key
will confirm the value and return to normal measure-
ment mode.

14
The MTC tag and up & down arrow symbols light up on
the LCD to indicate that the meter is in MTC mode. The
arrow keys can be used to enter the desired tempera-
ture value.
Note: In MTC mode, the user can press and hold the
arrow keys to incrementing or decrementing
quickly the temperature value. The meter will
keep measuring and the display is updated ev-
ery second.
ORP MEASUREMENTS
To perform ORP measurements, connect the ORPelec-
trode (AD2015B/1, optional) to the meter and turn it on
by pressing the ON/OFF button.
If necessary, enter the ORP mode by pressing RANGE
until the display changes to mV.
Submerge the ORP electrode tip (4 cm) into the sample
to be tested and wait a few minutes for the reading to
stabilize.
Measurementswithin the±699.9 mVrangeare displayed
with0.1 mVresolution,while outsidethis range thereso-
lution automatically switches to 1 mV.
23
SETUP MENU
The instrument allows the user to configure the param-
eters through a setup menu.
To enter thesetupmode,from normalmeasurementmode
press and hold the SETUP key for about 5 seconds.
The value of each parameter can be changed by using
the arrow keys and then confirmed with the CFM key.
After setting and confirming a parameter, the meter will
automatically show the next one.
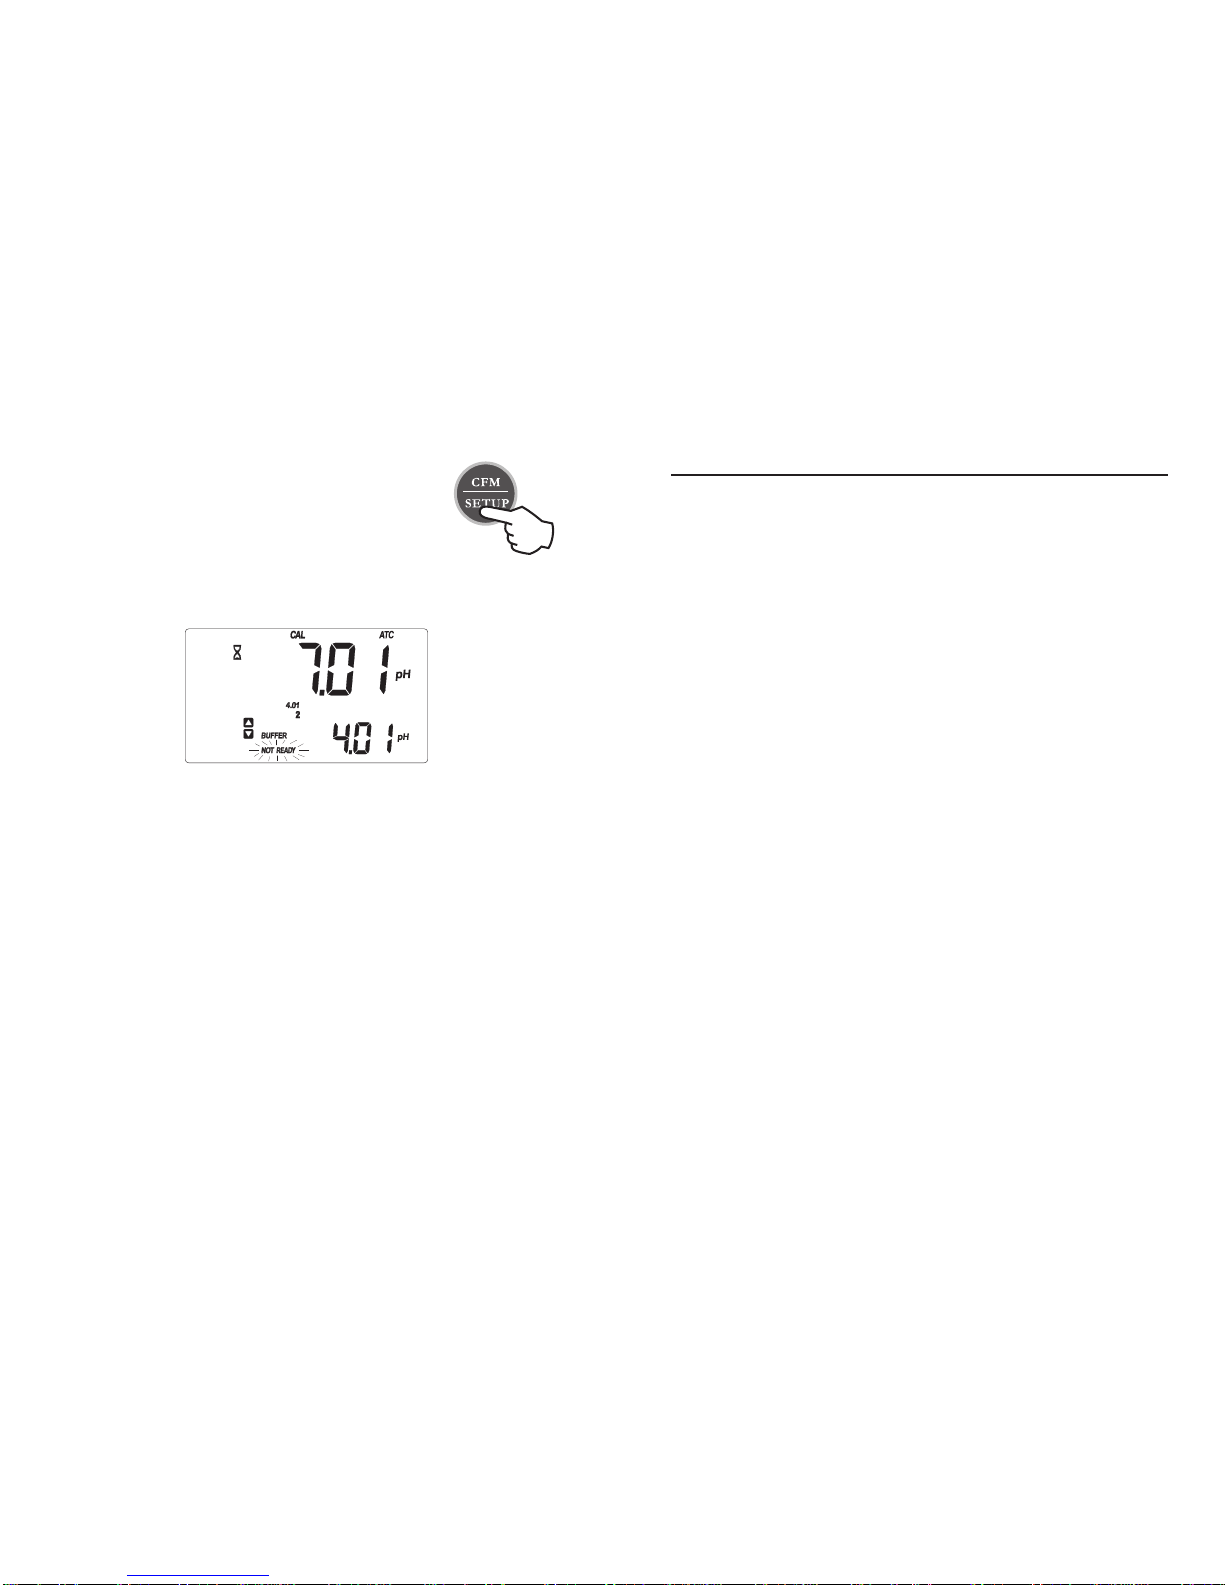
ONE-POINT CALIBRATION
For optimum accuracy it is always recommended to per-
form a two-point calibration, but for a faster operation it
is also possible to carry out a single-point procedure.
The meter can be calibrated using any of the memorized
buffers, but the pH 7.01 or pH 6.86 value is normally the
most appropriate for a single-point procedure.
After calibrating the first point, press the CAL key to
exit the calibration mode.

15
Since mV readings are not temperature compensated,
the ATC and MTC tags are turned off .
For accurate ORP measurements, the surface of the
electrode must be clean and smooth. Pretreatment solu-
tionsare availabletocondition theelectrode and improve
itsresponse time(see “Electrodes, Probesand Solutions”
section for details).
Notes:
•When the reading is out of range, the closest full-scale
valuewill blinkondisplay.
•If using pH electrode while in mV mode, the meter
will measure the mV generated by the pH electrode.
22
Notes:
• To avoid erroneous procedures, the meter automati-
callyskipsthe bufferusedforthe first calibrationpoint.
A difference of at least 1.5 pH units is required be-
tween the two buffers used for offset and slope cali-
bration (i.e. once calibrated at either pH 7.01 or pH
6.86, the instrument automatically ignores the other
value for the second point. Same for pH 10.01 and
pH 9.18).
• During calibration, the secondary LCD shows the se-
lected buffer value. Press RANGE to display the
buffer temperature.
• To clear previous calibration and return to the default
values, press the CLR key at any time after entering
the calibration mode. The LCD will show the mes-
sage “CLr CAL” for one second, and then will return
to normal measurement mode.

•Press the CFM key to confirm the
second calibration point.
•The meter stores the calibration data and returns to
normal measurement mode. The tags corresponding
to the buffers used for calibration will light up.
From measurement mode, pressing the
HOLD key will freeze the reading on
display. The frozen value is also stored
in the instrument memory and can be
recalled at any time by pressing the
MRCL key.
TheH symbolblinksto indicatethatthe displayisin hold
mode. Press the HOLD key again to return to normal
operations.
Notes:
• While in HOLD mode, the user can switch between
pH and mV by pressing the RANGE key.
• The memorized value is displayed as long as the
MRCL key is pressed, together with H and RCL sym-
bols. When the key is released, the display returns to
normal measurement mode.
16
HOLD AND MEMORY RECALL FUNCTIONS
21
17
pH CALIBRATION
Itis recommendedto calibratethe instrumentfrequently,
especially if high accuracy is required.
The pH range should be recalibrated:
a) Whenever the pH electrode is replaced
b) At least once a week
c) After testing aggressive chemicals
d) When extreme accuracy is required
PREPARATION
The user can choose among 7 memorized buffers (pH
1.68, 4.01, 6.86, 7.01, 9.18, 10.01 and 12.45).
•Pour small quantities of selected buffer solutions into
clean beakers. For accurate calibration use two bea-
kers for each buffer solution, the first one for rinsing
the electrode and the second one for calibration.
•Remove the tip protection bottle and rinse the elec-
trode with some of the buffer solution to be used for
the first calibration point.
20
•Press CFM to confirm the calibration
and the meter will store the first cali-
bration point. The primary LCD will
show the calibrated reading, while the
secondary LCD will show the second
expected buffer (pH 4.01).
•If a different calibration buffer is desired, select the
appropriate value with the arrow keys.
•Afterthe firstcalibrationpoint isconfirmed,submerge
the electrode tip approximately 4 cm into the second
buffer solution, place the temperature probe as close
as possible to the electrode and stir gently.
•The LCD will flash NOT READY for 12 seconds.
Then, if the reading is not close to the selected buffer,
WRONG BUFFER and WRONG ELECTRODE
will blink alternatively; if it is close to the selected
buffer, the calibration is performed and the display
will show READY and blinking CFM.

•Submerge the electrode tip approximately 4 cm into
the solution, place the temperature probe as close as
possible to the electrode and stir gently.
•The message NOT READY will blink for 12 sec-
onds. Then, if the reading is not close to the selected
buffer, WRONG BUFFER and WRONG ELEC-
TRODEwill blinkalternatively; ifthe reading isclose
to the selected buffer, the calibration is performed and
the display will show READY and blinking CFM.
18
TWO-POINT CALIBRATION
•Press the CAL key. CAL and BUFFER tags will be
displayed.
•The secondary LCD will display the value “7.01 pH”.
•If a different calibration buffer is desired, use the ar-
row keys to change the displayed value.
19
Table of contents
Other ADWA Measuring Instrument manuals


Popular Measuring Instrument manuals by other brands

Trans instruments
Trans instruments AquaCOMBO HM3070 Operation manual

Milwaukee
Milwaukee Smart PH Meter user manual

Extech Instruments
Extech Instruments MO230 user guide

RAYLASE
RAYLASE AXIALSCAN manual

Elma Instruments
Elma Instruments ELMA 795 manual

Gossen MetraWatt
Gossen MetraWatt METRAPHASE 1 operating instructions


ThermoWorks
ThermoWorks 7000 operating instructions

Keysight Technologies
Keysight Technologies N9030B Installation note

Ibanez
Ibanez MU40 user manual

Larson Electronics
Larson Electronics LZRWL-CRN-RED-100MW instruction manual

VDO
VDO Ocean Link Installation and operating instructions

Newport
Newport QuantX-300 user guide