Aervoe Snap Light 7805 User manual
OPERATING INSTRUCTIONS
AERVOE INDUSTRIES, INC.
Gardnerville, NV 89410 • 1-800-227-0196
Snap Light is a trademark of Aervoe Industries, Inc.
7805inst; cs12/15
TROUBLESHOOTING
DÉPANNAGE / RESOLUCIÓN DE PROBLEMAS
1. Not charging properly:
Check that the charging adapter matches your cell phone or electronic
equipment and is securely inserted into both devices.
2. Lights not working:
Make sure the battery is charged. If the unit has not been used or charged for 6
months the battery will need to be recharged. For optimal battery life, recharge
every 3 months.
1. Pas de charge correctement :
Vérier que l’adaptateur de charge correspond à votre équipement
électronique ou de téléphone cellulaire et qu’il est inséré correctement
dans les deux dispositifs.
2. Lumières ne fonctionne pas :
Assurez-vous que la batterie est chargée. Si l’appareil n’a pas utilisé
ou chargé pendant six mois la batterie devra être rechargée. Pour une
durée de vie optimale de la batterie, recharge chaque 3 mois.
1. No está cargando correctamente:
Asegurarse que el adaptador encaja correctamente con tu teléfono o
dispositivo y que esta correctamente conectado en ambos dispositivos.
2. Luces no funcionan:
Asegurarse que la batería esta cargada. Si el aparato no se ha utilizado
o recargado durante 6 meses la batería se tendrá que recargar de nuevo.
Para conseguir una vida optima de la batería, recargar cada 3 meses.
TECHNICAL INFORMATION
INFORMATION TECHNIQUE / INFORMACIÓN TÉCNICA
SPECIFICATIONS / SPÉCIFICATIONS / ESPECIFICACIONES
Overcharge, over discharge, overload and short circuit protection.
Protection contre les surcharges, les sous-charges et les courts-circuits.
Sobrecarga, sobre descarga, carga excesiva y protección contra cortocircuitos.
INTERNAL RECHARGEABLE
BATTERY / BATTERIE INTERNE
RECHARGEABLE / BATERÍA
INTERNA RECARGABLE
3.7V/6000mAh
lithium ion
LITHIUM-ION DE
6000mAh
6000mAh iones
de litio
DC INPUT 5V/1.5A 5V/1.5A 5V/1,5A
DC OUTPUT 5V/2A 5V/2A 5V/2A
LEDs 1W, 140 lumens 1W, 140 lumens 1W 140 lúmenes
SIZE / DIMENSIONS / TAMAÑO 2” x 2.1” x 4.3”
(51x54x110mm)
2” X 2.1” X 4.3”
(51X54X110mm)
51x54x110mm
WEIGHT / POIDS / PESO 8.6 oz. (243g) 8.6 OZ. (243G) 243g
RATING / ÉVALUATION /
CLASIFICACIÓN Built to IP64 rating
but not tested
Construit pour IP64
note mais pas testé
Construcción
de calificación
IP64pero no es a
prueba
CHARGE & OPERATING TIMES
CHARGEMENT ET TEMPS D’OPÉRATION / RECARGAS Y DURACION
Function Time
Charge using USB / Charge en utilisant l’USB / Recarga utilizando USB 8-10 hours
Charge using 120V or 12V adapter / Charge à l’aide ou l’adaptateur 12V
120V / Carga usando 120 V o adaptador de 12V
5-6 hours
Operating on High / Fonctionnant sur high / Utilizando luz blanca 17 hours
Operating red flasher / Fonctionnant avec le clignotant rouge /
Utilizando luz roja
34 hours
Charge iPhone 5 or 6 / Chargement du iPhone 5 or 6 / Recarga iPhone
5 or 6
3 times
Charge Samsung Galaxy 4 or 5 / Chargement du Samsung Galaxy 4 or
5 / Recarga Samsung Galaxy 4 or 5
2 times
Charge tablet / Tablette charge / Tableta de carga Up to 25%
FRANÇAIS
ESPAÑOL
RoHS
COMPLIANT

Snap Light #7805
The Snap Light™ is a multifunction light and power source for outdoor and
emergency preparedness. It provides super bright light in the form of a flashlight or
lantern and provides power to your handheld devices through 5V USB connection.
Rugged, weatherproof design.
La Snap Light™ est une lumière multifonction et une source d’énergie pour
l’extérieur et aide à être préparé aux situations d’urgence. Elle fournit une
lumière super brillante sous la forme d’une lampe-torche ou d’une lanterne et
elle fournit de l’énergie à vos dispositifs de poche grâce à un connecteur USB
5V. Conception robuste et résistant aux intempéries.
El Snap Light™ es una luz multifunción y una fuente de alimentación para
exteriores y emergencias. Ofrece una luz súper luminosa en forma de linterna
o faro y ofrece energía para tus dispositivos de mano con una conexión de 5V
USB. Diseño resistente a la intemperie resistente.
IMPORTANT SAFEGUARDS
PRÉCAUTIONS IMPORTANTES / NORMAS DE SEGUIRDAD IMPORTANTES
Read all instructions before operating
• Do not look directly at the light; may cause injury to your eyes
• Do not use in flammable or explosive environments.
• Do not operate or store at temperatures above 120°F or below 32°F
• Fully charge before first use, before storing for a long period and every 90 days
• Turn off all lights before charging
• Store in a clean dry place when not in use
• Unit is weatherproof but not fully waterproof. Do not submerge.
• Do not use alcohol, flammable or other solvents on or near this unit. Only clean
with warm water and soft cloth.
• Administer close supervision when using around children
Lire toutes les instructions avant utilisation
• Ne regarder pas directement la lumière; cela pourrait causer des
blessures à vos yeux
• Ne pas utiliser dans un environnement inammable ou explosif
• Ne pas utiliser ou entreposer dans une température au-dessus de 120°F
ou au-dessous de 32°F
• Charger complètement avant la première utilisation, avant de le ranger
pour une longue période et tous les 90 jours
• Éteindre toutes les lumières avant le chargement
• Entreposer dans un endroit propre et sec lorsque vous ne l’utilisez pas.
• Unité est résistant aux intempéries, mais pas étanche. Ne pas plonger.
• Ne pas utiliser d’alcool, de solvants inammables ou d’autres solvants
sur ou près de cet appareil. Nettoyer seulement avec de l’eau chaude et
un chiffon doux.
• Exercer une supervision étroite quand il est utilisé près d’enfants.
Leer todas las instrucciones antes de operar
• No mirar directamente a la luz; puede causar lesiones a tu vista.
• No utilizar en ambientes inamables o explosivos.
• No operar ni guardar a temperaturas por encima de 50°C o por debajo de
0°C
• Cargue completamente antes del primer uso, antes de guardarla durante
un largo periodo y cada 90 días
• Apagar todas las luces antes de recargar.
• La unidad es resistente a la intemperie, pero no a prueba de agua. No
sumerja.
• Guardar en un lugar limpio y seco cuando no se utilice
• No utilizar alcohol, inamables u otros solventes en o cerca de este
aparato. Solo limpiar con agua tibia y un trapo suave.
• Supervisar atentamente cuando se utilice cerca de niños.
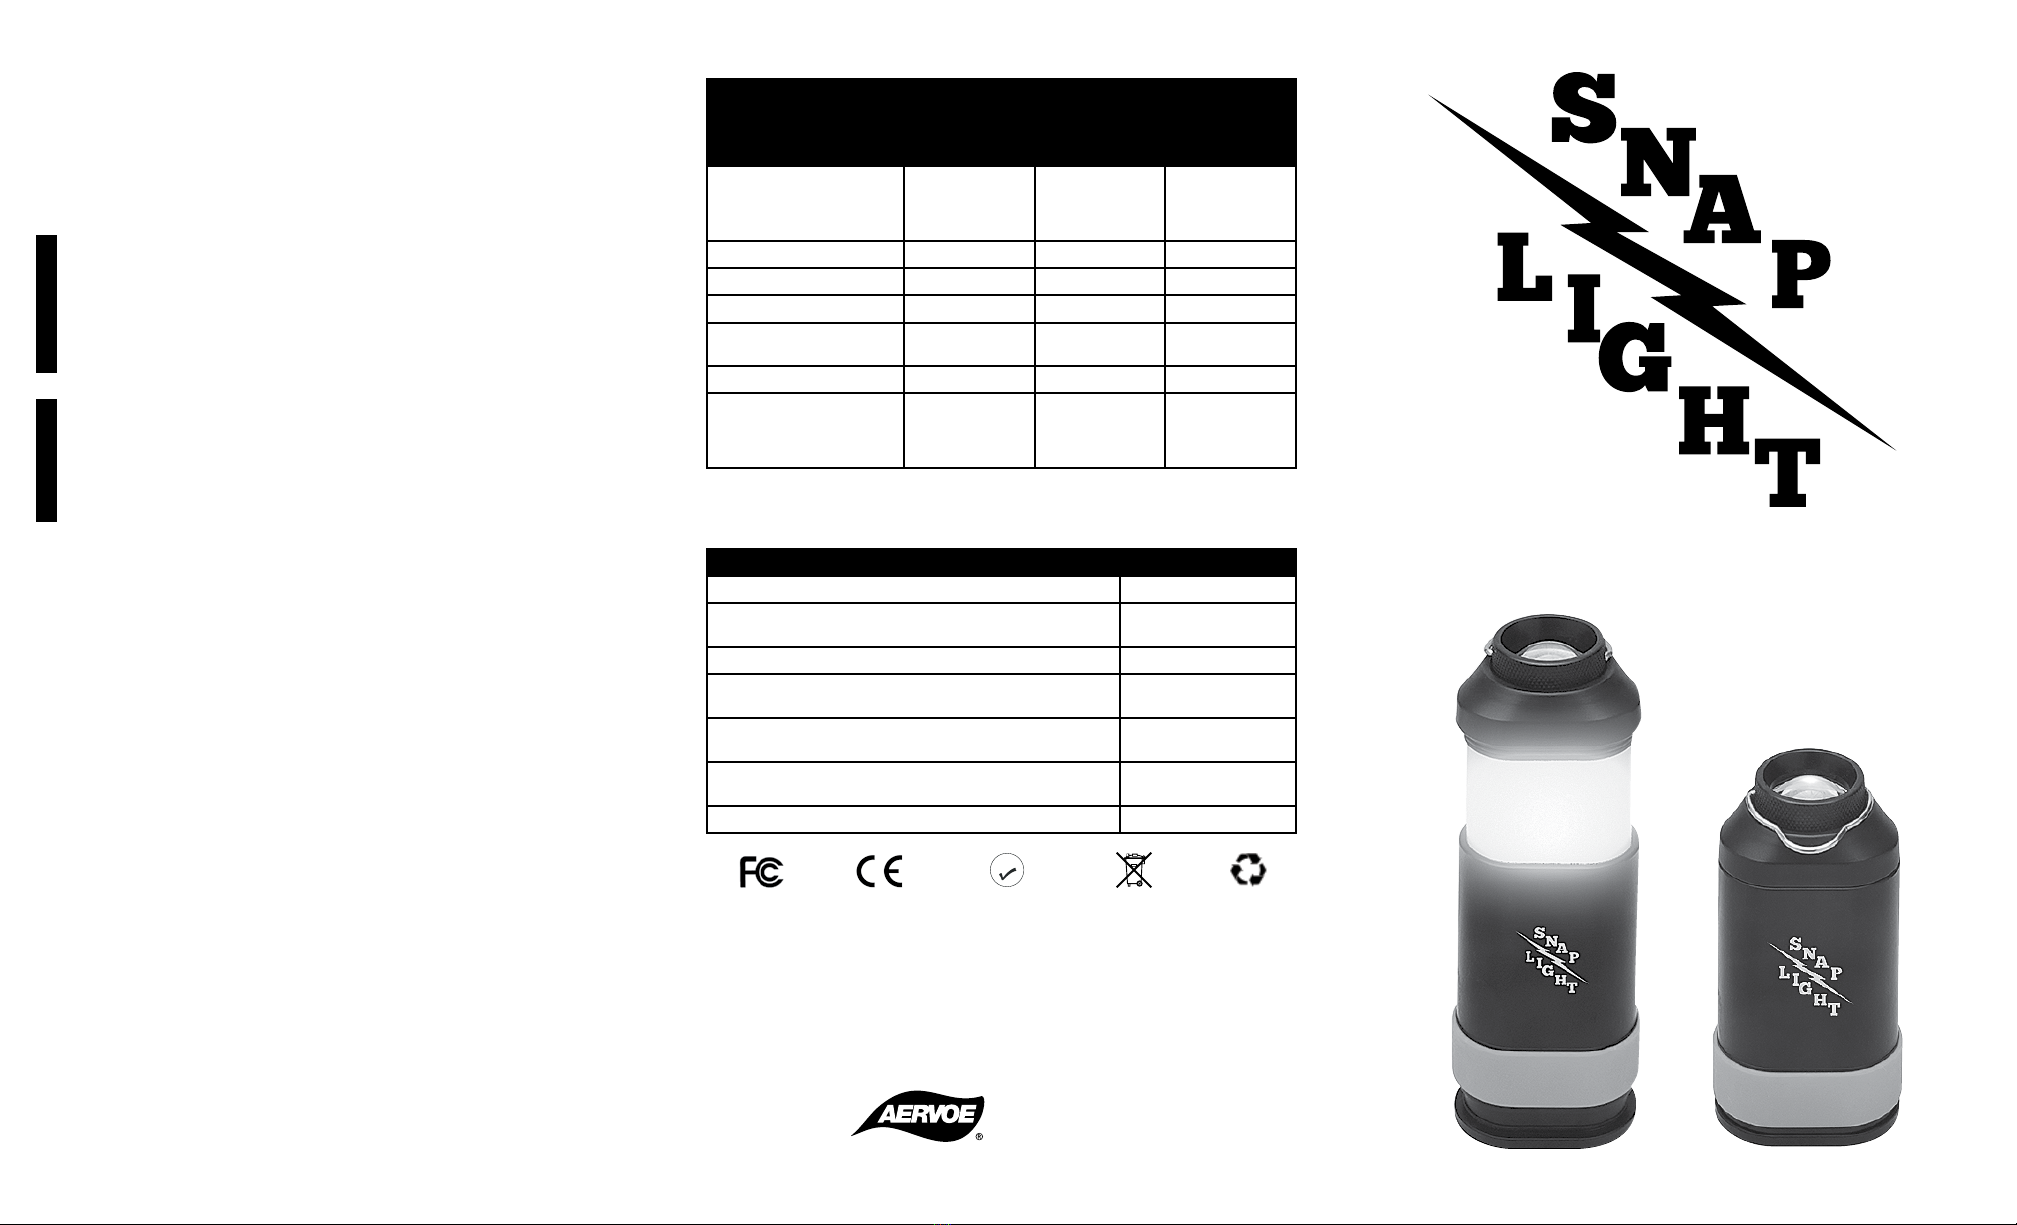
PARTS IDENTIFICATION
IDENTIFICACIÓN DE PIEZAS / IDENTIFICATION DES PIÈCES
CHARGING THE INTERNAL BATTERY
CHARGEMENT DE LA BATTERIE INTERNE / IRECARGAR LA BATERIA INTERNA
1. Pull the base down to reveal the DC IN PORT. Using the included multifunction
USB cable, connect the standard USB plug to any USB power source and the
mini USB plug to the DC IN PORT.
2. The blue LED indicator on the bottom will blink during charging. When fully
charged, the LED will stop blinking.
3. Battery capacity can be checked by pressing the POWER BUTTON.
a. All blue LEDs lit = 60-100% charged
b. 2 blue LEDs lit = 30-60% charged
c. 1 blue LED lit = 5-30% charged
1. Enlever la base pour révéler le PORT DC IN. En utilisant le câble USB
multifonction qui est inclut, connecter la prise USB standard à n’importe
quelle source d’énergie USB et la mini prise USB dans le PORT DC IN.
2. L’indicateur de LED bleu dans le bas clignotera durant le chargement.
Quand le chargement est complété, la LED arrêtera de clignoter.
3. La capacité de la batterie peut être vériée en pressant le BOUTON
D’ALIMENTATION.
a. Toutes les LED bleu allumées = 10-100% chargé
b. 2 LED allumées = 30-60% chargé
c. 1 LED bleu allumée
1. Tirar la base hacia abajo para encontrar el PUERTO DC IN. Utilizando el
cable USB multifunción (incluido), conectar el enchufe estándar USB a
cualquier fuente de alimentación USB y el enchufe USB mini al PUERTO
DC IN.
2. El indicador azul a la parte inferior del aparato parpadeara durante la
carga. Cuando este completamente cargado, la luz parara de parpadear.
3. Se puede comprobar la carga de la batería presionando el BOTÓN DE
ENCENDIDO.
a. Todas las luces azules encendidas = 60-100% cargado
b. 2 luces azules encendidas = 30-60% cargado
c. 1 luz azul encendida = 5-30% cargado
OPERATING THE FLASHLIGHT & LANTERN
COMMENT FAIRE FONCTIONNER LA LAMPE DE PORCHE & LA LANTERNE / FUNCIONAMENTO
DE LA LINTERNA Y EL FARO
1. Press the POWER BUTTON for 3 seconds for bright white light.
2. Press again for red flashing light.
3. Press and hold for 3 seconds at any time to turn off.
4. To operate as a lantern, pull the metal handle up to expose the lantern globe.
All operations above work in either the lantern or flashlight position.
5. The base of the unit has a built-in magnet that you can attach to any magnet
surface for hands-free use.
1. Presser le BOUTON D’ALIMENTATION pendant trois une lumière
blanche brillante.
2. Presser une autre fois pour obtenir une lumière rouge clignotante.
3. Presser et tenir pendant trois secondes à n’importe quel moment pour
l’éteindre.
4. Pour faire fonctionner la lanterne, tirer sur la poignée en métal pour
exposer le globe de la lanterne. Toutes les directives ci-dessous
fonctionnent en autant en position lanterne qu’en position lampe de
poche.
5. La base de l’appareil a un aimant encastré que vous pouvez attachez à
n’importe qu’elle surface magnétique pour une utilisation mains libres.
1. Presionar el BOTÓN DE ENCENDIDO durante 3 segundos para obtener
luz blanca.
2. Presionar de nuevo para obtener luz roja.
3. Presiona durante 3 segundos en cualquier momento para apagar.
4. Para utilizar el faro, bajar la manija metálica para exponer la bombilla.
Todas las opciones mencionadas funcionan en el modo linterna o faro.
5. La base del aparato tiene un imán incorporado que se puede colocar
encima de cualquier supercie magnética para utilizar-lo sin necesidad de
aguantarlo.
CHARGING CELL PHONES AND OTHER DEVICES
CHARGEMENT DU TÉLÉPHONE CELLULAIRE ET DES AUTRES DISPOSITIFS / RECARGAR
TELEFONOS MOBILES Y OTROS DISPOSITIVOS
1. Pull the base down to reveal the DC OUT PORT. Using the included
multifunction USB cable, connect the standard USB plug into the DC OUT
PORT and the appropriate tip to your device. Includes a Lightning tip for
iPhone 5 or newer, 32-pin tip for earlier iPhone models and a mini USB for
Android cell phones and other devices.
2. Disconnect when the charging indicator on your device show that charging is
complete.
1. Enlever la base pour révéler le PORT DC OUT. En utilisant le câble
USB multifonction qui est inclut, connecter la prise USB standard dans
le PORT DC OUT et l’extrémité approprié à votre dispositif. Inclut une
extrémité Lightning pour iPhone 5 ou plus récent, extrémité 32-pin pour
les modèles iPhone plus récents et un mini USB pour les téléphones
cellulaires Android et d’autres dispositifs.
2. Déconnecter quand l’indicateur de chargement afche que la charge est
complétée.
1. Tirar la base hacia abajo para encontrar el PUERTO DC OUT. Utilizando
el cable USB multifunción (incluido), conectar el USB estándar dentro
del PUERTO DC OUT y el conector adecuado para tu dispositivo.
Incluye conector par iPhone 5 o posterior, 32-pin conector para modelos
de iPhone anteriores y un mini USB para teléfonos Android y otros
dispositivos.
2. Desconectar cuando el indicador de carga en tu dispositivo muestre que
la carga esta completa.
FRANÇAISESPAÑOL FRANÇAIS
ESPAÑOL
FRANÇAISESPAÑOL
FRANÇAIS
ESPAÑOLFRANÇAISESPAÑOL
Handle
Flashlight
Lantern Multifunction USB Cable
Battery
Meter
Power
Button
DC In
Port
DC Out
Port
Other Aervoe Lighting Equipment manuals

Aervoe
Aervoe Super Road Flare User manual

Aervoe
Aervoe 11640 User manual

Aervoe
Aervoe 1156 User manual

Aervoe
Aervoe 1183 User manual

Aervoe
Aervoe 1162 User manual

Aervoe
Aervoe 11450 User manual

Aervoe
Aervoe 1154 User manual

Aervoe
Aervoe Flare User manual

Aervoe
Aervoe 1157 User manual

Aervoe
Aervoe 1154 User manual


Popular Lighting Equipment manuals by other brands


Inspire
Inspire Hoki Assembly, Use, Maintenance Manual

Safegate Group
Safegate Group Airfield Lighting 8-135 Series manual

Wooshin Press
Wooshin Press WSG-P 480W user guide

RHOX
RHOX LGT-297 installation instructions

LIVARNO home
LIVARNO home 1115-S manual

Star Headlight & Lantern
Star Headlight & Lantern The Starburst Phantom ULB44 Installation and instruction manual