AEV ProCal SNAP User manual

USER GUIDE | JL WRANGLER & GLADIATOR
AEV30348AC

1
2
3
4
5
6
1. INSTRUMENT CLUSTER DISPLAY CONTROL BUTTONS
2. INSTRUMENT CLUSTER DISPLAY
3. CRUISE CONTROL BUTTONS
4. STEREO DISPLAY
5. OBDII PORT
6. ENGINE START/STOP BUTTON

OVERVIEW
The AEV ProCal SNAP is a simple, easy to use electronic
recalibration module for Jeep JL Wrangler and Gladiator.
ProCal SNAP has the ability to recalibrate your vehicle’s
speedometer to compensate for non-factory tire sizes,
replacement axle gear ratios and aftermarket or dierent
transfer case gear ratios by simply plugging into the OBDII
diagnostic port and inputting the numerical values using the
stereo’s audio equalizer.
PLEASE read these instructions completely before
attempting to use this module. Follow these order of
operations:
1. Install the included AEV ProCal Harness using instructions
from aev-conversions.com.
2. Pair ProCal SNAP to the vehicle.
3. Recalibrate vehicle with ProCal SNAP
NOTE: The ProCal SNAP does not record the changes into
your vehicle’s history with FCA/Jeep. Any Warranty or Recall
that requires a re-programming of the modules may erase
the ProCal SNAP settings and require you to use the ProCal
SNAP to adjust your settings again.
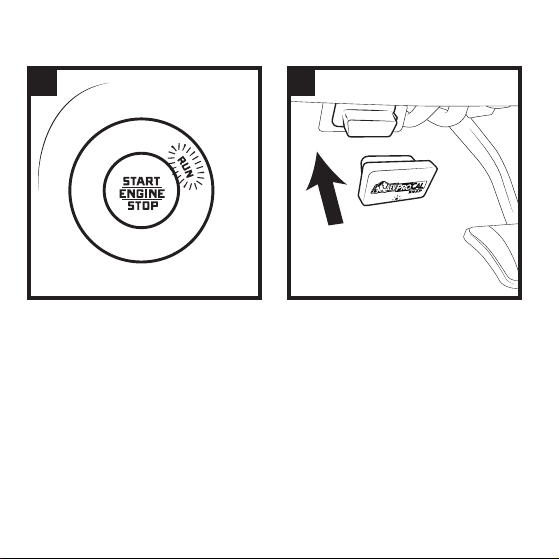
PAIR PROCAL SNAP TO VEHICLE
Insert ProCal SNAP into the
OBDII port.
1 2
Press 2 times to put into the
“RUN” position.
NOTE: The ProCal SNAP must be paired to a vehicle before
it will recalibrate any settings. Once completed, the ProCal
SNAP will be permanently locked to this vehicle.

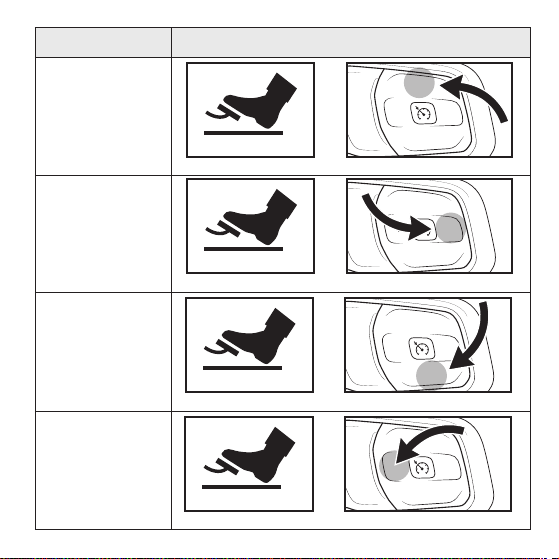
SET+
SET-
RES
CANC
Wait for a blinking GREEN
light on the SNAP and a
blinking BRAKE light on the
speedometer.
With your foot on the
brake, PRESS and HOLD the
CRUISE ON/OFF button for
3 SECONDS.
HONK! HONK! HONK! When the pairing process is
complete, the horn will sound quickly 3 times. Your
ProCal SNAP is now paired and ready to recalibrate
your vehicle.
+
34
5

+
–
+
–
+
–
+
+
Tr e b
—
Mid
—
Bass
—
Tr e b
+
Mid
+
Bass
+
+3
+4
+2
Adjust the stereo’s EQUALIZER SETTINGS to the values you
wish to set (be sure the stereo source is set to AM/FM).
Always enter the values in order: Bass, Mid, Treb.
• Example: 34.2” Tires, Bass = 3, Mid = 4, Treb = 2.
UCONNECT 4 and 4C
SETTING EQUALIZER

+
–
+
–
+
–
+
+
Tr e b
—
Mid
—
Bass
—
Tr e b
+
Mid
+
Bass
+
+3
+4
+2
Note that some stereos display EQ horizontally with Bass at
the bottom. It is important to remember all settings must
be entered in the correct order, Bass, Mid, Treb.
UCONNECT 3
EXAMPLE: TIRE SIZE
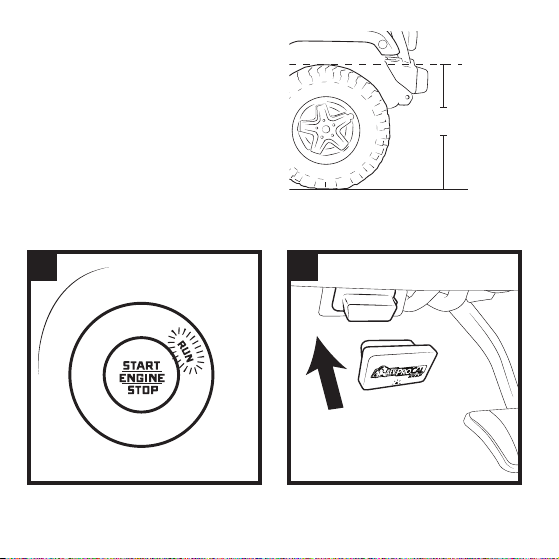
To recalibrate Tire Size: Begin
by physically measuring your
tire diameter IN INCHES
from the ground to the top
of front tire with the vehicle
level and on the ground.
Press 2 times to put into the
“RUN” position.
Insert ProCal SNAP into the
OBDII port.
2
1
ACTUAL MEASURMENT
TO THE NEAREST 10th IN.

Wait for a solid GREEN light on the SNAP.
3
Set the EQ values for the tire size (Example: 34.2”
Tires, Bass = 3, Mid = 4, Treb = 2.). Press the
combination below. PRESS and HOLD for 3 SECONDS.
Programming is complete when the horn sounds
twice. Unplug ProCal SNAP and store in vehicle.
4
SET+
SET-
RES
CANC
+
BRAKE PEDAL SET +
*During Programming: If the BRAKE INDICATOR flashes during programming,
immediately release the BRAKE PEDAL. Failure to release in time may cause
errors and warning lights. To resolve, try programming again paying attention
to the pedal and indicator.

FUNCTION DESCRIPTION EQ EXAMPLE COMBINATION
TIRE SIZE
When setting Tire Size, use the actual
measured height, not the rated size
written on the tire. *This function may
require releaseing the BRAKE PEDAL when the
BRAKE INDICATOR flashes on the instrument
panel.
34.2” Tires
B: 3, M: 4, T: 2
AXLE RATIO
The physical ratio of gears in your
dierential. Do no modify unless you
have changed gears. Note for 4xe owners:
The ProCal SNAP supports only 4.50 ratio.
Many other physical ratios should work without
issue. Do not program values over 4.50.
4.10 Axle
B: 4, M: 1, T: 0
TRANSFER CASE
The physical ratio of gears in your
Transfer Case. Do not modify unless you
have replaced the transfer case.
3.80 T-Case
B: 3, M: 8, T: 0
TPMS
Indication light shuts o at this value, and
will turn on when one tire is 75% of this
value. RANGE: 28-50psi
32 PSI
B: 0, M: 3, T: 2
SET+
SET-
RES
CANC
+
BRAKE PEDAL CANC
SET+
SET-
RES
CANC
+
BRAKE PEDAL RES
SET+
SET-
RES
CANC
+
BRAKE PEDAL SET –
SET+
SET-
RES
CANC
+
BRAKE PEDAL SET +

ADDITIONAL FUNCTIONS
To use ProCal SNAP to clear DTC codes or restore your
vehicle’s factory settings, follow programming steps 1 and 2
then PRESS/PULL and the combinations below and HOLD for
3 SECONDS.
CLEAR DTC CODES
RESTORE FACTORY SETTINGS
SET+
SET-
RES
CANC
+ +
BRAKE PEDAL RES
PULL HIGH BEAM
SET+
SET-
RES
CANC
+ +
BRAKE PEDAL CRUISE ON/OFF
PULL HIGH BEAM
*This function may require releasing the BRAKE PEDAL when the
BRAKE INDICATOR flashes on the instrument panel.

VIEW SETTINGS
If you wish to view the current settings, you can do so on the
Instrument Cluster Display. Insert the ProCal SNAP into the
OBDII port. Turn the radio o and use the Instrument Cluster
Display Control Buttons to navigate to AUDIO. The Instrument
Cluster Display will cycle through showing the current setting
for Tire Diameter, Axle Ratio, and 4Low Ratio.
Note: The 4xe model of Wranglers has some unique
characteristics. Please be aware of the following issues:
• Do not program an axle ratio value higher than 4.50
regardless of actual gears. This is a workaround
to inherent conditions in the transmission control
systems
• The ‘check engine light’/Malfunction Indicator
Lamp (MIL) may be on after programming. These
errors should clear themselves after time. Or use
SNAP’s “Clear Codes” function to remove these error
indications immediately.
!NOTICE FOR 4XE OWNERS

DIAGNOSTIC CODES
BLINKING GREEN: ProCal SNAP ready to pair
SOLID GREEN: ProCal SNAP paired and ready
SLOW PULSING ORANGE: Waiting for vehicle ignition
to be turned to RUN.
SLOW PULSING BLUE: Inserted into incorrect vehicle.
FAST PULSING ORANGE: No connection. Check that
the harness is properly installed.
FAST PULSING BLUE: There has been an error in
programming. Turn the radio o. Use the Instrument
Cluster Display Control Buttons to navigate to AUDIO.
Record the error message and contact AEV support
with the information shown.

Q: No light on the ProCal SNAP.
A: Contact Support.
Q: The light was solid green, I attempted to program
something, there was no honk and now the ProCal SNAP has a
fast pulsing blue light.
A: Turn the radio o. Use the Instrument Cluster Display
Control Buttons to navigate to AUDIO. Record the error
message and contact AEV support with the information shown.
Q: What if I don’t have a factory stereo?
A: Contact AEV support, some aftermarket radios could still
function properly. We’ll be able to advise you before trying.
AEV Customer Support: (248) 926-0256
Email: [email protected]
TROUBLESHOOTING

AEV-CONVERSIONS.COM
©2022 American Expedition Vehicles
Other manuals for ProCal SNAP
2
This manual suits for next models
1
Table of contents
Other AEV Automobile Accessories manuals


