manuals.online logo
Brands
  1. Home
  2. •
  3. Brands
  4. •
  5. AGFA
  6. •
  7. Digital Camera
  8. •
  9. AGFA ISOLA 6x6 User manual

AGFA ISOLA 6x6 User manual

This manual is for reference and historical purposes, all rights reserved.
This creation is copyright© by M. Butkus, NJ, U.S.A.
These creations may not be sold or distributed without the expressed permission of the producer
I have no connection with any camera company
On-line camera manual library
If you find this manual useful, how about a donation of $2 to:
M. Butkus, 29 Lake Ave., High Bridge, NJ 08829-1701
and send your e-mail address so I can thank you.
Most other places would charge you $7.50 for a electronic copy or
$18.00 for a hard to read Xerox copy.
This will allow me to continue this site, buy new manuals and pay their shipping costs.
It'll make you feel better, won't it?
If you use Pay Pal, go to my web site
www.orphancameras.com and choose the secure PayPal donation icon.
www.orphancameras.com
!
----_*--
www.orphancameras.com
Probieren Sie vor dem Filmeinfegen die einzelnen
Einstef
lm6glichkeiten der Comero ob Abb. 6, beson-
ders ouch dos Ausl6sen (Abb. 8).
Before looding o film info lhe comero try out the in-
dividuol operotions beginning with fig.d, in portic-
ulor operole the releose mechonism (seefiS. 8).
Tronsportknopf weilerdrehen bis im Filmfenster noch
den Vorzeichen (Hond, Punkte rlsw.} die Zohl I er-
scheint.
Continue lurning the film wind knob unlil, ofter the
worning signs (hond, dols, etc.!, the figure I oppeors
in the red window.
Zvm Filmeinleg6n: Rlickwond
und Gehciuse
mit einer
Hond leich' zusommendrticken. Doumen der onderen
Hond schiebtden Sperriegel noch unten.
To inserl the film: With one hond gently press the
bcrck
ogoinsl lhe comero body. Slide the cotch down-
words with the thumb of the other hond.
Nunmehr Obiektiv in Aufnohmestellung bringen.
Breiten gercindelten Verschlu0ring wie obgebildet
fossen, durch Iinksdrehung (siehC Pfeil) entriegeln
und den Tubus noch vornE herouszieheh. ln seiner
vorderen Endstelluns schnoppl er durch Federdruc{<
in die Aufnohmesteli-ung
ein.'
Pull ouf the lens into the working position, Holding
the brood milled ring of the shJtt'er os rhown, un-
lock it by lurning it-to the left (os shown by the
orrow) ond pull the tube forword. When in the for-
:vgrd-pogition the tube will snop by spring pressure
into the operolive position.
www.orphancameras.com
R0ckdeckel
on der Griffleiste oufkloppen und Spulen-
holier herousschwenken.
lm Spulenroum unter denr
Tronsportknopf soll eine leerspule liegen.
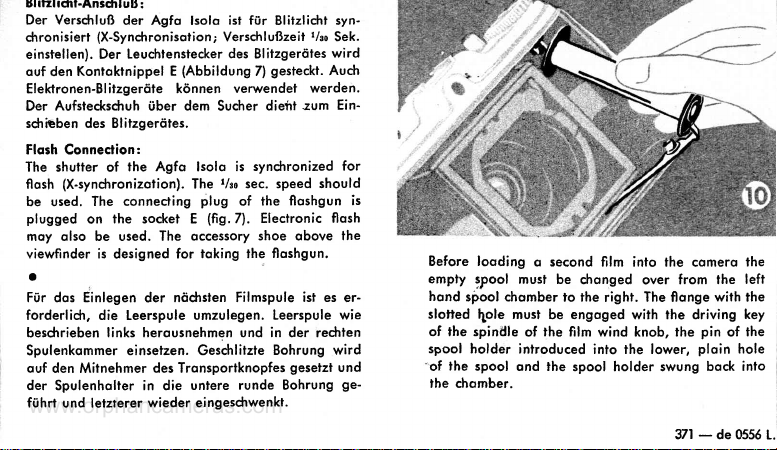
Open the bock by the thumb grip ond swing out the
spool holder. There should be on empty spool in the
spool chomber under the film wind knob.
Filmspule B 2 bei gedcimpftem Liclrt ouswic*eln
(Klebestreifen
obreiBen) und ouf oberen festen Zop-
fen setzen.Spulenlrolterlongsom zur0ckdrticken
und
dobei seinen Zopfen in die untere Spulenbohrung
gleiten lossen.
In subdued light remove o B2 filnrfrom itswropping,
breok the seol ond engoge the spool with the upper
fixed pin. Slowly swing bockthe spool holder, ollow-
ing fhe pin to slip into the hole in the lower flonge.
E:Kontoktnippel 3 mm @ fOr Blitzlicfitonschlufi
F:Blendenhebel; Stellung 6,3: volle Offnung
Stellungll: kfeine Offnung
Keine Zwischeneinstellung verwenden!
G: Entfernung zum Aufnohnreobjekt schcitzen und
durch Drehen des Meterrinqes G ermittelte Zoht
ouf schworze Metereinstellriorke D stellen.
B':Releose Button. A coble releose con be screwed
into the threod of the releosebutton.
C:Lever for Setting Shutter Speeds: t/so
or r/roo
sec.
(instontoneous),
or 'B' (tinieexposure).
With '8"
the shutter will remoin open os lons os the
releose button is depressed; use o tiipod or
other firm support. The shutter requires no lood-
ing.
D:lndex Mork for Distonce
Setting(see
'G'l.,
E:Flosh Contoct
3 mm. dio.
F:Diophrogm Lever:
Position 6.3-full operture
Position ll -smoll operture
Never use on infermediote setting !
G: Estimotethe distonce of the subiect qnd rotote
distonce ring. G until _desired
diitonce registers
with block index mork D.
B:Ausl6seknopf. Ein Drohtqusl6ser konn in dos
Gewinde des Knopfes gescfrroubt
werden.
C:Hebel fOr Versdrluflzeiteinstetlunsr/cc
oder r/roo
Sek.
(Momentoufnohme) oder ,8" TUrZeitoufnoh-
m_en.
Bei.,B' bleibt der Verschluflso longe ge-
6ffnet, ols mon ouf den Ausloseknopf dr0*t;
Stotiv oder feste Unterlooe erforderlidr.
EinSponnen des Verschlu'sses
er0brigt sich.
D:Morke fiir Entfernungseinstellung
(s.
Punkt G)
www.orphancameras.com
Zugespitztes Popierende weist in Richtung Leerspule.
Etwo l0 cm Schutzpopier
obrollen, Doumen hcilt do-
bei die volle Filmspule
im Spulenroum.
Popierende
in die lcingere
Schlitz6ffnung
der Leerspuleeinfcideln
und Tronsportknopf in Pfeilrichtung 2- bis 3mol dre-
hen. R0ckdeckel
zukloppen und bei Holtung wie Ab-
bildung I Riegel in die Mitte zur0ckschieben.
The topered end of the poper will now point towords
the empty spool. Pull out obout 4 in. (10
cm.) of the
bocking poper, keeping the full spool in its chomber
with the thumb. Insert the end of the poper in the
lonEerslof in the empty spool ond give the film wind
knob two or three turns in the direction of the orrow.
Close the bock of the comero, ond holding it os in
fig. I slide the cotch bock to the middle.
Zur Aufnohme Comero in beide Hdnde nehmen
und
mit dem Auge dicht on den Suchereinblick heron-
gehen. Comero gerode holten und nichi verkonten.
Ausl6seknopf so weit olr miigfich (bis zum Anschlog)
durchdriicken, ohne sich von etwo h6rboren Scholt-
gerciuschenbeirren zv lossen. Noch dem Ausl6sen
erscheint
im Fenster
vor dem Knopf ein roter Punkt.
To moke on exposure toke the comero in both honds
ond bring the viewfinder eyepiece close to the eye.
Hold the comero in o horizontol position, do noi
tilt it loterolly. Press
ihe releose button firmly right
down to the stop without heeding ony clicks pro-
duced by the mechonism. After the exposure hos
been mode o red dot oppeors in the window in
front of the releose button.
www.orphancameras.com
Doppelbelidrlungssperre :
Dieser rote Punkt erinnert Sie doron, doB der Fllm
bis zvJ ncichstenZohl weiterlronsportiert werden
mvfl, denn so longe er sichtbor isf, ist die Ausl6sung
oulomofisch gesperrt.
Doubfe Exposure Prevention :
This red dot reminds you thot the filrn sh,ould be
wound on until the next number oppeors in the red
window. As long os this red doi is visible the releose
mechqnismwill be outomoticolly blocked.
Zweipunhtei
nstelI
ung:
Wer roschund unbeschwert
qrbeilen wilJ, holle sich
un die Zweipunkteinstellung,die zwischen3 und 5 m,
sowie 5 m und unendlich (-) durch ie ein kleines
Dreieckmorkiert ist.Mon stellt eines dieser Dreiecke
ouf die Metereinstellmorke
D (Abb.7l vnd hot donn
elwo folgende Schcirfenbereiche,
Noch der letzten (12.)
Aufnohme Tronsportknopf so
longe drehen, bis dos Schutzpopierende
im Film-
fenster
vorbeilciuft.Donn noch 2 bis 3 Umdrehungen
mochen. R0ckwondwie bei I offnen und belichtete
Filmspule entnehmen. Filmspule dobei festholten,
domit sie sich nicht qufrollen konn. Noch Herous-
nehmen
Schulzpopierende
umknicken
und mit Klebe-
streifen zukleben. Sofort lichtsicher verpocken und
zum Enlwickeln
geben.
Two-Poinf Focusing:
For o quickond simple generol purpose setting,keep
the distonce
sel on one of the two smoll triongles-
Einstellung Blende:
II
zwischen
3-5 m
', 5m-o 2,30-6,80
m
4,15-o m
BETICHTUNGSHINWEISEFUR
Negotiv-Moteriol
Aufnohmezeit 3 Stunden noch
Between 3 hours
AGFArSOrA
I EXPOSURE
GU|DE
FORAGFA
tSOrA
17
fros
DIN I Film
speed
17
1rc0
DIN-40 ASA
Sonnenoufgongbis 3 Stunden
vor Sonnenuntergong
ofter sunr;seond 3 hours before sunset
Sonnig I U"a"ckt/tr0b
Sunshine f Cloudy/Dufl
Blende
: / Stop:
Belichtungszeit:
Exposure:
Sek.
/
sec.
Heffe Molive, Schnee,Strond
Lightsubiects,snow,beochscenes
londschoften
I Londscopes
Personen
undGruppenim Freien
Persons
ond groupsin the open
Sportoufnohmen
/ Sports
lm hellen
Zimmer
om Fenster
fnwell lit room close
to window
ll
mit Gelbfiller
with yellow filter
1l
nrit Gelbfilter
with yellow filter
ll
ll
6,3
l1 r/so
r/so
r/so
t/too
Bt/e-l
6,3
6,3
6,3
VerwendenSie dos possende
Agfo Speziol Gelbfilter Nr. l, Besl.-Nr.9106
We recommend
to usethe Agfo Speciol
Yellow FilterNo. I (Order No.9106)
www.orphancameras.com
betweenl0 ond 20 feet
finity (-). Wirh one of
indexmork
D (fig.7)
the
or between 20 feef ond in-
these triongles set on the
depth of field is os below:
Setting Stop
fnI
A
l
between l0 ond 20ft.
between 20 ft. ond @/,1',-)2,4,,
It'$"- 6
When the lost (l2th) exposure hos been mode, con-
tinue turning the film wind knob until the end of
the bocking poper hos been seento run post the fif
m
window, ond give two or three finol turns. Open the
bock os in I ond toke oul the exposed spool, toking
core to hold it so thot it connot unroll. Fold bock
the end of the poper ond secure
it with the gummed
seol. Wrop it up ot once to protect itfrorn light ond
hove it developed.
SCHARFENTI
EFEN
TABETTE
AgfoAgnor
6,3Fs
Zum Rricksetzen
des Tubus foBt rnon den Rcindelring,
entriegeft ihn durch kurze Linksdrehung (siehe Ab-
bildung mit Pfeil) und schiebt den Tubus bis zum
Einschnoppen
in dos Gehciuse.
To close down the tube, holding it by the milled
ring, unlotch it by o short turn to the left (see
orrow
in illustrotion) ond push it bock until it snops into
ploce in the comero body.
DEPTH
OF FIELD
TABLE
AgfoAgnor
f16.3,75
mm.
Entferng.
mSchcirfenbereich
bei
Blende6,3 | etende I I
I0,94=l 07 0,m-1,13
7,2 l,l I
-l ,31 1,05-1,41
r5 Id36-1,69 1,26-1,85
21,74,-2,35 1,59-2,72
32,11:3,y2 2,165,1,
51,0*12 2,95-tr7
@7,5*o 5,17-o
Distonce Ronge
of shorp focus ot
f/6.3 | rn
r
3'5" 3,31A,,-39w,,3'1t/*"1'
4' 3'8yn"4'4Y2" 3'5y"1'8r/2"
5' 4,6,, -jt/t/rtt 42r/r,,4,2t/2,,
7' 6'yr" $r!t1*rr 5'53/+"-99rA"
l0' 8,1r, -13,13/+,, 7'1" -17'2r/2"
2A' 13,2r, -$p' lV6r/2"-l jl'
@24'9Y+"- @l6'l llr't- 6
AGFA CA'NERA.U\f
ERK AG. 'NUENCHEN
Mode in Germony
www.orphancameras.com
u||tzttcnt-Anschluu:
Der Verschluft der Agfo lsolo ist f0r Blitzlicht syn-
chronisiert (X-Synchronisotion; VerschluBzeit1/go
Sek.
einstellen). Der Leuchtenstecker
des Blitzgertites wird
quf den Kontoktnippel E (Abbildung 7) gesteckt.
Auch
Elektronen-Blitzgercite k6nnen verwendet werden.
Der Aufsteckschuh 0ber dem Sucher diefrt :um Ein-
schieben des Blitzgercites.
Flosh Conneclion:
The shutter of the Agfo lsolo is synchronized for
flosh (X-synchronizotion).The t/ro sec. speed should
be used. The connecting plug of the floshgun is
plugged on the socket E (fig.
7). Electronic flosh
moy olso be used. The occessoryshoe obove the
viewfinder is designed for toking the floshgun.
o
FUr dos Einlegen der nddrsten Filmspule isf es er-
forderlich, die Leerspule umzulegen. Leerspule wie
beschrieben
links herousnehmen und in der rechten
Spulenkommer einsetzen. Geschlitzte Bohrung wird
ouf den Mitnehmer des Tronsportknopfes gesetzt und
der Spulenholter in die untere runde Bohrung ge-
fiihrt und letzterer wieder eingeschwenkt.
Before locding o second film into the comero the
empty spool must be chonged over from the left
hond sfiool chomber to the right. The flonge with the
slotted tlole must be engoged with the driving key
of the spindle of the film wind knob, the pin of the
spool holder introduced into the lower, ploin hole
'of the spool ond lhe spoof holder swung bock into
fhe chomber.
371
- de0556
L.
www.orphancameras.com

Other AGFA Digital Camera manuals

AGFA ePhoto 1680 User manual

AGFA

AGFA ePhoto 1680 User manual

AGFA AgfaPhoto WP8000 User manual

AGFA

AGFA AgfaPhoto WP8000 User manual

AGFA Karat 36 User manual

AGFA

AGFA Karat 36 User manual

AGFA sensor 505-D User manual

AGFA

AGFA sensor 505-D User manual

AGFA AgfaPhoto WP8000 User manual

AGFA

AGFA AgfaPhoto WP8000 User manual

AGFA ePhoto CL20 User manual

AGFA

AGFA ePhoto CL20 User manual

AGFA Silette User manual

AGFA

AGFA Silette User manual

AGFA ePhoto CL 15 Smile User manual

AGFA

AGFA ePhoto CL 15 Smile User manual

AGFA ePhoto ePHOTO 1280 User manual

AGFA

AGFA ePhoto ePHOTO 1280 User manual

AGFA Billy Clack User manual

AGFA

AGFA Billy Clack User manual

AGFA ePhoto CL 30 Clik! User manual

AGFA

AGFA ePhoto CL 30 Clik! User manual

AGFA ePhoto CL30 User manual

AGFA

AGFA ePhoto CL30 User manual

AGFA ePhoto CL34 User manual

AGFA

AGFA ePhoto CL34 User manual

AGFA DC-630i User manual

AGFA

AGFA DC-630i User manual

AGFA ePhoto CL30 User manual

AGFA

AGFA ePhoto CL30 User manual

AGFA 307 User manual

AGFA

AGFA 307 User manual

AGFA ePhoto CL30 User manual

AGFA

AGFA ePhoto CL30 User manual

AGFA Silette Manual

AGFA

AGFA Silette Manual

AGFA DC-530i User manual

AGFA

AGFA DC-530i User manual

AGFA ePhoto CL50 User manual

AGFA

AGFA ePhoto CL50 User manual

AGFA DC-8330i User manual

AGFA

AGFA DC-8330i User manual

AGFA Automatic 66 User manual

AGFA

AGFA Automatic 66 User manual

AGFA ePhoto CL18 User manual

AGFA

AGFA ePhoto CL18 User manual

AGFA ePhoto CL18 User manual

AGFA

AGFA ePhoto CL18 User manual

Popular Digital Camera manuals by other brands

Nikon CoolPix S1100pj instruction manual

Nikon

Nikon CoolPix S1100pj instruction manual

Braun Bodycam BCX2 user manual

Braun

Braun Bodycam BCX2 user manual

Honeywell Pentax Spotmatic II operating manual

Honeywell

Honeywell Pentax Spotmatic II operating manual

Pentax PC-33 DATE operating manual

Pentax

Pentax PC-33 DATE operating manual

PCO.IMAGING PCO.DIMAX user manual

PCO.IMAGING

PCO.IMAGING PCO.DIMAX user manual

Samsung SL35 - Digital Camera - Compact user manual

Samsung

Samsung SL35 - Digital Camera - Compact user manual

FujiFilm X-T2 New features guide

FujiFilm

FujiFilm X-T2 New features guide

Amcrest IP8M-MT2544EW user manual

Amcrest

Amcrest IP8M-MT2544EW user manual

Cognex CAM-CIC-3100-3-GC1 user manual

Cognex

Cognex CAM-CIC-3100-3-GC1 user manual

Konica Minolta Q-Mini install guide

Konica Minolta

Konica Minolta Q-Mini install guide

Samsung TL205 user manual

Samsung

Samsung TL205 user manual

SVP DC-12V Specifications

SVP

SVP DC-12V Specifications

Bushnell EQUINOX X650 owner's guide

Bushnell

Bushnell EQUINOX X650 owner's guide

Netvue Vigil quick guide

Netvue

Netvue Vigil quick guide

Vivitar Vivicam 3780 user guide

Vivitar

Vivitar Vivicam 3780 user guide

Bresser DL-30MP operating instructions

Bresser

Bresser DL-30MP operating instructions

Canon EOS Rebel T4i instruction manual

Canon

Canon EOS Rebel T4i instruction manual

Ricoh RDC-i500 Basic operations

Ricoh

Ricoh RDC-i500 Basic operations

manuals.online logo
manuals.online logoBrands
  • About & Mission
  • Contact us
  • Privacy Policy
  • Terms and Conditions

Copyright 2025 Manuals.Online. All Rights Reserved.