agratronix MT-PRO+ User manual

Operators Manual
MT-PRO+
Grain Moisture Tester
DOCU-M0142 1212


Operators Manual
MT-PRO+
Grain Moisture Tester
ENGLISH
DOCU-M0142 1212

Contents
i
Page
Operation
Components .................................................................................................. 10-1
Error messages ............................................................................................. 10-1
Operating conditions ..................................................................................... 10-2
Screen and button Information ...................................................................... 10-3
Moisture testing procedure ........................................................................... 10-4
Preheat testing procedure ............................................................................. 10-4
Normal testing procedure ............................................................................. 10-5
Moisture limit guidelines ................................................................................ 10-6
Testing grains that are above or below the limits ..........................................10-7
Displaying the averaged moisture results ..................................................... 10-7
Clear grain averages...................................................................................... 10-7
Select the number of tests to average ........................................................... 10-8
Select a different language ............................................................................ 10-8
Select the units to display for temperature..................................................... 10-8
Select the time to auto shutoff .......................................................................10-9
Displaying the software version of the tester ................................................. 10-9
Turning the backlight on or off ....................................................................... 10-9
Select a different font size.............................................................................. 10-10
Adjusting the contrast on the display ............................................................. 10-10
Personalizing and updating the tester............................................................ 10-11
Adjust the grain calibration............................................................................. 10-11
Calibration consideration / limits .................................................................... 10-12
Troubleshooting .......................................................................................... 15-1
Service
Checking the battery life ...............................................................................20-1
Cleaning the tester ........................................................................................ 20-1
Warranty ........................................................................................................ 20-2
Record serial number .................................................................................... 20-2
Manufacturer’s Contact Information ......................................................... 25-1
All information, illustrations and specifications in this manual are based on the
latest information available at the time of publication. The right is reserved to
make changes at any time without notice.

COMPONENTS
KEY PART NO. DESCRIPTION
1*PLAS-C0308 CAP
2*PLAS-D0307 BATTERY DOOR
3*PLAS-USB1 USB DOOR
4*06067 USB CABLE
5*06053 CARRYING CASE
. . . . . . *08125 TESTER
* Indicates manufacturer’s part numbers.
10-1
Operation
ERROR MESSAGES
Symbol Definition
ERROR (---) Tester is in need of service
NOTE: Contact manufacturer if an ERROR message occurs (See page 25-1).
1
2
3
5
4

Operation
10-2
OPERATING CONDITIONS
Test cell and grain MUST be free of any condensation
or surface moisture. Moisture on grain or in test
cell will cause high readings. Very hot or cool grain
will pick up moisture when it warms or cools. The
pressure cap of the tester can squeeze moisture from
high moisture grains, such as corn, into the bottom of
the test cell.
Because grains are irregularly shaped and may
not always pack the same way in the test cell,
minor variations in readings may occur. To enhance
accuracy, always take three (3) successive readings
of the total sample being tested and average the
results. Empty and refill the tester with new grain from
the sample between each test.
The tester is most accurate when grain and tester are between 60˚F (16˚C) and
90˚F (32˚C). The unit will, however, operate at temperatures between 33˚F (1˚C)
and 120˚F (49˚C). For best results, grain temperature should not be below 40˚F
(4˚C) or above 110˚F (43˚C). If the grain temperature is 20˚F (11˚C) more or less
than the temperature of the unit, preheat the tester per instructions on page 10-4.
Condensation on the grain or test cell is best avoided by having the tester and
grain at about the sample temperature.
The environment to which a grain sample is exposed can appreciably change
its moisture content. Exposed to the open air, grain can gain or lose 1% to 2%
indicated moisture in only a few minutes. If a sample is to be held for even a
short time before being tested, it should be placed into a tightly closed, air-tight
container, such as a re-closable bag or jar.

SCREEN AND BUTTON INFORMATION
BUTTON FUNCTIONS
A -
Power button is used to turn the tester on or off
B - Back arrow is used to go back to the
previous menu. When the back arrow is used
any changes made in a previous menu will not
be saved.
C -
Up arrow is used to scroll up through a list of
menu items or increment a value
D - Forward arrow is used in some menus to
advance to the next item
E - Down arrow is used to scroll down through a list of menu items or decrement
a value
F - Enter button is used to select a menu item or accept and save changes made
in a menu
MENU SCREENS (GRAIN MENU SHOWN)
A - The name of the menu that is currently displayed
B - The list of menu items to select from
C - The button bar indicates which buttons are active in the menu
GRAIN RESULTS SCREEN
A - Name of the grain tested
B - Current moisture result
C - Temperature of the grain
D - Averaged moisture result
E - Number of tests averaged
10-3
Operation
A BC D
EF
A
B
C
A
B
C
D
E

MOISTURE TESTING PROCEDURE
IMPORTANT: If the temperature of the grain sample is 20˚F (11˚C) more or less
than the temperature of the tester, then follow the preheat testing procedure,
otherwise follow the normal testing procedure.
PREHEAT TESTING PROCEDURE
1. Remove cap (A) and inspect test cell (B) to be sure that it is clean and
empty.
2. Press and release the “POWER” button (C) to turn on tester. The display (D)
will first show, “PROPERTY OF:” then display the GRAIN menu with the last
grain tested selected.
3. When the grain to be tested has been selected, by using the “UP OR DOWN”
buttons (E), fill the test cell (B) even to the top of the cell with the desired sample.
4. Replace cap loosely. DO NOT TIGHTEN.
5. After 30 seconds, empty test cell and immediately refill with fresh grain.
6. Replace cap (A) and tighten until pressure-indicator screw (F) is flush with the
top of cap (A). Use finger to level grain and remove excess from the test cell.
7. Immediately press the “ENTER” button (G). The words “TESTING”, the grain
being tested, and a moving gear will be displayed for about 5 seconds while
the tester measures the grain. Once the test is complete the moisture %,
temperature and the average moisture will be displayed.
8. The results will stay on the screen and not return to the GRAIN menu until
the “BACK ARROW” or “ENTER BUTTON” is pressed.
Operation
10-4
A - Cap
B - Test Cell
C - Power Button
D - Display
E - Up or Down Buttons
F - Pressure-indicator Screw
G - Enter Button
A - Cap
B - Test Cell
C - Power Button
D - Display
E - Up or Down Buttons
F - Pressure-indicator Screw
G - Enter Button
A
B
C
D
E
F
G
G
E

Operation
10-5
MOISTURE TESTING PROCEDURE (CON’T)
NORMAL TESTING PROCEDURE
1. Remove cap (A) and inspect test cell (B) to be sure that it is clean and empty.
2. Press the “POWER” button (C) to turn on tester. The display (D) will first
show, “PROPERTY OF:” then display the GRAIN menu with the last grain
tested selected.
3. When the grain to be tested has been selected by using the “UP OR
DOWN” buttons (E), fill the test cell (B) even to the top of the cell with
sample to be tested.
4. Replace cap (A) and tighten until pressure-indicator screw (F) is flush with the
top of cap (A). Use finger to level grain and remove excess from the test cell.
5. Immediately press the “ENTER” button (G). The words “TESTING”, the
grain being tested, and a moving gear will be displayed for about 5 seconds
while the tester measures the grain. Once the test is complete the moisture
%, temperature and the average moisture will be displayed.
6. The results will stay on the screen and not return to the GRAIN menu until
the “BACK ARROW” or “ENTER BUTTON” is pressed.
7. Once a test has been taken empty the test cell if another test is needed
refill with a fresh grain sample.
NOTE: For best results always take at least three tests of the grain being
sampled and use the average of the results as the grain samples moisture.

Operation
10-6
MOISTURE LIMIT GUIDELINES - DISPLAY READING
(Specifications and design subject to change without notice.)
GRAINS MOISTURE RANGE MOISTURE RANGE
LOW LIMIT HIGH LIMIT
Alfalfa ................................................ 6.0% ...................................... 24.0%
Barley ................................................ 7.0% ...................................... 25.0%
Beet ................................................... 8.0% ...................................... 20.0%
Buckwheat......................................... 6.0% ...................................... 23.0%
Canary............................................... 8.0% ...................................... 23.0%
Clover: Purple .................................... 6.0% ...................................... 20.0%
Clover: White ..................................... 6.0% ...................................... 20.0%
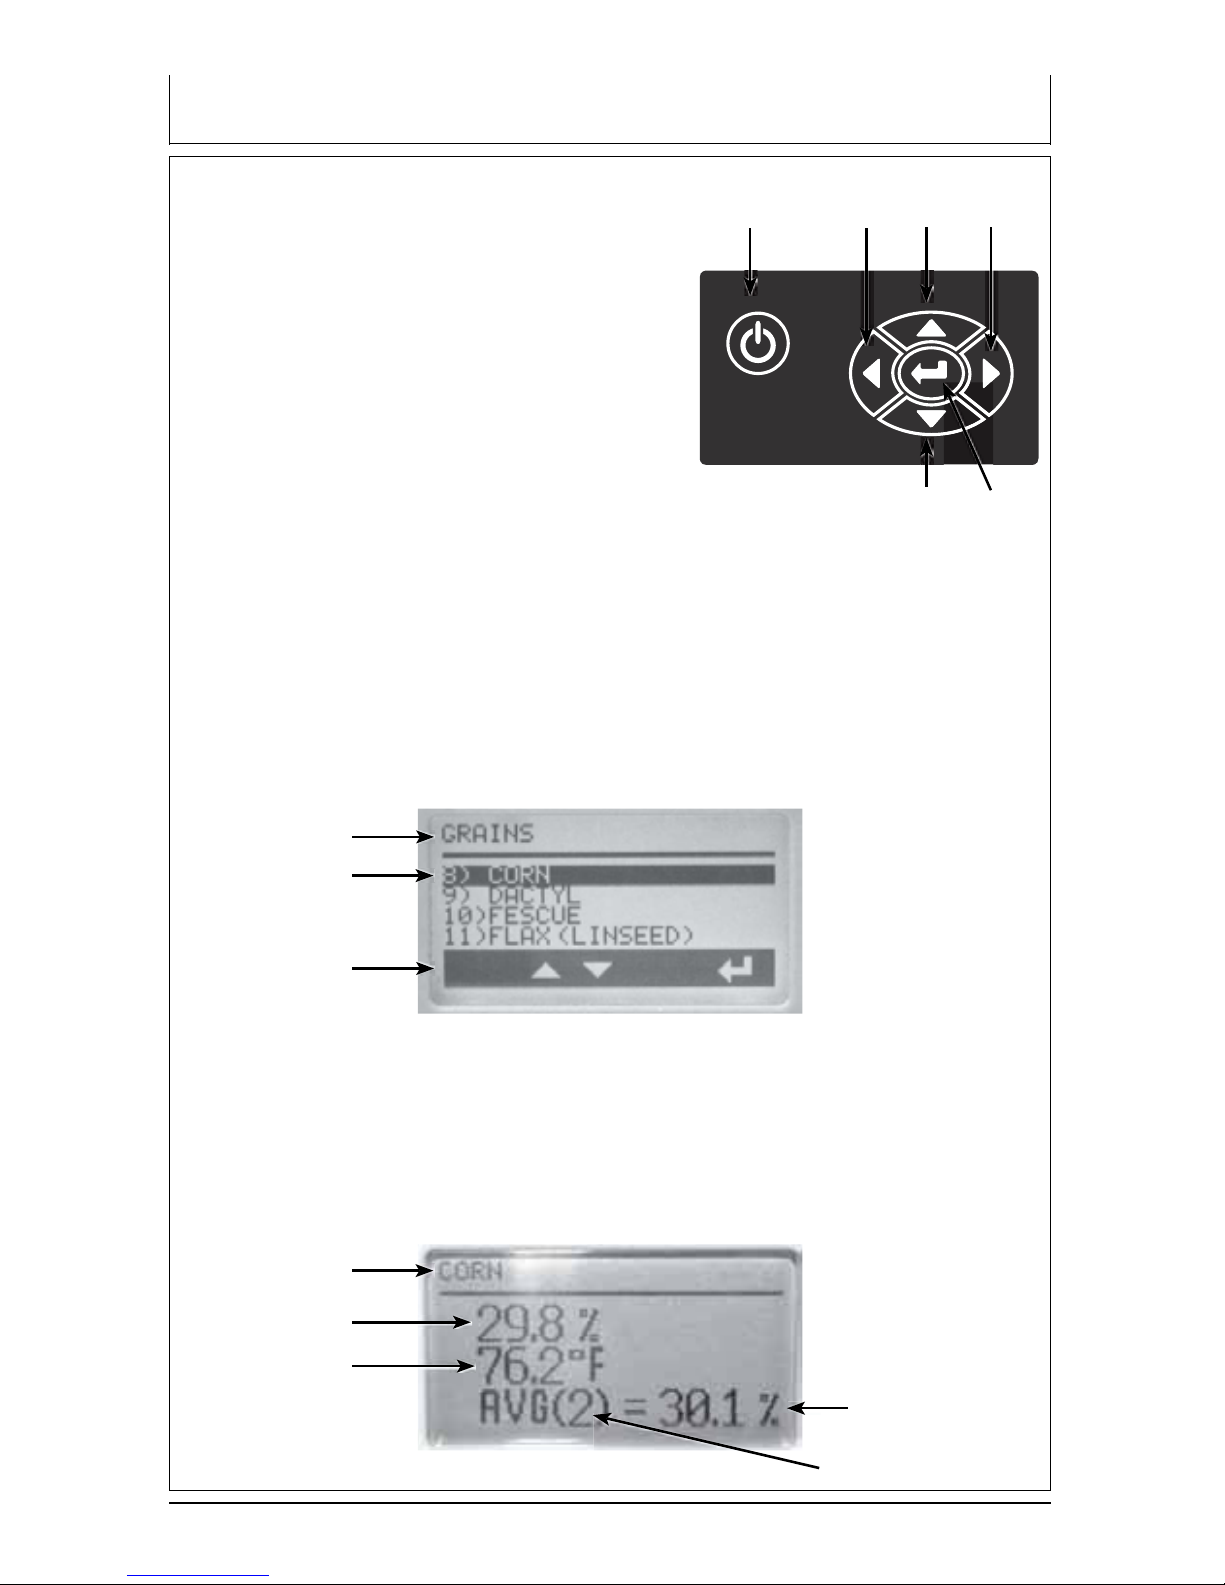
Corn .................................................. 8.0% ...................................... 40.0%
Dactyl................................................. 7.0% ...................................... 22.0%
Fescue ............................................... 6.0% ...................................... 22.0%
Flax (Linseed) ................................... 5.0% ...................................... 17.0%
Lentils ................................................ 7.0% ...................................... 18.0%
Millet .................................................. 6.0% ...................................... 21.0%
Mustard.............................................. 5.0% ...................................... 21.0%
Navy Beans ....................................... 8.0% ...................................... 20.0%
Oats................................................... 6.0% ...................................... 23.0%
Peanuts: Spanish ............................... 6.0% ...................................... 15.0%
Peas: Fodder ..................................... 7.0% ...................................... 20.0%
Peas: Green ....................................... 7.0% ...................................... 21.0%
Peas: Yellow....................................... 7.0% ...................................... 21.0%
Phleum .............................................. 6.0% ...................................... 22.0%
Popcorn: White .................................. 6.0% ...................................... 24.0%
Popcorn: Yellow.................................. 6.0% ...................................... 24.0%
Rapeseed (Canola) .......................... 7.0% ...................................... 15.0%
Rice: Long ......................................... 8.0% ...................................... 22.0%
Rice: Medium ..................................... 8.0% ...................................... 22.0%
Rye .................................................... 7.0% ...................................... 26.0%
Rye Grass.......................................... 9.0% ...................................... 20.0%
Safflower ............................................ 6.0% ...................................... 28.0%
Sorghum (Milo) ................................. 9.0% ...................................... 21.0%
Soybeans........................................... 8.0% ...................................... 25.0%
Sunflower: Oil .................................... 4.0% ...................................... 20.0%
Sunflower: Stripe ............................... 6.0% ...................................... 22.0%
Triticale .............................................. 7.0% ...................................... 23.0%
Wheat: Durum ................................... 8.0% ...................................... 20.0%
Wheat: Hard Red Spring ................... 8.0% ...................................... 20.0%
Wheat: Hard Red Winter .................... 7.0% ...................................... 21.0%
Wheat: Soft Red Winter ..................... 8.0% ...................................... 22.0%
Wheat: White ..................................... 7.0% ...................................... 22.0%
NOTE: If grain temperature is 40˚F (4˚C) or below, or 110˚F (43˚C) or above, and
the grain moisture is near either the high or the low limit of the unit (listed above),
the tester is programmed to reduce its range of operating limits.

Operation
10-7
TESTING GRAINS THAT ARE ABOVE OR BELOW THE LIMITS
If the grain being tested in the tester is above or below the grains calibration
limits the tester will display a < (less than) or > (greater than) symbol followed
by the tested grain’s upper or lower moisture limit. Even though the tester can’t
display a valid moisture result this information is still useful because you still
know the range above or below that the tester can display.
NOTE: Grains that are above or below the limits are not stored for averaging.
DISPLAYING THE AVERAGED MOISTURE RESULTS
1. Each time a moisture test is taken the averaged moisture result is
automatically displayed along with the current moisture and temperature.
2. The averaged results are stored for each individual grain, so when switching
between grains there is no need to clear the averaging results as the tester
calculates the average for each grain individually.
3. The tester by default will display the averaged results of the last selected
number of tests performed on the tested grain. (The default is the average of
the last 3 tests)
CLEARING GRAIN AVERAGES
1. You can clear the average result for the current grain (Last grain tested) or
all grains.
2. To clear the average, while in the grain menu press the “UP OR DOWN”
buttons until “OPTIONS” is selected then press the “ENTER” button.
3. The “OPTIONS” menu will now be displayed, press the “UP OR DOWN”
buttons until “CLEAR AVG” is selected then press the “ENTER” button.
4. The “CLEAR AVG” menu will be displayed. Press the “UP OR DOWN”
buttons to select either “CURRENT GRAIN” or “ALL GRAINS”. If
“CURRENT GRAIN” is selected, the current grain’s average will be cleared.
If “ALL GRAINS” is selected, all grain averages will be cleared.
5. Once you have selected the correct selection press the “ENTER” button the
words “CLEARING” and a trash can will be displayed to confirm that your
averages have been cleared.
6. If you don’t want your selection to be saved simply press the “BACK
ARROW” button and you will be returned to the previous menu without
saving your selection.

Operation
10-8
SELECT THE NUMBER OF TESTS TO AVERAGE
1. The tester can automatically average 3, 6 or 9 tests. (default is 3)
2. To change the number of averages, while in the grain menu press the “UP
OR DOWN” buttons until “OPTIONS” is selected then press the “ENTER”
button.
3. The “OPTIONS” menu will now be displayed, press the “UP OR DOWN”
buttons until “# TO AVG” is selected then press the “ENTER” button.
4. The “# TO AVG” menu will be displayed press the “UP OR DOWN” buttons to
select the number of averages you would like the tester to perform.
5. Once you have selected the correct number to average press the “ENTER”
button the words “SAVING” and a moving gear will be displayed to confirm
that your selection has been saved.
6. If you don’t want your selection to be saved simply press the “BACK
ARROW” button and you will be returned to the previous menu without
saving your selection.
SELECT A DIFFERENT LANGUAGE
1. To change languages, while in the grain menu press the “UP OR DOWN”
buttons until “OPTIONS” is selected then press the “ENTER” button.
2. The “OPTIONS” menu will now be displayed, press the “UP OR DOWN”
buttons until “LANGUAGE” is selected then press the “ENTER” button.
3. The “LANGUAGE” menu will then be displayed, press the “UP OR DOWN”
buttons to select the language you would like to use.
4. Once you have selected the correct language press the “ENTER” button the
words “SAVING” and a moving gear will be displayed to confirm that your
selection has been saved.
5. If you don’t want your selection to be saved simply press the “BACK
ARROW” button and you will be returned to the previous menu without
saving your selection.
SELECT THE UNITS TO DISPLAY FOR TEMPERATURE
1. The tester can display in either ºC or ºF.
2. To change the temperature units, while in the grain menu press the “UP OR
DOWN” buttons until “OPTIONS” is selected then press the “ENTER” button.
3. The “OPTIONS” menu will now be displayed, press the “UP OR DOWN”
buttons until “TEMPERATURE” is selected then press the “ENTER” button.
4. The “TEMPERATURE” menu will then be displayed, press the “UP OR
DOWN” buttons to select the temperature units you would like to use.
5. Once you have selected the correct temperature unit press the “ENTER”
button the words “SAVING” and a moving gear will be displayed to confirm
that your selection has been saved.
6. If you don’t want your selection to be saved simply press the “BACK
ARROW” button and you will be returned to the previous menu without
saving your selection.

10-9
Operation
SELECT THE TIME TO AUTO SHUTOFF
1. The tester can automatically turn off in 30 seconds, 1 minute or 5 minutes.
2. To change the time while in the grain menu press the “UP OR DOWN”
buttons until “OPTIONS” is selected then press the “ENTER” button.
3. The “OPTIONS” menu will now be displayed, press the “UP OR DOWN”
buttons until “AUTO SHUTOFF” is selected then press the “ENTER” button.
4. The “AUTO SHUTOFF” menu will then be displayed, press the “UP OR
DOWN” buttons to select the time you would like to use.
5. Once you have selected the correct time press the “ENTER” button the
words “SAVING” and a moving gear will be displayed to confirm that your
selection has been saved.
6. If you don’t want your selection to be saved simply press the “BACK
ARROW” button and you will be returned to the previous menu without
saving your selection.
DISPLAYING THE SOFTWARE VERSION OF THE TESTER
1. To display the software version of the tester while in the grain menu press
the “UP OR DOWN” buttons until “OPTIONS” is selected then press the
“ENTER” button.
2. The “OPTIONS” menu will now be displayed, press the “UP OR DOWN”
buttons until “VERSION” is selected then press the “ENTER” button.
3. The software version will then be displayed for a few seconds.
TURNING THE BACKLIGHT ON OR OFF
1. The display and keypad lighting can be turned on or off.
2. To toggle the backlight while in the grain menu press the “UP OR DOWN”
buttons until “OPTIONS” is selected then press the “ENTER” button.
3. The “OPTIONS” menu will now be displayed, press the “UP OR DOWN”
buttons until “BACKLIGHT” is selected then press the “ENTER” button.
4. The “BACKLIGHT” menu will then be displayed, press the “UP OR DOWN”
buttons to select either on or off.
5. Once you have selected the correct setting press the “ENTER” button the
words “SAVING” and a moving gear will be displayed to confirm that your
selection has been saved.
6. If you don’t want your selection to be saved simply press the “BACK
ARROW” button and you will be returned to the previous menu without
saving your selection.

10-10
Operation
SELECT A DIFFERENT FONT SIZE
1. The tester has two different font sizes: standard and large to allow for easier
viewing.
2. To select the font size while in the grain menu press the “UP OR DOWN”
buttons until “OPTIONS” is selected then press the “ENTER” button.
3. The “OPTIONS” menu will now be displayed, press the “UP OR DOWN”
buttons until “FONT SIZE” is selected then press the “ENTER” button.
4. The “FONT SIZE” menu will then be displayed, press the “UP OR DOWN”
buttons to select either standard or large.
5. Once you have selected the correct setting press the “ENTER” button the
words “SAVING” and a moving gear will be displayed to confirm that your
selection has been saved.
6. If you don’t want your selection to be saved simply press the “BACK
ARROW” button and you will be returned to the previous menu without
saving your selection.
ADJUSTING THE CONTRAST ON THE DISPLAY
1. The tester’s display contrast can be adjusted from 50% to 100%.
2. To adjust the tester’s contrast, while in the grain menu press the “UP OR
DOWN” buttons until “OPTIONS” is selected then press the “ENTER” button.
3. The “OPTIONS” menu will now be displayed, press the “UP OR DOWN”
buttons until “CONTRAST” is selected then press the “ENTER” button.
4. The “CONTRAST” menu will be displayed press the “UP OR DOWN” buttons
to adjust the contrast percentage.
5. Once you have adjusted the contrast press the “ENTER” button the
words “SAVING” and a moving gear will be displayed to confirm that your
adjustment has been saved.
6. If you don’t want your selection to be saved simply press the “BACK
ARROW” button and you will be returned to the previous menu without
saving your selection.

10-11
Operation
PERSONALIZING AND UPDATING THE TESTER
1. The tester is equipped with a USB port and when connected to a computer
will allow diagnostics and updates to its software and grain calibrations.
2. Visit www.AgraTronix.com to use your USB port for personalization (adding
user name), grain scale, firmware and diagnostic updates.
ADJUST THE GRAIN CALIBRATION
IMPORTANT: Always obtain three (3) test results from the grain elevator for the
sample being compared. Average these three (3) results and compare this aver-
age with the averaged result of your tester the moisture tester before making any
adjustments.
1. Each grain scale can be individually adjusted up to 5.0% by increments of
0.1% to more closely match the results of an elevator tester.
2. To adjust the calibration, while in the grain menu press the “UP OR DOWN”
buttons until “OPTIONS” is selected then press the “ENTER” button.
3. The “OPTIONS” menu will now be displayed, press the “UP OR DOWN” but-
tons until “CALIBRATION” is selected then press the “ENTER” button.
4. The “CALIBRATION” menu will be displayed showing the last grain that was
tested and the calibration that is applied.
5. If the grain that is being displayed is not the grain you wish to adjust or you
want to simply look through the grains calibrations press the “FORWARD
ARROW” button to toggle through the list of grains.
6. Once the grain to adjust is displayed press the “UP OR DOWN” buttons to
adjust the grains calibration.
7. Once you have adjusted the calibration press the “ENTER” button the words
“SAVING” and a moving gear will be displayed to confirm that your adjust-
ment has been saved.
8. If you don’t want your selection to be saved simply press the “BACK AR-
ROW” button and you will be returned to the previous menu without saving
your selection.
NOTE: Adjustment can NOT be made to factory calibration to produce moisture
readings in a tester that shows “BELOW LIMIT” or “ABOVE LIMIT” readings.

10-12
Operation
CALIBRATION CONSIDERATION / LIMITS
Typically the moisture tester will be consistent
with most elevator testers over a broad range
of moisture levels. However, there are some
things to consider when thinking about your
moisture tester calibration.
NOTE: Graph 1 provided is for illustration purposes
only and does not reflect actual test data.
1. Tester Differences: Your moisture tester
unit may not match a given elevator tester.
None of the testers exactly match the
actual weighted moisture of any given
grain. There is no national standard for
elevator testers. The difference between
moisture testers and various U.S.D.A.
approved elevator testers is not a constant
value. A correction at one moisture level may
not be valid for a different moisture level.
Graph 1 illustrates how the moisture tester
might compare to an elevator tester over a
broad range of moisture levels. The moisture tester and most elevator testers
(shown in graph by solid line) will closely match those of the moisture tester
(shown by dashed line) for that range, as illustrated. However, as we get away
from mid-range into the high and low moisture levels, differences between
elevator tester and moisture tester not only become greater, but may switch
from a moisture tester reading higher than elevator tester to a reading lower
than the elevator tester. For example, in Graph 1, the area between B and C
represents the mid-range moisture. Moisture tester readings match elevator
tester readings in this area with an accuracy of plus or minus 0.5 percent.
The area between A and B represents the low moisture range. Moisture
tester readings differ more from elevator tester readings, and are LOWER
than elevator tester readings. The area between C and D represents the
high moisture range. Moisture tester readings again differ more from elevator
tester readings than they did at mid-range moisture, but now the readings are
HIGHER than elevator tester readings.
2. Calibration Requirements: Graph 1 illustrates that moisture tester readings
closely match elevator tester readings for mid-range moisture levels. (Graph
1 is for illustration purposes only and does not reflect actual test data.)
Calibration changes required for grain in this moisture range will be small,
if any. However, if grain is very dry (Low Moisture Range) or very wet (High
Moisture Range), it may be necessary to calibrate your moisture tester unit
against the elevator tester using a sample of your grain in both testers. Record
the calibration correction required. It will be valid for all testing in that moisture
range for that grain.
MOISTURE RANGE
MOISTURE TESTER
ELEVATOR TESTER
GRAPH 1:
Moisture Tester - Elevator Tester
Comparison
LOW MID HIGH

SYMPTOM A: Unit does not power up or loses power
occasionally (or backlighting does not operate.)
SOLUTION 1: Press ON-OFF button for shorter time.
Do NOT hold button down.
SOLUTION 2: Check batteries for 0% or higher.
Replace as necessary.
SOLUTION 3: Battery contacts may be making poor
contact. Remove batteries and pull metal contacts (A)
up from bottom of compartment and above height of
plastic knob using needle-nose pliers.
SYMPTOM B: Unit is inaccurate.
SOLUTION 1: Temperature of the grain and unit may be more than 20˚F (11˚C)
different. Follow preheat procedure (See page 10-4).
SOLUTION 2: If grain is at an extreme temperature, let grain settle to reach room
temperature. Retest grain.
SOLUTION 3: Grain and/or test cell may have developed surface moisture from
rapid change in temperature of the grain sample. Allow grain and tester to stabi-
lize near room temperature. Inspect for visible moisture on grain and inside test
cell. Dry the test cell with a soft cloth or a blow dryer if necessary. Retest grain.
(See page 10-5).
SOLUTION 4: If the tester displays SYSTEM BATTERY LOW, the test results
may be inaccurate. Replace battery.
SOLUTION 5: Unit may need to be re-calibrated by factory. Return to your John
Deere Dealer for repair or replacement.
SYMPTOM C: Unit reads MOISTURE BELOW LIMIT or MOISTURE ABOVE LIMIT.
SOLUTION 1: Grain may be too wet or dry to test. Check moisture limit guide-
lines on page 10-6 of Operating Instructions. NOTE: Limits shown on page 10-6
are only guidelines.
SYMPTOM D: Unit reads ERROR (---).
SOLUTION 1: Electronic failure. Return to your Dealer for repair or replacement
or contact manufacturer (See page 25-1).
15-1
Troubleshooting

CHECKING THE BATTERY LIFE
1. The tester is powered with two 9 volt alkaline
batteries. The left battery (A) powers the backlight
circuit. The right battery (B) powers the system.
2. The tester will display a percentage of battery life left
in both the system and backlight batteries.
3. To select the battery check while in the grain menu
press the “UP OR DOWN” buttons until “OPTIONS”
is selected then press the “ENTER” button.
4. The “OPTIONS” menu will now be displayed, press
the “UP OR DOWN” buttons until “BATTERY” is
selected then press the “ENTER” button.
5. The tester with then display the percentages
remaining for the system and backlight battery.
6. The tester system functions will operate if no backlight battery is installed or
if it is low.
NOTE: When you first turn on the tester if the system battery is at or below 5%
the tester will automatically flash the battery life on the display to let you know
the battery needs to be replaced. If the backlight battery is fresh and the system
battery needs replacing, the backlight battery can be used to operate the system
by moving it to the system battery location.
A
B
Service
20-1
CLEANING THE TESTER
1. Remove cap and wipe out inside of the tester with a dry paper towel.
NOTE: Grain may become lodged in threads of cap and should be removed
with a small blade screwdriver.

Service
WARRANTY
This product is guaranteed to be free from defects in materials and
workmanship for two (2) years from date of retail purchase in USA or Canada
and one (1) year overseas. This warranty does not cover the battery or
damage resulting from misuse, neglect, accident or improper installation or
maintenance. This warranty does not apply to any product which has been
repaired or altered outside an authorized factory repair facility.
The foregoing warranty is exclusive and in lieu of all other warranties of
merchantability, fitness for purpose and any other type, whether expressed or
implied. AgraTronix neither assumes nor authorizes anyone to assume for it any
other obligation or liability in connection with its product and will not be liable for
consequential damages.
RECORD SERIAL NUMBER
NOTE: The tester serial number is located on the bottom of the unit.
Write your model number, serial number, and date of purchase in the space
provided below.Your dealer needs this information when ordering parts and when
filing warranty claims.
Model No. ________________________________________________________
Serial No. ________________________________________________________
Date of Purchase __________________________________________________
(To be filled in by purchaser)
20-2

Manufacturer’s Contact Information
25-1
Toll-Free 1-800-821-9542
330-562-2222
FAX 330-562-7403
www.AgraTronix.com
10375 State Route 43
Streetsboro, OH 44241
USA
Other manuals for MT-PRO+
1
Table of contents
Languages:
Other agratronix Test Equipment manuals

agratronix
agratronix Farmex GMT2 User manual

agratronix
agratronix Hay Core Sampler User manual

agratronix
agratronix HT-PRO User manual

agratronix
agratronix HST-1 User manual

agratronix
agratronix FARMEX DHT-1 User manual

agratronix
agratronix BHT-2 User manual

agratronix
agratronix WCT-2 User manual

agratronix
agratronix MT-PRO User manual
Popular Test Equipment manuals by other brands

Test Products International
Test Products International 343 instruction manual

sauter
sauter DA instruction manual

Dräger
Dräger Alcotest 6810 med Instructions for use

RS PRO
RS PRO Stroboscope pocket LED operating instructions

Tektronix
Tektronix P6455 TTL/MOS instructions

MARTINDALE
MARTINDALE MTL10 instruction manual