agratronix Farmex GMT2 User manual

MoistureMatch™
A next generation grain tester
A next generation moisture tester incorporating new and unique technology. Finally, a
portable tester that will more accurately match and track with the commercial elevator
testers. Designed for the future with computer interface and upgrade capability.
Warranty
The Farmex™ Model GMT2 – MoistureMatch Grain Moisture Tester is guaranteed to
be free from defects in materials and workmanship for one year from date of retail
purchase. This warranty does not cover the batteries or damage resulting from mis-
use, neglect, accident or improper installation or maintenance. This warranty does not
apply to any product which has been repaired or altered outside the factory.
The foregoing warranty is exclusive and in lieu of all other warranties of merchantability,
fitness for purpose and any other obligation or liability in connection with its product
and will not be liable for consequential damages.
Customer Support
AgraTronix / Farmex™
10375 State Route 43, Streetsboro, OH 44241
Phone: 800.821.9542 • Fax: 330.562.7403
http://www.agratronix.com

TABLE OF CONTENTS
SECTION Page
Setup and Installation
Tester Components...................................................................................1
Default Manufacturer Settings..................................................................1
Packaging.................................................................................................1
Battery Connection...................................................................................1
Main Selection Buttons.............................................................................1
Selecting the Menu Option .......................................................................2
Selecting the Battery Option.....................................................................2
Selecting the Language Option.................................................................2
Selecting the Commercial Tester Option ..................................................2
Selecting the Grain Option........................................................................3
Operation
General Information..................................................................................3
Operational Messages ..............................................................................3
Moisture Limit Guidelines ........................................................................4
Operating Conditions................................................................................5
Moisture Test............................................................................................6
Calibration Adjustment .............................................................................8
Selecting Diagnostics Option....................................................................9
Selecting Version Option ..........................................................................9
Troubleshooting
Symptoms and Solutions.........................................................................9
Service
To Replace Batteries ...............................................................................10
Maintenance of Moisture Tester .............................................................10
Accessories
Optional Carrying Case...........................................................................10
Optional Software...................................................................................10
Replacement Parts .................................................................................10

SETUP AND INSTALLATION
TESTER COMPONENTS
Identify the following components:
1. Fill Cup
2. Moisture Tester
3. Cap
4. Batteries
5. Port Door
6. Battery Door
DEFAULT MANUFACTURER SETTINGS
The tester has various options that have
different settings. These options and the
“default” settings are listed below:
Grain List – All grains are activated
Commercial Tester – Industry Standard
Language – English
Refer to the operation guidelines for further
information regarding settings.
Packaging
The MoistureMatch comes with a protective
plastic film cover over the display window.
Remove the protective cover and discard.
BATTERY CONNECTION
The tester is supplied with two standard 9V
alkaline batteries. The system battery provides
power for all electronics and the backlight
battery powers the LCD display backlight.
Inside the battery compartment, the base
has a raised image that shows the polarity
of the batteries. Line up the battery positive
(+) and negative (–) terminals to the raised
image. Make sure the batteries are completely
seated.
Place the battery door over the battery com-
partment and snap into place.
MAIN SELECTION BUTTONS
UP/DOWN Arrows
Toggle between various options such as YES
and NO. Either button will perform the same
toggle function.
Scroll through a list of options. One example is
grain selection. Use the UP or DOWN arrows
to scroll through all the different grains.
1

2
ENTER
The ENTER button will acknowledge the
selection you make. (Example: when se-
lecting grain, scroll through grain choices
with the UP/DOWN arrows to make your
grain choice and press ENTER to accept
the selection).
ENTER will take you through the steps of a
procedure by going to the next step.
ENTER can also return you to the previous
display.
MENU
Automatically shows the various menu
options (Batteries, Commercial Tester,
Diagnostics, Grain, Language, Software
Version).
CANCEL
CANCEL will return back to the initial dis-
play and not make any changes.
SELECTING THE MENU OPTION
When the tester displays the GRAIN
screen, press the MENU button.
The tester will display the MENU screen
with six options. Use the UP/DOWN
arrows to scroll to the option required and
press the ENTER button.
SELECTING THE BATTERY OPTION
Selecting the BATTERY option will display
a screen that indicates the power remain-
ing in the SYSTEM battery and the LIGHT
battery.
SELECTING THE LANGUAGE OPTION
Selecting the LANGUAGE option screen
displays the available languages.
Use the UP/DOWN arrows to select the
language of your choice.
The number of languages available
depends on the Software Version that you
have. Press the ENTER button and return
to the Main display.
Press the ENTER button to save the
language selected or press cancel to exit
the Language option.
SELECTING THE COMMERCIAL
TESTER OPTION
Selecting the commercial tester option
will display the list of commercial grain
elevator testers to which this unit has
been calibrated. Use the UP/DOWN
arrows to scroll through the list.
After scrolling to the desired commercial
grain elevator, press the ENTER button to
set this selection.

3
SELECTING THE GRAIN OPTION
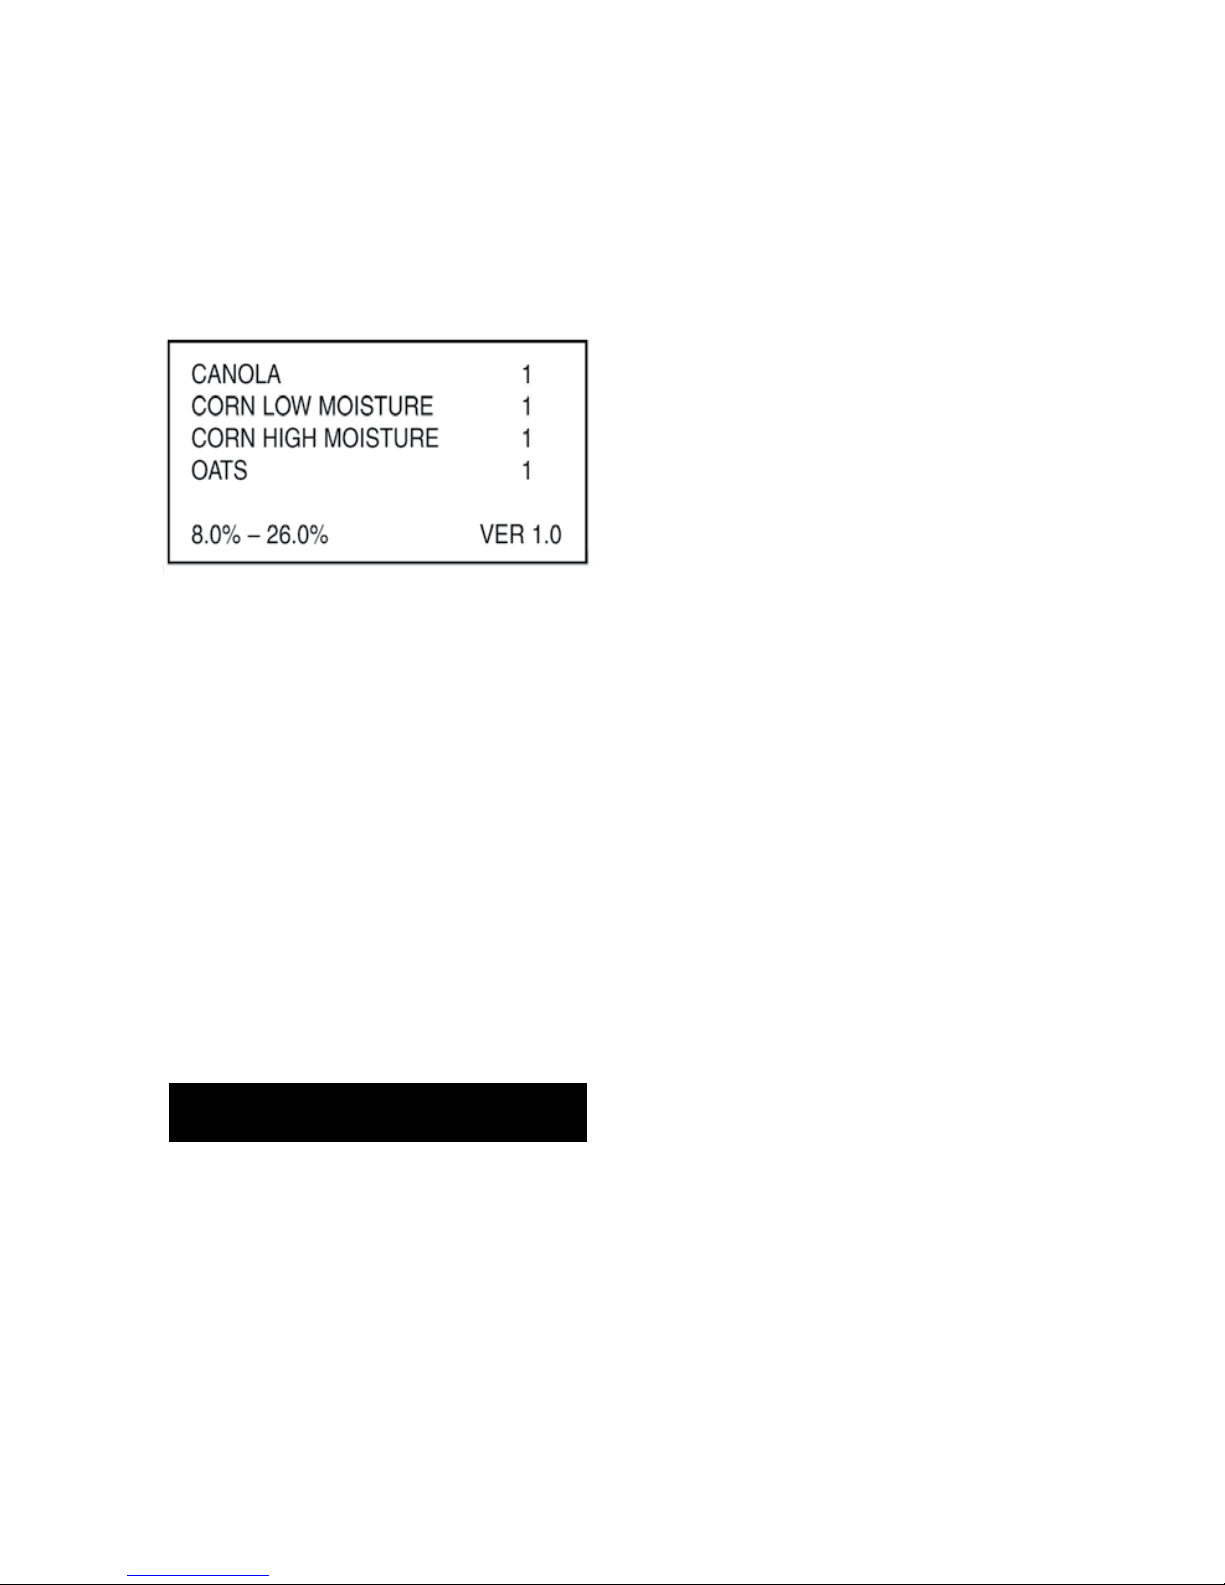
Selecting the GRAIN option will display a
list of up to four (4) grains at a time. Use
the UP/DOWN arrows to scroll through
the list. When the cursor points to a grain
to be selected, it will indicate it is enabled:
1, or disabled: 0, status. Press the ENTER
button to enable or disable that grain.
All enabled grains will be displayed on the
initial display when the tester is turned
on. Those grains that are enabled can be
selected by using the UP/DOWN arrows.
Disabled grains can be enabled at any
time by following the previous steps. After
selecting grains, press the ENTER button
to return to GRAIN screen.
Press the MENU button to return to the
previous screen.
NOTE: There must be at least one grain
enabled,soiftheuserdisablesallthegrains,
a message will be displayed prompting the
user to enable at least one grain.
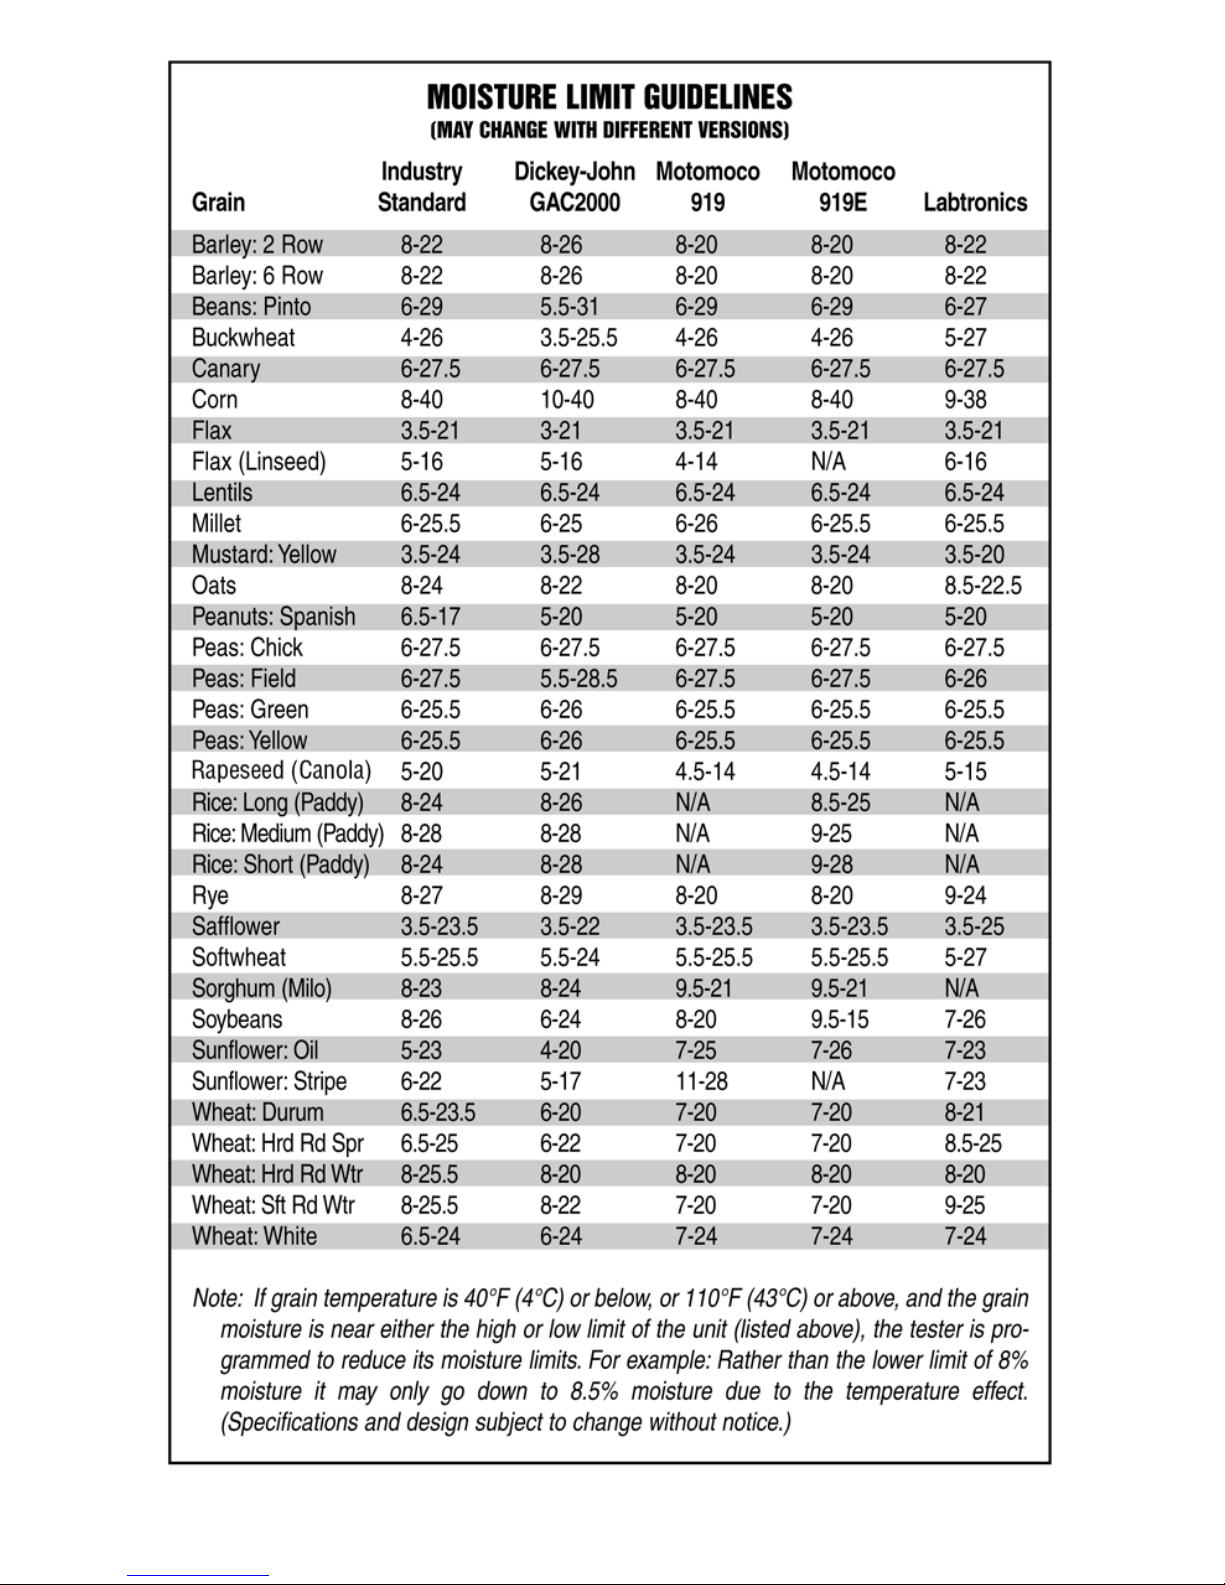
GENERAL INFORMATION
Matching Elevator Moisture
All other electronic grain moisture testers,
portable or commercial, are calibrated to
an industry standard like the ASAE Stan-
dard. Oven Drying, Microwave Drying or
another standard is used for determining
absolute moisture.
This tester takes a different approach. Cal-
ibration data was developed with respect
to the most widely used commercial grain
elevator testers in the North American
market. The user can select a calibration
curve that is based on the moisture read-
ings of a commercial grain elevator mois-
ture tester. The accepted industry practice
is for farmers to sell their grain according
to the readings given by their local grain
elevator. So the test equipment that the
grain elevator operator uses becomes the
standard, not absolute moisture.
Unfortunately, the elevator tester measure-
ments and absolute moisture may not be
the same. Therefore, it is more important
for the user to know what the elevator
tester reads, rather than to know the
absolute moisture. However, the Moisture-
Match tester does have an absolute scale
(Industry Standard) for reference.
Not only is it possible for different brands
of commercial testers to give different
results, it is also possible for the same
brand and model commercial testers
to produce different readings. The next
feature described below allows the user to
make fine tuning adjustments to track with
the specific commercial tester that his
local grain elevator uses.
Calibration to a Specific Commercial
Tester (MoistureMATCH Technology)
Calibration adjustments are usually made
by adding an offset to the entire calibration
curve. This can cause problems because
when a tester is adjusted at low moisture,
it can throw off the calibration at high
moisture and vice versa.
With the MoistureMATCH™ tester, when
a calibration adjustment is entered, it
impacts the moisture curve immediately
surrounding the specific moisture that is
being adjusted; the rest of the curve is not
affected.
OPERATION

4

5
With this feature, adjustments can be
made independently at high or low mois-
ture points. Adjustments can be made to
multiple individual moistures over the
entire moisture range.
Thistechnologyallowstheuserto “match”
hiscommercialtestermore precisely.Over
time, if the grain elevator tester drifts or
is reading differently for any reason, the
portable grain tester can be calibrated to
that specific grain elevator tester and will
still “match” it.
EXAMPLE: The commercial grain
elevator tester reads 13% moisture
and the MoistureMATCH™ reads
12%. Use the calibration procedure to
adjust the MoistureMATCH tester up to
13%. (As with all moisture testers, it is
recommended you take the average
of 3 readings).
Later, during harvest, you may have
grain that tests 18% with the Moisture-
MATCH™, and tests 17% with the com-
mercial tester. Adjust the MoistureMATCH
tester down to 17%, and this adjustment
will not impact the adjustment at 13%
described above.
Again, many moisture testers claim to be
adjustable to match commercial testers,
but they can only achieve this with a fixed
offset that impacts the entire moisture
range.
Automatic Compaction Detection
State-of-the-art technology automatically
detects the amount of grain compaction
in the test cell and allows a fixed com-
paction setting to be preset to establish a
trip point at which a test can begin. The
MoistureMATCH will automatically begin
testing the sample compacted when the
present compaction threshold is met.
OPERATIONAL MESSAGES
The following is a list of messages to the
user and their definitions.
MESSAGE DESCRIPTION
TIME LIMIT EXPIRED – Since the
tester has been filled with grain, the
time limit has expired. Empty test cell
and start over.
TEST CELL ERROR – Test cell needs to
be cleaned out or emptied; could not
calibrate test cell.
COMPACTION SENSOR ERROR –
Compaction sensor cannot initiate.
REPLACE NOW – System battery needs
to be replaced. If the battery goes to
0%, the battery icons will be displayed
when the tester turns on.
MOISTURE BELOW LIMIT – Moisture
is below low limit. Empty test cell for
next test.
MOISTURE ABOVE LIMIT – Moisture
is above high limit. Empty test cell for
next test.
EMPTY TEST CELL – Test cell is not
empty or is not clean.
OPERATING CONDITIONS
NOTE: This test cell must be empty
before turning on the tester. The unit
performs a self-calibration, similar to
the commercial elevator testers, each
time it is turned on.
The test cell and grain MUST be free of any
condensation or surface moisture. Mois-
ture on grain or moisture on the test cell
walls will cause high readings. Very hot
or cool grain will pick up moisture when it
warms or cools.

6
Because grains are irregularly shaped,
especially corn, and will not always pack
the same way in the test cell, minor varia-
tions in readings may occur. This is the
reason commercial tester grain elevators
may give different moisture results for the
same sample tested several times. To en-
hance accuracy, always take three (3) suc-
cessive readings of the total sample being
tested. Empty and refill the tester with new
grain from the sample between each test.
The tester is most accurate when the grain
and tester are between 60˚F (16˚C) and
90˚F (32˚C). The unit will, however, oper-
ate at temperatures between 32˚F (0˚C)
and 113˚F (45˚C). For best results, grain
temperatures should not be below 40˚F
(4˚C) or above 110˚F (43˚C).
Condensation on the grain or test cell is
best avoided by having the tester and grain
at about the same temperature. The envi-
ronment that a grain sample is exposed
to can significantly change its moisture
content. Exposed to the open air, grain can
gain or lose 1% to 2% indicated moisture
in a short period of time. If a sample is to
be held for even a short time before being
tested, it should be placed into a tightly
closed, air-tight container, such as a zip-
lock bag or jar.
MOISTURE TEST
The fill cup must be removed from the test
cell. The cap can be on or off while the
tester performs self-calibration.
Inspect the test cell and make sure it is
empty and clean.
1. Press and release the ON/OFF button to
turn on the tester. The display window
will briefly display a logo while the tes-
ter performs a real-time power up self-
calibration, similar to that performed
by commercial testers. The resulting
display is the “main display.”
2. Use the UP/DOWN arrows to scroll to
the grain that is to be tested.
NOTE: Options shown on a display can
be selected by pressing the UP/DOWN
arrows.
NOTE: Generally the two lower lines in
the display screen will indicate instruc-
tions to the user.
NOTE: When the test procedure is initi-
ated, the test must be completed when
fifty (50) seconds or the test session
will end and the tester will beep and
display an operational message “TIME
LIMIT EXPIRED.”
The test procedure is initiated when the
tester detects grain entering the test cell.
A message displaying “TEST INITIATED”
will appear on the display.
The user must move on to the follow-
ing steps and complete the test or press
CANCEL to back out of the test.
If the test is cancelled, the test cell must
be emptied. When the test cell is emptied,
the tester will return to the grain display
and is ready for another test.

7
3. Scoop up grain with the fill cup; pour
into the test cell; repeat until the grain
is at the top rim of the test cell (top
of the threaded portion of the tester).
Thread the cap onto the tester until it
beeps or “TESTING” is displayed.
NOTE: Some grains, such as fescue
and high moisture corn, will require
pre-compaction. Fill the test cell and
compact, using the bottom of the fill
cup. Continue to add grain until the
compaction is great enough to initiate
a test.
When the compaction threshold is met,
the tester will beep and display TESTING.
If you are in a noisy environment and can’t
hear the beep, watch the display until the
message “TESTING” is displayed.
After the moisture is determined, the dis-
play will read out the results of the test.
The last six test results will be displayed
as well as a running average for those
tests. At this point, you can prepare to take
another test or clear all or some of the
displayed moistures.
5. If additional tests are required, press
ENTER, remove the cap, and complete-
ly empty the test cell. Press ENTER and
the tester will return to the GRAIN dis-
play, ready to begin a new test.
IMPORTANT: A NEW SAMPLE MUST BE
USED FOR EACH TEST. THE TESTER
AUTOMATICALLY DETERMINES IF THE
TEST CELL HAS BEEN EMPTIED. IT WILL
NOT PERFORM A NEW TEST UNTIL THE
CURRENTLY TESTED GRAIN HAS BEEN
EMPTIED FROM THE TEST CELL.
6. Press CLEAR to clear all or some of the
previous test results.
The user will be prompted to choose
“CLEAR ALL” or “SELECT 1-6”.
Use the UP/DOWN arrows to select
either option.
If “CLEAR ALL” is selected, all read-
ings, including the current reading, will
be cleared.
If “SELECT 1-6” is selected, an arrow
will appear next to the first reading. Use
the UP/DOWN arrows to scroll to the
reading that is to be cleared. Push the
ENTER button to clear that reading.
7.
Push the CANCEL button to exit the
“CLEAR” reading option pop-up window.
When a reading is cleared, any readings
that follow the cleared reading will be
shifted up one and a reading of zero will
be loaded into the last (6th) position.
After the test is complete, press the
ENTER button to return to the grain
display.

8
CALIBRATION ADJUSTMENT
Calibration has two options:
ADJUST – Adjust calibration
RESET – Reset to original manufacturer’s
calibration
NOTE: Press and release the CANCEL
button of any time to stop the calibra-
tion adjustment process.
ADJUST
Enter the CALIBRATION menu by pressing
the CAL button while the grain moisture is
being displayed from a recent test.
NOTE: A calibration cannot be set that is
beyond the limits for the selected grain.
Four (4) readings will be displayed:
1. The MoistureMATCH reading that was
just taken.
2. The pre-selected commercial elevator
tester will appear with any existing
offset reading for that moisture point.
3. The existing adjusted value, if any,
that shows the different between the
commercial tester reading and the
MoistureMATCH.
4. The maximum offset allowed at that
moisture point. This is the largest
offset that a user can enter.
Use the UP/DOWN arrow to enter the mois-
ture reading of the commercial tester.
The adjusted value will change as you
change the commercial tester reading.
After entering the adjusted commercial
tester reading, push the ENTER button and
the user will be prompted to display the
calibration curve.
Select YES or NO and push ENTER.
Press ENTER to exit the Graph Display and
return to the Main Display.
RESET
1. Enter the CALIBRATION menu by
pressing the CAL button.
2. Use the UP/DOWN arrows to scroll to
RESET and push the ENTER button.
3. The current grain and current com-
mercial tester will be displayed. Use
the UP/DOWN arrows to scroll to YES
or NO to reset the calibration to the
original manufacturer’s calibration. All
adjustments will be deleted.

9
SELECTING THE DIAGNOSTICS
OPTION
NOTE: Press and release the CANCEL
button at any time to stop the Diag-
nostics.
Press the MENU button to enter the
Options Window. Selecting the DIAGNOS-
TICS option will display the list of available
diagnostics. Using the UP/DOWN arrows
will scroll through the list.
After scrolling to the desired Diagnostic,
press the ENTER button to activate the
selection.
SELECTING THE VERSION OPTION
Selecting the VERSION displays the soft-
ware version and selected grain table and
configuration version. A pop-up window
will display temporarily, and then go
away.
Press and release the CANCEL button to
return to the grain display.
TROUBLESHOOTING
Symptom A: Unit does not power up or
loses power occasionally (or backlight-
ing does not operate.)
Solution 1: Press ON-OFF button for short-
er time. Do NOT hold button down.
Solution 2: Check batteries for 7.5 volts or
higher. Replace as necessary.
Solution 3: Remove battery access door
from bottom of tester. Remove batteries
and ensure polarity is correct. Reseat bat-
teries.
Symptom B: Unit does not match the
commercial elevator tester.
Solution 1: Verify that the desired grain
and the correct commercial grain tester is
selected.
Solution 2: The portable tester’s moisture
range has not been adjusted to the com-
mercial elevator’s tester properly. Check
the calibration adjustment instructions and
make fine-tune adjustments.
Solution 3: Temperature of the grain and unit
may be more than 20˚F (11˚C) different.
Solution 4: The grain and/or test cell may
have developed surface moisture from
rapid changes in the grain sample’s tem-
perature. Allow grain and tester to stabilize
near room temperature. Inspect for visible
moisture on grain and inside the test cell.
Dry the test cell with a soft cloth or blow
dryer, if necessary. Retest grain.

10
Symptom C: Unit reads “MOISTURE
BELOW LIMIT” or “MOISTURE ABOVE
LIMIT.”
Solution 1: Grain may be too wet or dry
to test. Check moisture limit guidelines in
Operating Instructions.
NOTE: Moisture limits are only guide-
lines.
Symptom D: Unit reads “TEST CELL
ERROR”.
Solution 1: Fill cup may still be inside the
test cell. Remove it and try again.
Solution 2: Test cell still has grain in it.
Remove all grain.
SERVICE
TO REPLACE BATTERIES
The tester is supplied with two 9 volt, alka-
line batteries. The right battery (A) powers
the backlight circuit. The left battery (B)
powers the system.
At any time, select BATTERY from main menu
to display the condition of both batteries.
The tester will properly operate, except
backlighting, when there is no backlight-
ing battery and if this battery is low.
NOTE: If the backlighting battery is
fresh and the system battery needs
replacing, the backlight battery can be
used to operate the system, by moving
it to the system battery location.
Remove the battery door and the old
battery(s).
Insert new battery(s) and replace door.
TO CLEAN MOISTURE TESTER
Remove cap and wipe out inside of mois-
ture tester cell with a dry paper towel.
ACCESSORIES
OPTIONAL CARRYING CASE
(P/N 20101)
The carrying case is constructed of pad-
ded vinyl to protect the tester. A zippered
bottom, clear vinyl window and Velcro®
sealing flap permit tester operation with
tester in carrying case. Velcro is a regis-
tered trademark of VELCRO Industries.
OPTIONAL SOFTWARE
(P/N 20107)
This tester communicates to a PC through
the RS232 serial port, like some commer-
cial testers do. Software and grain table
upgrades can be downloaded through the
RS232 interface.
See the software documentation for down-
loading.
REPLACEMENT PARTS
Tester Cap Replacement:
Order P/N 20103
Grain Scoop Replacement:
Order P/N 20104
Battery Door Replacement:
Order P/N 20105
Serial Port Door Replacement:
Order P/N 20106
DOCU-M0111 3-09
Table of contents
Other agratronix Test Equipment manuals

agratronix
agratronix WCT-2 User manual

agratronix
agratronix HST-1 User manual

agratronix
agratronix MT-PRO User manual

agratronix
agratronix Hay Core Sampler User manual

agratronix
agratronix MT-PRO+ User manual

agratronix
agratronix BHT-2 User manual

agratronix
agratronix FARMEX DHT-1 User manual

agratronix
agratronix HT-PRO User manual