Agri-Spread AS35 User manual

©Copyright Agrispread September 2014
830 Belt Spreader
LIME & FERTILISER SPREADER OPERATING MANUAL
AS35, AS55, AS85, AS100, AS120 & AS120-T MODELS
Original Instructions

©Copyright Agrispread September 2014
830 Belt Spreader
Contents
Product Details.................................................................................................................................................1
Setting Spinner Speeds and Rear Deflectors......................................................................................................4
Setting the Application Rate.............................................................................................................................5
Gear Box Parts.................................................................................................................................................7
General Maintenance......................................................................................................................................10
Belt Maintenance and Adjustment ..................................................................................................................10
Belt Care........................................................................................................................................................12
Maintenance of Bearings................................................................................................................................15
Maintenance of Land driven Gearbox.............................................................................................................18
Maintenance of Hydraulic Gearbox.................................................................................................................19
Wheel Tightening Sequence ...........................................................................................................................20
Wheel Tightening Torque...............................................................................................................................20
Servicing Axles..............................................................................................................................................21
Tighting Torques for Underslung Suspension..................................................................................................22
Replacing Filter Element................................................................................................................................23
Agri-Spread Density Metres ...........................................................................................................................25
Headland Control Valve.................................................................................................................................25
Mounting Spreader to Tractor.........................................................................................................................26
Dismounting Spreader from Tractor................................................................................................................27
Connecting Up Hydraulics to Your Trailer......................................................................................................28
Adjusting Height of Hitch...............................................................................................................................29
Maintenance of Hitch .....................................................................................................................................30
Operating Handbrake......................................................................................................................................31
Maximum Tyre Inflation Pressure...................................................................................................................32
Maximum Spreader Speed..............................................................................................................................32
Bout Width Testing Form...............................................................................................................................34
Appendix 1 - Setting your Spreading Rate.......................................................................................................36
How to use Rate Charts:.................................................................................................................................37
Recommended Spinner Speeds For Spreading.................................................................................................38
Rate Charts (Please Note Rate Charts Are Only Used) with landdriven gearbox ..............................................44
Disclaimer
While every effort has been made in the production of this manual to ensure that the information contained
herein is full and correct, Agrispread assumes no responsibility for errors or omissions. Agrispread reserves the
right to modify the machinery and the technical data contained within the manual without prior notice.
Further to this, Agrispread assumes no liability for any damages that may result from the use of the information
contained within this manual.
©Copyright Agrispread September 2014 1
830 Belt Spreader
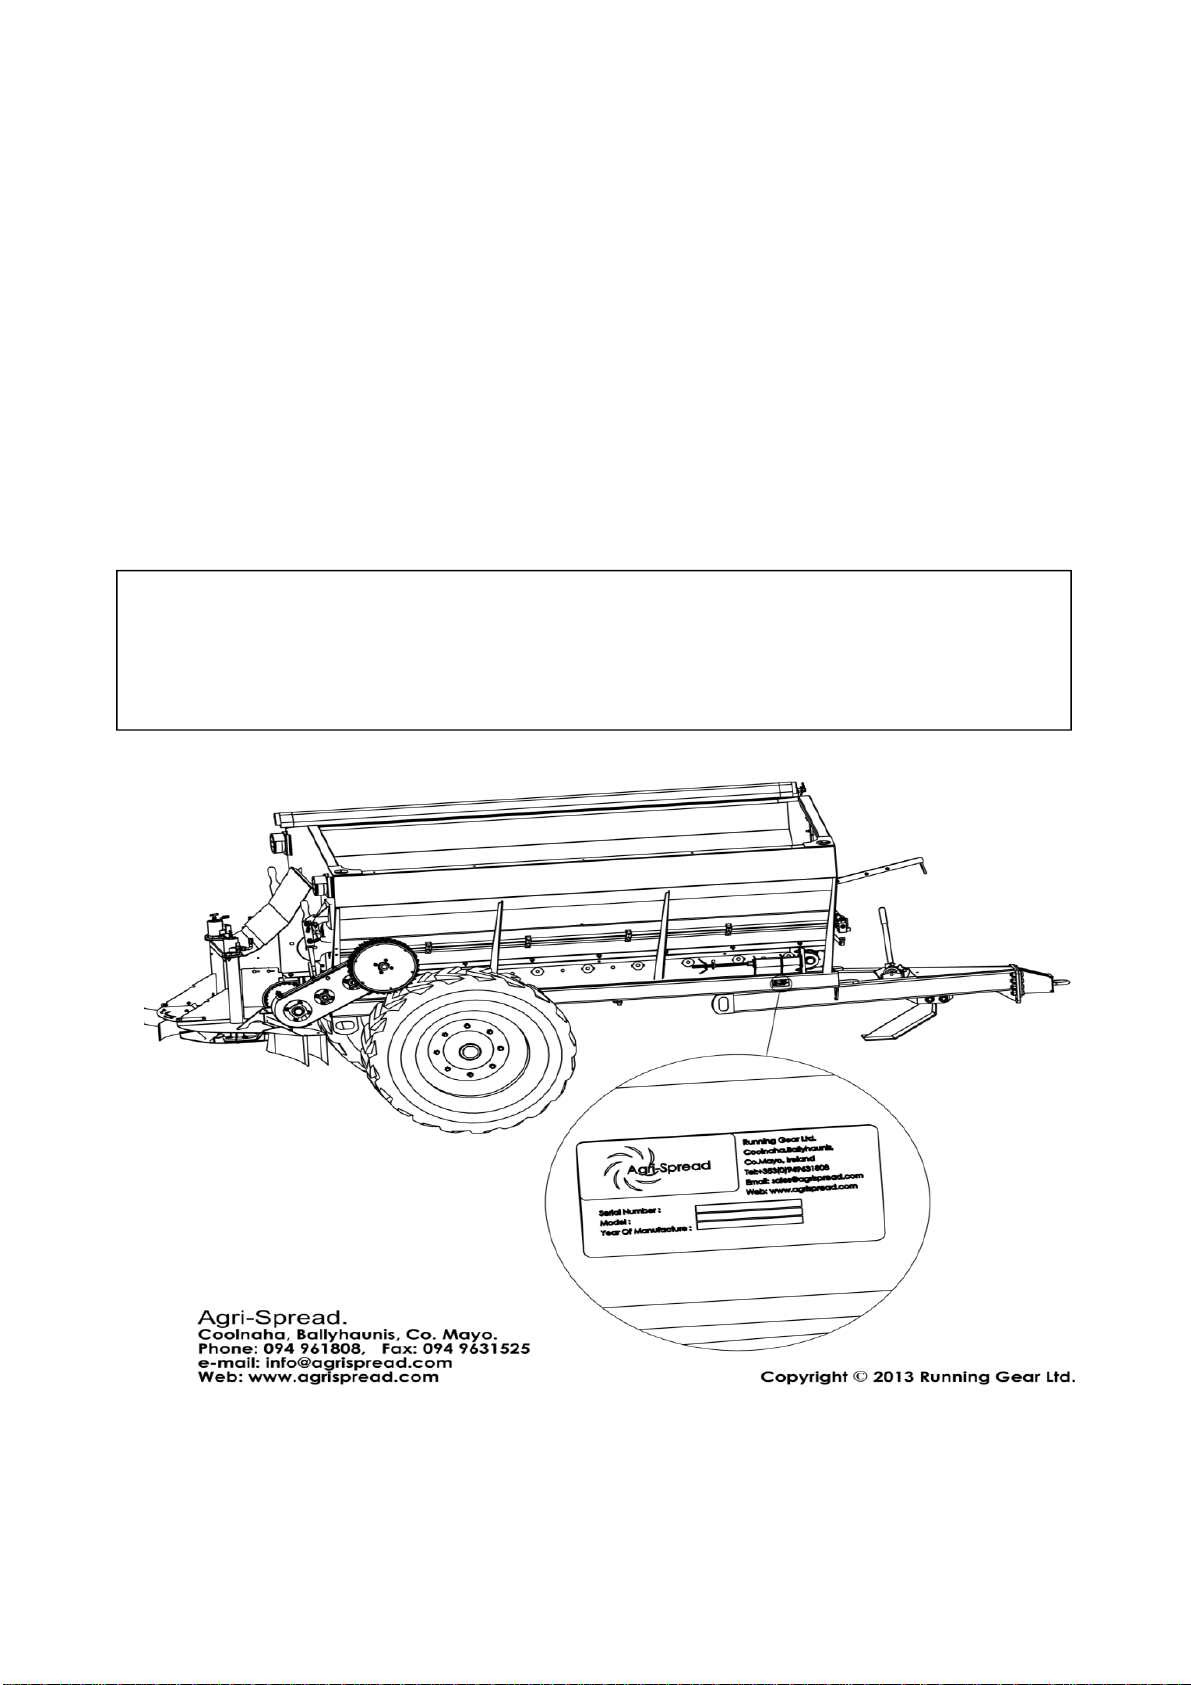
Product Details
Agrispread Model No: ………………………….. Serial Number….2013/
Spinner motor size: ………………………………………………………….….
Hydraulic valve No: ……………………………………………………………
Wheel & tyre spec: ……………………………………………………..………
Recommended Pressure: …………………………. Max.: ……………………..
Figure 1: Location of Machine Serial Plate
Notes

2 ©Copyright Agrispread September 2014
830 Belt Spreader
Important Safety Precautions
Never exceed the spreader’s speed rating as this could lead to death or serious injury.
Never carry out adjustments or maintenance on machinery while it is in operation, as
this could lead to death or serious injury.
Never attempt to clear a blockage while the spreader is in operation as this could lead
to death or serious injury.
Never operate the machine without all safety guards in place and properly secured as
this can result in death or serious injury.
Always disconnect hydraulic connections before carrying out any of the maintenance
instructions. Failure to disconnect, the above, could lead to death or serious injury.
Do not ride on the spreader. The ladder is only provided for ease of access during
servicing or maintenance operations.
Do not overload the spreader. Exceeding the axle weight will cause irreparable
damage to the spreader.
Observe all current Health and Safety Regulations.
When carrying out maintenance tractor should be turned off and the key removed.
All persons except the operator should be kept away a minimum of 75 m from
spreading area
Never enter machine when the spreader is running
Loose fitting clothing should never be worn when while using the machine as these
could become entangled in moving parts and could result in death or serious injury.
Personal Protective equipment should be worn when handling fertiliser (check
MSDS).
General
1. Keep the machine as clean as possible
2. Check wheel nuts daily before use.
3. Check tyre pressures before use (see max inflation pressure table)
4. Grease all bearings weekly.
5. Always check the oil filter indicator on the filter (if fitted,) before use.
6. Always change tractor oil and filter in accordance with the manufacturer’s
instructions.

©Copyright Agrispread September 2014 3
830 Belt Spreader
All maintenance work must be carried out when the machine is turned off and the key
removed.
Failure to comply with the instructions given in this manual may lead to the following
dangers:
-Danger of entrapment due moving conveyer type floor
-
-Danger of entanglement with spinners
-Danger of getting entangled in the shaft transmission parts if the guards are
removed;
Danger of falls when climbing ladder
Users should become thoroughly familiar with the contents of this manual before using,
servicing and mounting the spreader to the tractor. Never wear loose clothing when operating
the machinery. Always wear approved garments complying with accident prevention
provisions such as non-slip shoes, hearing and eye protection. Wear a jacket with reflecting
stickers if the spreader is used near public roads.
Work Area
The operator must remain seated while working the machine. Always ensure the tractor has
been turned off and the parking brake applied before any maintenance or changes are carried
out to the spreader.
Caution
The driven floor should never be operated with the doors in closed position this could cause
irreparable damage. On some fertilisers it should not be operated with less than 20 mm of gap
as packing will occur and the belt will jam. When spreading Steel Works Slag, always
operate the machine in the low gear with the door open as wide as possible.
4 ©Copyright Agrispread September 2014
830 Belt Spreader
Setting Spinner Speeds and Rear Deflectors
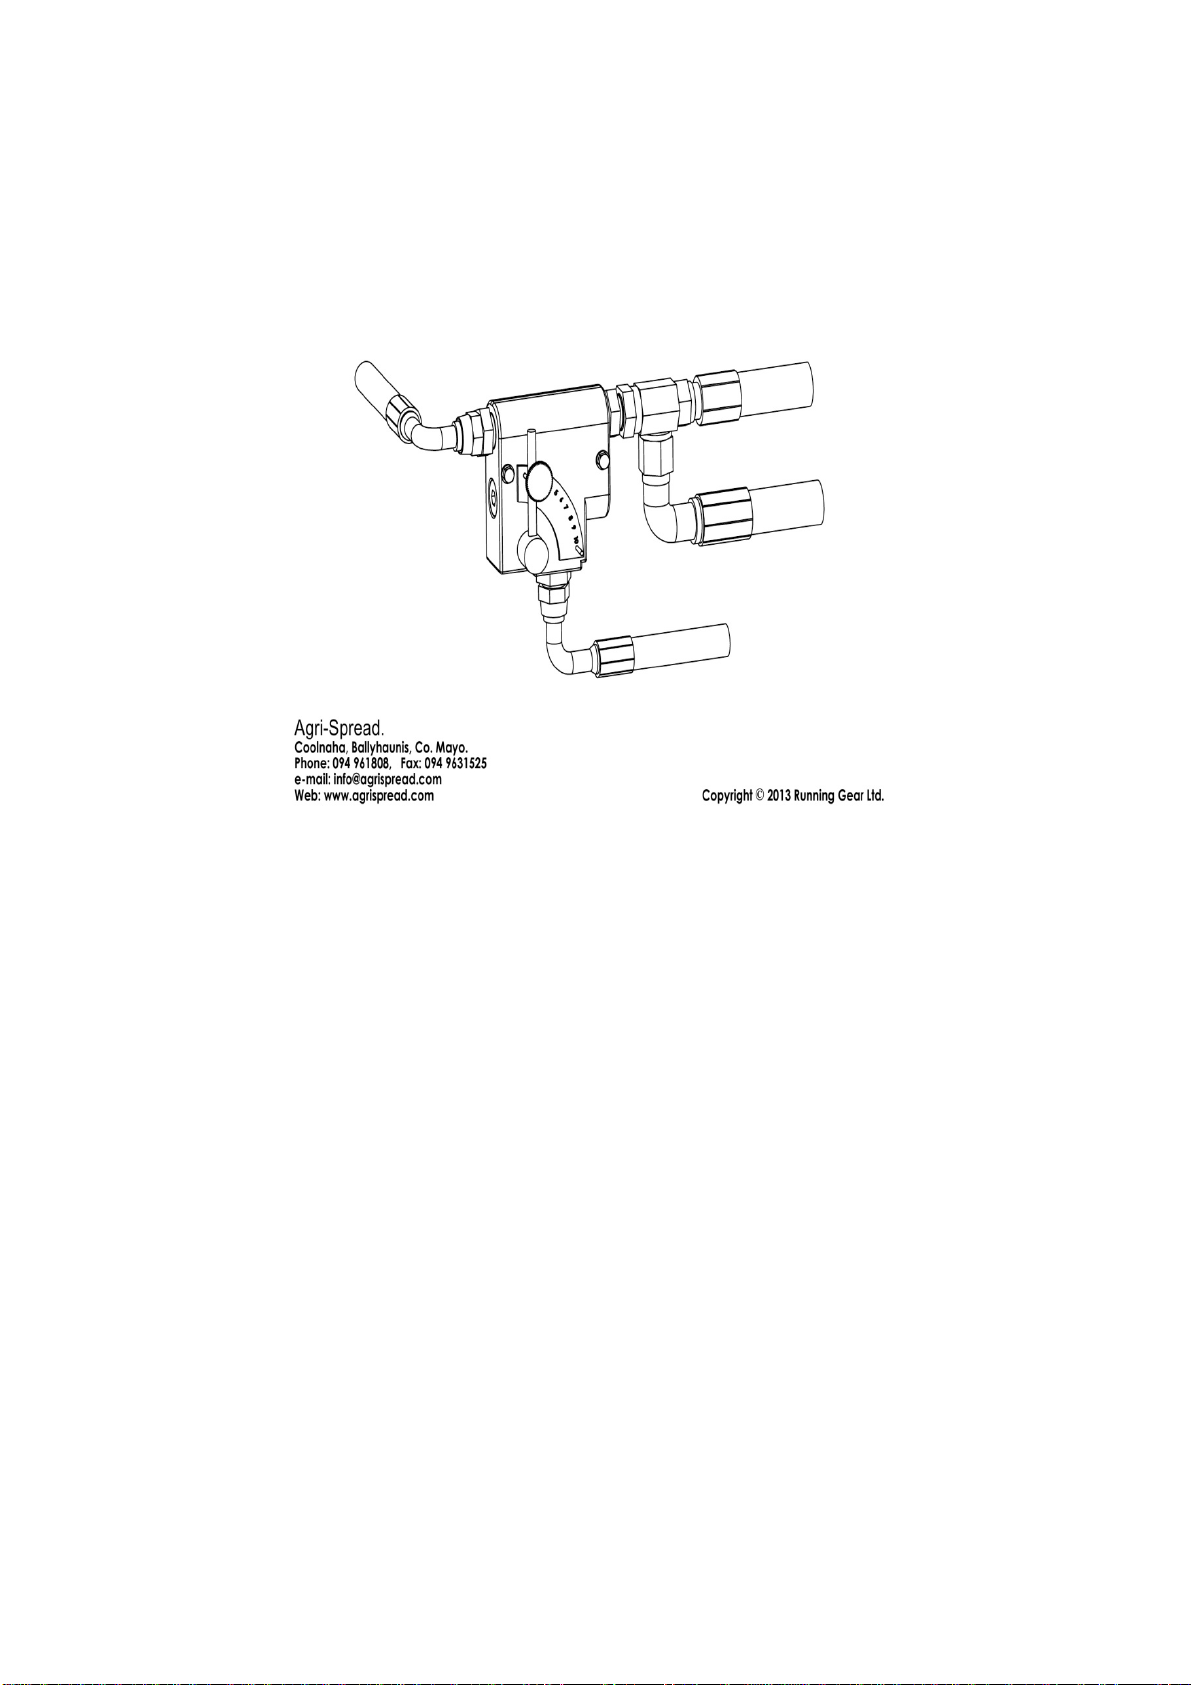
Spinner Speed is the most important factor in achieving an accurate spread pattern. The
spinner speed is adjusted by altering the control on the valve at the front of the machine
(shown in Figure 1 below). Guideline spinner speeds for various different materials are given
in Table 1 : Recommended Spinner Speeds For Spreading on page 38.
Figure 2: Spinner Flow Control Valve
When setting spinner speeds ensure the engine of the tractor is running at the same R.P.M. as
it will normally be operating in the field and make sure that the oil is warmed up to its normal
operating temperature. Always monitor the spinner speed by watching the tachometer when
operating the spreader as an error of 50 R.P.M. on spinner speed will result in a deterioration
of the spread pattern. If the spinner speed is too high there will be too much material behind
the spreader. If the spinner speed is too slow there will be too little material behind the
spreader.
It is sometimes necessary to alter the angle of the rear deflectors to lighten the spread behind
the machine and throw the material more into the centre of the pattern. This is shown in the
table on the following page along with the spinner speeds for sample materials and is
expressed in the following manner.
WARNING: NEVER ADJUST THE DEFLECTORS WHILE THE
SPINNERS ROTATING.

©Copyright Agrispread September 2014 5
830 Belt Spreader
Setting the Application Rate
The application rate of material is controlled by the back door settings and gear selection.
Refer to the rate charts in Appendix 1 - Setting your Spreading Rate. At the back of this
manual for guideline settings of the door opening in millimetres and which gear should be
selected. Once you have selected your rate from the charts, remove the retaining pins in the
door handles and adjust the door so that the top of the door indicator lines up with your
selected figure on the chart. Replace the retaining pins and check that both doors are level
with each other. The rate is now set. With the huge variation of prills and compounds it is
impossible to be 100% accurate without checking the batch of material you are spreading.
GEAR SETTINGS
Med..High..Low gear denoted on the table refers to the gear box selector on the inside of the
jockey wheel drive arm. Gear is selection is indicated on the decal on the gear box. Neutral is
between each gear. Always remember to replace the retaining pin after changing gear. Details
of changing gear are explained on page 8.
Use will dictate accurate settings.
To Start Spreading
Single Spool Tractors... Start by opening the tractor spool valve.
Twin Spool Tractors... Start the spinners by opening the tractor spool valve. Engage
the gearbox by lowering the gearbox ram until the gearbox jockey wheel is in full contact
with the trailer wheel. Do not run at high speed while engaging wheel.
Both... Ensure engine RPM is within the range as when the spinner speed was set and check
the spinner speed on the tachometer. Drive off maintaining engine RPM and using the tractor
gearbox to keep the engine from labouring. This will ensure the hydraulic flow will be
sufficient to maintain constant spinner speed.
To Stop Spreading
Single Spool Tractors... To raise jockey wheel clear of main wheel return the hydraulic
selector for the spinner to off through neutral to reverse flow until wheel is lifted and then
return to neutral.
Twin Spool Tractors... Lift the gearbox clear of the main trailer wheel by operating the
gearbox ram spool valve on the tractor, only stop spinners if required. Stop spinners by
operating the spinner spool valve on the tractor when required.

6 ©Copyright Agrispread September 2014
830 Belt Spreader
Feed Plate
Adjustments
Vane Settings
When starting testing, have the rear cross bar pivoted up into the neutral position. If after
carrying out a test there is still an unacceptable amount of material behind the spreader, pivot
the rear cross bar to the active position with the centre deflectors set at centre. Repeat test.
Spread width m
odifiers
Extend this end ofplate B
to reduce the amount of
material falling behind
thespreader.
Align ends of Contact
plates A and B
Centre V Insert
Centre deflectors
Extend this end ofplate A
to reduce the amount of
material directly behind
the spreader
Contact Plate A
To spread less material
behind the spreader,
increase the angle of the
centre deflectors.
Contact
Plate B
Rear Cross Bar

©Copyright Agrispread September 2014 7
830 Belt Spreader
Gear Box Parts
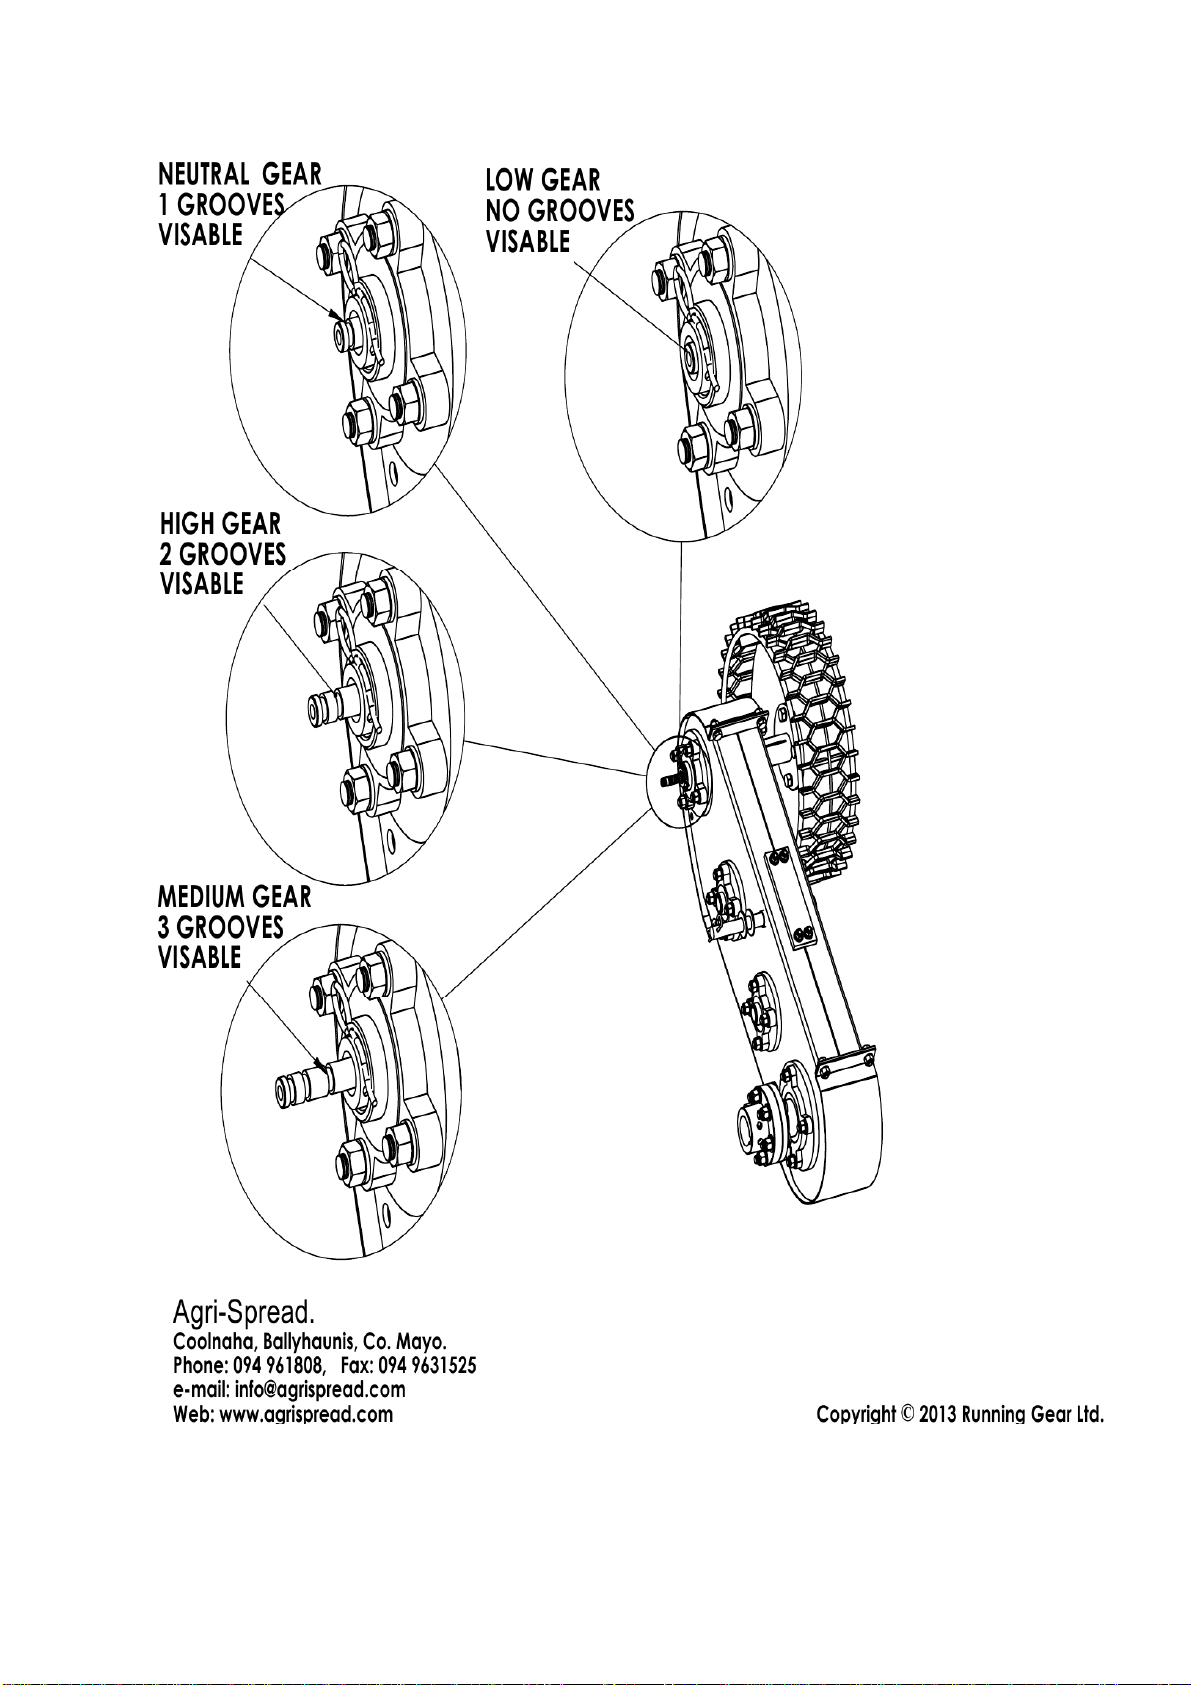
Gear Selection Details
Gear Change:
To change gear, remove “R” Clip from gear selector. Complete gear change by moving gear
selector to gear required. (See Figure 3 below)
When selecting gear it is necessary to rotate the Jockey wheel manually in order to select
required gear.
After selecting required gear, reinsert “R” Clip as shown above.
8 ©Copyright Agrispread September 2014
830 Belt Spreader
Figure 3: Gearbox Settings

©Copyright Agrispread September 2014 9
830 Belt Spreader
Removing Belt for Replacement
Should it be necessary to remove the belt, the following procedure should be adopted.
1. Slacken the both front adjuster’s worm drives right off.
2. Separate the bearing block carriers from the front adjuster’s on both sides of the
trailer.
3. Undo the grub screws on the inside of the front roller;
4. Remove bearing blocks on both sides.
5. Pull the bearing block with the loosened grub screws from the front roller shaft.
6. Slide Front Roller out from spreader
7. Remove all belt rollers by a tap up and out.
8. Loosen grub screws on rear belt roller
9. Loosen bolts which mount bearings to spreader
10. Remove bearings from rear roller
11. Slide the rear belt roller out from spreader
12. Remove the belt.
To install a new belt repeat the process in reverse order but ensure the belt is in correctly
Direction of rotation is marked and that the belt is on top side of pinch roller.
10 ©Copyright Agrispread September 2014
830 Belt Spreader
General Maintenance
All maintenance work must be carried out when the machine is turned off and the key
removed.
Belt Maintenance and Adjustment
The belt has been aligned in the factory before delivery of the spreader with no load. After
several initial loads, the belt will stretch and may need to be re-tensioned. This is described
below.
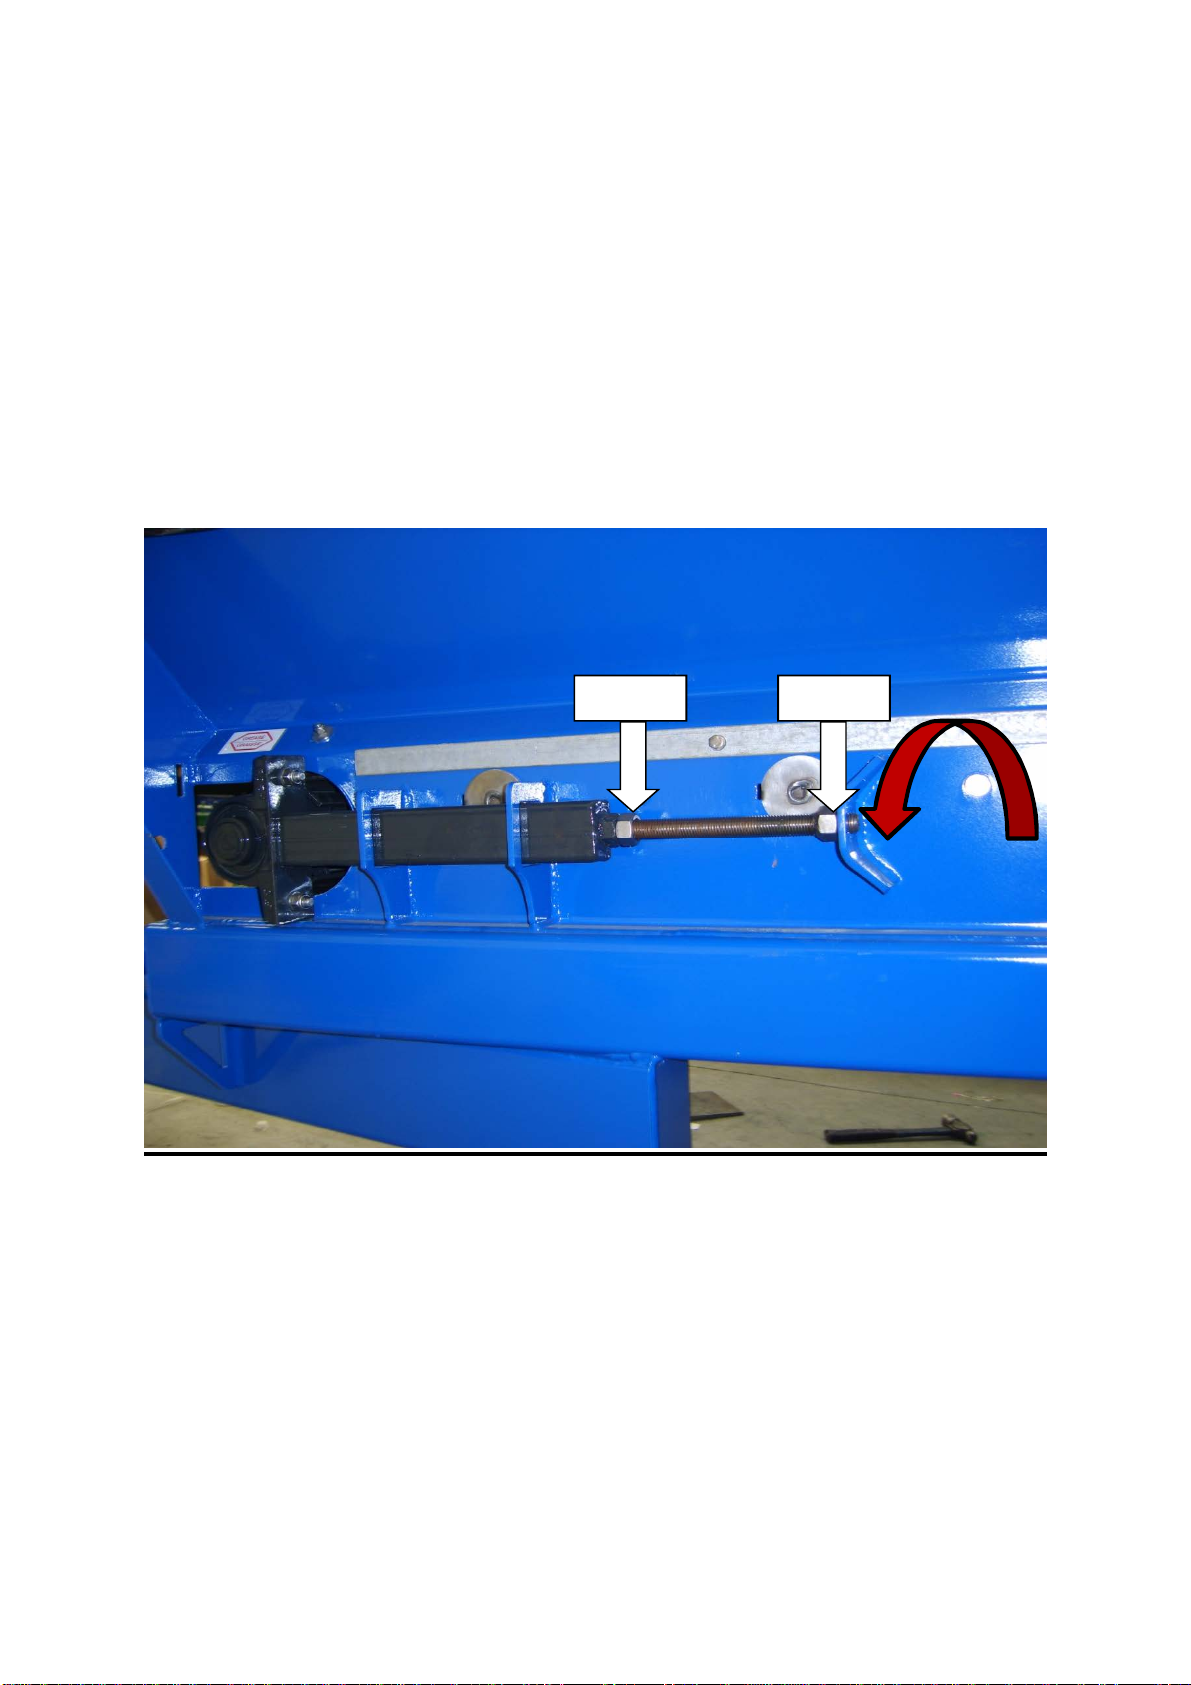
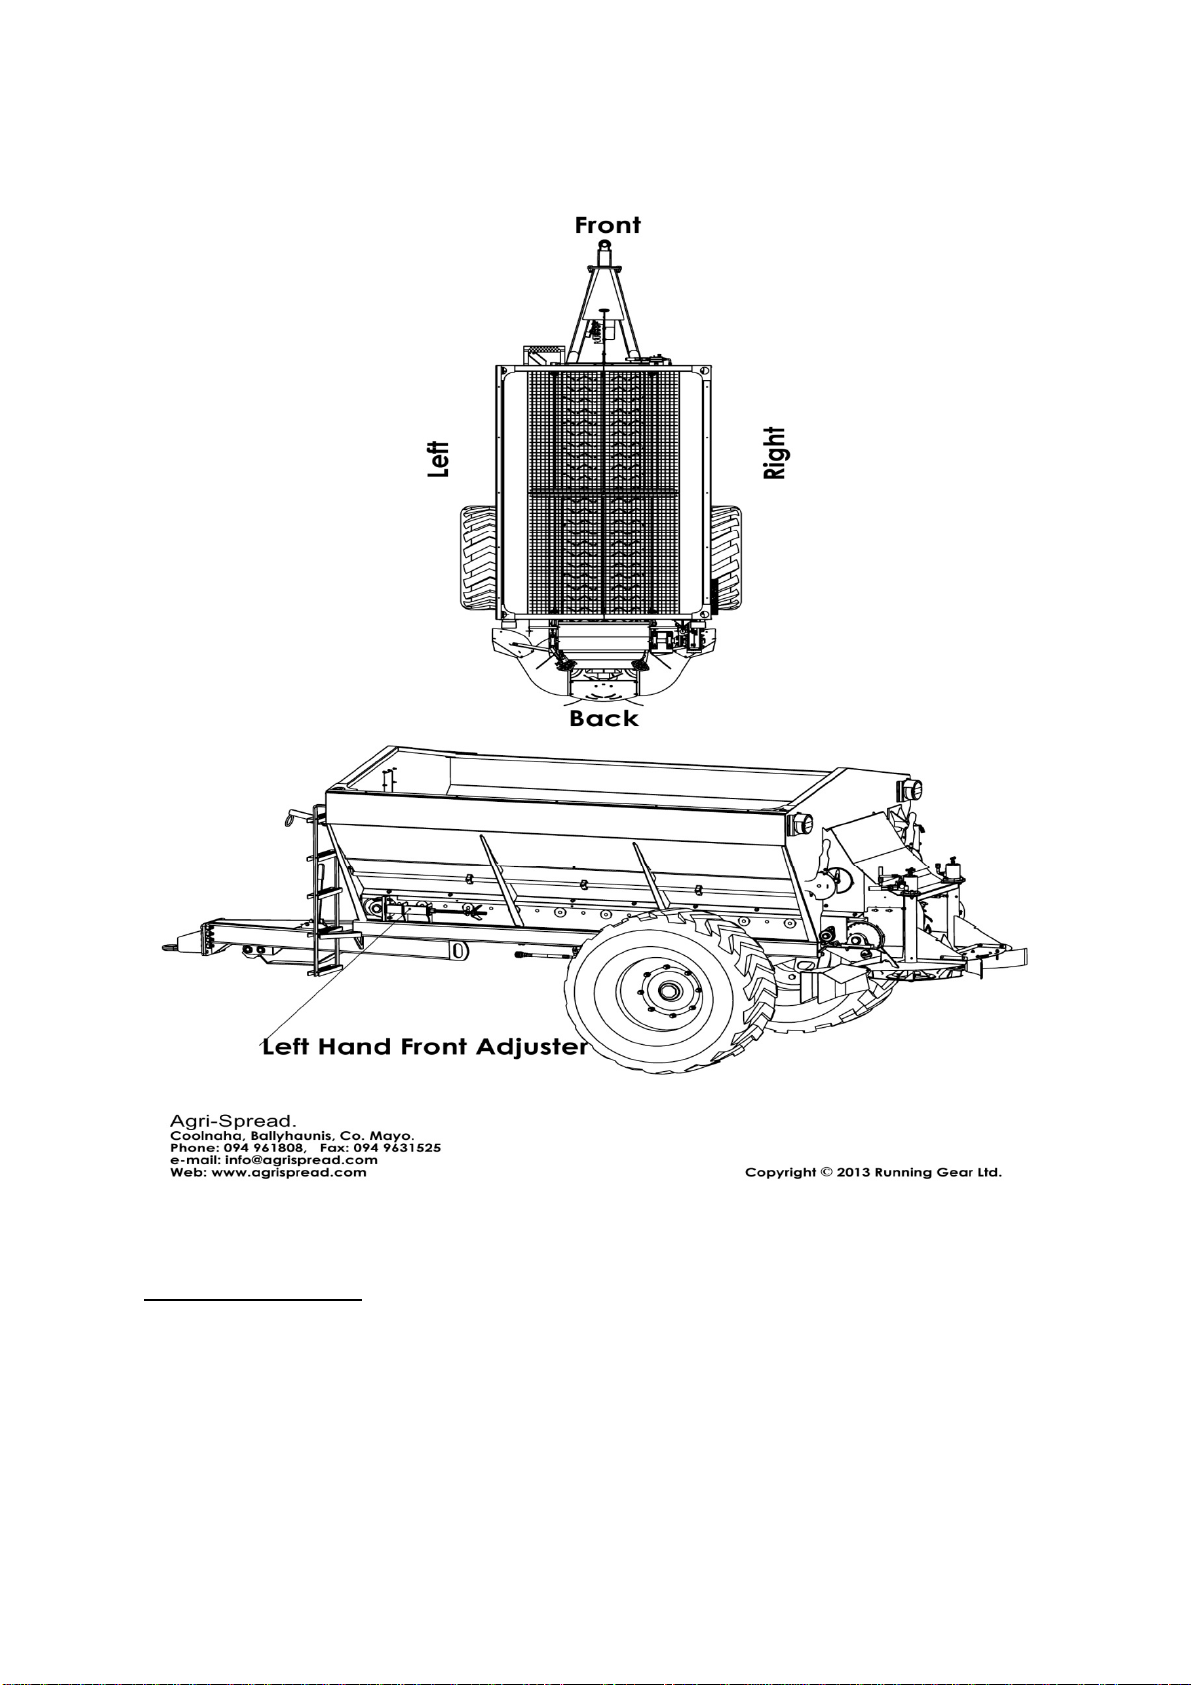
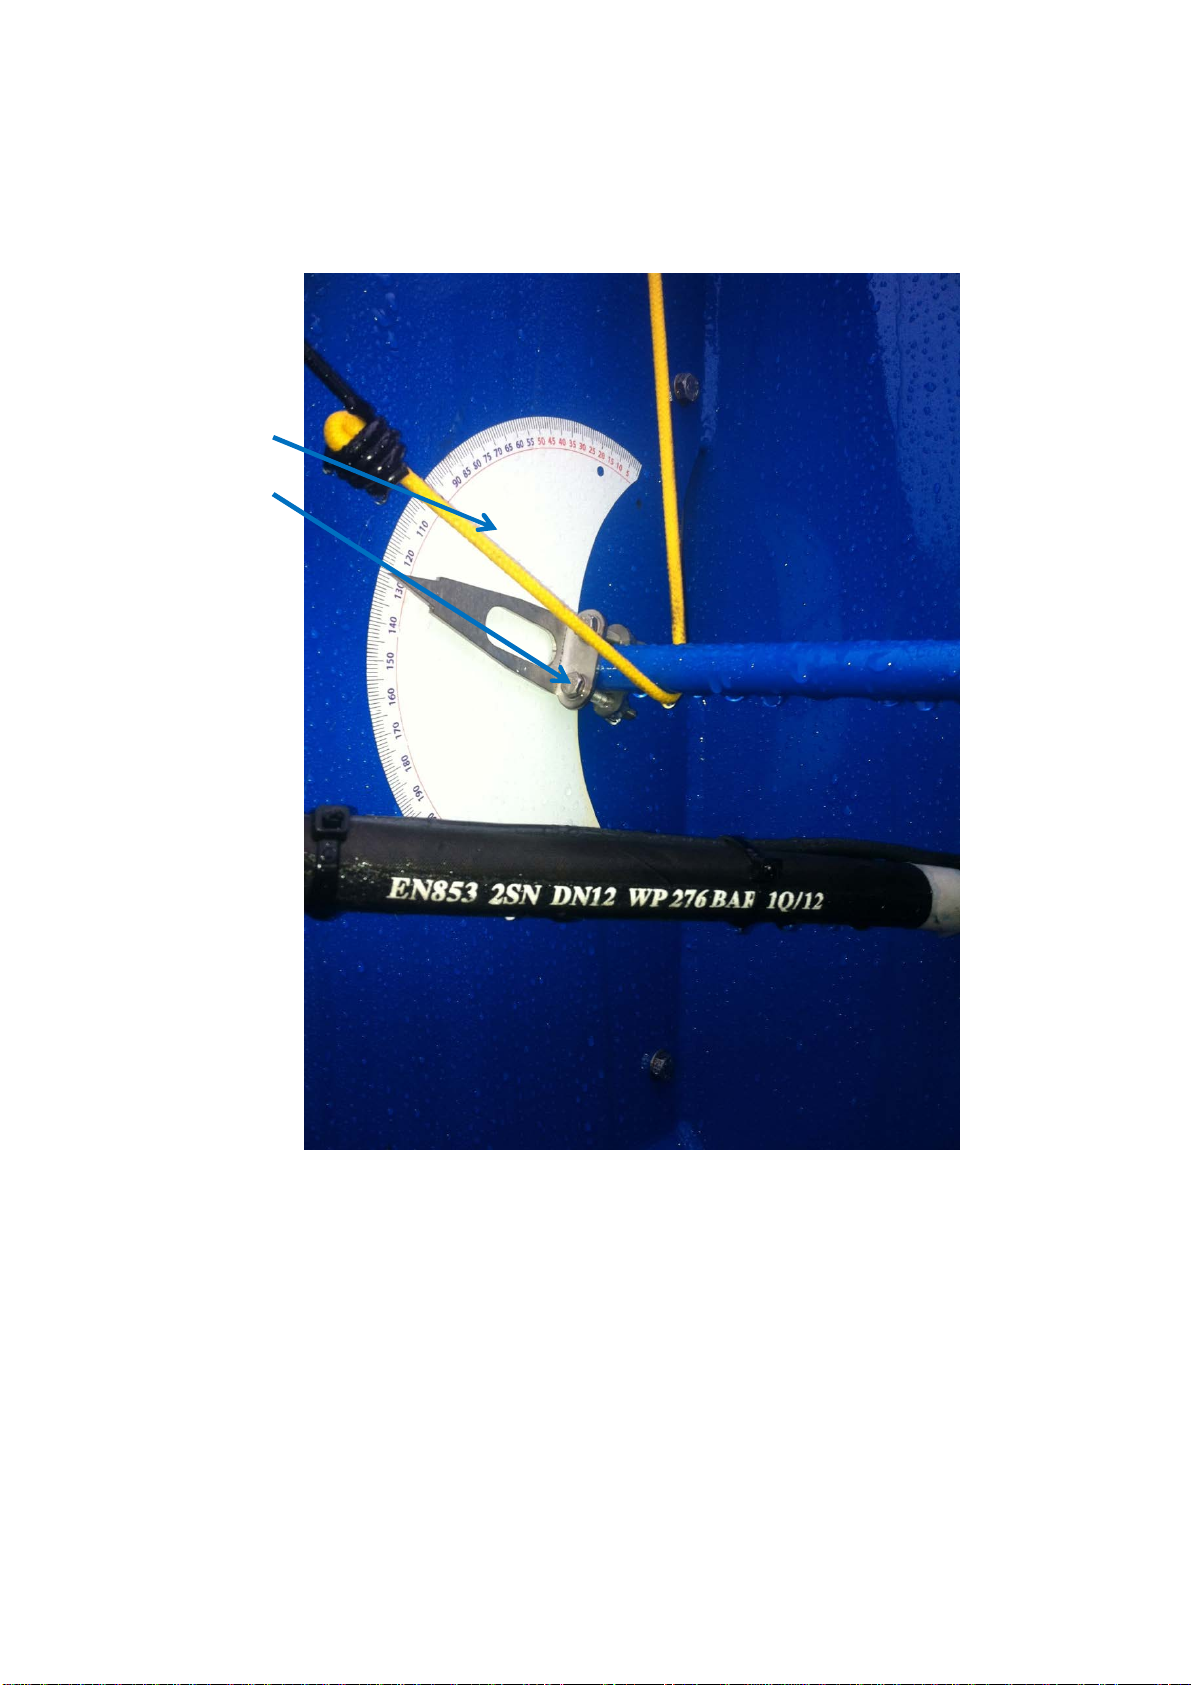
Left Hand Front Adjuster:
Using a 30 mm spanner, unlock nut “A”. Turn Nut “B” in the downward direction as shown
by the red arrow. See above illustration for details. (Note: positioning of front roller may
differ for different models) Turn the worm drive for only one revolution then repeat the
process on other belt adjuster(Note: for right hand adjuster nut B should be tightened in
upward direction . Repeat this process until belt is sufficiently tight. Location of Front
adjuster is shown in Figure 4: Location of Front Adjuster .
Nut “A”
Nut “B”
©Copyright Agrispread September 2014 11
830 Belt Spreader
Figure 4: Location of Front Adjuster
Belt Alignment:
If the belt drifts to this side of the spreader (left hand side), the left hand adjuster only should
be tensioned 1/8 of a turn at a time. After each turn run the belt for 3 minutes. If the belt
continues to drift to this side repeat the process. Adjust evenly so that the belt does not slip
under full loads
Repeat the process for the right hand adjuster.

12 ©Copyright Agrispread September 2014
830 Belt Spreader
Belt Care
Keep the rear stripper bar clean to prevent build up as this will cause premature belt wear and
alter the spread pattern. Remove material build up from behind and under skirting for the
same reason.
End of Season
Slacken the belt before storage. Free up bed rollers before commencing new season
operation.
Check all nylon nuts (item 1) and roller end bushings(item 2) to ensure they are tight

©Copyright Agrispread September 2014 13
830 Belt Spreader
Check couplings (item 4) and coupling insert (item 5) to ensure it is in good
condition.
Ensure both side skirts (item 6) are in good condition, free of holes and damage, if
side skirts are damaged replace immediately as failure to do so is likely cause further
damage.
14 ©Copyright Agrispread September 2014
830 Belt Spreader
Check calibration sticker is legible and still functioning correctly (e.g. when door is
fully closed door pointer should be at zero, when at 50mm it should be opened 50mm
etc. ).To recalibrate close door fully loosen door pointer nuts ,set pointer to zero and
retighten door pointer nuts.
Calibration sticker
Door pointer nuts

©Copyright Agrispread September 2014 15
830 Belt Spreader
Maintenance of Bearings
All bearings should be greased regularly. Each bearing has a grease nipple attached. The
locations of bearings are shown in Figure 5 below. (Warning Machine should not be
operating while maintenance is being carried out).All bearings are marked with “grease
“Label.
Figure 5: Belt Bearing Locations

16 ©Copyright Agrispread September 2014
830 Belt Spreader
Each Spinner has a grease nipple for the purpose of lubrication. Spinners should be greased
before each use.
Figure 6 : Location of spinner grease nipples
©Copyright Agrispread September 2014 17
830 Belt Spreader
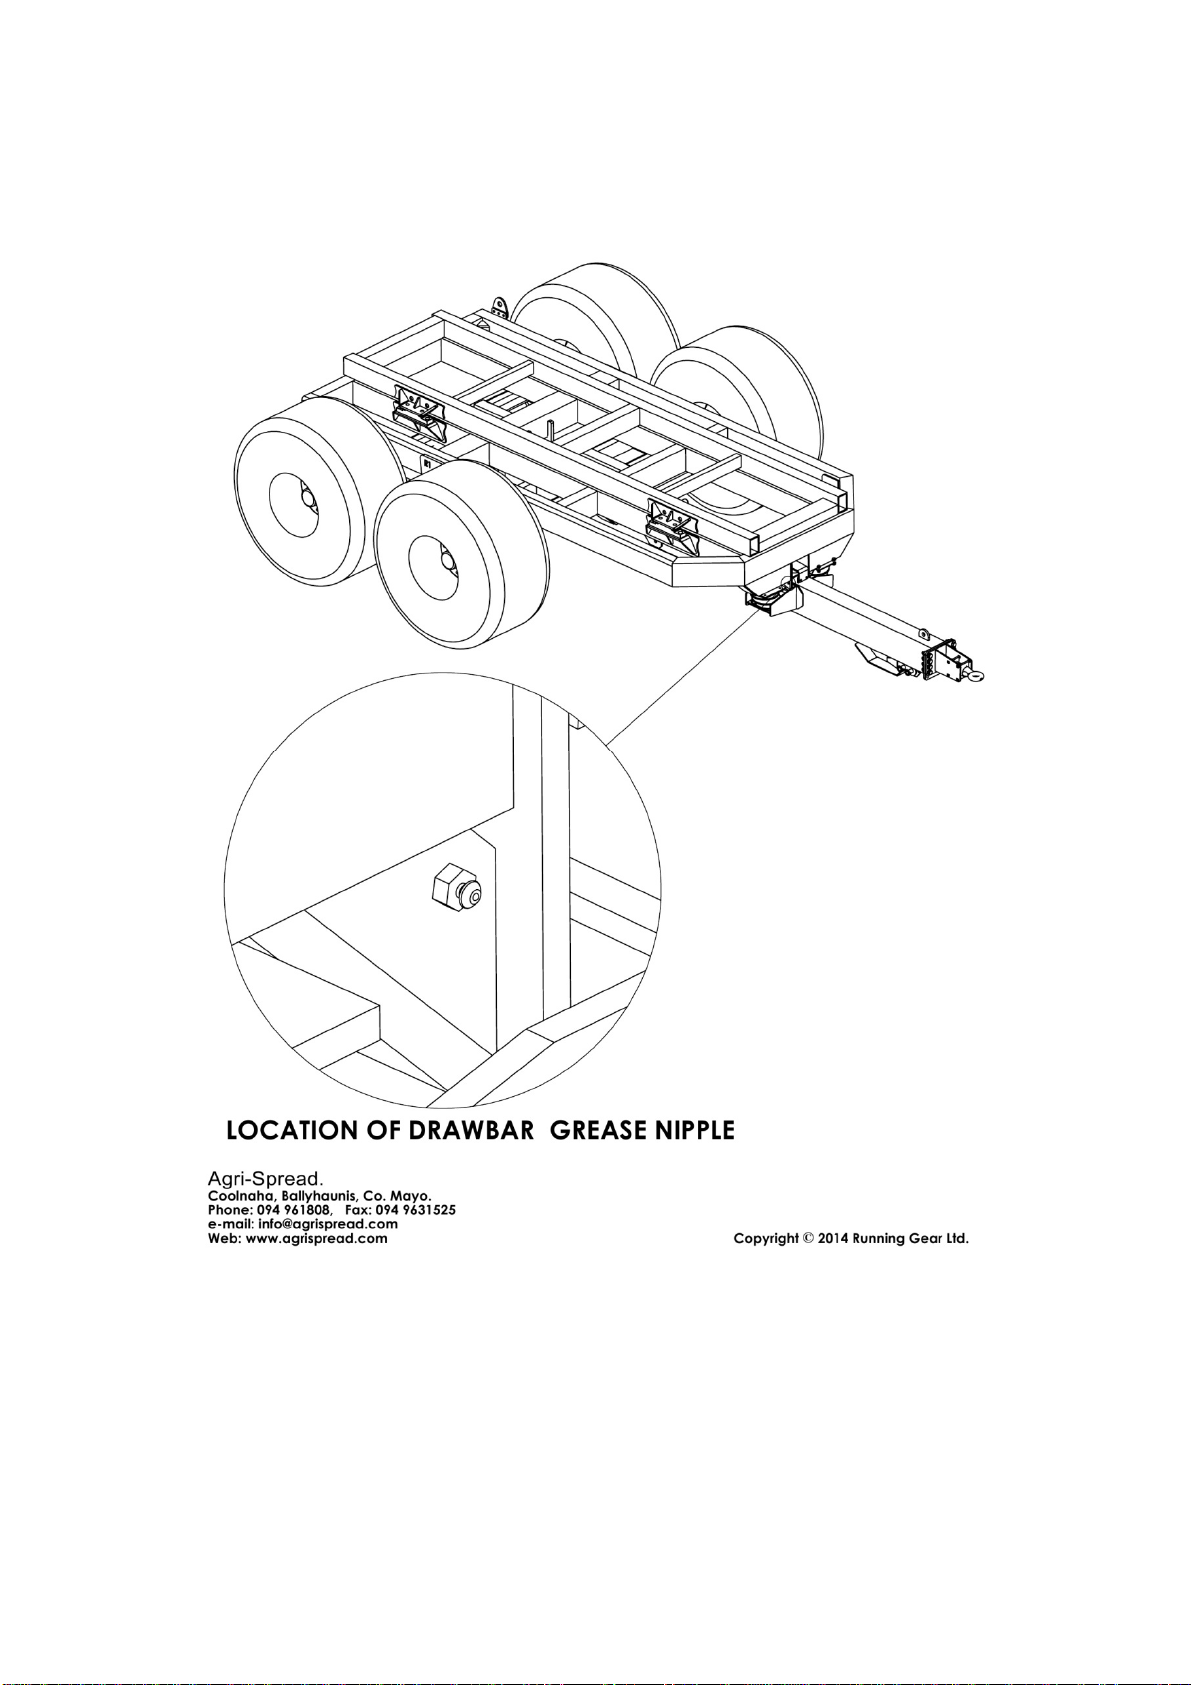
The drawbar should be checked to ensure that chassis is free from corrosion and cracks. The
drawbar should be greased after every use via the grease nipple shown in diagram below.
18 ©Copyright Agrispread September 2014
830 Belt Spreader
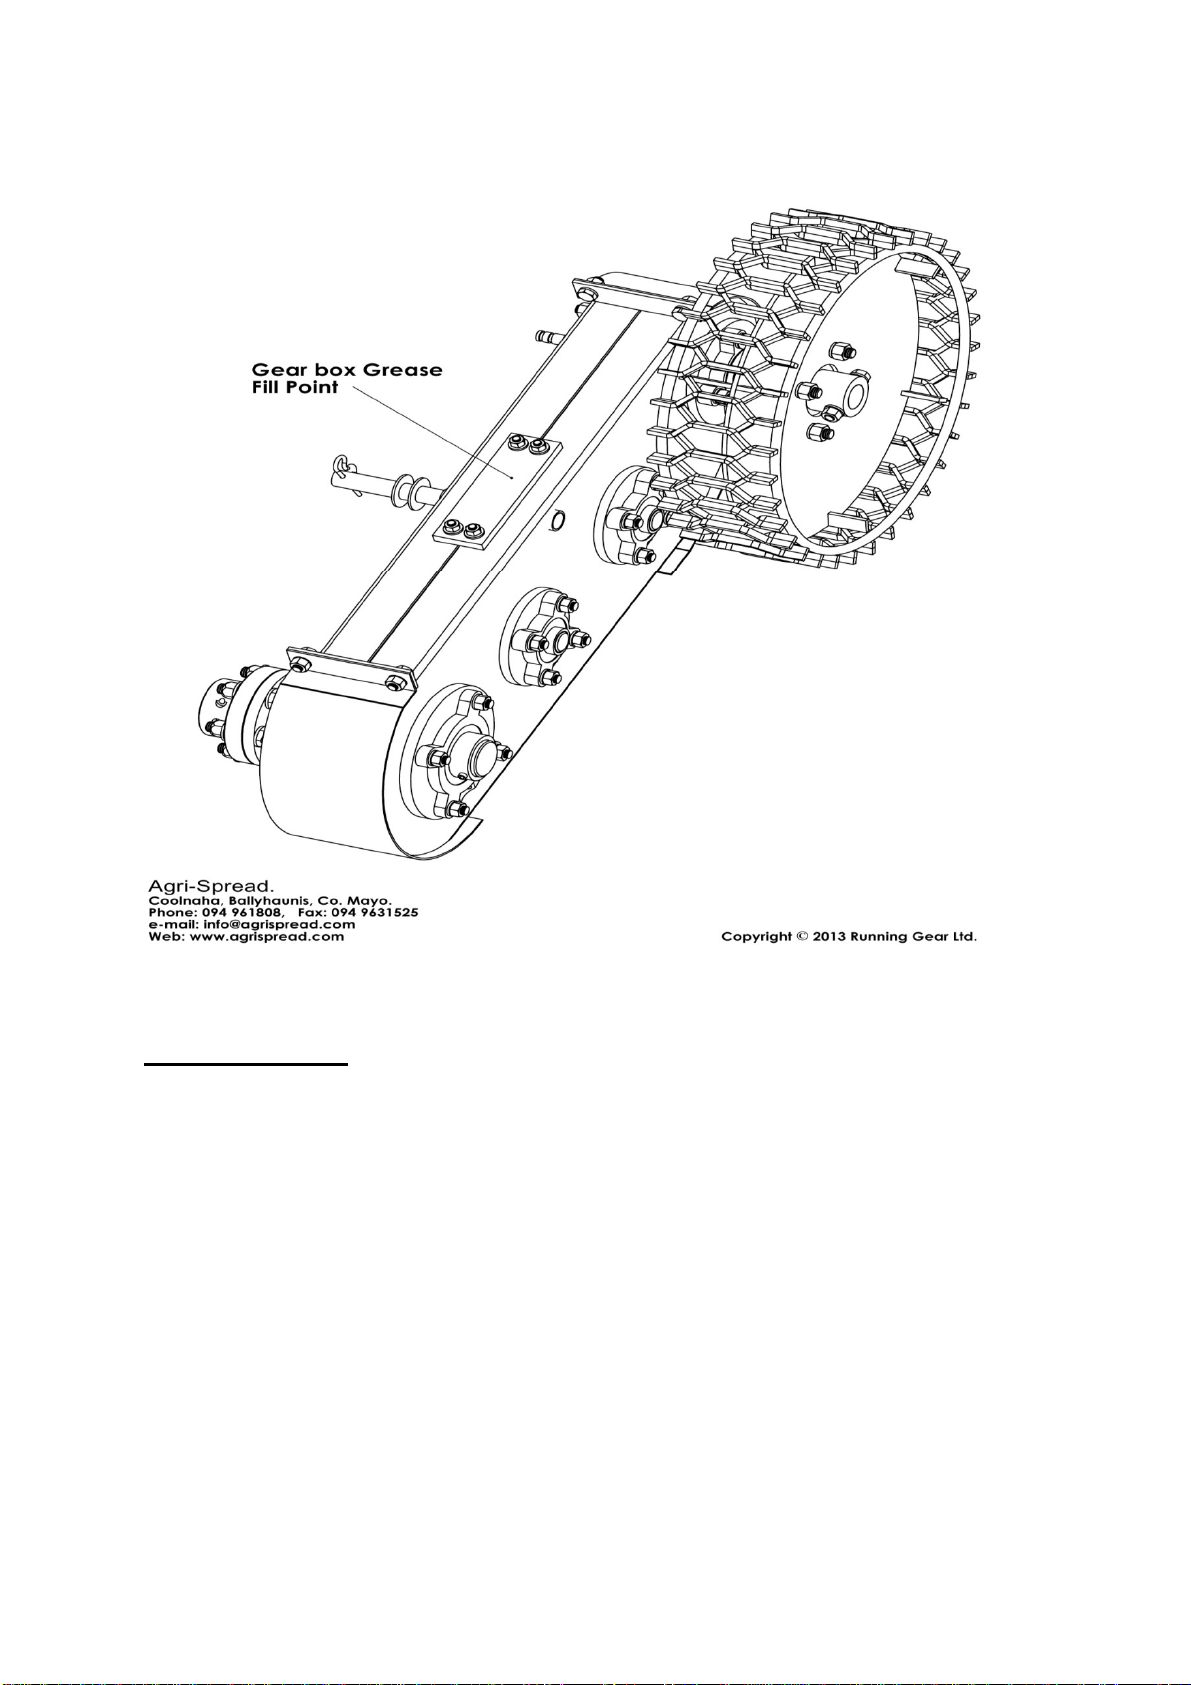
Maintenance of Land driven Gearbox
Grease details:
Recommended Oil: 80 W 90, 1 part oil
Recommended Grease: Lithium Complex Grease. 6 part Grease
Gearbox should be checked for grease regularly. Gearbox does not need to be emptied out,
just top up when necessary
There are 8 grease nipples on the gear box these should be greased regularly
This manual suits for next models
5
Table of contents
Other Agri-Spread Spreader manuals


