Aike AK1205 User manual

Automatic Soap Dispenser 丨 AK1205
Liquid Adjustment
Key
Cap
Indicator
Sealing Cap
Fixed Bracket Liquid Button
1. Insert the key into the lock to
open the top cover after install
the battery
2. Open the sealing cap and pour the
liquid soap, remove the extra over 3. Put your hand under the sensor
until the liquid sprayed out
WARNING
Children should be used under adult supervision to prevent accidentally eating!
c
The unit has bee u .
CAUTION
At thestandby status, youcan adjust liquid by pressing the liquid adjustment button.
The default liqui crease around 0.5ml output for
per press. Totall o
may have a slight deviation.
Indicator
Liquid adjustment button
Problem Potential Solution
Reason
LED indicator o Control system trouble
m
Batteries r
Circuits problem or poor contact
Block sight of indicator
r
g
Out of sensingdistance
Unit fault
Short liquid supply time
Too viscous liquid
Liquid coagulation or obstruction
h
Indicator on
d
supply
liquid
supply
Tips: Please prevent debris fromentering the container to avoid blocking.
Replace the controller
Checkthe Circuitsand batteries
Re-install or replac e the batteries
Checkthe Circuits
Clean the indicator
Replace the batteries
Remove the sensing object
Contactthe the dealer
Adjust the liquid output
Reduce liquid viscosity
Try some times or contactthe dealer
Model
Volume
Dimension
Net Weight
Pr
Sensing Distance
Liquid Supply
Temperature
5 step adjustment
After installing the batteries, t s in the standby state.
The unit is suggested to install batteries even if you don't use it, sothat the unit can automatically
run once per 72 hours in the standby status to avoid the catheter pressure adhesion.
Some of unit had installed batteries and in dormant status before delivery.Keep press setting
buttons for more turning into standby status.
Whereasif the unit turn to dormant status after keeping press the setting button,you can also
re-installation batteriesto turn the unit to standby status directly.
USER MANUAL
Using Your AK1205
1. The unit includes electronic devices and solenoid valve, please do not knock.
2. Caution for connecting line hen disassembling the unit.
3. Please it using soft cloth th neutral detergent hen cleaning the
product. Next detergent and dirt by the ung-out soft cloth, then using
dried soft cloth to dry.
4. Please do not shing th tering or using some detergent h particle
such as scouring and laundry detergent, also do not using diluent,
detergent th high acid or Nylon brush to cleanthis product, lest to damage
surface or erode internal electronic components, especially be careful not to
damage transparent cover hich placed induc to avoid decrease the
ctiveness of reaction. Tips: Ensure the distance bet sensing
and counter top is above 35cm When installing on stainless steel counter top.
Installation
CAUTION
Troubleshooting
Specification
Zhejiang AIKE Appliances Co.,Ltd.
Add: Yong'an Industry Zone, Taizhou, Zhejiang
E-mail: sales@zjaike.com
T
Website: m
AA Batteries

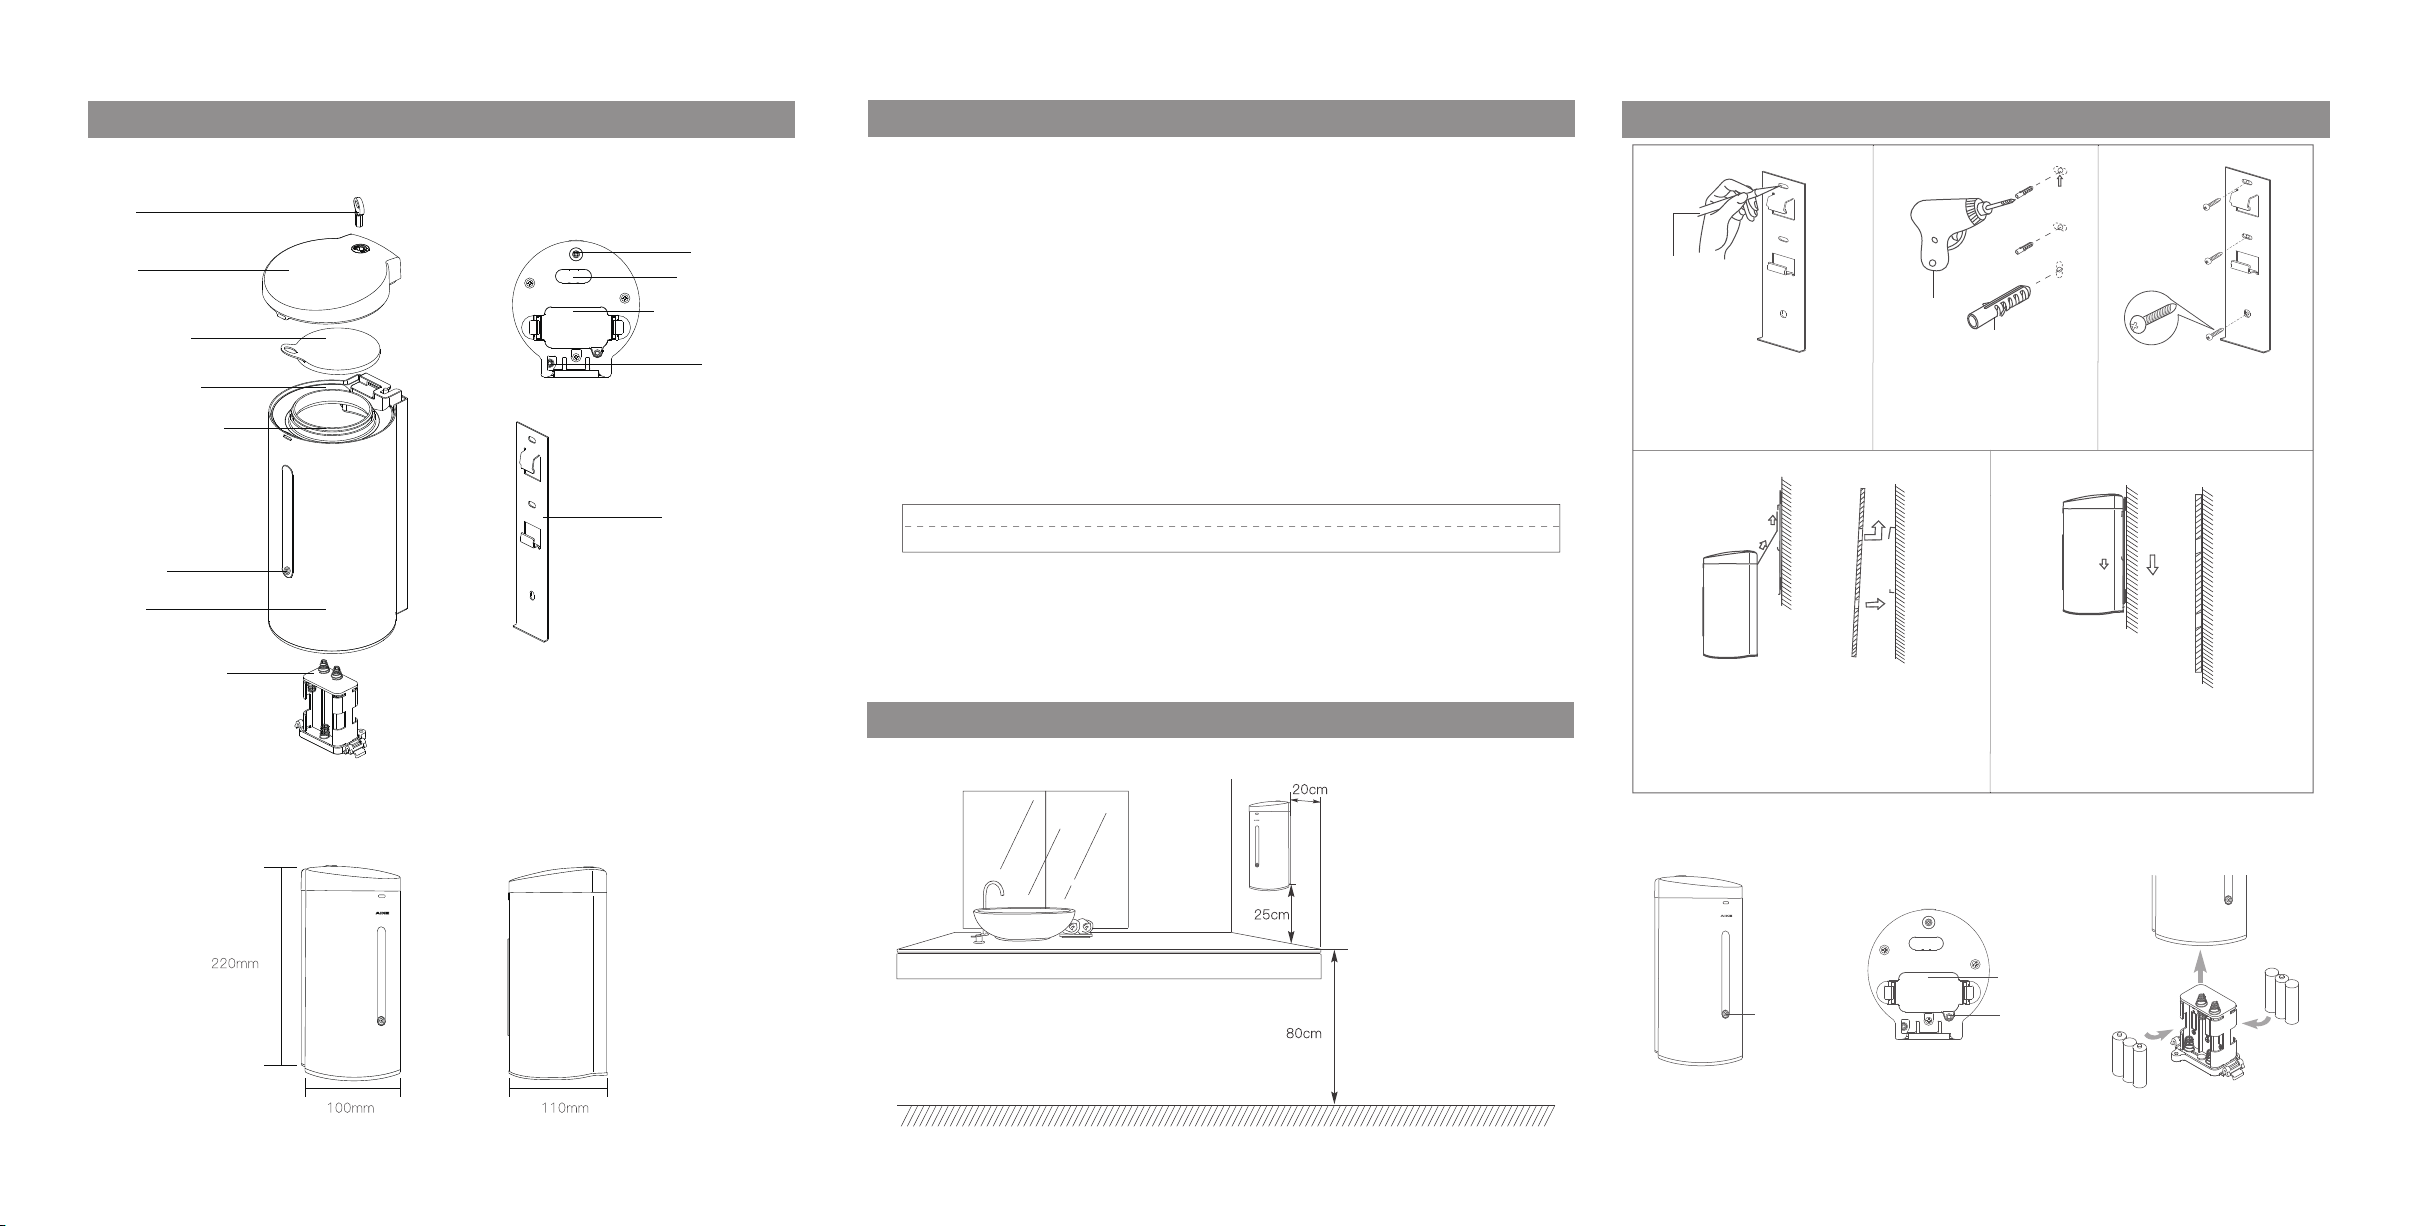
1.Attach mounting plate to the wall,
use pencil to mark the position of
installation three holes.
Tips: Ensure the distance
between sensing window and
counter top is above 35cm
When installing on stainless
steel counter top.
Floor
Note;Reference the product
Installation Panel
Liquid outlet
Bottom
Key
Cap
Sealing Cap
Fixed Bracket
Battery Container
Sensor window
Batteries container
Drain outlet
Indicator
Shell
Battery Container
Pencil
Drill
Expansion screw
2.Use a drill to bore three holes
(φ6) according to the marks, put
expansion screw head into the
corresponding holes.
3.Screws will be matched with
plastic nail – heads in the wall,
fix them together with mounting
plate.
4.Hook up unit with right direction and press,
make sure the unit is table by hooking up with
the mounting plate.
5.Push down slightly on the unit, then the unit
and the mounting plate hook up tightly.
Dimension
Installation
To make sure the unit dose work and extend its lifespan under the good condition, please
notice that:
1.Please read user manual and instructions very carefully before installing the unit.
2.Please using the same AA battery (6 pcs) of well – known brand. Old and new batteries can
not be mixed. If counterfeit or low-grade batteries are used, it may do harm to the unit
lifetime.
3. Please check the wall is flat or not and clean the surface of wall before installing the unit.
4.Distance (more than 25cm) will be needed from the bottom of unit to tables or other
objects.
5.The instructions of installing will be given to the user or manager by qualified person.
6.Reflective objects must not be put in the sensing distance under the unit.
7.Please do not cover with reflective objects (such as mirror or stainless steel) on the table
against the bottom of the unit, to avoid wrongly placed.
8.Indoor use only, to avoid wrongly placed.
UnitX1 Installation Panel X1
Expansion Screw X3
1.Please make sure if any items are missing or problems before installing, contact your dealer or
manufacturer.
2.Specification of part items changed might be not informed in time, please contact your dealer or
manufacturer when problems can not be solved during installing.
3.Main objects are sealed by special bag. Do not hit or drag too heavy when you move or open the
bags.
Certification X1 Key X1
ST4X25 Screw X3 Installation Manual X1
Packing list
Important Safety Instruction Installation
Introduction
Battery Installing and Replacement
Indicator
Battery Container
Screw
1. Keep the body straight up
when the LED light is flashing
2. Unscrew the screws and pick
out the battery container
3. Put in or replace all standard batteries
{DC 9V/AA batteries (6 Pcs)}. Put it back
and tighten the screws.
Other Aike Dispenser manuals
Popular Dispenser manuals by other brands

Kimberly-Clark
Kimberly-Clark Suretouch installation instructions

Vectair
Vectair Airoma quick start guide

KWC
KWC RODAN RODX672 Installation and operating instructions

Idex
Idex Fast & Fluid X-SMART Technical note

SaniServ
SaniServ DF200 Operation manual

Mityvac
Mityvac MV6400 User and maintenance instructions