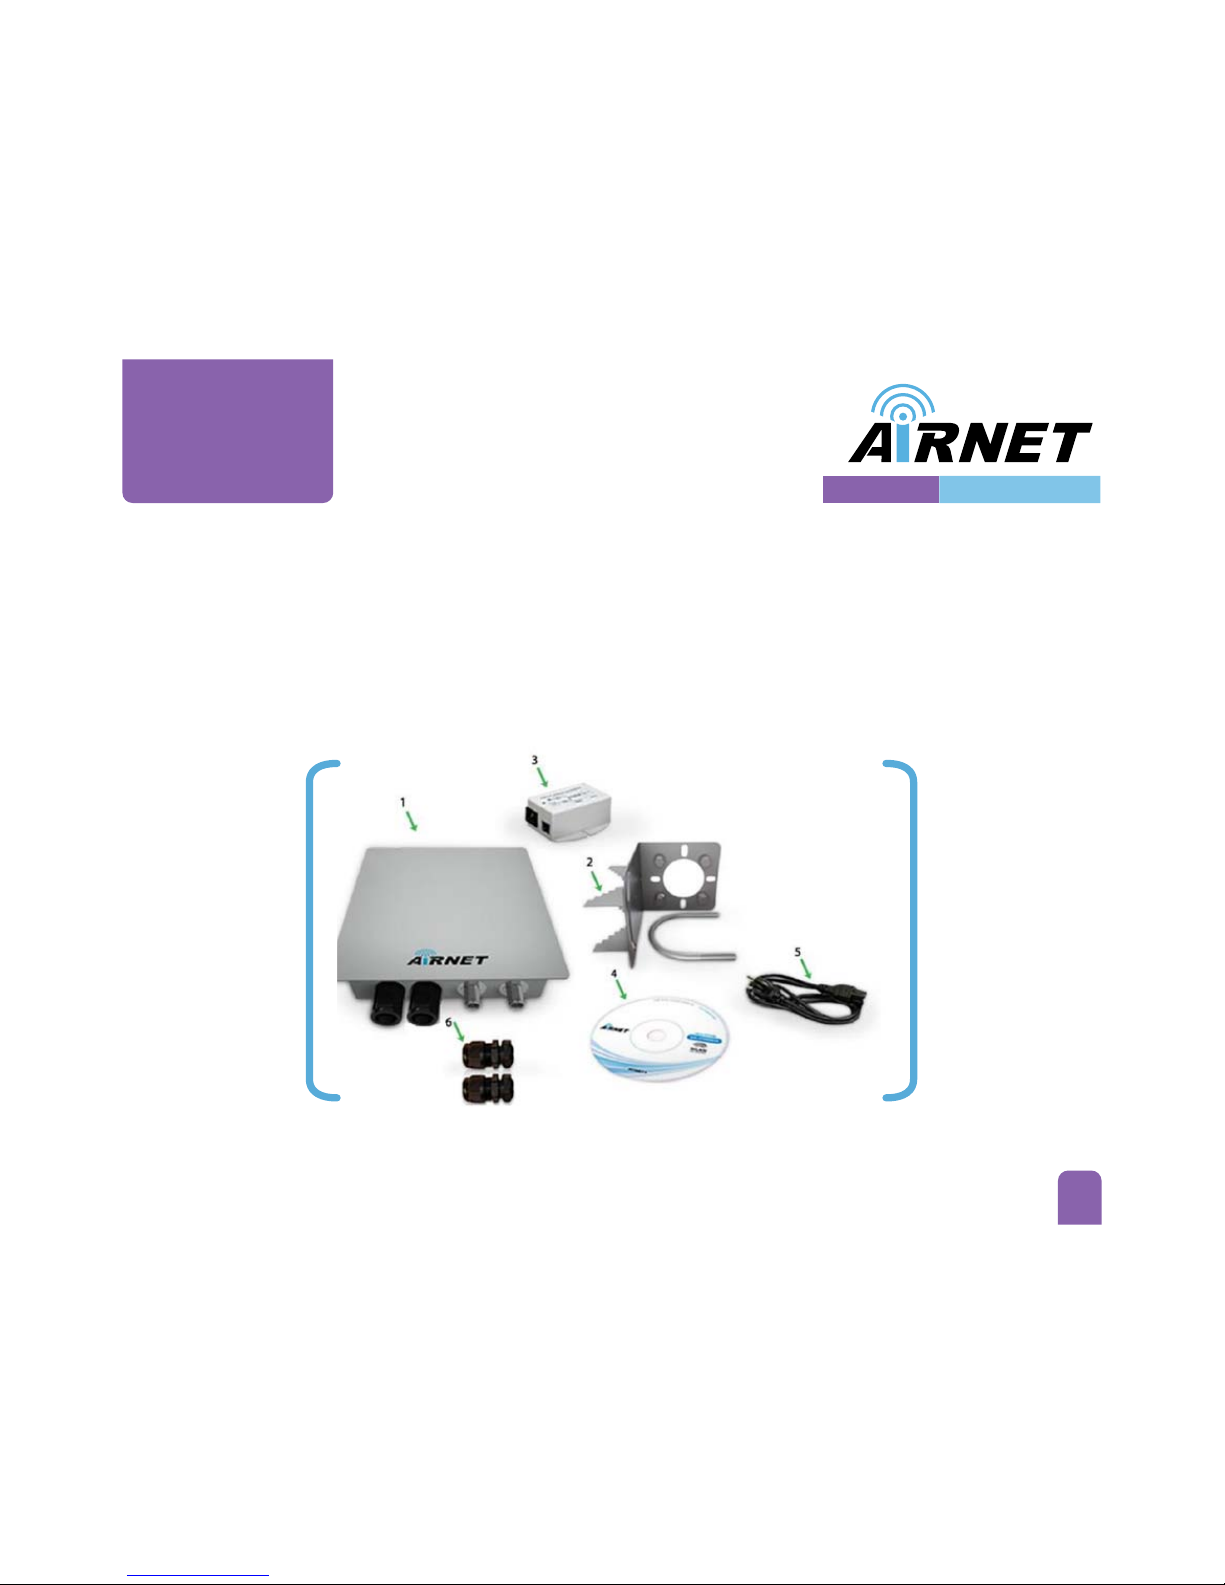
airnet AIR-BR1000AGN User manual

Quick Installaon Guide
Package Contents:
Airnet Outdoor Access Point
Mounng Bracket (Include: 2 Mounng
Brackets and 4 screw nuts)
PoE Injector
Power Cable
RJ45 Waterproof Connector System
CD-ROM
300 Mbps GIGA1000 SERIES
AIRNET GIGA MIMO 300 Mbps AP/Bridge Single Radio Series
AIR-BR1000AGN - AIR-BR1000GNH - AIR-BR1000ANH

Warnings
Hardware
Installaon
1
Quick
Installaon
Guide
Do not work on the system or connect or disconnect cables during periods of lightning acvity.
NETKROM shall not be liable for incidental or consequenal damages resulng from the furnishing, performance, or use of
this manual.
Do not locate the antenna near overhead power lines or other electric light or power circuits, or where it can come into
contact with such circuits. When installing the antenna, take extreme care not to come into contact with such circuits, as they
may cause serious injury or death.
Only trained and qualified personnel should be allowed to install, replace, or service this equipment.
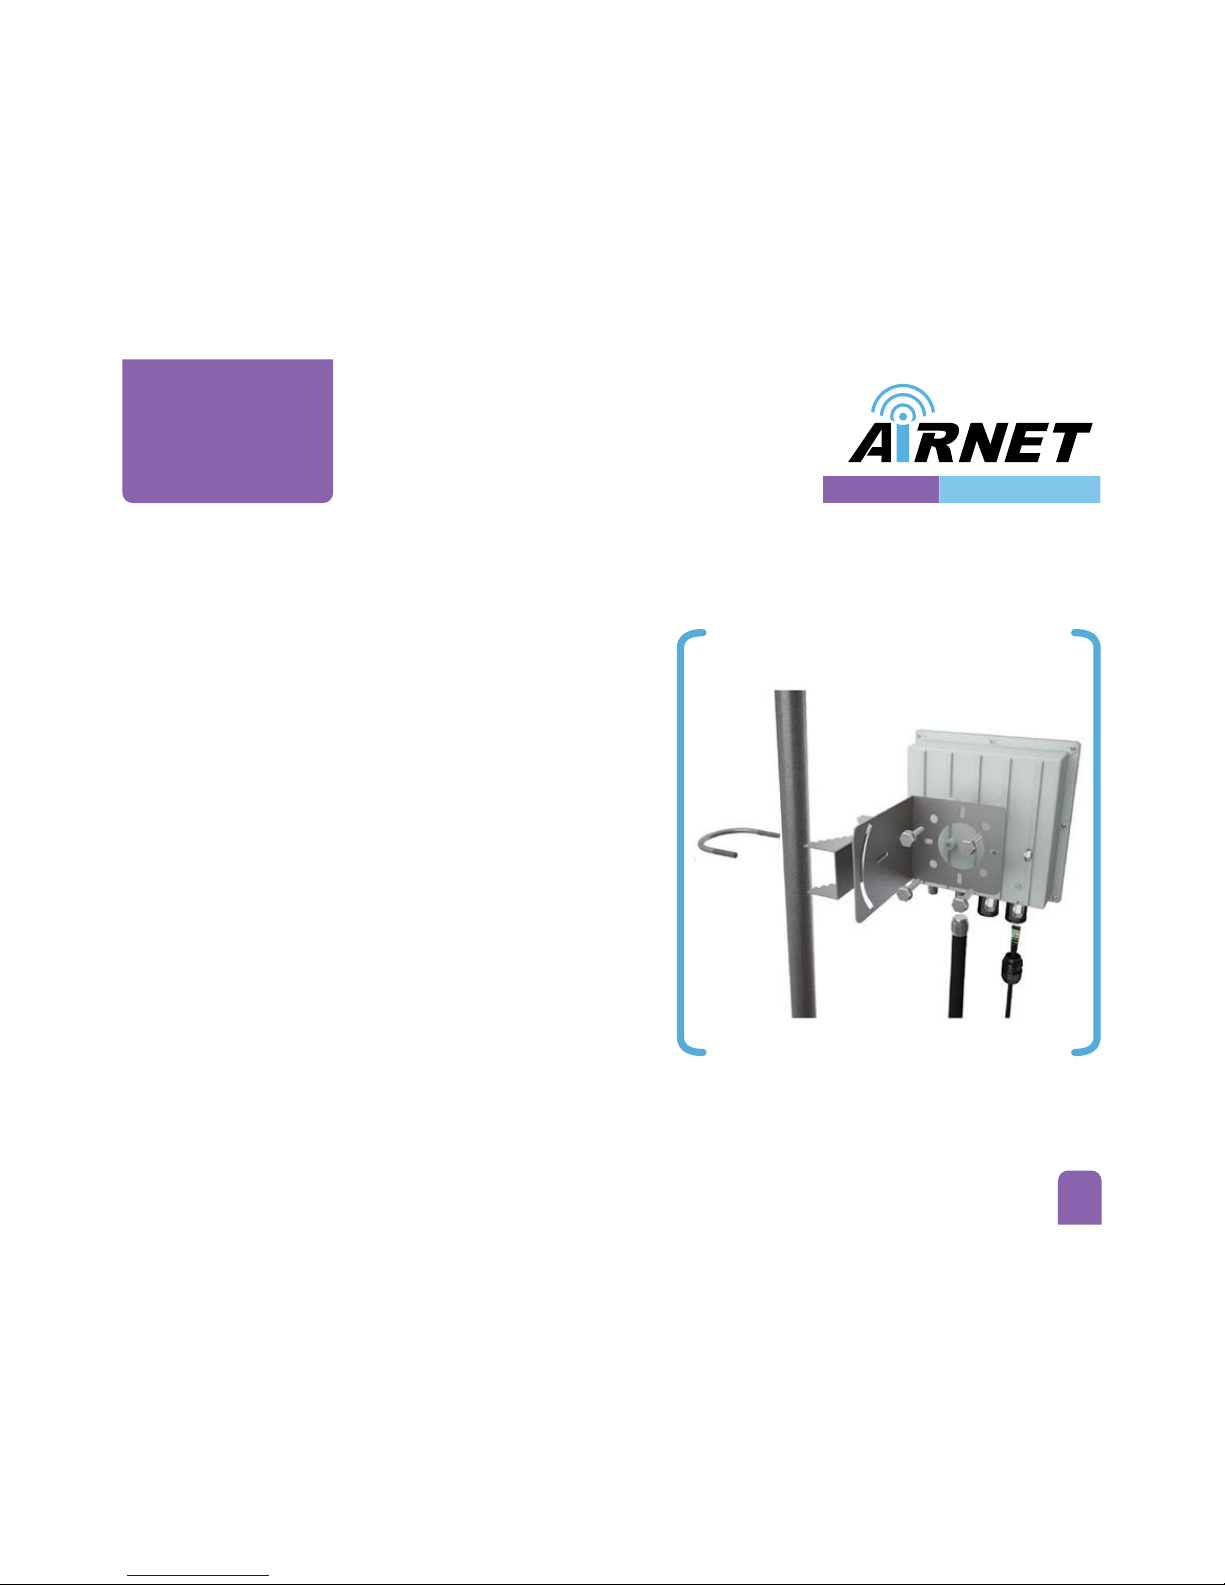
To meet regulatory restricons, the radio and the external antenna must be professionally installed. The network
administrator or other IT professional responsible for installing and configuring the unit must be a suitable professional
installer. Following installaon, access to the unit should be password protected by the network administrator to maintain
regulatory compliance.
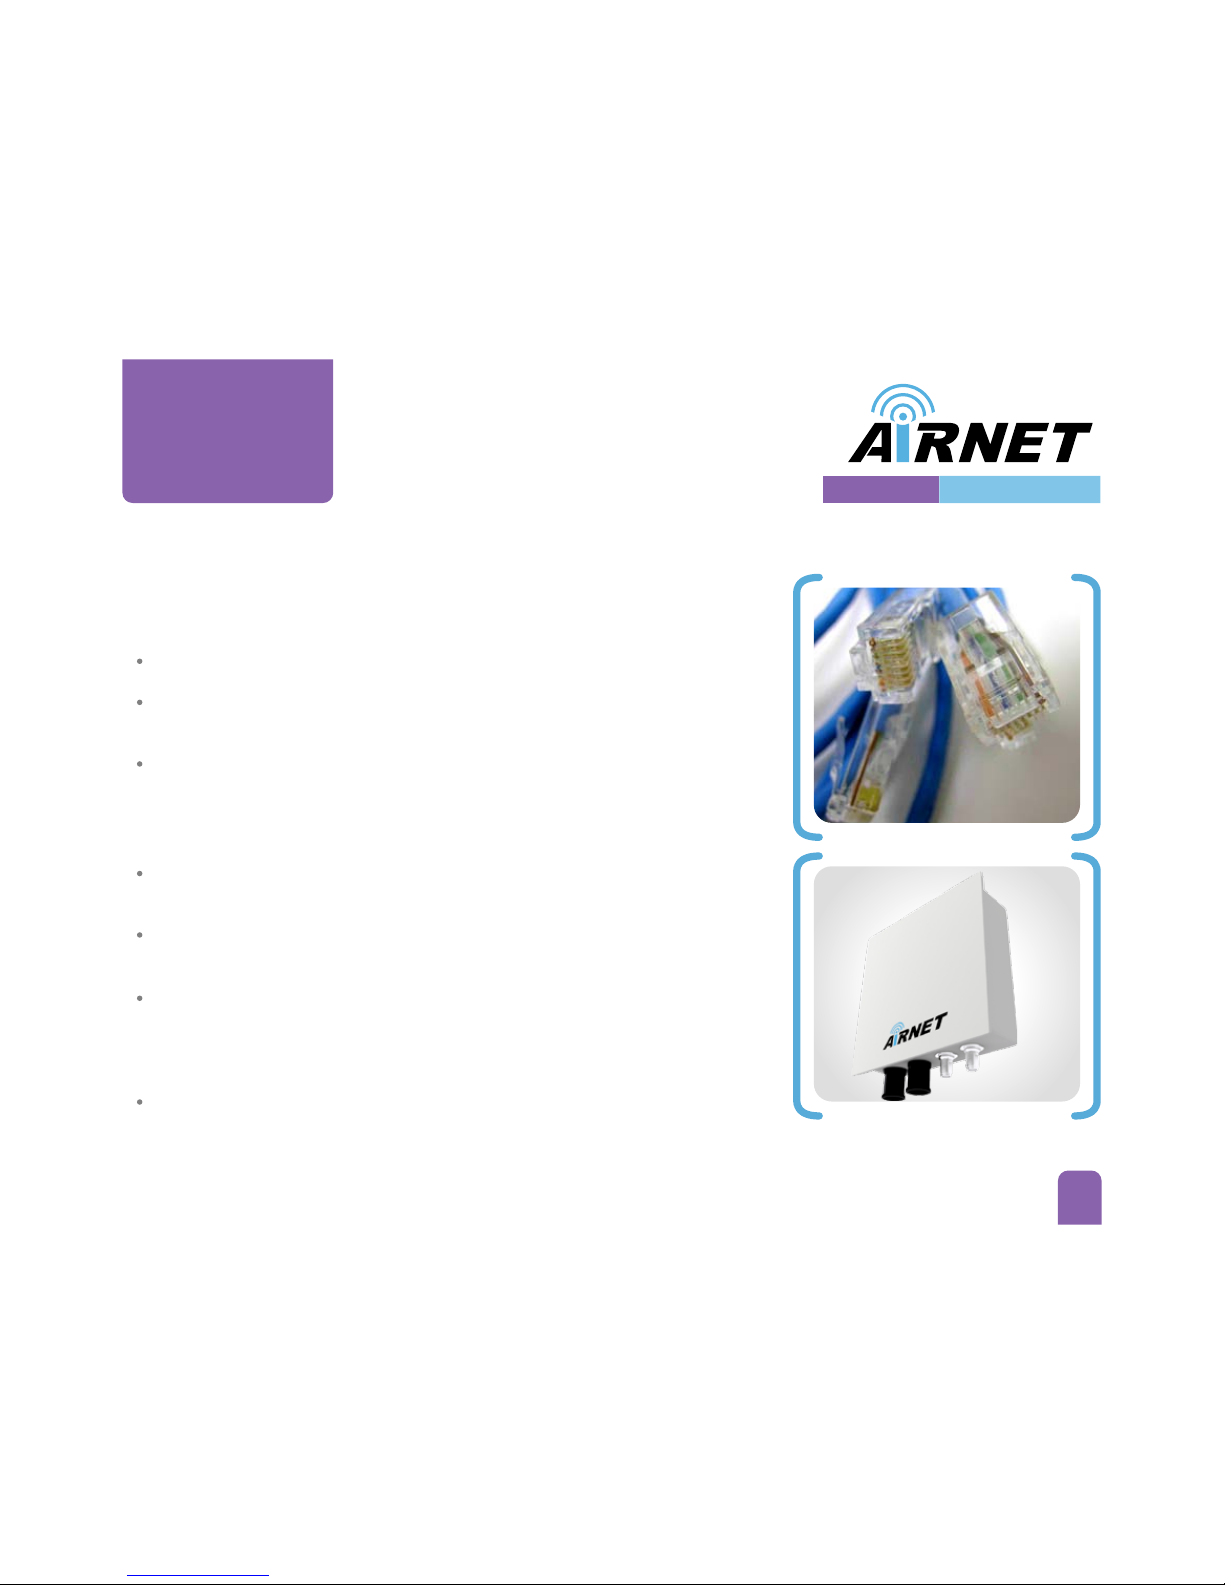
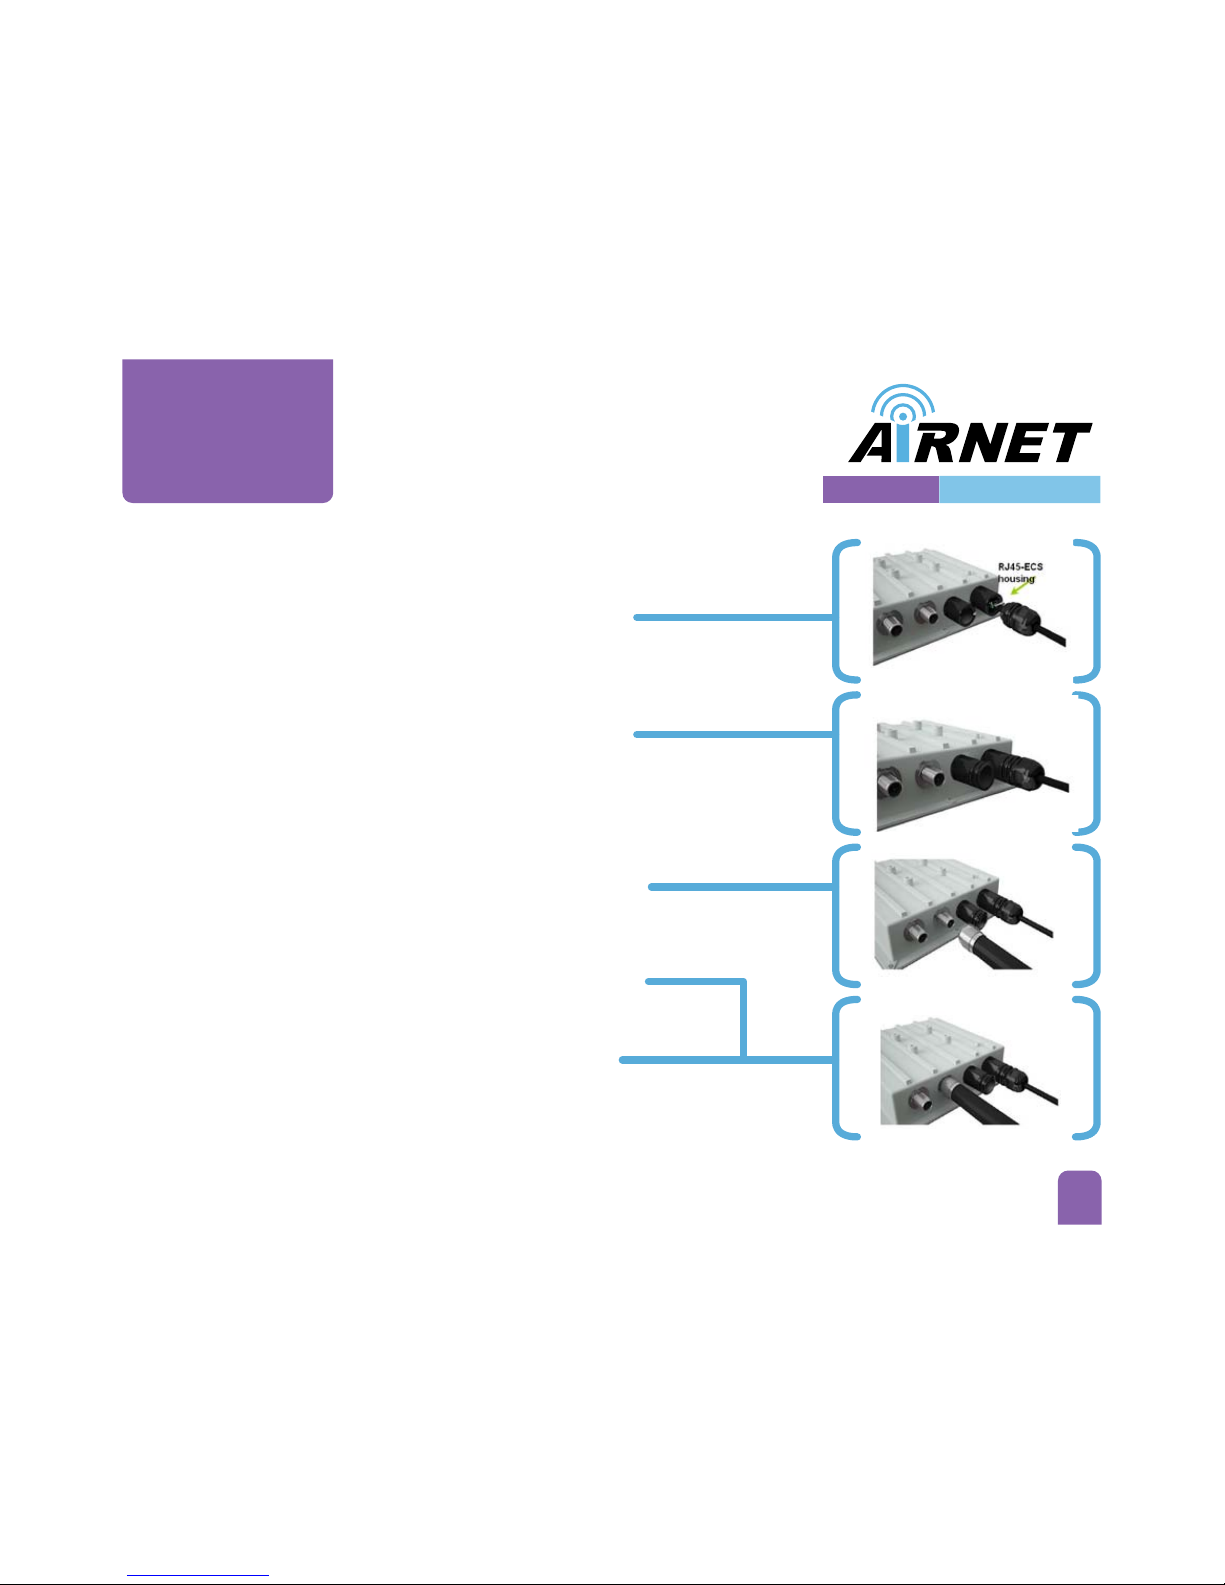
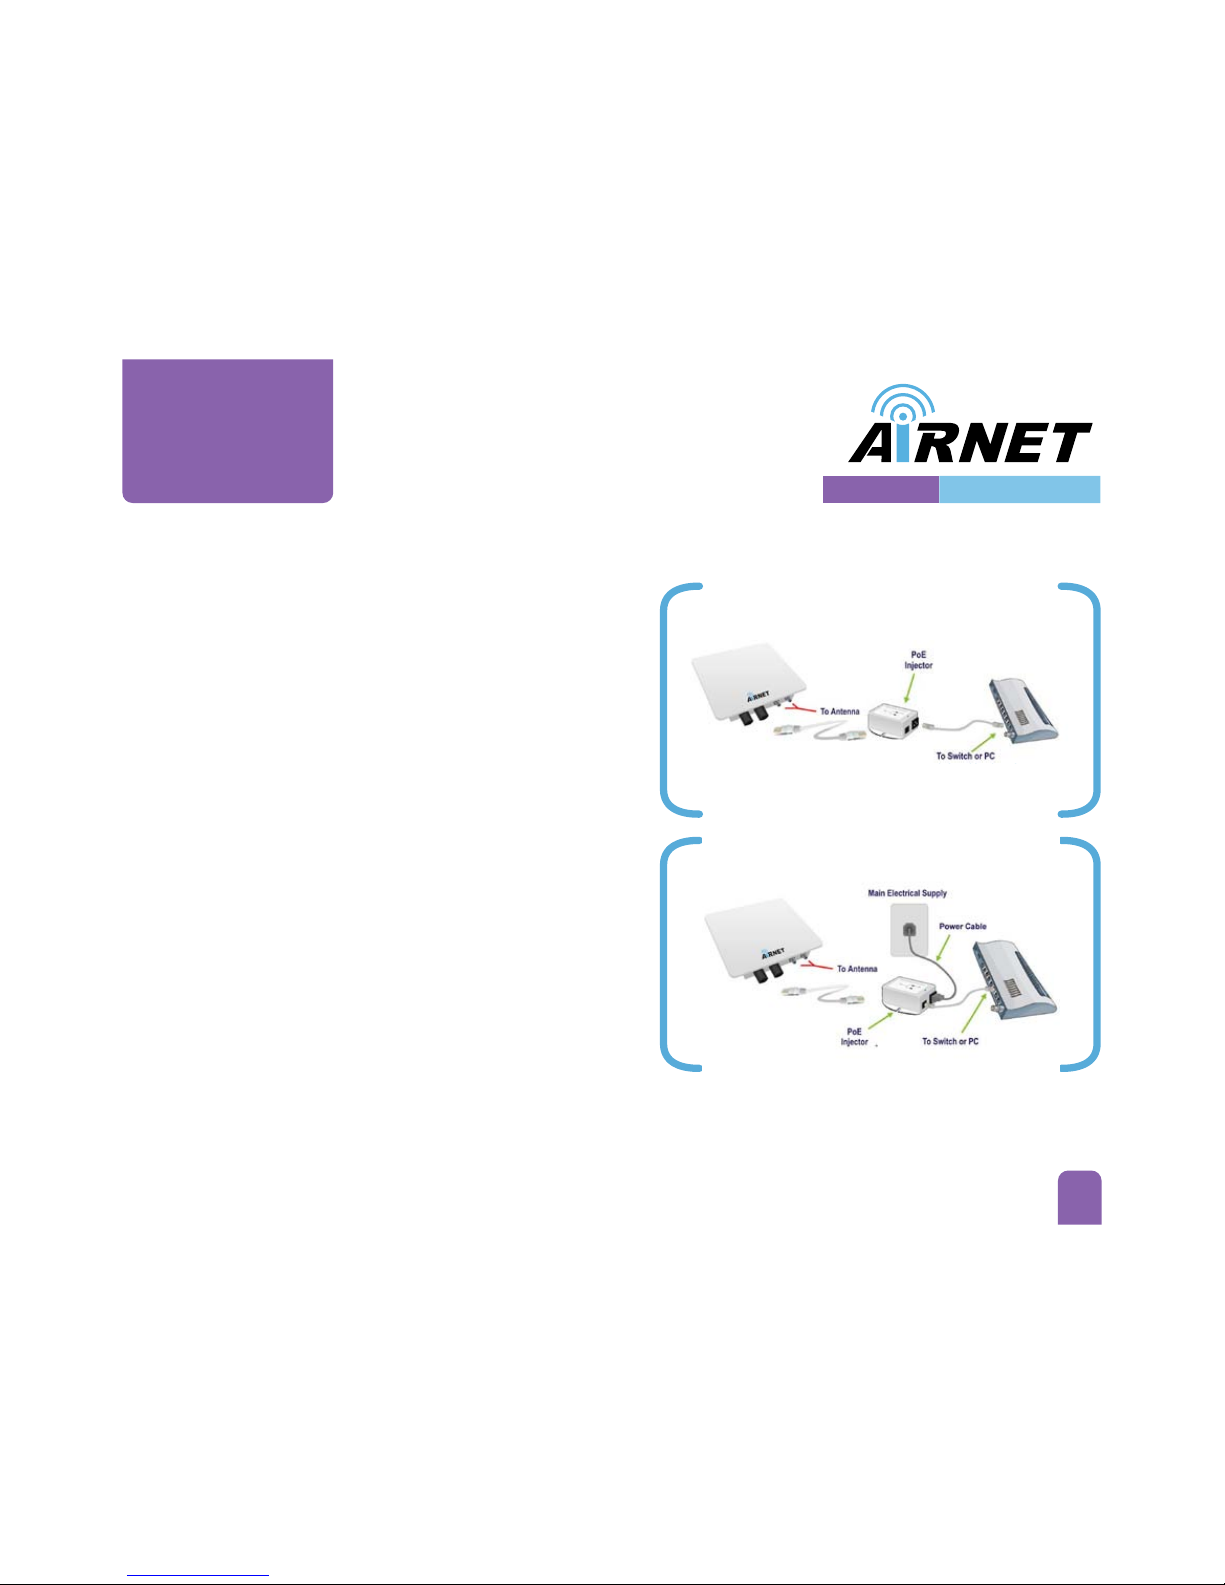
The Airnet outdoor access point and PoE injector can be damaged by incorrect power applicaon. Read and carefully follow
the installaon instrucons before connecng the system to its power source.
2
High Capacity Wireless Networks www.netkrom.com
300 Mbps GIGA1000 SERIES

Package contents
Hardware
Installaon
1
Quick
Installaon
Guide
Take a moment to ensure you have all of the following parts in your Outdoor Waterproof Unit installaon kit before you begin
installing the product. If any parts are missing, please contact your local vendor or contact us, please see the contact
informaon in Secon 6.
3
www.netkrom.comHigh Capacity Wireless Networks
300 Mbps GIGA1000 SERIES

Setup Requirements
Before starng, please verify that the following is available:
Hardware
Installaon
1
Quick
Installaon
Guide
CAT5/5e or FTP Outdoor Ethernet cable (from the Outdoor AP to PoE Injector)
At least one computer is installed with a Web browser and a wired or wireless
network interface adapter
TCP/IP protocol is installed and IP address parameters are properly configured
on all your network’s nodes
4
www.netkrom.com
Important!
Configure and verify the outdoor access point operaons first before you
mount the unit in a remote locaon.
You may need to install a lightning arrestor to protect your outdoor access
point from lightning.
For choosing the best locaon for your outdoor access point choose an
elevated locaon where trees, buildings and large steel structures will not
obstruct the antenna signals and which offers maximum line-of-sight
propagaon with the users.
Select an appropriate antenna to improve range and/or coverage. The access
point also lets you fine-tune parameters such as the transmit power to achieve
the best results.
High Capacity Wireless Networks
300 Mbps GIGA1000 SERIES

Outdoor AP Installaon
Step 1:
Hardware
Installaon
1
Quick
Installaon
Guide
Connect one end of your UTP or FTP Outdoor cat.5 Ethernet cable
with waterproof connector to the RJ-45 connector located in the
Outdoor Access Point. Then connect the other end of the cable to
the PoE injector.
For the Netkrom PoE, the recommended length of the Category 5
cable is up to 260 feet or 80 meters.
1. Remove the thin enclosure nut from the feedthru assembly.
This can be discarded. Loosen the compression nut completely.
5
www.netkrom.com
2. Insert the RJ45 connector thru the feedthru assembly.
3. Tighten the compression nut loosely to the feedthru assembly.
enclosure nut
feedthru
assembly
compression nut
High Capacity Wireless Networks
300 Mbps GIGA1000 SERIES

Hardware
Installaon
1
Quick
Installaon
Guide
6
www.netkrom.com
4. Screw the enre feedthru assembly into the RJ45- ECS housing
which is already mounted in the enclosure. There should be a
rubber gasket between the two assemblies. Tighten the
feedthru assembly to create a seal.
5. The final step is to ghten the compression nut unl the gaskets
are ght around the Cat5 cable. Always push the cable toward
the connector while ghtening to ensure good strain relief of
cable to connector.
Step 2:
Connect the external antenna to the N Female connector of the
Access Point.
Screw in the Coaxial cable connector correctly into the antenna
connector (N-Female) located on the Outdoor Access Point case.
Make sure the former line is properly done and cover the N
connectors with an insulang tape.
RJ-45 ECS Housing
High Capacity Wireless Networks
300 Mbps GIGA1000 SERIES

Hardware
Installaon
1
Quick
Installaon
Guide
7
www.netkrom.com
From the PoE injector connect one cat.5 Ethernet cable
to the radio and another cat.5 cable to a switch or PC.
Connect the power cable supplied in the Netkrom PoE kit
to the main electrical supply and the power plug into the
socket of the injector. Now, turn on your power supply.
Noce that the POWER LED has lighted up. This indicates
that the access point is receiving power through the
Netkrom PoE Injector and that connecon between your
access point and your network has been established.
Note Please use the PoE injector provided in the package.
Using a PoE with a different voltage rang will damage
this product.
Step 3:
Poe Injector
Poe Injector
To Antena
To Antena
To Switch or Pc
To Switch or Pc
Power Cable
High Capacity Wireless Networks
300 Mbps GIGA1000 SERIES

8
www.netkrom.com
Mounng Outdoor AP
Outdoor Access Point device can be mounted on the pole or tower as
shown in following:
1. Mount the bracket to the pole.
2. Aach the radio to the bracket which was mounted on the pole
with the supplied nuts and 4 screws.
Hardware
Installaon
1
Quick
Installaon
Guide
High Capacity Wireless Networks
300 Mbps GIGA1000 SERIES

9
www.netkrom.com
uConfig
Ulity2
Quick
Installaon
Guide
Using uConfig
When you execute the uConfig file you should see a window as it is
shown on the right side. Click yes to connue
The screen is divided into three secons. The top secon shows the
Ethernet adapter that is accessing the network device and the middle
poron shows the roung table associated with the Ethernet adapter.
In the lower window, a list of all uConfig compable devices on the
network is shown.
Highlight the device you desire to configure. Then click on the “Open
web” buon.
uConfig is a feature that provides the ability to directly access the
AIRNET AP/BR 600 without the need to know absolutely its IP
address. It may be run directly from the product CD or installed on
the user’s PC for later access.
High Capacity Wireless Networks
300 Mbps GIGA1000 SERIES

10
www.netkrom.com
Click the OK buon to connue
At the login prompt, enter the User name and Password.
The default are:
User name: admin
Password: password
Click on OK and start configuring the radio.
uConfig
Ulity2
Quick
Installaon
Guide
High Capacity Wireless Networks
300 Mbps GIGA1000 SERIES

11
www.netkrom.com
PC
Configuraon3
Quick
Installaon
Guide
If you don’t use the uConfig Ulity you need to establish Ethernet
connecon between your PC and the Outdoor AP, by default the
Outdoor AP has the IP address 192.168.168.1. Therefore, your PC
must be in the same network segment as the Outdoor AP is to get
Ethernet connecvity. The steps shown below are for Windows XP.
Step 1:
Go to Start buon, then go to My Network Places and
finally click on Network Connecons.
Right Click over your network adapter and select Properes.
Step 2:
Select the Internet Protocol Opon and then click in Properes.
Step 3:
Now configure the IP Address of your network adapter with an
IP in the same Network segment as your Outdoor AP is as it is
shown in the picture, you don’t need to assign any gateway
address.
Press OK and then press the Close buon.
High Capacity Wireless Networks
300 Mbps GIGA1000 SERIES

12
www.netkrom.com
Common
Configuraons4
Quick
Installaon
Guide
Find below typical and basic configuraons using the AP/BR 600. For
advanced features please refer to the user manual.
Geng Started
You can start configuring your AP/BR 600 using either your Web
Browser or the uConfig ulity
At the Address bar, enter hp://192.168.168.1 and press Enter on
your keyboard.
At the login prompt, enter the Username and Password and then click
on OK.
User name: admin
Default Password: password
You will then reach the home page of your radio’s Web interface: the
Status Page.
High Capacity Wireless Networks
300 Mbps GIGA1000 SERIES

Follow these steps to setup Access Point Mode
You can implement a Point-to-Point connecon by simply
seng one access point as Access Point Mode and seng
the other access point in Staon mode (client).
Click on the Basic Wireless Tab.
In wireless mode choose Access Point.
Enter a name for the Local AP-ESSID.
Choose the wireless profile
NA: 5GHz, mix of a and n
NG: 2.4GHz, mix of a, b and n
Save the changes and reboot the device to let your
changes take effect.
1.
2.
3.
4.
5.
Wireless Point to Point
and Point to Mulpoint Setup
13
www.netkrom.com
Common
Configuraons4
Quick
Installaon
Guide
High Capacity Wireless Networks
300 Mbps GIGA1000 SERIES

14
www.netkrom.com
Common
Configuraons4
Quick
Installaon
Guide
When using Remote AP MAC, the ESSID name must
also match the AP’s ESSID name, especially when
Closed System is enabled on the AP.
Repeat the Staon steps to add more Clients to the Point-to-Mulpoint connecon.
Follow these steps to setup Staon Mode.
Note:
Click on the Basic Wireless Tab.
In wireless mode choose Staon.
Enter the name of the Remote AP-ESSID.
Note: this opon must match with the ESSID configured
in the Access point.
Enter the Access Point’s MAC in Remote AP-Lock to MAC.
Choose the wireless profile
NA: 5GHz, mix of a and n
NG: 2.4GHz, mix of a, b and n
Note: this opon must match with the wireless profile
configured in the Access point.
Save the changes and reboot the device to let your
changes take effect.
1.
2.
3.
4.
5.
6.
Staon Mode does not provide transparent bridging.
Staon WDS Mode does provide transparent bridging.
Note:
High Capacity Wireless Networks
300 Mbps GIGA1000 SERIES

15
www.netkrom.com
Common
Configuraons4
Quick
Installaon
Guide
Follow these sengs to setup the repeater.
A Repeater AP can connect to an AP only if the opon
Act as RootAP is set or checked in the AP setup.
Repeater Setup
Click on the Basic Wireless Tab.
In wireless mode choose Repeater WDS.
Enter the name of the Remote AP-ESSID.
Note: this opon must match with the ESSID configured in the
Access point.
Enter the Access Point’s MAC (BSSID) in Remote AP-Lock to MAC.
Choose the wireless profile
NA: 5GHz, mix of a and n
NG: 2.4GHz, mix of a, b and n
Note: this opon must match with the wireless profile configured
in the Access point.
Save the changes and reboot the device to let your changes take
effect.
1.
2.
3.
4.
5.
6.
High Capacity Wireless Networks
300 Mbps GIGA1000 SERIES

16
www.netkrom.com
Advanced
Configuraon5
Quick
Installaon
Guide
Advanced Roung Configuraon:
Please go to page 85 of User Manual.
Bandwidth Control:
Please go to page 95 of User Manual.
Remote Management:
Please go to page 99 of User Manual.
Wireless Operaon Modes:
Please go to page 3 of User Manual.
Advanced Wireless Configuraon:
Please go to page 114 of User Manual.
Wireless Security Setup:
Please go to page 135 of User Manual.
Security Configuraon:
Please go to page 143 of User Manual.
High Capacity Wireless Networks
300 Mbps GIGA1000 SERIES

17
www.netkrom.com
Quick
Installaon
Guide
With these basics steps you can enjoy your wireless link without problems,
please for more informaon about the capabilies and advance configuraon
of our product please see the user manual.
Congratulaons
High Capacity Wireless Networks
300 Mbps GIGA1000 SERIES

Contact Informaon
Address:
2134 NW 99th Avenue, Miami Florida 33172
Sales and ordering:
American Customers: [email protected]
Worldwide Customers: sales@netkrom.com
Lan American and Spanish Customers: ventas@netkrom.com
Technical Support:
Worldwide and English Customers: support@netkrom.com
Lan American Customers: [email protected]om
Phones:
(+1) 305-418-2232
Fax:
(+1) 305-418-9266
Powered by
18
www.netkrom.com
Quick
Installaon
Guide
High Capacity Wireless Networks
300 Mbps GIGA1000 SERIES

300 Mbps GIGA1000 SERIES
This manual suits for next models
5
Table of contents
Other airnet Wireless Access Point manuals