Aiviq DESIGN PRO ACM-311 Installation instructions

USERS INSTRUCTION | COFFEE MAKER(1.8 L)
DESIGN PRO
COFFEE MAKER
MODEL NR: ACM-311

01
SAVE THESE INSTRUCTIONS
STRUCTURE DESCRIPTION:
Carafe
Display
Funnel
Spout Water tank cover
Water tank
Water gauge
Power cord
Main body
IMPORTANT SAFEGUARDS:
When using electrical appliances, basic safety precautions should
always be followed to reduce the risk of fire, electrical shock, and/or
injury to persons including the following:
1. Read the instructions in detail.
2. The coffee maker must be operated at the rated
voltage.
3. Do not touch the hot plate and burn the surface.
4. To prevent electric shock, do not place the power
cord, plug or device in
water or other liquids.
5. When working in the coffee pot more than one
hundred times, please clean the surface of the glass

02
water tank and the hot plate in time.
6. Unplug the plug from the outlet when not in use
and before cleaning. Cool before opening or removing
parts and before cleaning the unit.
7. Never continue to use the coffee maker in the
event of damage to the electrical components. If the
main leads or major parts are damaged, look for a
professional or repair or replace parts at a nearby
after-sales service station.
8. Use of non-jointed accessories may cause fire,
electric shock or personal injury.
9. The power cord should not be hung from the edge
of the table or the power cord placed on a hot
surface.
10. When the power is off, pull out the plug from the
socket and do not pull the power cord.
11. Do not use the coffee maker for other purposes or
work in a dry condition.
12. Do not leave the coffee maker unattended, and
children cannot operate the coffee maker by
themselves.
13. Be careful to get burnt by steam.
14. Don't let your coffee maker work without water.
15. Do not stand on the appliance.
16. Do not use outdoors.
17. Appliances with glass containers.
A. The container is designed for this device. Never
use it at the top of the range.
B. Do not place the heat container on a damp, cold
surface.
C. Do not use a broken container or a loose or
weakened container.
D. Do not clean the container with detergent, steel
wool pad or other abrasive material.
18. Bearing in mind the above considerations.

03
HOUSEHOLD USE ONLY
1-4/
1-4/
YOUR COFFEE MAKER
Please read the operating instructions carefully before using the coffee maker.
Carefully follow the operating instructions and pay special attention to safety
instructions. The coffee maker will perform at its best and be durable.
USING THE MACHINE FOR THE FIRST TIME
1. Before brewing coffee, use the coffee machine to boil water once.
(No need to add coffee or filter paper).
2. Insert the plug into the socket.
3. Fill the tank with cold water to the maximum water level mark.
4. Place the coffee pot in the coffee filter machine.
5. Press the "BREW / AUTO OFF" switch to start brewing coffee.
FUNCTION DECLARATION
1. Initial power on display
A. Plug in, the display shows "12:00 AM", the panel flashing 5 times, and then
the machine beep once. The clock runs normally and enters the standby mode.
The backlight is on, unless the power cord is unplugged, the backlight is always
on at any time.
B. In the standby mode, long press the " " button, the " " indicator is
light on, means that there is no sound for subsequent operation buttons except
for the "BREW / AUTO OFF" button. Long press the " " button, the
digital screen " " indicator is off.
C. In the standby mode, press the "HR" + "MIN" button for 2 seconds at the
same time. The appliance will beep 3 times and the factory settings will be
restored.
2. Local time setting in standby mode: ("HR"/"MIN" BUTTON)
A. In the standby state, press the "HR" or "MIN" button once, the clock will flash
and enter the clock setting.
B. Short press "HR" key to increase one hour each press; Long press the "HR"
key to increase rapidly until 11:00 AM is displayed, switch to 12:00 PM and cycle
again, let go when stay at the set display hour you want.
C. Short press "MIN" key to increase one minute each press; Long press "MIN"
key increase rapidly until 0:59 is displayed and then it returns to 0:00 and loops
again, let go when stay at the set display second you want.
D. After setting HR and MIN, if no operation the time will flash 5 times then
beep, the time stop blinking, means clock setup complete and the machine runs
normally.

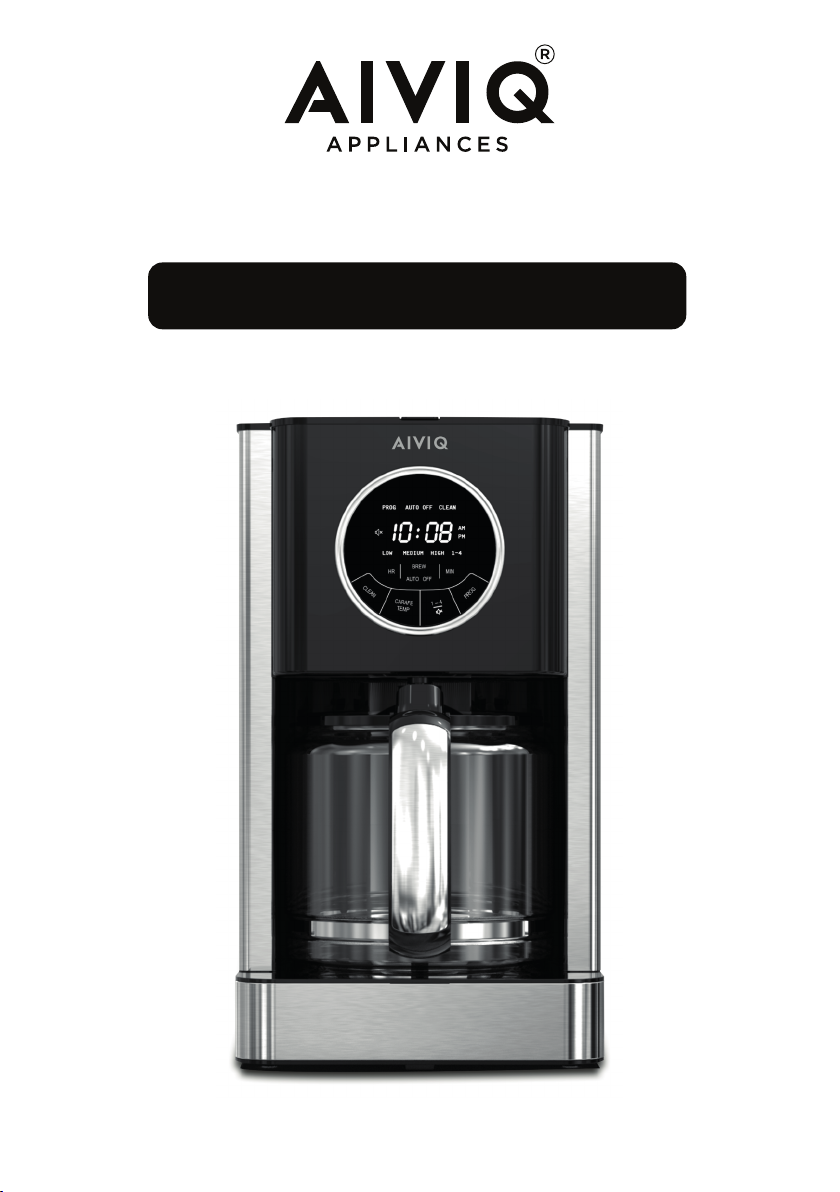
3. Normal coffee mode
A. In the standby state, press the "BREW/AUTO OFF" button to enter the
coffee brew mode, the “BREW/AUTO OFF” button lights up, the screen will
display the default carafe temperature grade, then start to brew coffee and the
clock runs normally.
B. After brewing the coffee, the machine enters to keep warm mode
automatically. The screen will display the keep warm time and "AUTO OFF".
The default automatic keep-warm time of the machine is 30 minutes.
C. When the keep warm time is over, the machine will in the standby mode and
the clock run normally.
D. In the coffee brew and keep warm mode, the HR/MIN/PROG buttons are
invalid. Press "CARAFE TEMP" button to enter the keep warm time setting.
4. Keep warm temperature setting: ("CARAFE TEMP" BUTTON)
The keep warm temperature level is set to Medium by default. In any mode,
short press the "CARAFE TEMP" to display the keep warm level first, and press
again to switch the keep warm level between Low/Medium/High. The selection
will appear on the display.
5. Keep warm time setting: ("CARAFE TEMP" BUTTON)
(Note: Set the Keep Warm Time before setting the PROG preset time, the Keep
Warm Time cannot be changed during the machine’s work)
A. In standby mode, long press the "CARAFE TEMP" button for 3 seconds to
display the keep warm time of 0:30 and the digital screen “AUTO OFF” flashes.
B. Press the "HR" button to increase the hour by 1 hour. If you press and hold
the "HR" button by 1 second, the hour will increase rapidly and "0"-"4" will
cycle. Press the "MIN" button once and the display will switch from "30" to "0".
The maximum time is 4 hours.
C. When setting the keep warm time, if there is no button operation within 5
seconds (flashing 5 times), the keep warm time will be set, then beep and the
setting time will stop flashing. There is no button operation within 10s, the
"AUTO OFF" light out, and the clock runs normally.
6. Automatic brew at preset time: ("PROG" BUTTON)
(Important note: Please set the correct clock time first, please refer to point 2
to ensure the correct preset time, because the preset time is based on the clock
time Set.)
A. In the standby state, press the "PROG" button, the digital screen displays
12:00 AM, and "PROG" button flash.
(Note: Press the "PROG" button or no button operation within 10 seconds,
"PROG" light out, coffee maker return to standby mode, the preset time setting
is not finish.)
B. When "PROG" flashes, press "HR" or "MIN" once to enter the preset time
setting, and the time start flashing.
Short press "HR" button to increase 1 hour each press; Long press "HR" button
04

05
1-4/
1-4/
1-4/
1-4/
1-4/
1-4/
to increase rapidly. Short press "MIN" button to increase 1 minute each press;
Long press "MIN" button to increase rapidly.
C. After setting the preset time, no button operation within 5S (flashing for 5
times), the preset time will be confirmed and beep, the time stops flashing.
Press "BREW / AUTO OFF" again within 10S, the preset time and "PROG" are
both on, the preset time setting is successful.
D. When the machine clock runs to the preset time, the coffee maker will
automatically initiate the brew cycle. The Brew button will illuminate, indicating
that your coffee maker has begun the brewing.
In the "PROG" mode:
• Press the "CARAFE TEMP" button to set the keep warm temperature level;
• Press the "BREW / AUTO OFF" button to cancel the reservation;
• Press the " " button to enter the " " cup mode;
• Press the "PROG" button, “PROG” lights up and the preset time display.
7. 1-4 cup function ( BUTTON)
If you want a strong coffee, short press the " " button. When "1-4" is
displaying on the screen, press the "BREW/ AUTO OFF" button to enter the
strong coffee mode.
When the water runs out, the machine will enter the heat preservation mode
and 1-4 will be extinguished.
Remark: In the "1-4" mode, if you do not want the strong coffee, short press the
" " button again to exit the "1-4" function.
8. Mute function ( BUTTON)
In the standby state, long press the " " button, the " " indicator is
light on, means that there is no sound for subsequent operation buttons except
for the "BREW / AUTO OFF" button. Long press the " " button, the
digital screen " " indicator is off, means that there is sound on the operation
button.
9. CLEAN function (“CLEAN” BUTTON)
A. In standby mode, press the "CLEAN" button and the "CLEAN" flash on the
digital screen, and then press the "BREW / AUTO OFF" button to enter the
clean mode.
B. In Clean mode, press the "CLEAN" or "BREW / AUTO OF" button to exit the
standby mode.
D. After 100 times of brewing, the "CLEAN" light flashes to remind you that you
need to clean the machine. After the clean function is completed, the "CLEAN"
display will be extinguished.
Cleaning and maintenance
• Disconnect the appliance.
• Never immerse the appliance in water.
• Clean the appliance with a damp cloth only.
• The carafe can be cleaned with warm water, some washing-up liquid and
a soft brush. Do not clean the carafe in a dishwasher.
• Serving should be performed by an authorized service facility.
1-4/ 1-4/

DESCALING
To make sure that your coffee maker goes on producing perfect coffee you will
need, from time to time, to descale it. Frequency will depend on how hard the
water is in your area, and how often you use the coffee maker. If you use your
coffee maker once or twice a day, it is recommended that the maker be cleaned
every 6-8 weeks.
If the time it takes to brew a can of coffee suddenly is increased it is recom-
mended that the coffee maker is descaled. The harder the water is in your area,
the more often the coffee maker needs to be descaled. The hardness of the
water can be advised at your local waterworks.
ENVIRONMENTAL TIP
An electronic appliance should, when it is no longer capable of functioning be
disposed with least possible environmental damage. The appliance should be
disposed according to the local regulations in your municipality, in most cases
you can discharge the appliance at your local recycling center.
Grounds and coffee filter can be disposed via a compost container.
CAUTION
• The electrical voltage must correspond with the
voltage stated on the label on the bottom of the
appliance.
• Use only cold water!
• Ensure the carafe is placed properly in its position
when brewing coffee.
• Between brewing processes switch off the
appliance and let it cool down for about 5 minutes.
Then refill with cold water.
• After the brewing process, always switch off the
appliance.
• Disconnect the appliance before cleaning.
• Keep the appliance out of reach of children.
• To switch off the appliance use the BREW/AUTO
OFF switch.
• The control lamp going out indicates when the
machine is off.
• If the supply cord is damaged, it must be replaced
by the manufacturer, its service agent or similarly
qualified persons in order to avoid a hazard.
06

07
• This appliance can be used by children aged from 8
years and above and persons with reduced physical,
sensory or mentalcapabilities or lack of experience
and knowledge if they have been given supervision
or instruction concerning use of the appliance in a
safe way and understand the hazards involved.
• Children shall not play with the appliance.
• Keep the appliance and its cord out of reach of
children aged less than 8 years.
• The appliance is normally cleaned after use and
must not be immersed in water.
• Misuse may cause injury.
• Heating element surface is subjected to residual
heat after use.
• The coffee-maker shall not be placed in a cabinet
when in use.
• Cleaning and user maintenance shall not be made
by children without supervision.
• This appliance is intended to be used in household
and similar applications such as:
– staff kitchen areas in shops, offices and other
working environments
– farm houses
– by clients in hotels, motels and other residential
type environments
– bed and breakfast type environments

08
THE WARRANTY DO NOT COVER
• If the above points have not been observed.
• If the appliance has not been properly maintained, if force has been used
against it or if it has been damaged in any other way.
• Errors or faults owing to defects in the distribution system.
• If the appliance has been repaired or modified or changed in any way or by
any person not properly authorized.
DISPOSAL: Do not dispose this product as unsorted municipal waste.
Collection of such waste separately for special treatment is necessary.
Kaffepro ApS
Navervænget 3
4000 Roskilde
This marking indicates that this product should not be disposed with other household
wastes throughout the EU. To prevent possible harm to the environment or human health
from uncontrolled waste disposal, recycle it responsibly to promote the sustainable reuse
of material resources. To return your used device, please use the return and collection
systems or contact the retailer where the product was purchased. They can take this
product for environmental safe recycling.
Table of contents
Other Aiviq Coffee Maker manuals
Popular Coffee Maker manuals by other brands

DeLonghi
DeLonghi Nespresso LATTISSIMA PRO EN 750.MB user manual

Clatronic
Clatronic KA 2545 instructions

Farberware
Farberware FCM103 Use & care instructions

BonsenKitchen
BonsenKitchen CM8903 Operation instructions

Miele
Miele CVA 4075 EN-CA installation instructions

Black & Decker
Black & Decker CM5000BD Use & care manual