Aiwa CDC-X917M User manual

CDC-X917M
YU
STEREO CAR CD RECEIVER
RADIO-TOCADISCOS DE CD ESTEREOFONICO PARA
AUTOMOVIL
ENGLISH
ESPAÑOL
FRANÇAIS
OPERATING INSTRUCTIONS
MANUAL DE INSTRUCCIONES
MODE D’EMPLOI
OWNER’S RECORD
For your convenience, record the model number and
serialnumber(youwillfindthemonthebottomsideof
yourset)inthespace provided below. Pleasereferto
them when you contact your AIWA dealer in case of
difficulty.
Model No. CDC-X917M
Serial No.
8B-KC7-901-01
001030ATM-OX

1
ENGLISH
PRECAUTIONS
•Use only in a 12-volt DC negative-ground electrical
system.
•Disconnect the vehicle’s negative battery terminal
while mounting and connecting the unit.
•
When replacing the fuse, be sure to use one with an
identical amperage rating. Using a fuse with a higher
amperage rating may cause serious damage to the unit.
•DoNOTattempttodisassembletheunit.Laserbeams
from the optical pickup are dangerous to the eyes.
•Makesurethat pins or other foreign objects do not get
insidetheunit;theymaycausemalfunctions,orcreate
safety hazards such as electrical shock or laser beam
exposure.
•When your vehicle has been parked in direct sunlight
resulting in a considerable rise in the temperature
inside, allow the unit to cool off before operating it.
•Keep the volume at a level at which you can hear
outside warning sounds (horns, sirens, etc.).
NOTE
This equipment has been tested and found to comply
with the limits for a Class B digital device, pursuant to
Part 15 of the FCC Rules. These limits are designed to
provide reasonable protection against harmful
interference in a residential installation.
This equipment generates, uses, and can radiate radio
frequency energy and, if not installed and used in
accordance with the instructions, may cause harmful
interference to radio communications. However, there
is no guarantee that interference will not occur in a
particular installation. If this equipment does cause
harmful interference to radio or television reception,
which can be determined by turning the equipment off
and on, the user is encouraged to try to correct the
interference by one or more of the following measures:
—Reorient or relocate the receiving antenna.
—Increase the separation between the equipment
and receiver.
—Connect the equipment into an outlet on circuit
differentfromthattowhichthereceiverisconnected.
—Consult the dealer or an experienced radio/TV
technician for help.
CAUTION
Modifications or adjustments to this product, which are
not expressly approved by the manufacturer, may void
the user’s right or authority to operate this product.
1
ENGLISH
TABLE OF CONTENTS
THEFT PROTECTION .............................................. 2
BASIC OPERATION, AUDIO AND CLOCK
ADJUSTMENT ..................................................... 2
RADIO OPERATION................................................. 3
CD PLAYER OPERATION ........................................ 4
AUXILIARY EQUIPMENT ......................................... 5
OTHER FUNCTIONS ............................................... 5
STEERING WHEEL REMOTE CONTROL ............... 6
CD CHANGER OPERATION .................................... 6
TROUBLESHOOTING .............................................. 7
MAINTENANCE ........................................................ 7
SPECIFICATIONS .................................................... 7
CD Notes
•Playing a defective or dusty CD can
cause dropouts in sound.
•Hold CDs as illustrated.
• Do NOT touch the unlabeled side.
•DoNOTattachanyseal,labelor dataprotectionsheet
to either side of a disc.
•Do NOT expose a CD to direct sunlight or excessive
heat.
•WipeadirtyCDfromthecenteroutwardwithacleaning
cloth.
Never use solvents such as benzine or alcohol.
•This unit cannot play 3-inch (8 cm) CDs.
•NEVERinserta 3-inch CD contained in the adapter or
any irregularly shaped CD.
The unit may not be able to eject it, resulting in a
malfunction.
DEMO (Demonstration) mode
Theunithasanextradisplaymode,whichdemonstrates
the display of the operation modes of the unit. The unit
switches to DEMO mode automatically if you turn the
unit on and leave it as it is for 5 seconds after all the
connections have been completed.
To cancel DEMO mode
DuringDEMOmode,pressandholdDISPformorethan
2 seconds.
ToresumeDEMOmode,pressandhold DISPagainfor
more than 2 seconds.
In addition to ordinary CDs, CD-Rs or CD-RWs can be read by this unit. However, NEVER use a CD-R or CD-RW
that contains no data or data in the wrong format, such as MP3 or other computer files.
Dependingontheconditionsoftherecordingequipment,textdatastoredinaCD-RorCD-RWmaynotbedisplayed.

THEFT PROTECTION
(Retractable Front Panel)
When your car’s ignition switch is turned off, the front
panel will be retracted automatically as if there were no
car audio in the console.
When the ignition switch is set to ACC or ON position,
the front panel will appear automatically.
BASICOPERATION,
AUDIO AND CLOCK
ADJUSTMENT
Turning the unit on/off
•Youcanturntheuniton by pressing any button on the
front panel except z.Theunit also turns on whenyou
press zand insert a CD.
•Press and hold PWR/MUTE until the unit turns off.
Note
Mostoperationsdescribedinthismanualrequirethe
unit to be turned on before starting the operation,
unless explicitly stated otherwise.
Changing the source mode
1Press FUNCTION .
Pressing FUNCTION cycles through source
modes in the following order:
*“CD” does not appear in the display when there is no
CD in the unit.
**CD Changer Play mode (available when an optional
CD Changer is connected)
Adjusting the volume
1Press +or –.
VOL (volume) indication appears.
Muting the sound
1Press PWR/MUTE briefly.
MUTE indicator flashes.
To restore volume, briefly press PWR/MUTE again.
Adjusting sound
Youcan select the followingmodes for adjusting sound
depending on the music you listen to: BASS (low
frequencies), TRE (high frequencies), BAL (left/right),
FAD (front/rear), H-BASS (high bass)*, and DSSA
(Drivers Sound Stage Adjustment)**
*You can reinforce the bass sound.
** Youcanadjustsoundstageandtonebalancetobest
serve a particular seat in the car.
1Press SEL repeatedly to select the mode to be
adjusted.
Pressing SEL cycles through the modes. The
selected mode’s indicator appears.
2Press+or–toincreaseordecreasethelevelforthe
selected mode (except for H-BASS and DSSA).
In H-BASS mode, press +or –to select 1 (low),
2 (medium), 3 (high), or OFF.
InDSSAmode, press +or–toselectL (forthefront
left seat), R (for the front right seat), or OFF.
Note
•Adjust the level or select an item within 5 seconds, or
the selected mode will return to previous state.
•WhenDSSAisactivated,youcannotadjustBAL,FAD,
BASS, and TRE.
Aligning the source levels
(Source Level Adjuster)
Volume may vary each time you change the source
mode. In this case, you can align each source mode’s
volume to almost the same level.
1PressFUNCTION repeatedlytoselectthedesired
mode.
2Press DISP while pressing SEL.
“LEVEL 0” appears in the display.
3Press +or –to adjust the level.
Note
Adjustthe level within5seconds, or thisfunction will be
canceled.
Restoring the factory settings
1Turn off the unit.
2PressandholdDISPuntil“LEVEL--” appearsinthe
display.
Note
You can restore the factory settings only for VOL,
BASS, TRE, BAL, FAD, H-BASS, and DSSA as well as
aligned source volume levels.
ENGLISH
2
ENGLISH
2
ENGLISH

3
ENGLISH
3
ENGLISH
Muting button beep sounds
1Turn off the unit.
2Press and hold SEL until “BEEP” appears in the
display.
3Press +or –to select “ON” or “OFF”.
4Press SEL.
The unit turns off.
Setting the clock
1Press and hold SEL until the clock indicator flashes
in the display.
2Press TUNEk(to set hour) or TUNEi(to set
minute) and press +or –.
3Press SEL.
Displaying the clock
1Press DISP.
To return to the former display, press DISP again.
RADIO OPERATION
Tuning in to a station
(Seek/Manual Tuning)
Local indicator Stereo indicator
*“F” means FM, and “A” means AM.
1PressFUNCTION repeatedlytoselectthedesired
band (F1, F2, F3, A1 or A2).
2Press TUNEi(to move to higher frequencies) or
TUNEk(tomove tolower frequencies) totune in to
a station.
“ST” appears in the display when an FM station is
broadcastinginstereo,andreceivingconditionsare
good.
Seek Tuning and Manual Tuning
•Press and hold TUNEior TUNEkuntil Seek
Tuning starts.
The unit locates a station automatically (Seek
Tuning).
• PressTUNEiorTUNEkrepeatedlytosearchfor
a desired station while increasing or decreasing
the frequency step by step (Manual Tuning).
To stop Seek Tuning, press TUNEior TUNEk
again.
Monaural mode
When FM signals become weak, or FM reception
becomes poor, the unit automatically switches to
Monaural mode to reduce noise.
Local mode
Local mode allows you to tune in only to strong stations
during Seek Tuning.
1Press LO before you start seek tuning.
“LO” appears in the display.
To return to Distant mode, press LO again.
“LO” disappears and the unit tunes in to all receivable
stations.
Using preset stations
Youmustpresetstationsbeforeyoucantuneinastation
using preset station number buttons.
Presetting stations automatically
(Auto Memory)
1PressFUNCTION repeatedlytoselectthedesired
band (F1, F2, F3, A1 or A2).
2Press and hold PS/A.ME until automatic presetting
starts.
The unit automatically stores up to 6 stations for
each band.
After completion of automatic presetting, the unit
tunes in to all the stations stored on the preset
station buttons in order (Prest Scan).
Tocancelautomaticpresetting,pressPS/A.MEagain.
Checking the preset stations (Preset Scan)
1Press PS/A.ME briefly.
Each preset station will be tuned in for 5 seconds in
order.
To cancel Preset Scan, press PS/A.ME again or any
preset station button.
Band indicator* Frequency indication
Preset station buttons 1 – 6
Preset station number

Presetting stations manually
(Manual Memory)
1PressFUNCTION repeatedlytoselectthedesired
band (F1, F2, F3, A1 or A2).
2Press TUNEior TUNEkto tune in to a desired
station (see “Tuning in to a station,” page 3).
3Pressandholdthedesiredpresetstationbuttonuntil
the unit beeps.
Note
Anewlypreset station replaces the station on the same
band that was previously stored on that preset station
button.
Tuning in to a preset station
1PressFUNCTION repeatedlytoselectthedesired
band (F1, F2, F3, A1 or A2).
2Pressthepresetstationbuttononwhich thedesired
station is stored.
Active tuning reception control (ATRC)
The unit automatically suppresses FM noise caused by
vehicle movement, and maintains sound quality.
Using the timer
(My Information)
You can schedule the radio to activate for daily radio
programs. The unit automatically turns on and off in
Radio mode at the scheduled times.
1Turn off the unit.
2Press and hold INFO until “PROGRAM”, flashes in
the display.
3Press the preset station button 1(for PROGRAM 1)
or 2 (for PROGRAM 2) to select the desired timer.
4Press SEL twice.
5Set the time you wish the unit to turn on.
• Press TUNEkand press +or –to set the hour.
• Press TUNEiand press +or –to set the minute.
6Press SEL twice.
7Press FUNCTION to select the band.
8Press TUNEi, TUNEkor the desired preset
station button to select the station.
9Press SEL twice.
10 Setthetimeyouwishtheunittoturnofffollowingthe
same procedure used in step 5.
11 Press SEL.
12 Press INFO.
The unit turns off, and setting is completed.
•If you preset another program, preset all the steps
from step 1.
•To cancel a timer setting in progress, press and
hold PWR/MUTE to turn off the unit.
When the unit is on, “MY INFO” appears in the
displayindicating that theunitis standby fora timer.
During the timer-activated tuning, “MY INFO”,
continues to flash.
To cancel the timer standby
1 Press INFO repeatedly to select the desired
timer (PRG 1 or PRG 2).
2 Press TUNEior TUNEkto select “OFF”.
3 Press INFO again.
Note
•When you preset two programs, be sure that they do
not overlap.
•The unit automatically starts tuning at the scheduled
timeregardless of thecurrent source mode.When the
scheduled program is over, the unit automatically
returns to the former source mode.
•Whenthisfunctionisactivated,TUNEi/k,A.ME/PS,
LO,INFO, and thepreset number buttons donot work
for tuning in stations.
•However, if you press FUNCTION to change the
source mode during timer-activated tuning, the
scheduled program is canceled.
CD PLAYER OPERATION
Playing a CD
You can play CDs, CD-Rs and CD-RWs using the
procedure described below.
1Press zto open the front panel.
2Insert a CD.
The front panel will be closed automatically and
“CD” appears in the display.
CD play starts.
If a CD is already inserted, press FUNCTION
repeatedly to select CD play mode.
In normal play, when the last track finishes, the unit
returns to the first track and continues to play.
ENGLISH
4
ENGLISH
4

5
ENGLISH
5
ENGLISH
Labeled-side up
*When you remove the CD, the front panel will close
automatically after a while.
To close the front panel manually, press zwhile the
front panel is open.
Note
•When you play a CD that is already inserted, CD play
starts at the point where it stopped the previous time.
A newly inserted CD starts from the first track.
•ACD-RorCD-RWmaytakesometimetostartplaying
back, but this is not a malfunction.
•Ifa CD-R or CD-RW withnodata or incompatible data
isinserted, “ERROR03”will appearin thedisplay. The
unit cannot play such discs.
Intro Play
Youcan locate adesired track bymonitoring the first10
seconds of all the tracks on a CD.
1Press INT during CD play.
“SCAN” appears in the display.
2Press INT again when the desired track is played.
The unit returns to normal CD play.
One track Repeat Play
You can play a track repeatedly.
1Press REP1 during CD play.
“REPEAT1” appears in the display.
To cancel One track Repeat Play, press REP1 again.
Random Play
You can play all the tracks in random order.
1Press RNDM during CD play.
“RANDOM” appears in the display.
To cancel Random Play, press RNDM again.
CD indicator Elapsed playing time
To
Eject a CD
Skip to the next track
Go back to the beginning
of the current track
Each extra press skips
backward one extra track
Locate a specific point in
a track
Press
z*
t
r
Press and hold ror
tuntil you find the
point.
Track number
Note
During Random Play, pressing rallows you to skip
only to the beginning of the current track, not to the
previous track.
AUXILIARY EQUIPMENT
Listening to a cassette/MD/MP3 portable
player or other equipment
Youcanlistentoequipmentconnectedtotheunit.Refer
to the operating instructions for the corresponding
equipment for more detailed information.
Be sure to remove inserted CDs to prevent possible
damage to the unit before connecting the equipment.
1Connectacassette/MD/MP3portableplayerorother
equipment via the unit’s AUX IN jack (3.5 mm dia.).
2Press FUNCTION repeatedly until “AUX IN”
appears in the display.
Note
WhenaconnectingcordispluggedintotheAUXINjack,
you cannot insert or eject a CD even if you press z. Be
sure to disconnect the cord before inserting or ejecting
the CD. Likewise, be sure to disconnect it before you
turn off the ignition switch, otherwise the front panel
won’t be retracted.
OTHER FUNCTIONS
Changing the display contrast
1PressandholdFUNCTION until“CONT.”,appears
in the display.
2Press +or –to adjust the contrast.

ENGLISH
6
ENGLISH
6
CD Changer indicator Track number
Changing the key illumination color
Youcanchooseblueorredasthekeyilluminationcolor.
1PressandholdFUNCTION until“CONT.”appears
in the display.
2PressTUNEior TUNEkuntil “ILL” appears in the
display.
3Press +or –to select 1 (for blue) or 2 (for red).
STEERING WHEEL
REMOTE CONTROL
Remote control button
1VOLUME +button: To increase the volume.
2VOLUME -button: To decrease the volume.
3FUNCTION button: To select Radio, CD Play, CD
Changer Play or AUX IN mode.
4DISC/PRESET button:
(CD) To skip back to the beginning of the current
track. Each extra press skips backward one extra
track.
(Radio) To tune in to the next preset station, in
descending order.
(CD Changer)
Press and release to skip back to the beginning of
the current track or the previous track.
Press and hold to switch to the previous CD.
5DISC/PRESET button:
(CD) To skip to the next track.
(Radio) To tune in to the next preset station, in
ascending order.
(CD Changer)
Press and release to skip to the next track.
Press and hold to switch to the next CD.
CD CHANGER
OPERATION
Playing a CD
YoucanplayCDsfromaconnectedAIWACDChanger.
For detailed information on installing a CD Changer,
refertotheInstallationandConnectionmanualsupplied
with the CD Changer.
CD number
1
Press
FUNCTION
repeatedly to display “CD-CH.”
The CD Changer play starts.
Press
t
r
and hold t, then
release it at the
desired point
and hold r, then
release it at the
desired point
DISCN
DISCM
To
Skip to the next track
Skip back to the beginning of
the current track or to the
previous track
Advance rapidly to locate a
desired point
Reverse rapidly to locate a
desired point
Start CD Changer play from
the first track on the next disc
Start CD Changer play from
the first track on the previous
disc
Intro Play
Youcan locate adesired track bymonitoring the first10
secondsofallthetracksontheCDsinthediscmagazine.
1Press INT during CD Changer play.
“SCAN” appears in the display.
2Press INT again when the desired track is played.
The unit returns to normal CD play.
One track Repeat Play
You can play a track repeatedly.
1Press REP1 during CD Changer play.
“REPEAT1” appears in the display.
To cancel Repeat Play, press REP1 again.
One disc Repeat Play
You can play all tracks on a disc repeatedly.
1Press REP during CD Changer play.
“REPEAT” appears in the display.
To cancel Repeat Play, press REP again.

7
ENGLISH
Random Play
Youcanplayallthetrackson aCDin thediscmagazine
in random order.
1Press RNDM during CD Changer play.
“RANDOM” appears in the display.
To cancel Random Play, press RNDM again.
Note
PressingrduringRandomPlaylocatesthebeginning
of the current track. The unit does not retrieve previous
tracks during Random Play.
CD text information (Disc and Track title)
CDtextinformationisavailableonlyiftheoptionalAIWA
CDchanger(ADC-EX108,etc.)whichsupportsCDtext,
isconnected tothisunit andaCD withCD text isplayed
on it.
PressingDISP cycles through the items in the following
order:
Radio/CD Play/CD Changer Play indication→Disc
title*→Track title*→Clock
*The CD text information is displayed only when it is
available.
TROUBLESHOOTING
Error code
In the following cases the corresponding error code
indication appears. Follow the suggestions below to
solve such problems. If the error code indication does
not disappear, consult an AIWA service center.
ERROR01 The disc magazine is not properly inserted
inthe CDChanger. Reinsertthemagazine.
Refer to the instruction manual for the CD
Changer.
ERROR02 No CDs are loaded in the disc magazine.
InsertCDsproperly.Refertotheinstruction
manual for the CD Changer.
ERROR03 Focus error. Check that the CD is loaded
properly (right side up, etc.), and the CD
contains valid data.
ERROR04 Problem with the CD Changer. Reset the
unitbypressingtheresetbutton.Ifthisdoes
not solve the problem, consult an AIWA
service center.
Reset button
IfaCDdoesnotoperateproperly,presstheresetbutton
with a pointed object such as a pencil, etc. Note that all
your settings will be erased if this button is pressed.
Reset button
MAINTENANCE
Cleaning the front panel
Wipe the surface with a soft, dry cloth.
SPECIFICATIONS
RADIO SECTION
(FM)
Frequency Range: 87.5 MHz – 108 MHz (100-kHz
steps)* or 87.5 MHz – 108 MHz (50-kHz steps)*
Usable Sensitivity: 12.7 dBf
50 dB Quieting Sensitivity: 17.2 dBf
IF Rejection: 80 dB
Frequency Response: 30 Hz – 15,000 Hz
S/N Ratio: 63 dB
Stereo Separation: 35 dB at 1 kHz
Alternate Channel Selectivity: 70 dB
Capture Ratio: 3 dB
(AM)
Frequency Range: 530 kHz – 1,710 kHz (10-kHz
steps)* or 531 kHz – 1,602 kHz (9-kHz steps)*
Usable Sensitivity: 30 µV (30 dB)
*Set the frequency increment for your area using
the switch on the bottom of the unit. (The switch
is factory-set to the 10k position [for the U.S.A.])
CD SECTION
Frequency Response: 17 Hz – 20 kHz +0/–3 dB
Dynamic Range: More than 80 dB
Channel Separation: More than 65 dB
S/N Ratio: More than 85 dB
Wow/Flutter: Not applicable
AUDIO SECTION
Max. Power Output: 50 W ×4 channels
AUX IN input
Input sensitivity (load impedance) AUX IN: 300 mV
(10 kΩ)
GENERAL
Power-Supply Voltage: 14.4 V (11 to 16 V
allowable), DC, negative ground
Load Impedance: 4 Ω
Tone Control:
Bass ± 10 dB at 100 Hz, Treble ± 10 dB at 10 kHz
Preamp Output Voltage (load impedance): 4 V (10 kΩ)
Installed size: 182 (W) ×53 (H) ×155 (D) mm
(7 1/4(W) ×2 1/8(H) ×6 1/8(D) inches)

ENGLISH
8
STEERING WHEEL REMOTE CONTROL
Dimensions: approx. 67 (W) ×26 (H) ×27 (D) mm
(2 3/4(W) ×1 1/16 (H) ×1 1/8(D) inches) (excluding
holder)
Weight: approx. 38 g (1.33 oz.) (including holder,
battery)
Supplied Accessories: Mounting kit (1 set), Lithium
battery (1)
•Specificationsand externalappearance aresubject to
change without notice due to product improvement.
REAR PANEL

1
ESPAÑOL
ÍNDICE
PROTECCIÓN ANTIRROBO.................................... 2
OPERACIÓN BÁSICA, AJUSTE DEL SISTEMA
AUDIO Y DEL RELOJ .......................................... 2
MANEJO DE LA RADIO ........................................... 3
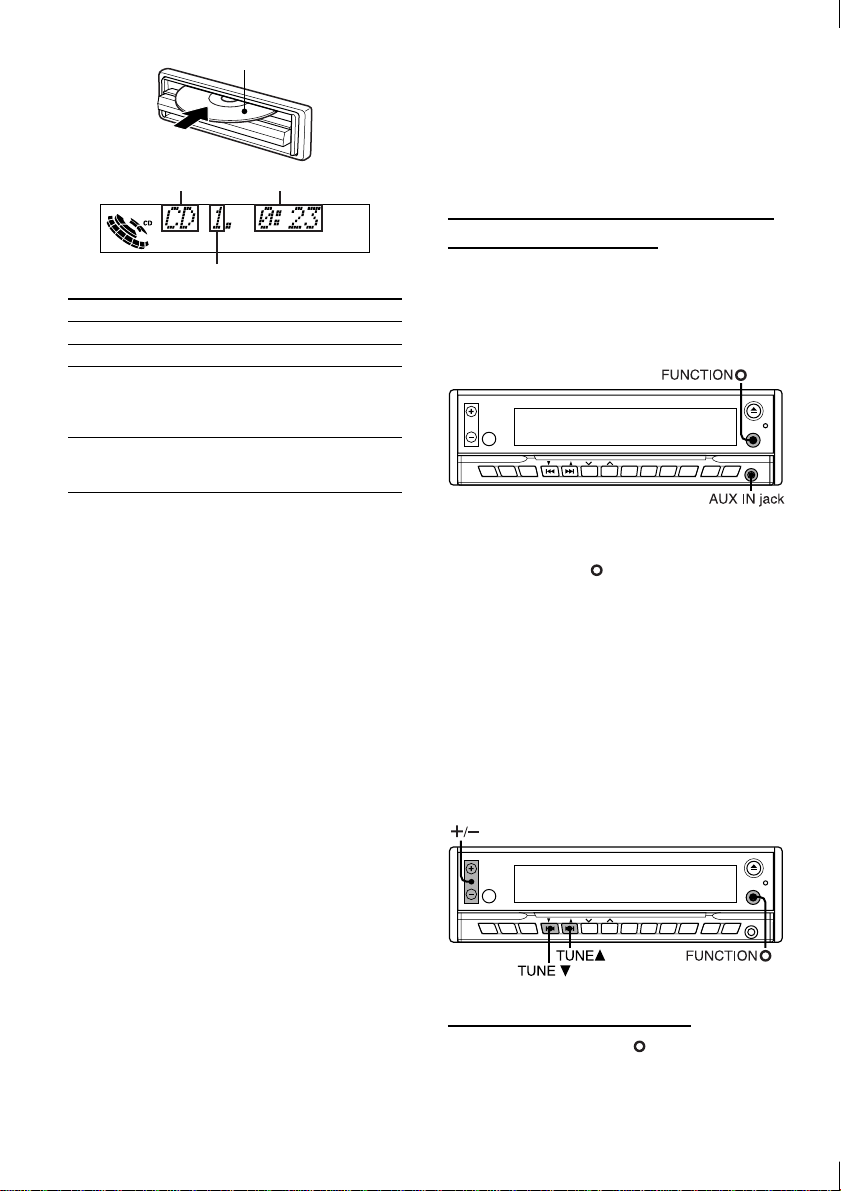
MANEJO DEL REPRODUCTOR DE CD.................. 4
EQUIPOS ACCESORIOS......................................... 5
OTRAS FUNCIONES ............................................... 5
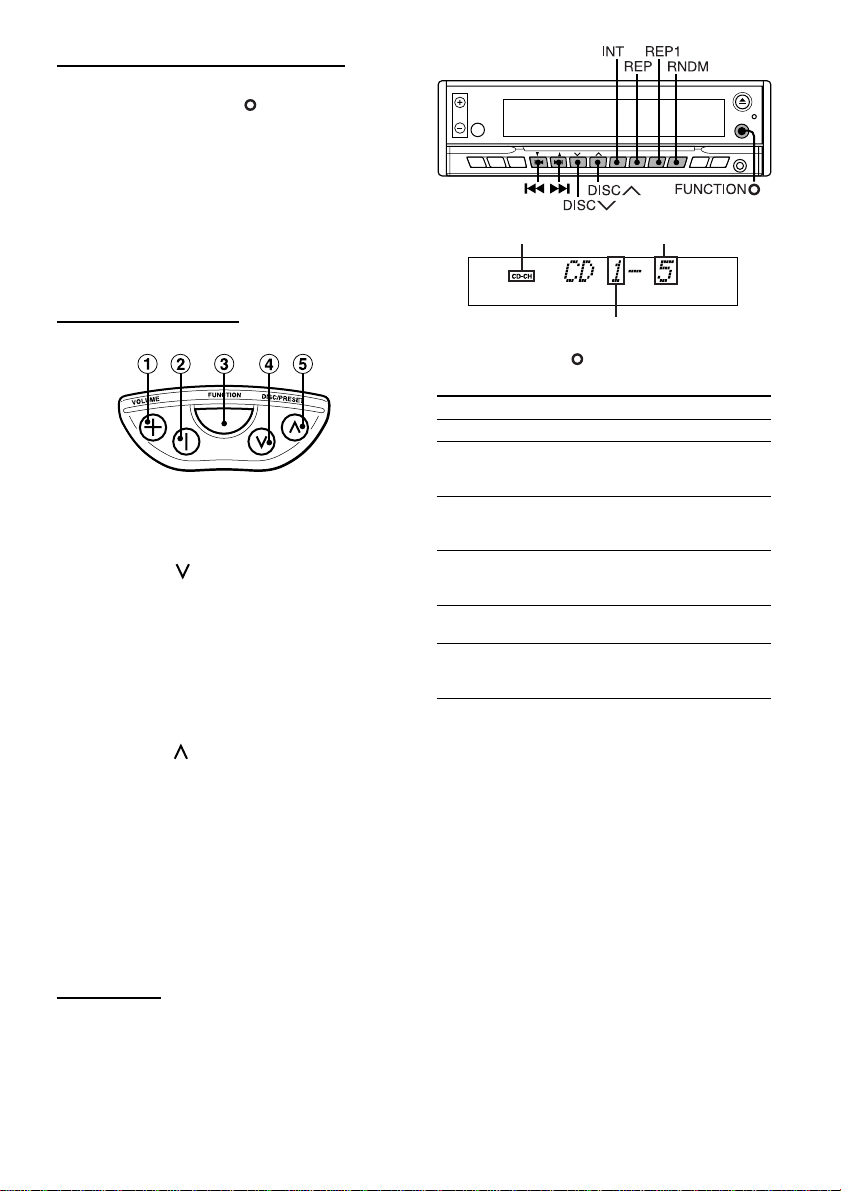
VOLANTE DE CONTROL REMOTO ........................ 6
MANEJO DEL CAMBIADOR DE CD ........................ 6
LOCALIZACIÓN DE AVERÍAS ................................. 7
MANTENIMIENTO .................................................... 7
ESPECIFICACIONES ............................................... 7
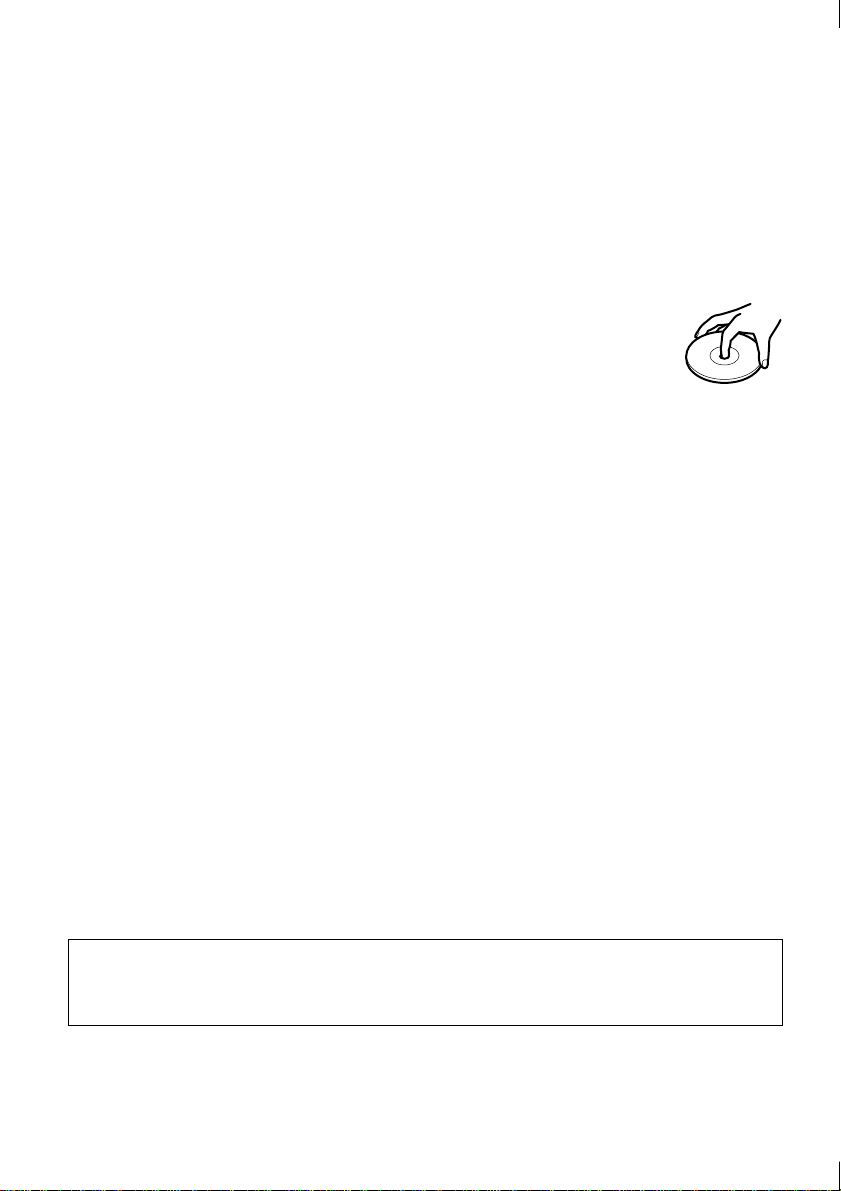
Notas acerca del CD
•La reproducción de un CD
defectuoso o con polvo puede
ocasionar interrupciones en el
sonido.
•Sujete el CDs como se ilustra en la
imagen.
•NO toque la cara no etiquetada.
•NOpegueningúnsello,etiqueta,nifundadeprotección
de datos en ninguna de las dos caras del disco.
•NOdejequeelCDseaexpuestoalaluzdirectadelsol
o al calor excesivo.
•Para limpiar un CD sucio, hágalo con un trapo de
adentro hacia fuera.
Nunca utilice disolventes como benceno o alcohol.
•Este aparato no puede reproducir CDs de 8 cm.
•NUNCA inserte CDs de 8 cm recubiertos por el
adaptador, ni CDs de formas irregulares.
Elaparato puede no sercapaz de expulsarlo, ypuede
haber problemas.
Modo DEMO (Demostración)
La unidad tiene un modo de visualización extra, el cúal
muestraenlapantallaindicadoralosmodosdeoperación
de la unidad. La unidad cambia a modo DEMO
automáticamentesilaunidadesencendida ydejadaen
ese estado por más de 5 segundos luego de que todas
las conecciones hayan sido completas.
Para cancelar el modo DEMO
Durante el modo DEMO, pulse y mantenga DISP por
más de 2 segundos.
Para volver al modo DEMO, pulse y mantenga DISP
nuevamente por más de 2 segundos.
PRECAUCIONES
•Utiliceelaparatosolamenteenunsistemaeléctricode
tierra negativa de 12 volt CC.
•Desconecte el terminal negativo de la batería del
vehículo antes de montar y conectar el aparato.
•Alcambiarelfusible,pongaunodeamperajeidéntico.
Si se utiliza un fusible de mayor amperaje, se pueden
producir serios daños en el aparato.
•NOintentedesmontar el equipo. Los rayos láser de la
captación óptica son peligrosos para los ojos.
•Tenga cuidado de que no se metan alfileres u otros
objetosdentrodelaparato:podríancausardesperfectos
o generar peligros como descargas eléctricas o
exposiciones a rayos láser.
•Cuando el vehículo haya sido aparcado al sol y se
haya producido un considerable aumento de la
temperatura interior, deje que el aparato se enfríe
antes de operarlo.
•Mantenga el volumen a un nivel que le permita oir los
sonidos de advertencia provenientes del exterior
(bocinas, sirenas, etc.)
NOTA
Este equipo ha sido probado y verificado para cumplir
con los límites para un artículo digital de Clase B, en
conformidad con la parte 15 de las reglas FCC. Estos
límites están designados para proveer protección
razonable en contra de interferencias perjudiciales en
una instalación residencial.
Este equipo genera, usa, y puede irradiar energía de
radiofrecuenciay,sinoesinstaladoniusadodeacuerdo
con las instrucciones, puede causar perjudicial
interferenciaenradiocomunicaciones.Sinembargo,no
hay ninguna garantía que no se produzca interferencia
en una instalación particular. Si este equipo causa
interferencia perjudicial en la recepción de radio o
televisión, la cuál puede ser determinada apagando y
encendiendo el equipo, el usuario es alentado a tratar
de corregir la interferencia mediante una o más de las
siguientes medidas:
—Reoriente o relocalize la antena receptora.
—Incremente la separación entre el equipo y el
receptor.
—Conecte el equipo a una salida de un circuito
distinto del cual el receptor está conectado.
—Consulte por ayuda a su vendedor o a un técnico
especializado en radio/TV.
ATENCIÓN
Las modificaciones o ajustes que se hagan en este
producto,noaprobadasexpresamenteporelfabricante,
puedenanularelderechodelusuarioaoperarelaparato.
Ademásdelos CDs ordinarios, este aparato también puede leer CD-Rs o CD-RWs. Noobstante,NUNCA utilice
unCD-Ro CD-RW que no contenga datos o loscontengaen formato equivocado, como MP3 y otros ficherosde
ordenador.
Dependiendodelas condicionesdelequipodegrabación, lainformacióntextualguardadaen unCD-Ro CD-RW
puede no ser visualizada.

ESPAÑOL
ESPAÑOL
2
PROTECCIÓNANTIRROBO
(Panel Frontal Retractable)
Cuando el contacto del coche es apagado, el panel
frontal será retractado automáticamente como si no
hubiera ninguna radio en el coche.
Cuando el contacto del coche es ajustado a la posición
ACCoON,elpanelfrontalapareceráautomáticamente.
OPERACIÓN BÁSICA,
AJUSTE DEL SISTEMA
AUDIO Y DEL RELOJ
Encendio y apagado del aparato
•Sepuedeencenderlaunidadalpulsarcualquierbotón
en el panel frontal excepto z. La unidad se enciende
también cuando se pulse zy se introduce un CD.
•Pulse y mantenga apretado PWR/MUTE hasta que el
aparato se apague.
Nota
La mayoría de las operaciones descritas en este
manual requieren que el aparato esté encendido
antesde iniciar la operación, anoser que se indique
expresamente lo contrario.
Para cambiar el modo fuente
1Pulse FUNCTION .
Pulsando FUNCTION varias veces se recorre un
ciclo de modos fuentes en el siguiente orden:
*Laexpresión“CD”noapareceenlapantallaindicadora
cuando no hay CDs dentro del aparato.
** Modoreproducción del cambiador de CD (Disponible
cuandosehaconectadouncambiadordeCDopcional)
Ajuste del volumen
1Pulse +o –.
El indicador VOL (volumen) se hace intermitente.
Para silenciar el sonido
1Pulse PWR/MUTE brevemente.
El indicador MUTE brilla.
Para restablecer el volumen, pulse de nuevo
PWR/MUTE brevemente.
Ajuste del sonido
Se pueden seleccionar los siguientes modos para el
ajuste de sonido dependiendo de la música que se
escuche: BASS (bajas frecuencias), TRE (altas
frecuencias), BAL (izquierdo/derecho), FAD (frontal/
trasero), H-BASS (super graves)*, y DSSA (Ajuste del
Estado de Sonido del Conductor)**
*Se pueden reforzar los graves.
** Se puede ajustar el estado del sonido y balance del
tono para servir de la mejor forma a un asiento
particular en el automóvil.
1Pulse SEL varias veces para seleccionar el modo
que desea ajustar.
Al pulsar SEL se recorre un ciclo a través de los
modos. Aparecerá el indicador del modo
seleccionado.
2Pulse+o –paraincrementaro disminuirel nivel del
modoseleccionado(exceptoparaH-BASSyDSSA).
En modo H-BASS, Pulse +o –para seleccionar 1
(débil), 2 (medio), 3 (fuerte) o OFF (apagado).
En modo DSSA, Pulse +o –para seleccionar L
(paraelasientofrontalizquierdo),R(paraelasiento
frontal derecho) o OFF (apagado).
Nota
•Ajuste el nivel o seleccione un artículo dentro de 5
segundos,oelmodoseleccionadovolveráasuestado
anterior.
•CuandoDSSAestáactivado,nosepodráajustarBAL,
FAD, BASS ni TRE.
Nivelación de las fuentes
(Regulador del nivel de las fuentes)
El volumen puede variar cada vez que usted cambia el
modo fuente. En nuestro caso, usted puede poner el
volumendetodoslosmodosfuentecasialmismonivel.
1Pulse FUNCTION varias veces para seleccionar
el modo deseado.
2Pulse DISP mientras mantiene apretado SEL.
La expresión “LEVEL 0” aparece en la pantalla
indicadora.
3Pulse +o –para ajustar el nivel.
Nota
Ajusteelniveldentrode5segundos,oestafunciónserá
cancelada.
Restablecimiento de las configuraciones
de fábrica
1Apague el aparato.
2Pulse y mantenga apretado DISP hasta que
aparezca en pantalla la expresión “LEVEL --”.
Nota
Sepuedenrestaurarlasconfiguracionesdefábricasólo
para VOL, BASS, TRE, BAL, FAD, H-BASS, y DSSA
comotambiénlosnivelesalineadosdesonidodeorigen.

3
ESPAÑOL
• Pulse TUNEio TUNEkrepetidamente para
buscarlaestaciónquesedeseasubiendoobajando
lafrecuencia poco a poco(Sintonización Manual).
ParadetenerlaSintonizaciónAutomática,vuelva
a pulsar TUNEio TUNEk.
Modo Monoaural
Cuandola señal de FM se debilitaola recepción FM es
mala, el aparato cambia automáticamente al modo
monoaural con el fin de reducir el ruido.
Modo Local
El modo local le permite sintonizar sólo las estaciones
de señal fuerte durante la Sintonización Automática.
1PulseLOantesdeiniciarlasintonizaciónautomática.
Laexpresión“LO”apareceenlapantallaindicadora.
Para volver al modo Distant, pulse LO nuevamente.
Laexpresión“LO”desapareceráylaunidadsintonizará
todas las estaciones que es capaz de recibir.
Uso de las estaciones preconfiguradas
Antes de poder sintonizar una estación, hay que
preconfigurarla usando los botones numerados a tal
efecto. Botones1–6 paralapreconfiguración
de estaciones
Número de la estación preconfigurada
Preconfiguración automática de estaciones
(Memoria Automática)
1Pulse FUNCTION repetidas veces para
seleccionarlabandadeseada(F1,F2,F3,A1,óA2).
2Pulse y mantenga apretado PS/A.ME hasta que se
inicie la preconfiguración automática.
Elaparatoescapazdememorizarhasta6estaciones
por banda.
Luego de terminar la preconfiguración automática,
la unidad se sintoniza en todas las estaciones
almacenadas en los botones de estaciones
preajustadas en orden (comprobación de la
preconfiguración).
Paracancelarlapreconfiguraciónautomática,vuelva
a pulsar PS/A.ME.
Comprobación de las estaciones preconfiguradas
(Comprobación de la preconfiguración)
1Pulse PS/A.ME brevemente.
Se sintonizarán en orden y durante 5 segundos
cada una de las estaciones preconfiguradas.
Paracancelarlacomprobacióndelapreconfiguración,
vuelvaapulsarPS/A.MEoelbotóndecualquierestación
preconfigurada.
Para silenciar los pitidos de los botones
1Apague el aparato.
2Pulse y mantenga apretado SEL hasta que la
expressión“BEEP”apareceenlapantallaindicadora.
3Pulse +o –para seleccionar “ON” (encendido) o
“OFF” (apagado).
4Pulse SEL.
La unidad se apagará.
Ajuste del reloj
1Pulse y mantenga apretado SEL hasta que el
indicadordelrelojsehagaintermitenteenlapantalla.
2Pulse TUNEk(para ajustar las horas) o TUNEi
(para ajustar los minutos) y pulse +o –.
3Pulse SEL.
Para mostrar la hora
1Pulse DISP.
Para regresar a la pantalla anterior, vuelva a pulsar
DISP.
MANEJO DE LA RADIO
Sintonización de estaciones
(Sintonización Automática/Manual)
Indicador de banda* Indicación de frecuencia
Indicador local Indicador de estéreo
*“F” significa FM, y “A” significa AM.
1Pulse FUNCTION varias veces para seleccionar
la banda deseada (F1, F2, F3, A1, ó A2).
2Pulse TUNEi(recepcióndefrecuenciasmásaltas)
o TUNEk(recepción de frecuencias más bajas)
para sintonizar una estación.
Laexpresión“ST”apareceenlapantallaindicadora
cuando se recibe una estación FM emitiendo en
estéreoylascondicionesderecepciónsonbuenas.
Sintonización Automática y Sintonización
Manual
•Pulse y mantenga apretado TUNEio TUNEk
hasta iniciar la Sintonización Automática.
EnlaSintonizaciónAutomática,elaparatolocaliza
las estaciones automáticamente.

ESPAÑOL
ESPAÑOL
4
Preconfiguración manual de estaciones
(Memoria Manual)
1Pulse FUNCTION varias veces para seleccionar
la banda deseada (F1, F2, F3, A1, ó A2).
2Pulse TUNEio TUNEkpara sintonizar la estación
deseada(ver“Sintonizacióndeestaciones”,página3).
3Pulse y mantenga apretado el botón de la estación
preconfigurada que se desea, hasta que el aparato
emita un pitido.
Nota
La estación recién preconfigurada reemplaza a la
estaciónde lamisma bandaqueestaba guardadaen el
mismo botón.
Sintonización de una estación
preconfigurada
1Pulse FUNCTION varias veces para seleccionar
la banda deseada (F1, F2, F3, A1, ó A2).
2Pulseel botón de laestación preconfigurada donde
se guarda la estación que desea recibir.
Control activo de la recepción de frecuencia (ATRC)
El aparato suprime automáticamente el ruido FM
causadoporel movimientodelvehículo, ymantieneasí
la calidad del sonido.
Utilización del temporizador
(Mi Información)
Usted puede programar la radio para activarse en la
hora de programas de radio a diario. La unidad se
enciendeyapagaenmodoRadioenlahoraprogramada.
1Apague la unidad.
2Pulse y mantenga INFO hasta que la expresión
“PROGRAM” brille en la pantalla indicadora.
3Pulse el botón de estación preconfigurada 1 (para
PROGRAM 1) o 2 (para PROGRAM 2) para
seleccionar el temporizador deseado.
4Pulse SEL dos veces.
5Ajuste la hora en la cuál desea que la unidad se
encienda.
• PulseTUNEkypulse+o–paraajustarlashoras.
• Pulse TUNEiy pulse +o –para ajustar los
minutos.
6Pulse SEL dos veces.
7Pulse FUNCTION para seleccionar la banda.
8Pulse TUNEi, TUNEko el botón de estación
preconfigurada deseado para seleccionar la
estación.
9Pulse SEL dos veces.
10 Ajuste la hora en la cuál desea que la unidad se
apague siguiendo el mismo procedimiento usado
en el paso 5.
11 Pulse SEL.
12 Pulse INFO.
La unidad se apaga, y la configuración se ha
completado.
•Si se preconfigura otro programa, preconfigure
todos los pasos desde el paso 1.
•Paracancelarunaconfiguracióndeltemporizador
en progreso, pulse y mantenga PWR/MUTE para
apagar la unidad.
Cuando la unidad está encendida, “MY INFO”
aparece en la pantalla indicadora indicando que la
unidad está en modo de espera para un
temporizador.Durantelasintonizaciónactivadapor
temporizador, “MY INFO” continua brillando.
Paracancelarelmododeesperadeltemporizador
1Pulse INFO repetidamente para seleccionar el
temporizador deseado (PRG 1 o PRG 2).
2PulseTUNEioTUNEkparaseleccionar“OFF”.
3 Pulse INFO nuevamente.
Nota
• Cuando configure dos programas, asegúrese de que
no esten sobrepuestos.
•Launidadcomienzaautomáticamentelasintonización
a la hora programada independientemente del modo
fuente actual. Cuando el programa termina, la unidad
vuelve automáticamente al modo fuente anterior.
• Cuando esta función es activada, TUNEi/k, A.ME/
PS, LO, INFO, y los botones de estaciones
preconfiguradas no funcionarán para sintonizar
estaciones.
•Sin embargo, si se pulsar FUNCTION paracambiar
el modo fuente durante la sintonización activada por
temporizador, el programa es cancelado.
MANEJO DEL
REPRODUCTOR DE CD
Reproducción de CD
Usted puede reproducir CDs, CD-Rs, y CD-RWs
siguiendo el procedimiento descrito a continuación.
1Pulse zpara abrir el panel frontal.
2Inserte un CD.
El panel frontal será cerrado automáticamente y la
expresión “CD” aparece en la pantalla indicadora.
El CD empieza a sonar.
Si ya hay un CD dentro del aparato, pulse
FUNCTION variasvecesparaseleccionarelmodo
reproductor de CD.
En la reproducción normal, cuando se termina la
última sección o canción, el aparato retorna a la
primera sección y continúa tocando.

La etiqueta hacia arriba
Tiempo de reproducción
Indicador de CD transcurrido
Número de sección
Para Pulsar
Expulsar un CD z*
Saltar a la sección siguiente t
Volver al principio de la r
sección en curso
Cada pulsación añadida
salta hacia atrás una sección
Localizar un punto Pulsar y mantener
específico dentro de apretado ro t
una sección hasta encontrarelpunto.
*Cuando se retire el CD, el panel frontal se cerrará
automáticamente luego de un momento.
Para cerrar el panel frontal manualmente, pulse z
mientras el panel frontal este abierto.
Nota
•CuandosehacesonarunCDqueyaestabadentrodel
aparato, la reproducción comienza en el punto donde
se paró la última vez. Un CD recién introducido
comienza por la primera sección.
•UnCD-Ro CD-RW puede tardar un rato en activarse,
pero esto no implica un mal funcionamiento.
•Si se introduce un CD-R o CD-RW sin datos grabados
o con datos incompatibles, la expresión “ERROR03”
aparece en pantalla. El aparato no puede reproducir
tales discos.
Localización inicial
Se puede localizar una sección o canción determinada
escuchando los 10 primeros segundos de todas las
secciones del CD.
1Pulse INT durante la reproducción del CD.
La expresión “SCAN” aparece en pantalla.
2Vuelva a pulsar INT cuando se llegue a la sección
deseada.Elaparatoregresaalareproducciónnormal
del CD.
Repetición de una misma sección
Se puede escuchar la misma sección repetidamente.
1Pulse REP1 durante la reproducción del CD.
La expresión “REPEAT1” aparece en pantalla.
Para cancelar la función “repetición de sección”,
pulse REP1 de nuevo.
Reproducción aleatoria
Se pueden reproducir todas las secciones en orden
aleatorio.
1Pulse RNDM durante la reproducción del CD.
La expresión “RANDOM” aparece en pantalla.
Para cancelar la reproducción aleatoria, vuelva a
pulsar RNDM.
Nota
Durante la reproducción aleatoria, la pulsación de r
permitesaltarsolamentehastaelprincipiodelasección
en curso, no a la sección anterior.
EQUIPOS ACCESORIOS
Para escuchar reproductores portátil de
cintas/MD/MP3 y otros equipos
Se pueden escuchar otros equipos conectándolos al
aparato. Consulte las instrucciones de manejo de los
equiposrespectivosparaunainformaciónmásdetallada.
Antes de conectar el equipo correspondiente, retire los
CDsintroducidosparaprevenirposiblesdañosalaparato.
Enchufe AUX IN
1Conecteel reproductor portátilde cintas/MD/MP3 u
otroequipoalenchufeAUXIN(3,5mmdediámetro)
del aparato.
2Pulse FUNCTION varias veces hasta que la
expresión “AUX IN” aparezca en pantalla.
Nota
Cuando un cable de conección es conectado al zócalo
AUXIN(Entradaauxiliar),nopodráintroduciroexpulsar
unCD aun si se pulse z. Asegúresede desconectar el
cableantesdeintroduciroexpulsarunCD.Delamisma
forma, asegúrese de desconectarlo antes de apagar el
contacto, o sino el panel frontal no será retractado.
OTRAS FUNCIONES
Cambio del contraste de la pantalla
indicadora
1PulseymantengaFUNCTION hastaque“CONT.”,
aparezca en la pantalla indicadora.
2Pulse +o –para ajustar el contraste.
5
ESPAÑOL

ESPAÑOL
Cambiodelcolordeiluminacióndelasteclas
Sepuedeescogerentredoscolores paralailuminación
de las teclas: azul o rojo.
1Pulse y mantenga apretado FUNCTION hasta
que la expresión “CONT.” aparezca en pantalla.
2PulseTUNEio TUNEkhasta que“ILL”aparezca
en la pantalla indicadora.
3Pulse +o –para seleccionar 1 (para azul) o 2 (para
rojo).
VOLANTE DE
CONTROL REMOTO
Botones del control remoto
1Botón VOLUME +:Para subir el volumen.
2Botón VOLUME -:Para bajar el volumen.
3Botón FUNCTION : Para seleccionar los modos
Radio, Reproductor de CD, Cambiador de CD o
Modo AUX IN.
4Botón DISC/PRESET :
(CD) Para saltar al principio de la sección en curso.
Cada pulsación añadida, salta una sección hacia
atrás.
(Radio) Para sintonizar la siguiente estación
preconfigurada en orden descendente.
(Cambiador de CD)
Pulsary soltar parasaltaral principiode lasección
en curso o a la sección anterior.
Pulsar y mantener apretado para cambiar al CD
anterior.
5Botón DISC/PRESET :
(CD) Para saltar a la próxima sección.
(Radio) Para sintonizar la siguiente estación
preconfigurada en orden ascendente.
(Cambiador de CD)
Pulsar y soltar para saltar a la sección siguiente.
Pulsar y mantener apretado para cambiar al CD
siguiente.
MANEJO DEL
CAMBIADOR DE CD
Reproducción de CD
Se pueden reproducir CDs a partir de un cambiador de
CD AIWA conectado al aparato. Para información más
detallada sobre la instalación de un cambiador de CD,
consulte el manual de instalación y conexión que viene
con el mismo.
:
Indicador del cambiador de CDs Número de sección
Número de CD
1PulseFUNCTION variasveceshastaqueaparezca
“CD-CH”.
El cambiador de CD da comienzo a la reproducción.
Para Pulsar
Saltar a la sección siguiente t
Saltar al principio de la
sección en curso o a la r
sección anterior
Avanzar rápidamente para y mantener apretado el
localizar un punto determinado botónt, y soltarlo al
llegaralpunto deseado
Retroceder rápidamente para y mantener apretado el
localizar un punto determinado botónr, y soltarlo al
llegaralpunto deseado
Hacer que el cambiador de
CDs salte a la primera sección DISC N
del disco siguiente
Hacer que el cambiador de
CDs salte a la primera sección DISC M
del disco anterior
Localización inicial
Se puede localizar una sección o canción determinada
escuchando los 10 primeros segundos de todas las
secciones de los CDs que hay en la bandeja de discos.
1PulseINTdurantelareproduccióndelcambiadorde
CDs.
La expresión “SCAN” aparece en pantalla.
2Vuelva a pulsar INT cuando se llegue a la sección
deseada.Elaparatoregresaalareproducciónnormal
del CD.
Repetición de una sección
Se puede escuchar la misma sección repetidamente.
1PulseREP1 durante lareproducción del cambiador
de CDs.
La expresión “REPEAT1” aparece en pantalla.
Para cancelar la repetición de la sección, vuelva a
pulsar REP1.
ESPAÑOL
6

Botón de reconfiguración
Si un CD no funciona bien, pulse el botón de
reconfiguración con un objeto puntiagudo, como por
ejemplounlápiz,etc.Tengaencuentaquesiestebotón
sepulsa,todassusconfiguracionesquedaránborradas.
Botón de reconfiguración
MANTENIMIENTO
Limpieza del panel delantero
Limpie la superficie con un trapo suave y seco.
ESPECIFICACIONES
RADIO
(FM)
Intervalo de frecuencia: 87,5 MHz – 108 MHz
(incrementos de 100-kHz)* ó 87,5 MHz – 108 MHz
(incrementos de 50-kHz)*
Sensibilidad utilizable: 12,7 dBf
Sensibilidad silenciadora 50 dB: 17,2 dBf
Banda de rechazo IF: 80 dB
Respuesta en frecuencia: 30 Hz –15.000 Hz
Relación Señal/Ruido: 63 dB
Separación estéreo: 35 dB a 1 kHz
Selectividad de canal alternativo: 70 dB
Relación de captación: 3 dB
(AM)
Intervalo de frecuencia: 530 kHz – 1.710 kHz
(incrementos de 10-kHz)* ó 531 kHz – 1.602 kHz
(incrementos de 9-kHz)*
Sensibilidad utilizable: 30 µV (30 dB)
*Ajuste el incremento de frecuencia para su área
usando el conmutador en la parte inferior de la
unidad. (El conmutador está ajustado de fábrica a la
posición 10k [para los estados unidos]).
CD
Respuesta en frecuencia: 17 Hz – 20 kHz +0/–3 dB
Intervalo dinámico: Más de 80 dB
Separación de canales: Más de 65 dB
Relación Señal/Ruido: Más de 85 dB
Fluctuación y trémolo: No aplicable
AUDIO
Máxima potencia de salida: 50 W x 4 canales
Entrada AUX IN
Sensibilidadde entrada (impedanciade carga) AUX
IN: 300 mV (10 kΩ)
Repetición de un disco
Se pueden escuchar todas las secciones de un mismo
disco repetidamente.
1Pulse REP durante la reproducción del cambiador
de CDs.
La expresión “REPEAT” aparece en pantalla.
Para cancelar la repetición del disco, vuelva a
pulsar REP.
Reproducción aleatoria
Se pueden reproducir en orden aleatorio todas las
secciones de los CDs que hay en la bandeja de discos.
1PulseRNDMdurantelareproduccióndelcambiador
de CDs.
La expresión “RANDOM” aparece en pantalla.
Para cancelar la reproducción aleatoria, vuelva a
pulsar RNDM.
Nota
Si durante la reproducción aleatoria se pulsa r, el
aparato salta al principio de la sección en curso. En la
reproducción aleatoria, el aparato no puede saltar a
secciones tocadas previamente.
Información textual de CD (título de Disco y
sección)
La información textual de CD está disponible sólo si el
Cambiador de CD AIWA (ADC-EX108,etc.) el cuál
soporte texto de CD, sea conectado a esta unidad y un
CD con texto de CD sea reproducido en este.
Al presionar DISP se recorre un ciclo en orden a través
de los siguientes artículos:
RADIO/Reproducción de CD/Indicación de la
reproducción del Cambiador de CD →Título de Disco*
→Título de sección* →Reloj
*La información textual de CD es visualizada sólo
cuando es disponible.
LOCALIZACIÓN DE
AVERÍAS
Códigos de errores
En los siguientes casos aparece la correspondiente
indicacióndelcódigodeerror.Sigalasrecomendaciones
presentadas abajo para resolver los problemas
mencionados. Si la indicación del código de error no
desaparece,consulteenuncentrodeserviciosdeAIWA.
ERROR01 La bandeja de discos no está bien metida
enelcambiadordeCDs.Vuelvaameterla
bandeja. Consulte el manual de
instrucciones del cambiador de CDs.
ERROR02 La bandeja de discos no tiene CDs.
IntroduzcaCDsapropiadamente.Consulte
el manual de instrucciones del cambiador
de CDs.
ERROR03 Error de centrado. Compruebe que el CD
está bien metido (con la cara
correspondiente hacia arriba, etc.), y que
el CD contiene datos válidos.
ERROR04 Problema en el cambiador de CDs.
Reconfigure el aparato pulsando el botón
de reconfiguración. Si esto no resuelve el
problema,consulteenuncentrodeservicio
AIWA.
7
ESPAÑOL

ESPAÑOL
GENERAL
Voltaje del suministro eléctrico: 14,4 V (11 a 16 V
permisibles), CC, tierra negativa
Impedancia de carga: 4 Ω
Control de tono:
Graves ± 10 dB a 100 Hz, Agudos ± 10 dB a 10 kHz
Voltaje de la salida de la preamplificación
(impedancia de carga): 4 V (10 kΩ)
Tamaño instalado: 182 (An) x 53 (Al) x 155 (Pf) mm
VOLANTE DE CONTROL REMOTO
Dimensiones: aprox. 67 (An) x 26 (Al) x 27 (Pf) mm
(excepto la funda)
Peso: aprox. 38 g (incluyendo funda, batería)
Accesorios suministrados: Utillaje de instalación (1
juego), pila de litio (1)
•Las especificaciones y la apariencia externa pueden
variar sin notificación debido a mejoras introducidas
en el producto.
PANEL TRASERO
ESPAÑOL
8

PRÉCAUTIONS
•Utilisezuniquementuncircuitélectrique12VCCavec
négatif à la masse.
•Débranchez la borne négative de la batterie avant de
monter et de raccorder l’appareil.
•Lorsque le fusible doit être remplacé, veillez à utiliser
un fusible de remplacement de même calibre.
L’utilisation d’un fusible de plus gros calibre peut
sérieusement endommager l’appareil.
•N’essayezPASdedémonterl’appareil.Lerayonlaser
émis par la lentille de lecture est dangereux pour les
yeux.
•Vérifiezque desépingles ou d’autresobjets étrangers
ne pénètrent pas à l’intérieur de l’appareil car ils sont
susceptibles de provoquer des dysfonctionnements
ou de vous exposer à des risques tels qu’une
électrocutionouuneexpositionaurayonnementlaser.
•Si votre véhicule est resté longtemps au soleil, ce qui
se traduit par une élévation considérable de la
température intérieure, laissez refroidir l’appareil
pendant un certain temps avant de l’utiliser.
•Réglez le volume à un niveau qui vous permette
encored’entendrelessonsextérieursliésàlasécurité
(avertisseurs sonores, sirènes, etc.).
REMARQUE
Cetéquipementaététestéetaétécertifié commeétant
respectantleslimitesd’unappareildigitaledeClasseB,
conformément à la Partie 15 des lois FCC. Ces limites
sont désignés pour assurer une protection résonnable
contre de dangereuses interférences dans une
installation résidentielle.
Cet équipement produit, utilise, et peut émettre une
énergie de fréquence radio et, s’il n’est pas installé ou
utilisé conformément aux instructions, peut causer de
dangereuses interférences avec les communications
radio. D’autre part, il n’y a pas de garantie que
l’interférence ne surviendra pas dans une installation
particulière. Si cet équipement cause de dangereuses
interférences avec la radio ou la réception télévisée, ce
qui peut se déterminer par la mise en arrêt et la remise
en marche de la machine, l’utilisateur est encouragé à
essayerdecorrigerl’interférenceparunouautremoyen
que les suivants:
—Réorienter ou relocaliser l’antenne.
—Augmenter la séparation entre l’équipement et le
récepteur.
—Branchez l’équipement à une prise de circuit
différente de celle à laquelle est branché le
récepteur.
—Consultez le vendeur ou un technicien radio/TV
expérimenté pour de l’aide.
ATTENTION
Les modifications ou réglages apportés à l’appareil et
non explicitement approuvés par le fabricant peuvent
invalider le droit de l’utilisateur à utiliser ce produit.
TABLE DES MATIÈRES
PROTECTION ANTIVOL .......................................... 2
FONCTIONNEMENT DE BASE, RÉGLAGE
DU SON ET DE L’HORLOGE ............................... 2
MODE RADIO ........................................................... 3
MODE CD ................................................................. 4
MATÉRIEL AUXILIAIRE ........................................... 5
AUTRES FONCTIONS ............................................. 5
COMMANDE À DISTANCE AU VOLANT................. 6
CHANGEUR DE CD ................................................. 6
DÉPANNAGE ........................................................... 7
ENTRETIEN.............................................................. 7
CARACTÉRISTIQUES ............................................. 7
Remarques relatives aux CD
•L’utilisation de CD défectueux ou
poussiéreux peux provoquer des
“blancs” dans la lecture.
•Manipulez les CD comme indiqué
sur la figure.
•Ne touchez PAS le côté du CD opposé à l’étiquette.
•Ne fixez absolument RIEN (étiquette ou autre) sur le
CD, quelle que soit la face.
•N’exposez PAS le CD au rayonnement solaire direct
ou à une chaleur excessive.
•Nettoyez un CD sale du centre vers la périphérie à
l’aide d’un chiffon de nettoyage.
N’utilisez jamais de solvants et notamment la benzine
ou l’alcool.
•Cet appareil ne peut pas lire les CD de 8cm.
•N’insérez JAMAIS un CD de 8cm placé dans un
adaptateur ou des CD de forme irrégulière.
L’appareilpourrait être incapablede les éjecteretêtre
ainsi affecté d’un mauvais fonctionnement.
Mode DEMO (Démonstration)
L’unitéestmunied’unafficheurdemodeadditionnelqui
démontrelemoded’opérationeffectuéparl’unité.L’unité
bascule sur le mode DEMO automatiquement si vous
tournez l’unite sur ON et vous laissez comme elle est
pour 5 secondes après que toutes les connections
soient accomplies.
Pour annuler le mode DEMO
Pendant le mode DEMO, appuyer et maintenez l’appui
sur DISP pour plus de 2 secondes.
Pour revenir au mode DEMO, appuyez et maintenez
l’appuisurDISPencoreunefoispourplusde2secondes.
Outre les CD ordinaires, cet appareil peut également lire les CD-R et les CD-RW. Toutefois, n’utilisez JAMAIS
un CD-R ou un CD-RW vierge ou contenant des données dont le format n’est pas reconnu, comme des fichiers
MP3 ou d’autres fichiers informatiques.
Selon les conditions de l’équipement d’enregistrement, la donnée texte contenue dans un CD-R ou un CD-RW
paut ne pas être affichée.
1
FRANÇAIS

FRANÇAIS
Mise en sourdine
1Appuyez brièvement sur PWR/MUTE.
L’indicateur MUTE émet des flashs.
Pour rétablir le volume, appuyez de nouveau
brièvement sur PWR/MUTE.
Réglage du son
Vous pouvez sélectionner les modes suivants pour
régler le son en fonction de la music que vous entendez:
BASS (basses fréquences), TRE (hautes fréquences),
BAL (gauche/droite), FAD (devant/arrière), H-BASS
(graves renforcés)*, et DSSA (L’ajustenment du
conducteur du stage du son “Drivers Sound Stage
Adjustment” )**
* Vous pouvez renforcer le son grave.
** Vous pouvez ajuster le stage du son et la balance
sonorepourmieuxservirunsiègeparticulierdevotre
voiture.
1Appuyezplusieurs foissur SEL pour sélectionnerle
mode à régler.
L’appuisurSEL vousfaitbasculerentrelesdifférents
modes. L’indicateur du mode sélectionné apparaît.
2Appuyez sur +ou –pour augmenter ou diminuer de
niveau pour le mode sélectionné (excepté pour H-
BASS et DSSA).
En mode H-BASS, appuyez sur +ou –pour
sélectionner 1 (bas), 2 (moyen), 3 (haut), ou OFF.
En mode DSSA, appuyez sur +ou –pour
sélectionnerL(pourlesiègefrontalducôtégauche),
R (pour le siège frontal du côté droit), ou OFF.
Remarque
•Le réglage d’un niveau ou la sélection d’un article
doivent être dans un laps de temps ne dépassant pas
les 5 secondes, faute de quoi le mode sélectionné
reviendra sur son état précédent.
•QuandleDSSAestactivé,vousnepouvezpasajuster
les BAL, FAD, BASS, et TRE.
Alignement des niveaux de la source
(Réglage des niveaux de la source)
Levolumepeutvarieràchaquechangementdesource.
Danscecas,vouspouvezalignerlevolumedesdiverses
sources afin qu’elles aient à peu près le même niveau.
1Appuyez plusieurs fois sur FUNCTION pour
sélectionner le mode souhaité.
2Appuyez simultanément sur DISP et sur SEL.
L’indication “LEVEL0” apparaît sur l’afficheur.
3Appuyez sur +ou –pour ajuster le niveau.
Remarque
Le niveau doit être réglé dans un laps de temps de 5
secondesau plus,faute dequoi lafonction estannulée.
Rétablissement des réglages d’usine
1Mettez l’appareil hors tension.
2Maintenezl’appuisurDISPjusqu’àcequel’indication
“LEVEL --” apparaisse sur l’afficheur.
Remarque
Vous pouvez rétablir les réglages d’usine uniquement
pour VOL, BASS, TRE, BAL, FAD, H-BASS, et DSSA
ainsiquepourlesniveauxdevolumedesourcealignés.
PROTECTION ANTIVOL
(Panneau Frontal Escamotable)
Quand l’allumage de votre voiture se met en arrêt, le
panneau frontal sera escamoté automatiquement
comme s’il n’ y avait pas de radio d’automobile sur la
console.
Quandl’allumageestcalésurlespositions ACCouON,
le panneau frontal apparaîtra automatiquement.
FONCTIONNEMENT DE
BASE, RÉGLAGE DU
SON ET DE L’HORLOGE
Mise sous tension et hors tension
•Vouspouvezmettrel’unitéenmarcheenappuyantsur
n’importe quel buton du panneau frontal excepté z.
L’unité se met aussi en marche quand vous appuyez
sur zet vous insérez un CD.
•Maintenez l’appui sur PWR/MUTE jusqu’à ce que
l’appareil soit hors tension.
Remarque
La plupart des opérations décrites dans ce manuel
exigent que l’appareil soit sous tension avant de les
lancer, sauf indication contraire explicite.
Changement de la source
1Appuyez sur FUNCTION .
L’appui sur FUNCTION sélectionne
successivementlesdifférentessourcesdansl’ordre
suivant:
*L’indication“CD”n’apparaîtpassurl’afficheurlorsqu’il
n’y a aucun CD dans l’appareil.
** Le modeLecture duchangeur deCD (Valablequand
un changeur de CD optionel est connecté)
Réglage du volume
1Appuyez sur +ou –.
Le témoin VOL (volume) clignote.
FRANÇAIS
2

Pour arrêter la recherche auto, appuyez de
nouveau sur TUNEiou sur TUNEk.
Mode Mono
Lorsque les signaux FM deviennent faibles ou que la
réception FM se dégrade, l’appareil passe
automatiquement en mode Mono pour réduire les
parasites.
Mode Local
Lemodelocalvous permetdevousmettre àl’écoutede
seules les stations à forte émission durant la recherche
automatique (Seek Tuning).
1AppuyezsurLOavantdecommenceràrechercher.
L’indication “LO” apparaît sur l’afficheur.
PourreveniraumodeDistant,appuyezsurLOencore
une fois.
L’indication“LO”disparaîtetl’unitésecalesurtoutesles
stations recevables.
Utilisation de stations préréglées
Vous devez prérégler des stations avant de pouvoir les
sélectionner à l’aide des touches numériques.
Touchesde stations préréglées1 à 6
Numéro de la station préréglée
Préréglage automatique des stations
(Mémorisation Automatique)
1Appuyez plusieurs fois sur FUNCTION pour
sélectionner la bande désirée (F1, F2, F3, A1 ou
A2).
2Maintenez l’appui sur PS/A.ME jusqu’à ce que le
préréglage automatique démarre.
L’appareilmémorisejusqu’à6stationsdanschaque
bande.
Après l’achèvement de la programmation
automatique, l’unité vous met à l’écoute de toutes
les stations radio enregistrées dans l’ordre des
butons de programmation de stations lors de la
programmation (Preset Scan : Vérifications des
stations préréglées).
Pourannulerlepréréglageautomatique,appuyezde
nouveau sur PS/A.ME.
Vérification des stations préréglées (fonction
Preset Scan)
1Appuyez brièvement sur PS/A.ME.
L’appareil se cale sur chaque station préréglée
pendant 5secondes, dans l’ordre.
Pour annuler la fonction Preset Scan, appuyez de
nouveau sur PS/A.ME ou sur une touche de station
préréglée.
Miseensourdinedusonémisparlestouches
1Mettez l’appareil hors tension.
2Maintenezl’appuisurSELjusqu’àcequel’indication
“BEEP” apparaisse sur l’afficheur.
3Appuyez sur +ou –pour sélectionner “ON” ou
“OFF”.
4Apuyez sur SEL.
L’unité est hors tension (off).
Réglage de l’horloge
1Maintenez l’appui sur SEL jusqu’à ce que le voyant
de l’horloge clignote sur l’afficheur.
2Appuyez sur TUNEk(pour régler les heures) ou
TUNEi(pour régler les minutes) et appuyez sur +
ou –.
3Appuyez sur SEL.
Affichage de l’horloge
1Appuyez sur DISP.
Pour revenir à l’affichage antérieur, appuyez de
nouveau sur DISP.
MODE RADIO
Accord sur une station
(Accord Automatique Ou Manuel)
Témoin de bande* Affichage de la fréquence
Indicateur local Témoin stéréo
*“F” signifie FM, et “A” signifie AM.
1Appuyez plusieurs fois sur FUNCTION pour
sélectionner la bande souhaitée (F1, F2, F3, A1 ou
A2).
2Appuyez sur TUNEi(fréquencesplusélevées)ou
sur TUNEk(fréquencesmoins élevées)pour vous
accorder sur une station.
La mention “ST” apparaît sur l’afficheur lorsqu’une
station FM émet en stéréo et que la réception est
bonne.
Accord par recherche automatique ou manuelle
des stations
•Maintenez l’appui sur TUNEiou sur TUNEk
jusqu’à ce que la recherche automatique des
stations démarre.
L’appareil détecte automatiquement une station
(Recherche Auto).
•AppuyezplusieursfoissurTUNEiousurTUNEk
pour rechercher une station particulière, ce qui a
poureffetd’augmenteroudediminuerlafréquence
pas à pas (Recherche Manuelle).
3
FRANÇAIS
Table of contents
Languages:
Other Aiwa Car Receiver manuals

Aiwa
Aiwa CDC-MP3R User manual

Aiwa
Aiwa CDC-R507M User manual

Aiwa
Aiwa CDC-X135 User manual

Aiwa
Aiwa NSX-A909 User manual

Aiwa
Aiwa CDC-Z106 User manual

Aiwa
Aiwa CT-X430M User manual

Aiwa
Aiwa CDC-R146M Specification sheet

Aiwa
Aiwa CSD-A340 K(H) User manual

Aiwa
Aiwa CDC-X447M User manual

Aiwa
Aiwa NSX-MT90 User manual