manuals.online logo
Brands
  1. Home
  2. •
  3. Brands
  4. •
  5. Aiwa
  6. •
  7. Cassette Player
  8. •
  9. Aiwa HS-JS385 User manual

Aiwa HS-JS385 User manual

anua PREPARATIVES ❑
PREPARATION t?i
PRECAUCIONES PRECAUTIONS PREPARATION ❑
PRECAUTIONS
HS=JS385W
STEREORADIOCASSEITERECORDER
RADIO-CASSETTEESTEREOFONICO
OPERATING INSTRUCTIONS
INSTRUCCIONES DE MANEJO
MODE D’EMPLOI
88-HJ7-901 -01
980311 AAS-P9
Printed in Malaysia AIWA CO.,LTD.
Pour maintenir de bonnes performances
●Nepasutiliser l’unite dansdes endroits extr@mement
chauds, froids, poussiereux ou humides. En
particulier, ne pas Iaisser I’appareil clans un endroit:
●avec une humidite importance comme clans une
sane de bain
●Pres d’un appareil de chauffage
●Exposr5 aux rayons directs du soleil comme clans
I’habitacle d’une voiture garee en plein soleil.
●Ranger Ies cassettes, Ies cartes magnetiques et
autres supports d’enregistrement magnetique loin
du haut-parleur, car Ies information enregistrees
peuvent 6tre effacees et du souffle peut apparaltre
sur Ies bandes magnetiques.
Remarque concernant I’@coute avec Ie casque
●Ecouter a un volume modere afin d’r$viter de subir
un dommage de I’ou’ie.
●Ne pas utiliser Ie casque en conduisant une voiture
ou a bicyclette. Cela peut constituer un danger pour
la circulation.
●II yalieu d’?+tre parficuli&rement attentif, voire
d’interrompre provisoirement I’utilisation de I’appareil,
clans des situations potentiellement dangereuses
(en traversant une rue, en faisant du jogging, etc).
●Porter Ie casque d’ecoute correctement; “L” sur la
gauche, “R” sur la droite.
Connecting the headphones
Connect the supplied headphones to the (_?jack of the
unit.
To listen through the speakers
Set the SPEAKER WIDE /SPEAKER ON /OFF/ S-
BASS switch to SPEAKER ON. o
To obtain awide and rounder sound, set the switch to
SPEAKER WIDE. @
●The speakers sound is heard in stereo.
●Even when the SPEAKER WIDE /SPEAKER ON /
OFF/ S-BASS switch is set to SPEAKER WIDE or
SPEAKER ON, the sound can be heard with the
connected headphones.
●When listening through the speakers, you cannot
emphasize low frequencies with the S-BASS .
Volume O
Adjust the VOLUME control to suit your preference.
SUPER BASS @
To emphasize the low frequencies. Set the SPEAKER
WIDE /SPEAKER ON /OFF/ S-BASS switch to S-
BASS.
Conexion de Ios auriculares
Conecte Ios auriculares que vienen con el aparato en
la toma ~de su unidad.
Escuchando por el altavoz
Ponga el selector SPEAKER WIDE/ SPEAKER ON /
OFF/ S-BASS en la position SPEAKER ON. O
Para obtener un sonido m~s vivo yamplio, ajuste el
interruptor en SPEAKER WIDE ~.
●El sonido del altavoz se escuchar~ en estereo.
●Aunque se haya puesto et selector SPEAKER WIDE/
SPEAKER ON/ OFF/ S-BASS en SPEAKER WIDE
oSPEAKER ON, el sonido se podra escuchar
tambien por Ios auriculares conectados.
●Cuando escuche el sonido mediante Ios altavoces,
no sera posible enfatizar Ias frecuencias bajas con
S-BASS.
Para conservar el buen rendimiento
●No utilice el aparato en Iugares que scan
extremadamente calurosos, fries, polvorosos o
humedos. En particular, no 10deje:
●en sitios muy htimedos, como en el bafio.
●cerca de calefacciones.
●en sitios expuestos ala Iuz directs del sol (como
dentro de un vehiculo estacionado, donde la
temperature puede subir excesivamente).
●Guarde Ios cassettes, Ias tarjetas magn&icas, y
dem& materials magn&icamente grabados
alejados del altavoz, ya que la informacih grabada
podr(a borrarse, oes posible que se produjese ruido
en Ias cintas.
Nota sobre escucha con Ios auriculares
●Escuche solo a un volumen moderado para evitar
dafio al oido.
cNo escuche con Ios auriculares mientras conduce o
monta en bicicleta. Puede converfirse en un peligro
para el tr~fico.
●Debe tener mucho cuidado odejar de utilizar
temporalmente en situaciones potencialmente
peligrosas, por ejemplo mientras camina, corre, etc.
●Lftilice correctamente Ios auriculares; “L” es izquierdo
y“R” es derecho.
Notas sobre Ias cintas de cassette
●Estire la cinta con un Mpiz oinstrument similar
antes de usarla. Una cinta floja puede romperse o
quedar atascada en el mecanismo. ❑
●Las cintas C-100 omas son extremadamente finaS
ypor 10 tanto f~cilmente deformable. No se
recomienda su uso en esta unidad.
●Para evitar el borrado accidental, utilice un
destornillador uotro objeto puntiagudo para romper
Ias Ienguetas de plastico despues de hater la
grabaci6n. ❑
@Cara A
@Lengueta de la cara A
Para grabar nuevemente en la cinta, cubra el orificio
con cinta adhesiva.
Branchement du casque
Branchez Ie casque fourni sur la prise Ode I’appareil.
Ecoute par Ie haut-parleur
R6gler Ie selecteur SPEAKER WIDE /SPEAKER ON /
OFF/ S-BASS sur SPEAKER ON. @
Pour obtenir un son plus ample et plus rend, reglez Ie
commutateur sur SPEAKER WIDE ~.
●Le son en provenance du haut-parleur sera stereo.
●M6me si Ie selecteur SPEAKER WIDE /SPEAKER
ON/ OFF/ S-BASS est regle sur SPEAKER WIDE
ou SPEAKER ON, Ie son restera audible au casque
raccorde
●Lorsque vous 6coutez Ie son via Ies haut-parleurs,
vous ne pouvez pas renforcer Ies basses frdquences
avec S-BASS.
To maintain good performance
cDo not use the unit in places which are extremely
hot, cold, dusty or humid. In particular, do not keep
the unit:
●in ahigh humidity area such as abathroom
●near aheater
●in an area exposed to direct sunlight (e.g., inside a
parked car, where there could be a considerable
rise in temperature).
●Keep cassette tapes, magnetic cards and other
magnetic recorded materials away from the speakers
as the recorded information maybe erased or noise
may occur on cassette tapes.
Note on listening with the headphones
●Listen at amoderate volume to avoid hearing
damage.
●Do not wear the headphones while driving or cycling.
It may create traffic hazard.
●You should use extreme caution or temporarily
discontinue use in potentially hazardous situations,
such as walking, jogging, etc.
●Wear them properly: Lis left, Ris right.
Notes on cassette tapes
●Take up any slack in the tape with apencil or similar
tool before use. Slack tape may break or jam in the
mechanism. ❑
cC-1OOor longer tapes are extremely thin and easily
deformed or damaged. They are not recommended
for use in this unit.
●To prevent accidental erasure, break off the plastic
tabs on the cassette tape after recording, with a
screwdriver or other pointed tool. ❑
@Side A
@Tab for side A
To record on the tape again, cover the tab
openings with cellophane tape.
Volume 0
R4gler la commande de VOLUME selon vos
preferences.
SUPER BASS @
Pour renforcer Ies basses frdquences. Mettez Ie
commutateur SPEAKER WIDE/SPEAKER ON /OFF/
S-BASS sur S-BASS,
Volumen Q
Ajuste el control VOLUME asu gusto,
SUPER BASS @
Para subrayar la frecuencia baja. Ajuste el selector
SPEAKER WIDE /SPEAKER ON /OFF/ S-BASS en
S-BASS.
OWNER’S RECORD
For your convenience, record the model number and
serial number (you will find it in the cassette holder of
your set) in the space provided below. Please refer to
them when you contact your AIWA dealer in case of
difficulty. 1(MAINTENANCE ❑
Model No. HS-JS385W MANTENIMIENTO ❑ENTRETIEN ❑
To clean the head and the tape path
After every 10 hours of use, clean the head and the
tape path with a head cleaning cassette or cotton
swab moistened with cleaning fluid or denatured
alcohol. (These cleaning kits are commercially
available.) When cleaning with acotton swab ~, wipe
the playbackkecording head ~, the erasure head o,
the pinch rollers o, and the capstans ~.
Serial No. Remarques sur Ies cassettes
●Eliminer tout mou de la bande avec un crayon ou un
objet similaire avant I’utilisation. Une bande
desserree pourratt se rompre ou s’entorfiller clans Ie
mecanisme. ❑
●Les bandes C-100 ou plus sent extr6mement fines
et elles se dbforment ou s’endommagent facilement.
II est deconseille de Ies utiliser clans cet appareil.
●Pour 6viter tout effacement accidental, briser Ies
Ianguettes en plastique de la cassette aprbs
I’enregistrement, avec un tournevis ou un autre objet
pointu. El
@Face A
@Languette pour la face A
Pour reenregistrer sur la bande, recouvrir Ies orifices
avec du ruban adhesif.
Para Iimpiar la cabeza yel paso de la cinta
Cada 10 horas de USO,Iimpie la cabeza yel paso de
la cinta, bien sea, con un cassette de Iimpiar ocon un
algodon humedecido con Iiquido de Iimpiar ocon
alcohol desnaturalizado. (Estos productos se pueden
conseguir en cualquie establecimiento comercial del
ramo), Cuando Iimpie con un algodon Iimpie o, la
cabeza de reproduction/grabacion ~, la cabeza de
borrado @, Ios rodillos de presi6n O, yIos
cabrestantes e.
Para Iimpiar el cabinete
Usar un pafio suave humedecido con una suave
solution de detergence. No use fuertes solventes tales
como alcohol, bencina odiluyente de pintura.
Pour nettoyer Ies t6tes et Ie chemin de la
bande
Apres 10 heures d’utilisation, il convient de neftoyer
Ies t6tes et Ie chemin de la bande au moyen d’une
cassette de nettoyage pour ti5tes ou d’un coton-tige
Iegerement humidifie avec du Iiquide de neftoyage ou
de I’alcool ddnature. (Ces accessoires de neftoyage
sent disponibles clans Ie commerce.) Lors du nettoyage
avec un coton-tige ~, nettoyez la t~te de lecture/
enregistrement 0, la t&e d’effacement ~, Ies galets-
presseurs @, et Ies cabestans ~.
To clean the cabinet
Use asoft cloth lightly moistened with amild
detergent solution. Do not use strong solvents such
as alcohol. benzine or thinner.
POWER SOURCES
The unit may be powered by two size AA (R6) batteries
or AC house current using the optional AC adaptor
AIWA AC-6201AC-302.
To use with dry cell batteries ❑
1Open the cover of the battery compartment @
on the bottom of the unit.
2Insert two size AA (R6) batteries with the 0and
Oproperly aligned.
3Close the cover.
If the cover of the battery compartment comes off
Reattach it as illustrated in ❑.
Battery replacement ❑
The batteries need replacement when the “M
(orange) OPE/BATT indicator turns off and the “E”
(red) indicator lights up during operation.
Note on dry cell batteries
If the dry cell batteries are not handled properly, there
may be a danger of leakage or explosion. Observe
the following precautions and handle the batteries
correctly.
●Make sure that the 0/0 marks are correctly aligned.
●Do not mix different types of batteries, or an old
battery with anew one.
●Never recharge the batteries, apply heat to them or
take them apart.
●When not using the batteries, remove them to prevent
needless wear.
. If liquid leaks from the batteries, wipe thoroughly to
remove,
To use on AC house current ❑
Connect the optional AC adaptor (AIWA AC-620/AC-
302) plug to the DC 3V @-G3 jack of the unit and
plug the AC adaptor in to an AC wall outlet.
SPECIFICATIONS Nettoyage du coffret
Utiliser un chiffon doux humecte de solution detergence
neutre, Ne pas employer de solvant puissant, tel
qu’alcool, benzine ou diluant,
FUENTES DE
ALIMENTACION Frequency range
AM: 530 – 1710 kHz
FM: 87.5 – 108 MHz
Maximum output
20 mW +20 mW (EIAJ/16 Q)
15 mW +15 mW (EIAJ/32 Q)
Power source
Battery DC 3V, size AA (R6) X2
Domestic AC power (using optional AC adaptor:
AIWA AC-620/AC-302)
Speakers
Diameter 36 mm, 4QX2
Battery life
EIAJ, 1mW output, playback
Approx. 5hours using size AA (R6P) manganese
batteries
Approx. 22 hours using size AA (LR6) alkaline
batteries
EIAJ, 10 mW output, playback
Approx. 3hours using size AA (R6P) manganese
batteries
Approx. 10 hours using size AA (LR6) alkaline
batteries
EIAJ, recording
Approx, 3.5 hours using size AA (R6P) manganese
batteries
Approx. 13 hours using size AA (LR6) alkaline
batteries
Maximum dimensions (W XHXD)
115.4 X90.7X 38.5 mm
(45/8 x35/8x 1‘/16 inches)
Weight (excluding batteries)
Approx. 205 g (7 OZ)
Accessories
Stereo microphone (1)
Stereo headphones (1)
Carrying case (1)
ALIMENTATION ESPECIFICACIONES
La unidad puede funcionar con dos pilas tamafio AA
(R6), ocon corriente alterna utilizando el adaptador
de CA optional AIWA AC-620/AC-302.
Para utilizar la unidad con pilas secas ❑
1Abra la cubierta del compartimiento de Ias pilas
@de la parte inferior de la unidad.
2Inserte dos pilas tamafio AA (R6) respetando
Ias polaridades OyO.
3Cierre la tapa.
Si ee desprende la tapa del compartimiento de
pilas
Vuelva aponer la tapa como se muestra en ❑.
Reemplazo de Ias pilas ❑
Cuando se apague el indicador OPE/BATT (naranja)
“M” yse encienda el indicador rojo “E’ durante el
funcionamiento, reemplace ias pilas.
Precauciones atener en cuenta sobre Ias pilas
Si ias pilas secas no fuesen manipuiadas
adecuadamante, podria existir peligro de fuga, asi
como de explosion. Para evitarlo deberemos seguir
10ssiguientes consejos.
●Debe asegurarse que estdn correctamente alineadas
con sus signos 0/0.
●No mezcle pilas de tipo diferente, ni una vieja con
otra nueva.
●No debe recargarlas de ninguna manera, ni
exponerlas aninguna fuente de calor.
●Cuando no vaya autilizar Ias pilas, extrdigalas para
L’appareil peut @trealimente par deux piles format AA
(R6) ou sur secteur Ai’aide de I’adaptateur secteur
optionnel Al WA AC-620/AC-302.
Aiimentation sur piles ❑
1Ouvrez Ie couvercle du compartment apiles en
appuyant sur la touche @de I’appareil.
2Installer deux piles format AA (R6) en respectant
Ies polarites 0et e.
3Refermer ie couvercle.
Si Ie couvercle du Iogement des piles se detache
Le remettre en place comme iliustre en ❑.
SPECIFICATIONS
Gama de frecuencias
AM :530-1710 kHz
FM :87,5 – 108 MHz
Salida maxima
20 mW +20 mW(EIAJ/16 Q)
15 mW +15 mW (EIAJ/32 Q)
Fuente de alimentacion
2pilas secas de 3VCC, tamatio AA (R6)
Fuente de alimentacion de CA (per medio del
adaptador de CA optativo: AC-620/AC-302 de
AlWA)
Altavoz
Di~metro 36 mm, 4QX2
Viola de pilas \
EiAJ, salida de 1 rnW, reproduction
5horas aproximadamente con Ias pilas
manganesicas tamaflo AA (R6P)
22 horas aproximadamente con Ias pilas alcalinas
tamafio AA (LR6)
EIAJ, salida de 10 mW, reproduction
3horas aproximadamente con Ias pilas
mangam%icas tamafio AA (R6P)
10 horas aproximadamente con Ias pilas alcalinas
tamafio AA (LR6)
EIAJ, grabacion
3,5 horas aproximadamente con Ias piias
mangarv%icas tamafio AA (R6P)
13 horas aproximadamente con Ias pilas alcalinas
tamafio AA (LR6)
Dimensioned maximas (An XAl XPr)
115,4 X90,7 X38,5 mm
Peso (con excepto et pilas)
205 g aproximadamente
Accesorios
Microfono estereo (1)
Estereoaudifonos (1)
Estuche de transport (1)
Plage de frequence
AM: 530 – 1710 kHz
FM: 87.5 – 108 MHz
Puissance maximaie
20 mW +20 mW (EIAJ/16 Cl)
15 mW +15 mW (EIAJ/32 Q)
Alimentation
Courant continu 3V, 2piles format AA (R6)
Secteur (avec emploi d’adaptateur secteur en option:
AIWA AC-620/AC-302)
Haut-parleur
Diam?rtre 36 mm, 4QX2
Autonomic de piles
EIAJ, sortie 1mW, en lecture
Env. 5heures avec piles au manganese format AA
(R6P)
Replacement des piles H
Remplacer Ies piles seches quand I’indicateur “M”
(orange) OPE/BATT s’eteint et que Ie voyant “E”
(rouge) s’allume pendant Ie fonctionnement.
Remarques sur Ies pilee seches
Si Ies piles seches ne sent pas manipulees
correctement, elies peuvent fuir ou exploser. Observer
Ies precautions suivantes et manipulez correctement
Ies piles.
●Verifier que Ies repbres 0/0 sent correctement
alignes.
●Ne pas melanger diffr$rents types de piles, ou une
pile usee avec une neuve.
●Ne jamais recharger Ies piles, ne pas Ies chauffer et
ne pas essayer de ies ouvrir.
●Quand Ies piles ne sent pas ufilis6es, Ies sorfir pour
&iter de Ies user inutilement.
Env, 22 heures avec piles alcalines format AA (LR6)
EIAJ, eortie 10 mW, en lecture
Env. 3heures avec piies au manganese format AA
(R6P)
Env. 10 heures avec piles alcalines format AA (LR6)
EIAJ, enregistrement
Env. 3.5 heures avec piles au manganese format
AA (R6P)
Env. 13 heures avec piles alcalines format AA (LR6)
Dimensions maximales (L XHXP)
115,4 X90,7 X38,5 mm
Poids (piles exclure)
Env. 205 g
Accessoires
Microphone stereo (1)
Casque stereo (1)
Etui de transport (1)
evitar que se desgasten innecesariamante.
●Si nota que hay una fuga, sequelas con un pai?o.
IPara utilizar la unidad con la fuente de
alimentacion de CA ❑
Conecte el enchufe del adaptador de CA optativo
(AC-620/AC-302 de AiWA) ala toma DC 3V @-@_
de la unidad yel adaptador de CA al tomacorriente
mural de CA.
●Si du Iiquide fuit des piles, Ie nettoyer
convenablement.
Alimentation sur Ie secteur Q
Brancher la fiche de I’adaptateur secteur (AIWA AC-
620/AC-302) en option sur la prise DC 3V @-@~ de
I’appareil, puis brancher I’adaptateur secteur sur une
prise murale du secteur.
●The specifications and external appearance of this
unit are subject to change without prior notice.
●Les specifications et I’aspect’ exterieu rde cet appareil
peuvent ~tre modifk% saris preavis.
COPYRIGHT
Please check the laws on copyright reiating to
recording from discs, radio or external tapes for the
country in which the machine is being used.
●Las especificaciones asi como la configuration
externa de esta unidad estan sujetas acambios sin
previos aviso. DROITS D’AUTEUR
Veuiliez respecter Ies Iois de droits d’auteur relatives
aux enregistrements de disques, de la radio ou de
cassettes clans ie pays OCIcet appareil est utilise.
DERECHOS DE AUTOR
Skvase comprobar Ias Ieyes de derechos de autor
relacionadas con la grabacion de discos, de la radio o
de cintas del pais en el que se utilice ei aparato.
——.— ——— .. ..
PLAYBACK ❑REPRODUCTION ❑LECTURE ❑GRABACION
RECORDING ENREGISTREMENT
•I
1
2
3
Ouvrir Ie compartment du Iecteur de cassettes
et introduireune cassette.
@C6te avant @C&e inverse
Apri% avoir introduit une cassette, appuyer
Iegerement surlecouvercle ducomparfimentde
lecture pour refermer celui-ci.
Regler Ie commutateur TAPE(RADIO OFF)/AM/
FM aTAPE(RADIO OFF).
Appuyer sur la touche <> PLAY pour lancer la
1Open the cassette holder and inserf acassette.
@Front side @Reverse side
When the cassette is inserted, press the cassette
holder lightly to close it.
2Set the TAPE(RADIO OFF)/AM/FM switch to
TAPE(RADIO OFF).
3Press the <p PLAY button to start playback.
1Abra el portacassettes einserta un cassette.
@Cara frontal @Cara inversa
Una vez inserfado el cassette, presione Iigeramente
el portacassettes para cerrarlo.
2Ponga et selector TAPE(RADIO OFF)/AM/FM a
la position TAPE(RADIO OFF).
3Presione el boton <b PLAY para iniciar la
reproduction.
●Use Type I(normal) tapes for recording.
●Recording can be done on both sides of the tape.
Recording from the radio ❑
Connect the headphones when recording FM
broadcasts.
1Insert acassette.
@Front side ~Reverse side
To record on only one side, insert acassette with
the side to be recorded on as reverse side,
2Set the FWDIREV switch.
To record on both sides, set to FWD.
Recording starts from the front side and stops at
the end of the reverse side.
To record on only one side, set to REV.
Recording starts from the reverse side and stops at
the end of the tape.
3Tune in to astation.
See “RADIO RECEPTION”.
4Press the .REC button to start recording.
The +>PLAY button is depressed simultaneously,
The reverse mode switch will automatically set to
Cposition.
To IIsten to the sound being recorded
Use the headphones or the speaker,
Adjusting the output volume does not affect the sound
being recorded,
If ahigh-pitched sound is heard during recording
from AM band
Set the TAPE/FM MODE/OSC switch to the position
that less noise is heard. @
Recording from the microphone ❑
●Utilice cintas Tipo I(normales) para grabacirh.
●Es posible grabar en Ias dos caras de la cinta.
Grabacion de la radio ❑
Conecte Ios auriculares cuando grabe emisiones de
FM.
●Utiliser des bandes type I(normal es) pour
I’enregistrement.
●L’enregistrement peut ~tre realise sur Ies deux faces
de la cassette.
Enregistrement apartir de la radio ❑
Raccordez Ie casque d’ecoute Iorsque vous
enregistrez des emissions FM.
1Inserer une cassette.
@C6te avant @Cdte inverse
Pour n’enregistrer que sur une seule face,
introduisez uen cassette avec la face ~enregistrer
orientee vers I’arriere.
2R6glez Ie commutateur FWD/REV.
Pour enregistrer sur Ies deux faces, r~glez-le sur
FWD. L’enregistrement demarre Aparfir de la face
avant et s’arr&e ala fin de la face arriere.
Pour n’enregistrer que sur une seule face, reglez-
Ie sur REV. L’enregistrement demarre aparfir de la
face arriere et s’arriXe ala fin de la cassette.
3Accorder une station.
Voir “RECEPTION RADIO.
4Appuyez sur la touche ●REC pour demarrer
I’enregistrement.
La touche +>PLAY s’enfonce simultanement.
Le commutateur du mode d’inversion se r6gle
automatiquement sur la position t=.
Ecoute du son en tours d’enregistrement
Utiliser Ie casque ou Ie haut-parleur.
L’ajustement du volume de sortie n’affecte pas Ie son
enregistre.
Si un son aigu se fait entendre pendant
I’enregistrement Apartir de la AM bande
Regler Ie selecteur TAPE/FM MODE/OSC sur une
position ou Ie bruit sera rdduit. @
Enregistrement apartir du microphone ❑
1
2
3
4
Inserte un cassette.
@Cara frontal @Cara inversa
Para grabar solo en una cara, inserte un cassette
como si fuera agrabar en la cara inversa.
Ajuste el interruptor FWD/REV
Para grabar en Ias dos caras, ajustelo en FWD.
La grabacion se inicia aparfir de la cara frontal yse
detiene al final de la inversa.
Para grabar solo en una cara, ajtistelo en REV.
La grabaci6n se inicia apartir de la cara inversa y
se detiene al final de la cinta,
Sintonice una emisora.
Consulte “RECEPTION DE LA RADIO.
Pulse el bot6n ●REC para iniciar la arabacion.
Basic operations
Press the following buttons. lecture.
Funcionamente b~sico
Presione Ios siguientes botones.
Para parar ■STOP
Para avanzar -la cara frontal
r~pidamente 44 la cara inversa
Para rebobinar 4< la cara frontal
~la cara inversa
●Los botones -y-no se Iiberan al final de la
cinta. Pulse el bot6n ■STOP para Iiberarlos.
●Para evitar dahar la cinta, pulse primero el boton ■
STOP antes de cambiar al modo de radio.
Para hater una pausa
Ajuste el interruptor PAUSE en la position 0 de
activaci6n (“on”). Para reanudar la reproducci6n,
ajustelo en la posici6ri 0 de desactivaci6n. Mientras
el interruptor PAUSE se encuentre en la posici6n de
activaci6n, al pulsar afondo el boton ■STOP, dicho
interruptor se ajustara en la position de desactivaci6n,
Para cambiar la cara de reproduction Q
Cambie la posici6n del selector FWD/REV.
FWD: Para reproducer la cara frontal.
REV: Para reproducer la cara inversa.
Ia
Operations de base
Appuyer sur Ies touches suivantes.
Pour arriXer ■STOP
I
To stop ■STOP
To fast forward >on the front side
+< on the reverse side
To rewind -on the front side
➤>on the reverse side
●The 4 and -buttons are not released at the
end of the tape. Press the 9STOP button to release
them.
●To prevent tape damage, press the ■STOP button
first before changing to radio mode.
-&- /
Pour avancer -sur la face avant
rapidement <sur la face arriere
IPour rebobiner I4+
sur la face avant
-sur la face arriere IEl boton <-PLAY se pulsa simult~ne~mente.
El interruptor de modo de reversion se ajustara
automaticamente en la position f=,
Para escuchar et sonido mientras 10esta grabando
Utilice Ios auriculares oel altavoz,
El ajuste del volumen de salida no afectara el sonido
que se est~ grabando.
Si se escucha un sonido agudo durante la
grabacion de la banda de AM
Mueva el selector TAPE/FM MODE/OSC ala posici6n
en la que el ruido sea menor. @
Grabacion con el microfono ❑
1Inserte un cassette.
@Cara frontal @Cara inversa
Para grabar solo en una cara, inserte un cassette
como si fuera agrabar en la cara inversa.
2Ajuste el interrupter FWD/REV
Para grabar en [as dos caras, ajtistelo en FWD.
La grabaci6n se inicia apartir de la cara frontal yse
defiene al final de la inversa.
Para grabar s610 en una cara, ajustelo en REV,
La grabacion se inicia apartir de la cara inversa y
se defiene al final de la cinta.
3Ponga el selector TAPE(RADIO OFF)/AM/FM en
la position TAPE(RADIO OFF).
4Si utiliza el microfono incoruorado. @
●Les touches -et >ne sent pas d6sactiv6es a
la fin de la cassette. Appuyez sur la touche _
STOP pour Ies desactiver.
●Pour eviter d’endommager la bande magnetique,
appuyez d’abord sur la touche ■STOP avant de
passer au mode de radio.
To pause
Set the PAUSE switch to “on”position ~. To resume
play, set it to release position 0.
While the PAUSE switch is set to “on”position, pressing
the ■STOP button fully will set the PAUSE switch to
release position.
To change the playback side @
Set the FWD/REV switch.
FWD :To playback front side
REV :To playback reverse side
1Pour introduire une pause
Reglez Ie commutateur PAUSE sur la position “on”
@. Pour reprendre la lecture, amenez-le sur la position
~. Lorsque Ie commutateur PAUSE se trouve sur la
position “on”, une pression hfond sur la touche
■STOP desactive [e commutateur PAUSE. 1
2
3
4
5
Ineert acassette.
@Front side @Reverse side
To record on only one side, inserf acassette with
the side to be recorded on as reverse side,
Set the FWDIREV switch.
To record on both sides, set to FWD.
Recording starts from the front side and stops at
the end of the reverse side,
To record on only one side, set to REV.
Recording starts from the reverse side and stops at
the end of the tape.
Set the TAPE(RADIO OFF)/AM/FM switch to
TAPE (RADIO OFF).
When using built-in microphone @
Orient the microphone to the sound source.
When using external microphone 0
Connect the supplied stereo microphone to the MIC
jack, and orient it to the sound source,
●Fix the microphone with the attached clip. O
Press the .REC button to start recording.
The <-PLAY button is det)ressed simultaneously.
Pour inverser Ie sens de lecture o
Appuyer sur Ie commutateur FWD/REV.
FWD: Pour une lecture de la face avant
REV :Pour une lecture de la face oppos6e
Pour effectuer une recherche tout en contri31ant Ie
son (avarice rapide et rembobinage)
Maintenez la touche 4ou *enfoncee en tours
de lecture. Vous pouvez rechercher I’endroit que vous
desirez ecouter en contrdant Ie son en tours d’avance
rapide ou de rembobinage. Lorsque I’endroit desire
est atteint, rel~cher la touche -ou -et reprendre
la lecture normale,
REVERSE MODE (Mode d’inversion) @
CZJ :Les deux faces sent Iues de maniere repetee.
c:Les deux faces ne sent Iues qu’une seule fois.
La lecture s’arr~te ala fin de la face opposee de
la cassette. Lorsque vous changez la face de
lecture en mode de lecture inverse, la cassette
s’arr6te.
To search while monitoring the sound (Cue and
Review)
Press and hold the ~or> button during playback.
You can search for the point you wish to listen to by
monitoring fast forward or rewind sound. When the
desired point is reached, release the 44 or E
button and resume normal playback.
REVERSE MODE @
c) :Both sides are played back repeatedly.
c:Both sides are played back once.
Playback stops at the end of the reverse side of
the tape. When you change the playback side
during reverse side playback, the tape stops.
To seiect the tape type (NORM/Hl/MTL(PB)
switch) 0
NORM :For Type I(Normal) tapes.
HVMTL(PB): For Type 11 (high/CrO,) and Type IV
(Metal) tapes.
Para buscar mientras escucha el sonido
(Iocalizacion progresiva yretrocesiva)
Pulse ymantenga pulsado el boton -0> durante
la reproducci6n. Es posible buscar el punto que desea
oir mediante el controi del sonido de avarice r/rpido o
rebobinado. Cuando Ilegue al punto deseado, soitar
el bot6n 4+ owyseguir con la reproducci6n
normal.
REVERSE MODE (Modo de inversion) @)
m:Ambas caras se reproduciran repetidamente.
c:Ambas caras se reproduciran una vez.
La reproduction se detiene al final del Iado
inverso de la cinta. Si cambia la cara de
reproduction durante la reproducci6n de la cara
inversa, la cinta se detendr4..
Saieccion del tipo de cinta (Seiector NORM/Hi/
MTL(PB)) @
NORM :Para cintas Tipo I(Normales).
H1/MTL(PB): Para cintas de Tipo II (Alto/Cromo) yde
Tipo IV (Metal).
1
2
3
4
Inserer une cassette.
@Cbte avant @CM inverse
Pour n’enregistrer que sur une seule face,
introduisez uen cassette avec la face aenregistrer
orientee vers I’arri?we,
Reglez Ie commutateur FWD/REV.
Pour enregistrer sur Ies deux faces, reglez-le sur
FWD. L’enregistrement demarre Apartir de ia face
avant et s’arriite ala fin de la face arriere.
Pour n’enregistrer que sur une seule face, r6glez-
Ie sur REV. L’enregistrement demarre aparfir de ia
face arriere et s’arr6te ala fin de ia cassette.
Regler Ie commutateur TAPE(RADiO OFF)/AM/
FM & TAPE(RADiO OFF).
Lors de I’utilisation du microphone integre @
Orienter ie microphone vers la source de son.
Lors de i’utiiisation d’un microphone externe @
Brancher Ie microphone stereo fourni ala prise
MIC et i’orienter vers la source de son.
Oriente el micr6fono ala fuen~e de son~do.
Si utiliza el microfono externo. 0
Conecte el micr6fono estereo suministrado ala
toma MIC, yorientelo ala fuente de sonido,
●Fije el microfono con el clip adjunto. O
Puise el boton ●REC para iniciar la grabacion.
El boton ●-PLAY se rmlsa simultheamente.
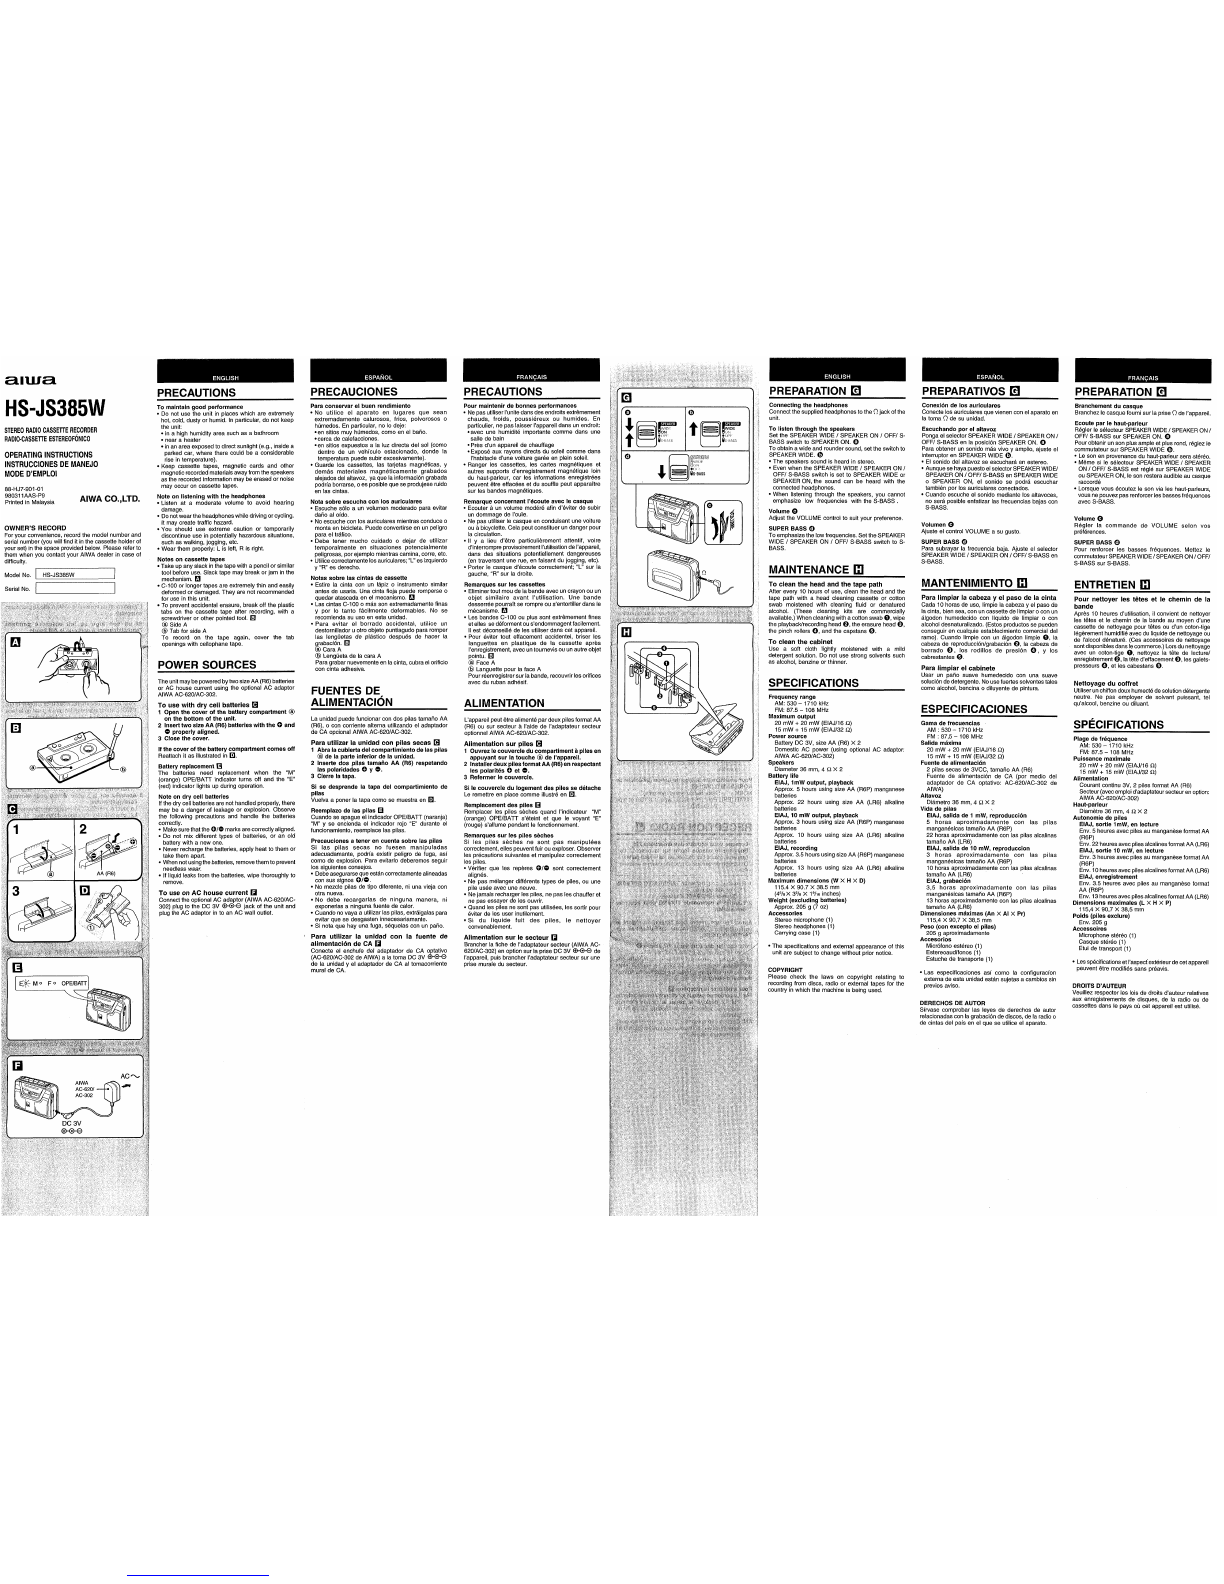
❑
1
0
TAPE/FMMODE/OSC
!<0111,!
,0ii:),(i)d}
. ST MONO .
db
5
The reverse mode switch ‘will automatically set to
Cposition. El interruptor de modo de reversion se ajustara
automaticamente en la position c.
●El microfono incorporado no funcionara si el externo
estA conectado.
Para escuchar el sonido mientras 10esta grabando
Utilice Ios auriculares, Si se oye un sonido agudo,
aleje ios auriculares yel micrdfono oreduzca el
volumen, El ajuste del voiumen de salida no afectara
al sonido que se est~ grabando.
●El sonido grabado con el microfono incorporado se
oirti en monofonico.
Funcionamente basico
Para detener la grabacion, presione el boton
■STOP.
Para introducer la grabacion en pausa, ajuste el
interruptor PAUSE en la posici6n @de activation
(“on”). Para reanudar ia grabacion, ajustelo en la
position @de desacfivaci6n.
Mientras el interruptor PAUSE se encuentre en la
position de activaci6n, al pulsar afondo el boton
■STOP, dicho interruptor se ajustara en la position
de desactivaci6n.
Al ilegar al final de la cinta
La grabacion parari, Se soltaran 10Sbotones ●REC
y<> PLAY.
Notas
●Utilice cintas fipo I(normaies) para la grabacidn. Si
se utiiizan cintas tipo IV (metal) o de fipo 11(cromo)
el sonido grabado previamente puede no quedar
completamente borrado.
●Si esta rota la Iengueta de protecci6n contra borrado
de la cara en la que se va agrabar, no sera posible
pulsar el boton ●REC.
●Durante la grabaci6n con el micr6fono, el altavoz no
emitir% sonido, aunque el selector SPEAKER WiDE /
SPEAKER ON /OFF/ S-BASS est~ ajustado en
SPEAKER WiDE OSPEAKER ON.
Pour selectionner ie type de bande (selecteur de
NORM/Hl/MTL(PB)) G
NORM :Pour bande type I(normale).
H1/MTL(PB): Pour Ies bandes type 11(CrOL) et type
IV (metal). 4
3
4
RADIO RECEPTION Q●Fixer Ie microphone au moyen du clip de fixation. O
●Buiit-in microphone will not function when the external
microphone is connected. 5Appuyez sur la touche OREC pour dr$marrer
i’enregistrement.
La touche +F PLAY s’enfonce simuitanement.
Le commutateur du mode d’inversion se regle
automatiquement sur la position ~.
●Le microphone integre ne fonctionnera pas si Ie
microphone externe est raccord&
Ecoute du son en tours d’enregistrement
Utiliser Ie casque. Si un hurlement aigu se fait
entendre, Aloigner Ie casque du microphone, ou reduire
Ie voiume. L’ajustement du volume de sortie n’affecte
pas Ie son enregistre.
●Le son enregistre via ie microphone integr6 sera
diffuse en monaurai.
Operations de base
Pour arr&ter I’enregistrement, appuyer sur la touche
■STOP.
Pour introduire une pause d’enregistrement, reglez
Ie commutateur PAUSE sur la position “on” o. Pour
reprendre I’enregistrement, amenez-le sur ia position
0.
Lorsque Ie commutateur PAUSE se trouve sur la
position “on”, une pression ~fond sur la touche
❑STOP desactive Ie commutateur PAUSE.
En fin de bande
L’enregistrement s’arr~te. Les touches ●REC et
<E PLAY sent Iiberees.
Remarques
●Utiliser des cassettes Abande type I(normale) pour
I’enregistre’ment. Avec une bande type IV (metal)
ou type 11 (chrome), Ies mak%iaux preaiablement
enregistres risquent d’~tre entibrement effaces,
●Si I’onglet de protection contre I’enregistrement de
la face aenregistrer a&6 brise, il n’est pas possible
d’enfoncer ia touche .REC.
●En tours d’enregistrement aparfir du microphone,
m6me si Ie commutateur SPEAKER WIDE /
SPEAKER ON /OFF/ S-BASS est mis sur
SPEAKER WiDE ou SPEAKER ON, aucun son ne
sera Amis par ie haut-parieur,
RECEPTION DE LA RADIO ❑
When iistening to FM broadcasts
Connect the supplied headphones to the (_?jack of
the unit, even when listening through the speakers.
The headphone cord functions as the FM antenna.
To listen to the sound being recordsd
Use the headphones. If ahigh-pitched howiing sound
is heard, move the headphones and the microphone
farther apart, or reduce the volume. Adjusting the
output volume does not affect the sound being
recorded.
●The sound recorded from the built-in microphone
will be heard in monoaural,
Cuando escuche emisiones de FM
Conecte Ios auriculares que vienen con el aparato
en la toma (1 de su unidad, incluso si oye atraves
de ios altavoces. El cable de Ios auriculares
funciona como antena de FM.
RECEPTION RADIO Q
1Set the TAPE(RADiO OFF)/AM/FM switch to AM
or FM.
The OPE/BATT indicator lights.
2Turn the TUNiNG controi to tune into astation.
Lorsque vous 6coutez des 6miasions FM
Branchez Ie casque fourni sur la prise Qde
I’appareil, m~me Iors de Wcoute via Ie haut-parleur,
Le cordon de casque fonctionne comme antenne
FM.
1Ponga el selector TAPE(RADiO OFF)/AM/FM en
la posici6n AM oFM.
Se enciende ei indicador OPE/BATT.
2Gire el control TUNING para sintonizar una
emisora.
Basic operations
To stop recording, press the ■STOP button.
To pause recording, set the PAUSE switch to “on”
Dosition ~. To resume recordina, set it to release
After listening, turn off the power by setting the
TAPE(RAOIO OFF)/AM/FM switch to TAPE(RADIO
OFF). 1R6gler Ie commutateur TAPE(RADIO OFF)/AM/
FM sur AM ou FM.
L’indicateur OPE/BAll_ s’allume.
2Tourner la commande TUNiNG pour accorder
une station.
To listen to FM stereo broadcasts @
Set the ST/MONO switch to ST.
If the FM stereo signal is weak and distorted, set it to
MONO. The sound will be monaural, but the distortion
will be reduced.
12-.
position 0.
While the PAUSE switch is set to “on” position, pressing
the WSTOP button fullv wili set the PAUSE switch to
Despu6s de escuchar, ponga el selector
TAPE(RADIO OFF)/AM/FM en la posici6n
TAPE(RADIO OFF) para desconectar el aparato,
Para escuchar emisiones en FM estereo 0
Ajuste el interruptor ST/MONO en ST.
Si ia sefiai de FM estt%eo es d~bil ose distorsiona,
ajtistelo en MONO. El sonido ser~ monofonico, pero
la distortion se reducira.
REVq@FWD
m
release position. -
Apres l’r5coute, metfre hors tension en reglant Ie
commutateur TAP E(RADi OOFF)/AM/FM sur
TAPE(RADiO OFF).
Pour ecouter des emissions FM ster~o @
R6glez Ie commutateur ST/MONO sur ST.
Si ie signal st&60 est faible et comporte des
distortions, rdglez-le sur MONO. Le son est alors
diffuse en monaural, mais ies distortions auront
diminue d’intensitc!.
Pour ameliorer ia reception ❑
FM: Le cordon de casque fonctionne comme antenne
FM. La ddployer et aissez Ie casque d%coute
raccord6, m6me Iors de I%coute via Ie haut-
parleur.
AM: Comme une antenne est incorporr5e aI’appareil,
tourner ceiui-ci pour trouver la position qui fournit
la meilleure r6ception.
When the end of the tape is reached
Recording stops. The ●REC button and the <~
PLAY button are released.
For better reception ❑
FM: The headphone cord functions as the FM antenna.
Keep it extended and keep the headphones
connected, even when listening through the
speaker.
AM: There is abuilt-in antenna inside the unit. Turn
the unit to find the position that gives best
reception.
❑
FM Notes
●Use Type I(normal) tapes for recording. if you use
Type IV (metal) or Tvpe 11 (chrome) ta~es, sound
AM
Para mejorar la recepcion K
FM: El cable de Ios auriculares funciona como antena
de FM.
Mant&galo extendido ymantenga conectados
Ios auriculares, incluso si oye atraves de Ios
altavoces.
AM: Esta unidad tiene incorporada una antena.
Cambie la direcci6n de la unidad para encontrar
la mejor position de recepci6n.
3+
Jrm)
.4,,-” -
*TAPE/1:4FfJ
that has been already recorded’ may not be
erased completely.
●if the erasure prevention tab of the side to be
recorded on is broken off, the ●REC button cannot
be depressed,
●During recording from the microphone, even when
the SPEAKER WiDE /SPEAKER ON /OFF/ S-
BASS switch is set to SPEAKER WIDE or SPEAKER
ON, no sound will be heard from the speaker.
5/’”3
..—. -—_______ ——.—

Other manuals for HS-JS385

1

This manual suits for next models

1

Other Aiwa Cassette Player manuals

Aiwa HS-PS191 User manual

Aiwa

Aiwa HS-PS191 User manual

Aiwa CSD-A210 User manual

Aiwa

Aiwa CSD-A210 User manual

Aiwa VX-T21BX1 User manual

Aiwa

Aiwa VX-T21BX1 User manual

Aiwa HS-RX418 User manual

Aiwa

Aiwa HS-RX418 User manual

Aiwa AD-F250K User manual

Aiwa

Aiwa AD-F250K User manual

Aiwa CSD-A240 User manual

Aiwa

Aiwa CSD-A240 User manual

Aiwa HV-MX100 User manual

Aiwa

Aiwa HV-MX100 User manual

Aiwa HS-PS40 User manual

Aiwa

Aiwa HS-PS40 User manual

Aiwa HS-SP190 User manual

Aiwa

Aiwa HS-SP190 User manual

Aiwa HS-TA164 User manual

Aiwa

Aiwa HS-TA164 User manual

Aiwa CSD-ES977 User manual

Aiwa

Aiwa CSD-ES977 User manual

Aiwa HS-JX807 User manual

Aiwa

Aiwa HS-JX807 User manual

Aiwa AD-F780 User manual

Aiwa

Aiwa AD-F780 User manual

Aiwa CSD-FD79 User manual

Aiwa

Aiwa CSD-FD79 User manual

Aiwa HS-JX807 User manual

Aiwa

Aiwa HS-JX807 User manual

Aiwa HS-JXM2000D User manual

Aiwa

Aiwa HS-JXM2000D User manual

Aiwa CSD-ES227 User manual

Aiwa

Aiwa CSD-ES227 User manual

Aiwa CSD-MD30 User manual

Aiwa

Aiwa CSD-MD30 User manual

Aiwa TP-M700 User manual

Aiwa

Aiwa TP-M700 User manual

Aiwa HS-TX516 User manual

Aiwa

Aiwa HS-TX516 User manual

Aiwa CSD-TD21 User manual

Aiwa

Aiwa CSD-TD21 User manual

Aiwa HS-RX490 User manual

Aiwa

Aiwa HS-RX490 User manual

Aiwa NSX-HMA56 User manual

Aiwa

Aiwa NSX-HMA56 User manual

Aiwa CSD-A319 LH User manual

Aiwa

Aiwa CSD-A319 LH User manual

Popular Cassette Player manuals by other brands

Philips AQ4150-14S Benutzerhandbuch

Philips

Philips AQ4150-14S Benutzerhandbuch

Philips AZ1412 user manual

Philips

Philips AZ1412 user manual

Pioneer H-22 Service manual

Pioneer

Pioneer H-22 Service manual

Sony CFM-A50 Specifications

Sony

Sony CFM-A50 Specifications

Sony TC-K909ES Service manual

Sony

Sony TC-K909ES Service manual

Sony WM-EX655 Service manual

Sony

Sony WM-EX655 Service manual

Marantz PMD511 Service manual

Marantz

Marantz PMD511 Service manual

Sharp QT-CD7L Bedienungsanleitung

Sharp

Sharp QT-CD7L Bedienungsanleitung

Sony TC-WR590 - Dual Cassette Deck operating instructions

Sony

Sony TC-WR590 - Dual Cassette Deck operating instructions

Enabling Devices 3710 user guide

Enabling Devices

Enabling Devices 3710 user guide

Sony Sports Walkman WM-FS400 operating instructions

Sony

Sony Sports Walkman WM-FS400 operating instructions

Sony Walkman WM-FX288 operating instructions

Sony

Sony Walkman WM-FX288 operating instructions

Sony J10 Brochure & specs

Sony

Sony J10 Brochure & specs

Onkyo TA-RW255 - Dual Cassette Deck Service manual

Onkyo

Onkyo TA-RW255 - Dual Cassette Deck Service manual

Yamaha K-720 owner's manual

Yamaha

Yamaha K-720 owner's manual

Philips N 4450 Service manual

Philips

Philips N 4450 Service manual

Sony TCS TCS-30D Service manual

Sony

Sony TCS TCS-30D Service manual

Sony Walkman WM-FX481 Service manual

Sony

Sony Walkman WM-FX481 Service manual

manuals.online logo
manuals.online logoBrands
  • About & Mission
  • Contact us
  • Privacy Policy
  • Terms and Conditions

Copyright 2025 Manuals.Online. All Rights Reserved.