anua
Las Ietras yntimeros subrayados en el texto de este manual corresponded aIas figuras. Les Ieffres et num&os en gras clans Ie texte de ce mode d’emploi correspondent aux
illustrations.
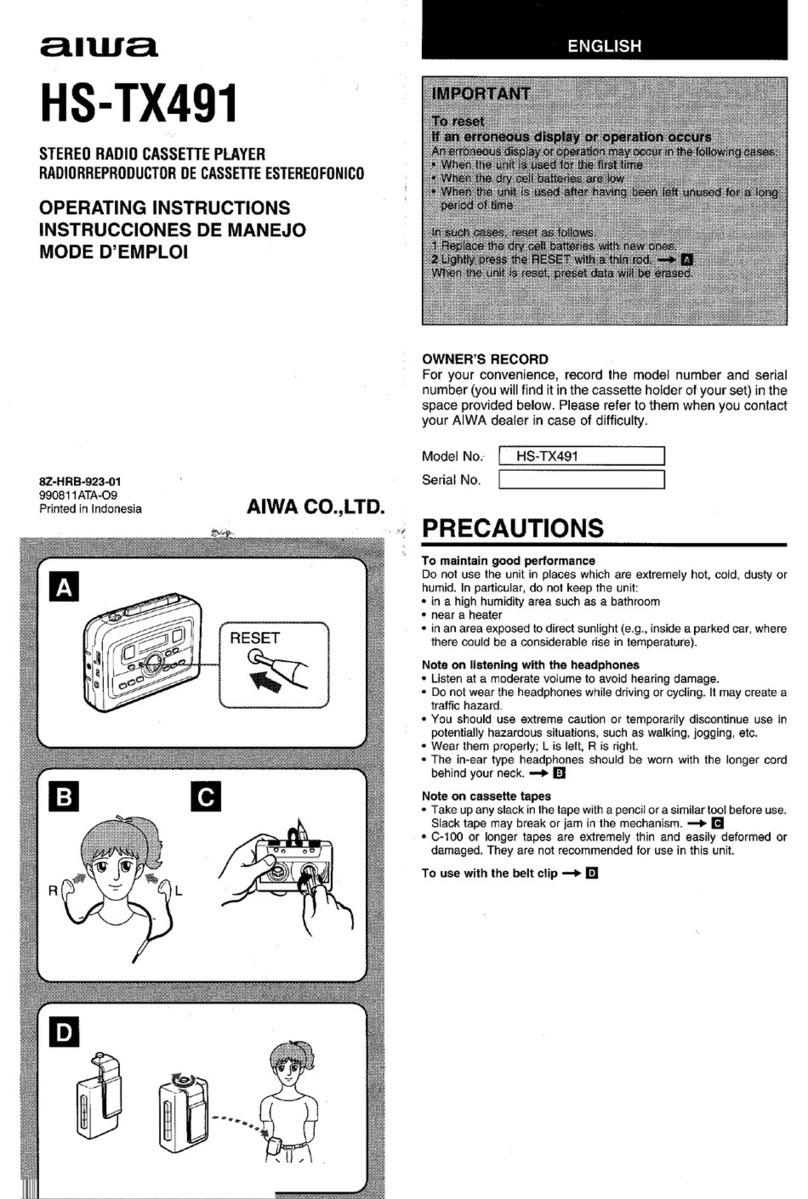
HS”RX797 OWNER’S RECORD
For your convenience, record the model number and the serial number (you will find it In
the cassette holder of your set) in the space provided below. Please refer to them when
you contact your Aiwa dealer in case of difficulty. PRECAUCIONES PRECAUTIONS
STEREORADIOCASSETTEPLAYER
RADIORREPRODUCTOR DE CASSETTE ESTEREOFONICO
Para mantener sus buenas prestaciones
No uliiice el aparato en Iugares muy calientes, fries, con polvo ohumedad. Especialmente,
no debe dejar el aparato:
●en Iugares muy humedos, por ejemplo an el bafio
●cercade lacalefacci6n
●en un Iugar expuesto aIos rayos del sol (per ejemplo dentro de un coche estacionado,
donde puede aumentar mucho la temparatura)
Notas para escuchar con Ios cascos auriculares
●Escucheaunvolumen nomuyalto para nodafiarsusoidos.
●No ufilice Ios auriculares durante la conducci6n oalandar en bicicleta. Puede ser
peligroso para el tr~nsito.
●Debe tener mucho cuidado odejar de usar provisoriamente en situaciones peligrosas,
por ejemplo cuando camina, corre, etc.
●Utilicelos correctamente: Lesizquierdoy Resderecho.
.Los cascos auricularea deben utilizarse con el cable m4a Iargo detrtls del cuello. +❑
Cintasde cassette
●Tense Ias cintas flojas antes de ufilizarlas, con un Mpiz oherramienta similar. Una clnta
floja puede romperse oatascarse en et mecanismo. -r E
●Las cintas de tOO minutes omtts son muy finas ypueden deformarse odariarse
f4cilmente, Nose recomiendasuuso.
Pour maintenir de bonnes performances
N’ulilisez pas cet appareil &des endroits chauds, froids, poussi6reux ou humides. En
parficulier, ne Ie laissez pas.
●riun endroit trbshumide, dansune sallede bainsparaxemple
●prbs d’un radiateur
●Aun endroit exposb en plein soleil (par exemple dana une voiture gar6e, ou la
tempr$rature peut consid6rablement augmenter).
Remarques sur I’r$coute avec des ecouteurs
●Ecoutez ?ivolume mod6r6 pour 6viter Ies dommages audififs.
●Ne portez pas Ies &couteurs en conduisant ou en faisant du velo. Cela pourrait provoquer
des accidents de la circulation.
*Montrez-vous trbs prudent ou arr6tez temporairement d’ufiliser Ies t$couteurs clans
des situations potentiellement dangereuses, par exemple en marchant, en faisant du
jogging.
●Portezcorrectement Ies 6couteurs: Lpourl’oreille gauche et Rpour l’oreilledroite.
●Passez-vous lecordon lepkrslong derriere lanuque. +n
Cassettes
●Retendez la bande avec un crayon ou un oufil similaire avant d’ufiliser la cassette.
Tout mou de Iabande peut provoquer unecassure ou un emm&lementdans Ie
m6caniame. -r ~
●Lescassettes ~bandede 100minutesou plus, extr6mement fines, sed6forment et
s’endommagent facilement. Leur emploi n’est pae recommand6.
Model No. HS-RX797
ISerial No. I
OPERATING INSTRUCTIONS
INSTRUCCIONES DE MANEJO
MODE D’EMPLOI
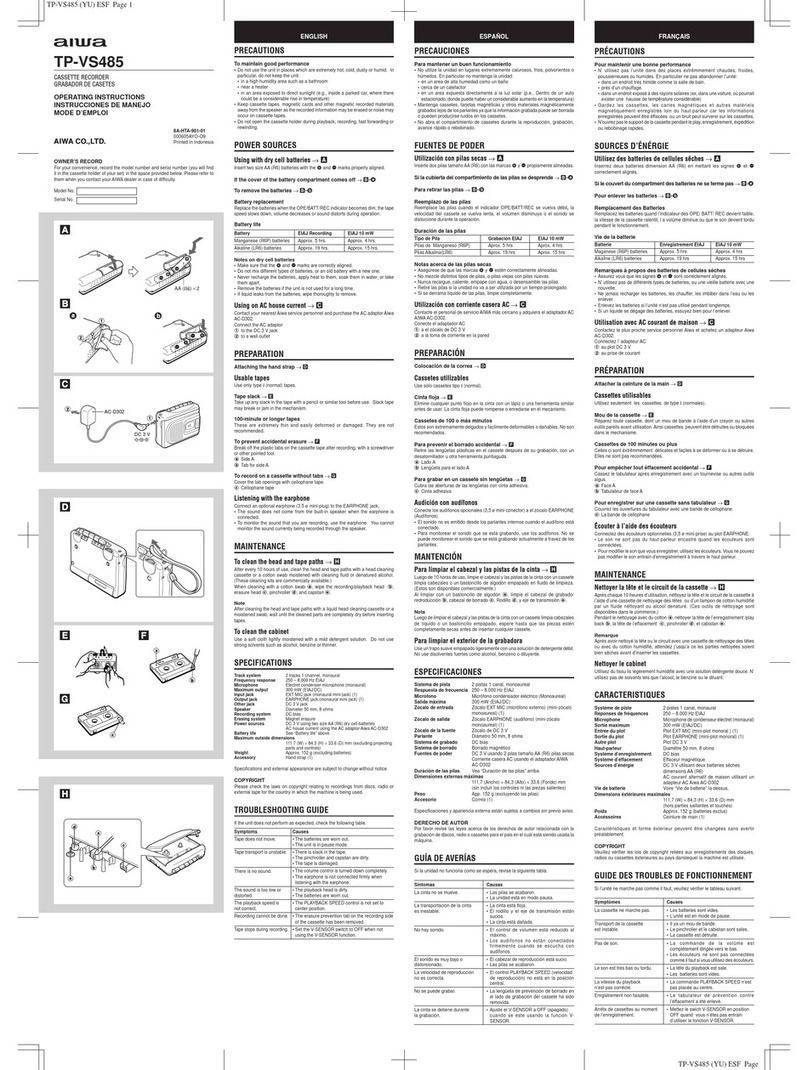
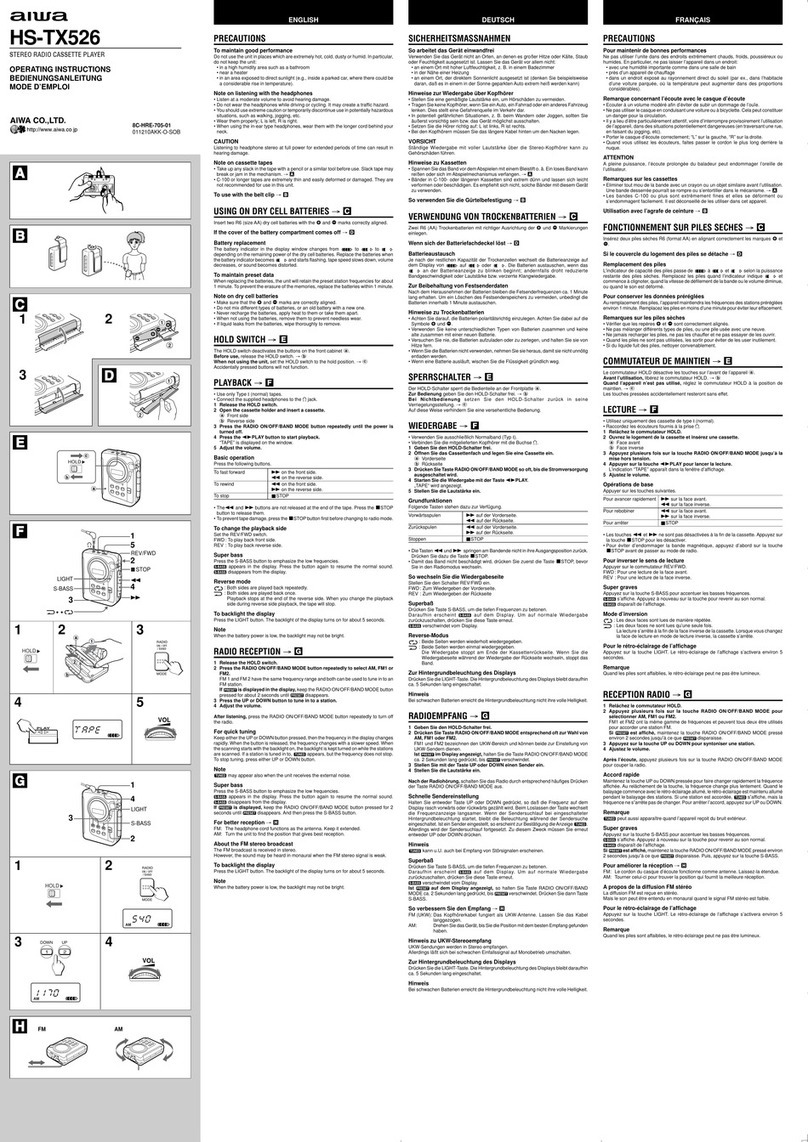
Highlighted letters and numbers in the text of this manual correspond to the illustrations.
PRECAUTIONS
To maintain good performance
Do not use the unit in places which are extremely hot, cold, dusty or humid, In particular,
do not keep the unit:
●In ahigh humidity area such as abathroom
●near aheater
●in an area exposed to direct sunlight (e,g., inside aparked car, whera it can become
extremaly hot)
Note on listening with the headphones
●Listen at moderate volumes to avoid hearing damage.
●Do not waar the headphones while driving or cycling. It may create atraffic hazard.
●You should use axtreme caution or temporarily discontinue use in potentially hazardous
situations, such as walking, jogging, etc.
●Wear them properly; Lis left, Ris right.
●The headphones should be worn with the longer cord behind your neck. +❑
Cassette tape
.Take up any slack in the tape with apencil or similar tool before use. Slack tape may
break or jam in the mechanism. -r E
●100-minute or longer tapes are extremely thin and easily deformed or damaged. They
are not recommended.
88-HR6-903-01
980605AY0-O-DO
Printed in Japan
AIWA CO.,LTD.
UTILIZATION DE LA BATERIA RECARGABLE +❑
Cuando se utiliza la bateria recargable por primers vez, cargue durante m~s de 2 horas.
1Irrstale la bateria en el cargador de baterla.
2Cargue la baterfa.
Enchufe el cargador en un tomacorriente para cargar la bateria,
Despu6s de cargar, saque la bateria del cargador de bateria ydesconecte el cargador
del tomacorriente.
3fnstale la bater[a en el aparato con Iaa marcas 43 yOcorrectamenteallneadaa.
FONCTIONNEMENT SUR BATTERIE RECHARGEABLE
*H
Chargez la bafteria rechargeable au moins pendant 2heures avant de f’utfliser pour la
premibre fois.
1lna&ez la batterie dana fe chargeur de batterie.
2Rechargez la batterie.
Branchez Ie chargeur clans une prise murale pour recharger la bafferie.
Apr& la charge, retirez la batterie du chargeur et d6branchez fe chargeur de la prise
murale.
3fns&ez Ie batterie dana I’appareil en respectant Ies polarit6s (0, O).
USING ON THE RECHARGEABLE BATTERY+ ❑Duraciones de recarga yreproducci6n (EIAJ 1mW)
Whan using the rechargeable battery for the first time, charge it for more than 2hours.
1fnaert the battery into the battery charger.
2Recharge the battery.
Plug the charger into awall outlet to recharge the battery.
After charging, remove the battery from the battery charger and disconnect the charger
from the wall outlet,
3Insert the battery into the main unit with the 4) and Omarks correctly aligned.
Recarga 3horas
Reproducci6n Aprox. 9horas
La duration de reproducci6n puede variar de acuerdo con Ias condiciones de utilizaci6n.
●Recargue cuando se apaga el indicador OPE/BATT odeja de funcionar despur% de
escucharse un timbre.
Si la tapa del comparfimiento de Ias pilas se sale +❑
Note sobre la bateria recargable
●Ufilice s610 el cargador de bater(a suministrado para recargar la bateda recargabfe
suministrada.
●No cargue durante mtis de 24 horas,
●La bater(a puede cargarse unas 500 veces. Cuando funciona durante muchos menos
tiempo que antes, c~mblela por una nueva. Hable con su tienda de productos de Aiwa.
Temps de recharge et de lecture (EIAJ 1mW)
Recharge 3heures
Lecture env. 9heures
Recharging and playback times (EIAJ 1mW) Le temps de lecture peut varier selon Ies conditions d’utilisatiom
●Rechargez quand I’indicateur OPE/BATT s’&eint ou quand I’appareil s’arr~te de
fonctionner apri% retentissement d’une tonalite hip.
Si Ie couvercle du Iogement de la pile se detache +❑
Remarque sur la batterie rechargeable
●Utifisez seulement Ie chargeur de batterie fourni pour recharger la batterie rechargeable
fournia.
●Ne chargez pas plus de 24 heures.
●La bafterie peut &re rachargr$e environ 500 fois. Remplacez-la par une neuve quand
son autonomic devient neftement plus courte, Veuillez contacter votre revendeurAiwa.
Recharging 3hours
Playback Approx. 9hours
Playback time may vary according to the conditions of use.
●Recharge when the OPE/BATT indicator goes out or operation stops after a beep
sound is heard.
If the cover of the battery compatiment comes off+ ❑FUNCIONAMIENTO CON PILAS +❑
Note on rechargeable battery
●Use only the supplied battery charger to recharge the supplied rechargeable battery.
●Do not charge for more than 24 hours.
●The battery can ba recharged approximately 500 times. When operation time becomes
noticeably shorter, replace with anew one. Please contact your Aiwa dealer.
Coloqua una pifs tamario AA (R6) con fae marcae 0yOcorrectemente aflneades.
Longevidad de la pila (1 mW EIAJ con pila alcalina LR6)
Raproducci6n Aprox. 30 horas
Reemplazo de la pila
Cambie la pila cuando se apaga el indicador OPE/BAIT odaja de funcionar despu6s
de escuchar un sonido de timbre.
Nota sobre la pila
●Verifique que Iaa marcas 0yOestfm correctamente alineadas.
●Para evitar que se produzcan fugas de electr6fito oexplosions, no recargue la pila,
caliente odesarme.
●Cuando no utilice la pila s6quela para evitar que se gaste irttitilmente.
●3i se produce una fuga de Hquido de la pila, Iimpie para poder sacarla.
Utilization de la CA del hogar
Hable con su tienda de Aiwa ycompre un adaptador de CA. Conecte el enchufe del
adaptador de CA en la toma de CC de 1.5 Ven el aparato yen el tomacorriente de la
pared,
FONCTIONNEMENT SUR PILE SECHE +❑
USING ON DRY CELL BATTERY+ Hlns&ez une pile sbche format AA (R6) en respactant Ias polarit6s (0, O).
Vie de service de la pile (EIAJ 1mW avec une pile LR6 alcaline)
Lecture Environ 30 heures
Replacement de la pile
Remplacez la pile quand Ie tbmoin OPE/BATT s%teint ou que I’appareil s’arr&e aprl% Ie
retentissement d’une tonalite hip.
Notes sur Ies piles sbches
●V&ifiez que Ies polarit6s (43, O) sent respecters.
. Pour &iter tout risque de fuite d’dectrolyte ou d’explosion, ne rechargez jamais la pila,
ne la chauffez pas et ne la d6montez pas.
●Quand la pile n’est pas utilis6e, retirez-la de I’appareil pour eviter toute uaure inufile.
●Si du fiquide fuit de la pile, essuyez bien pour Wliminer completemant.
Fonctionnement sur Ie secteur
Contactez votre revendeur Aiwa pour acheter un adaptateur secteur. Raccordez une
fiche de I’adaptateur secteur hla prise 1,5 VC.C.de I’appareil et branchez I’autre clans
une prise murale.
Insert an alze AA (R6) dry cell battev with the Oand Omerke correctly aligned.
Battery life (EIAJ 1mW using alkaline battery LR6)
Plavback Aoorox. 30 hours
Battery replacement
Replace the battery when the OPE/BATT indicator goes out or operation stops after a
beep sound is heard.
Note on dry cell battery
●Make sure that the C) and Omarks are correctly aligned.
●To prevent the risk of electrolyte leakage or explosions, never recharge the battery,
aPPIY heattoit,or take it apart.
●When not using the battery, remove it to prevent needless battery wear.
●If liquid leaks from the battery, wipe thoroughly to remove. INTERRUPTORES DE BLOQUEO (HOLD) +❑
Using on AC house current
Contact your Aiwa dealer and purchase an AC adaptor. Connact the plug of tha AC
adaptor to the DC 1.5 Vjack on the main unit and to awall outlet.
Cuendo haga funcionarcon foa controles def aparato, desactive el HOLD del aparato.
+@
Cuando haga funcionar con ef control remoto, desactive el HOLD dal control remoto.
+@
Cuando no utlllce el aparato, active ambos HOLD. -r @
No funcionar#m Ios botones aunque presione uno por error, COMMUTATEURS DE MAINTIEN +❑
HOLD SWITCHES +❑Ala commande /r I’apparell, lib6rez HOLD sur f’appareit. -+ @
Ala commande depuis ia t616commende, lib&ez HOLD sur la te16commande. --r @
Quand I’appareil n’est pas utilis6, rtrglez Ies deux HOLD ala position de mainfien, +@
La pression accidentelle d’une touche restera saris effet.
When operating with the main unit, releasa HOLD on the main unit. +o
When operating with the remote control, release HOLD of the remote control. -r@
When not using the unit, set both HOLD to the hold position.+@
Accidentaiiy pressed buttons wiil not function.
FUNCION DEL MENU+ ❑
Ajuate cada una de ias funciones Ilamando el MENU antas de hacarfuncionar el aparato.
Presione MENU para selaccionar la funci6n ypresione MODE/SET para registrar el
ajuste mientras aparezca la funci6n.
Cada vez que se presiona el MENU, ei visuaiizador cambia en el siguiente orden. FONCTION DE MENU +❑
MENU FUNCTION +❑R6glez chaque foncfion en pressant MENU avant Ie fonctionnement.
Pressez MENU pour selectionner une fonction, puis MODE/SET pour enregistrer Ie
r6glage pendant I’affichage de ia fonction.
Achaque pression de MENU, I’affichage change clans I’ordre suivant.
DOLBY B NR -) @
Al’6coute d’une caaaette enregistrc$e avec fe r4ducteur de bruit DOLBY B, pressez
MODE/SET pour afficher ON,
+
Tape type (type de cassette)+@
Pour Ilre une cassette de type I(normal), pressez MODEL’3ET pour afficher NOR,
Pour Iire une cassette detype II (high/Cr02) ou de type IV (m6tal), pressez MODE/
SET pour afficher Hi.
+
DSL +@
Pour obtenir dea graves profonds puiseante, pressez MODE/SET pour afficherON.
+
Reverse mode (mode d’inversion) +@
Pour fire de manl&e r6p6t6e lea deux faces, pressez MODE/SET pour afficher c~.
Pour Iire une fola ies deux faces, pressez MODE/SET pour afficher J
La lecture s’arr&era ala fin de la face arri~re.
+
Blank skip (saut de section vierge) +@)
Pour sauter une section de plus de 12 eecondea, preasez MODE/SET pour afficher
ON.
Dans ce cas, I’appareil passe automatiquement la section en avarice rapide et la lecture
reprend au d6but de la section enregistr6e suivante.
+
FM mode (mode FM) -r@
Quand Ie algnaf et6r60 FM est faible, pressez MODE/SET pour afficher MONO.
Remarque
●Les fonctions affichables d6pendent du mode courant de I’appareil:
●Lecture: @A@
●Reception radio FM: @et @)
●R4ception radio AM: @
●Pendant la r6ception radio, “Auto” s’affrche egalement en pressant MENU. (Voir
“Pr6r6glage automatique” au verse.)
Dolby B NR +@
Cuando escuche uns chtta grabada con la reducci6n de ruldos Dolby B, presione
MODE/SET para gue aparezcz ON.
+
Tipo de cinta +@
Para reproducer une cinta da tlpo I(normal), presione MODELSETpara que aparezca NOR.
Para reproducer clntae de tipo 11(alto/Cr02) o de tipo IV (metal), preeione MODE/
Sat each functions by pressing MENU before operation.
Press MENU to select afunction, and press MODE/SET to register the setting while the
function is displayed.
Each time MENU is pressed, the display changes in the following order.
Dolby B NR +@
When Ilsteningto atape recordedwith Dolby BNR, press MODE/SET to disptay ON.
JSET pare que aparezca H1.
4
DSL +@
Para qua fos gravea eean mis potentea, presione MODE/SET para que aparezca ON.
+
Modo de inversi6n +@
Para repatir la reproducc16n da emba$ caras, presione MODE/SET para que aparezca C3.
Para reproducer una vez ambas carae, presione MODE/SET para que aparezca A.
La reproducci6n se detiene al final de la cara inversa,
+
Salto de espaclos en blanco +@
Para aaftar una secc16n de m~s de 12 segundos, presione MODE/SET para que
aparezca ON.
En este caso el avarice r~pido se hate autom/dicamente ysigue reproduciendo cuando
aparezca la siguiente secci6n grabada.
4
Modo FM -) O
Cuando la setial FM eet&eo eat(r demasiado d6bil, presione MODE/SET para que
aparezca MONO.
Nota
●Las funciones que pueden aparecer dependen dei modo en el que eat$i la unidad.
●Reproducci6n: @a@
●Sintonizaci6n de la radio en FM: @y@)
●Sintonizac16n de la radio en AM: @
.Mlentras se eintoniza la radio aparece tambMn “Auto” presionando MENU. (Consulte
la “Memorizaci6n autom&ica” en el otro lade.)
Tape type.+ @.)
To play back aType I(normai) tape, press MODE/SET to display NOR.
To play back Type 11(high/Cr02) or Type IV (metsl) tapes, press MODE/SET to
display HI,
‘$
DSL +@
To obtain powerful heavy base, press MODE/SET to display ON.
+
Reverse mode +@
To play back both eldes repeatedly, press MODELSET to display CL).
To play back both sides once, press MODE/SET to display J.
Playback stops at the end of the reverseside.
4’
Blank skip +@
To ekip asection longer than 12 seconds, press MODE/SET to display ON.
in this case, the section is automatically fast forwarded and playback resumes from the
beginning of the next recorded section.
+
FM mode+ ~
When the FM stereo algnal ie weak, press MODE/SET to display MONO.
Note
●Functions to be displayed depend on the mode the unit is currently in.
●Playback: @to @
●FM radio reception :@and@)
●AM radio reception: @
.During radio reception, “Auto” is also displayed by prassing MENU. (Please refer to
“Automatic presetting” on the reverse side.)
El
MODE/SET
REPRODUCTION +❑
PLAYBACK +❑Conecte Ios auricuiares auministrados ala toma !? del aparato.
1Deaactive HOLD.
2Coloque un ceasette.
Deslice +OPEN para abrir el compartimiento de cassettes ycoloque un cassette.
@Cara delantera
@Cara trasera
3Presione ●>REPEAT.
La reproducci6n se iniciara deade la cara delantera, El indicador OPE/BATTse enciende.
4Ajuste el volumen.
Despu6s de haber puaato ei control VOLUME de la unidad principal en
aproximadamente 6a8, ajuste el control VOL del control remoto.
LECTURE +❑
Connect the supplied headphones to the !_!jack of the main unit.
1Releaee HOLD.
2Insart acaasatte,
Stide +OPEN to open the cassette holder, and inserf acassette.
@Front side
(@)Reverse side
3Prees <~ REPEAT.
Playback starts from the front side, The OPE/BAl_T indicator lights up.
4Adjust the volume.
After setting the VOLUME control of the main unit to around 6to 8, adjust the VOL
control of the remote controi.
m
SLS
@J
3/! 5“”
Non
F@
J
,, Ei
-1-
TAP SEL
Raccordez Ies 6couteurs fournie ala prise (? da I’appareil.
1Lib6rez HOLD.
2lna6rez une casaette.
Glissez -OPEN pour ouvrir Ie Iogement de cassette, et inserez une cassette.
@Face avant
@Face arribre
3Pressez +F REPEAT.
La lecture commence par la face avant. Le t6moin OPE/BATT s’allume.
4Ajuatez [e volume.
Apri% Ie r6glage de la commande VOLUME AI’appareil henviron 6~8, ajustez la
commande VOL de la t616commande.
Fonctionnement de base
Pressez Ies touches suivantea.
Pour avancer rapidement FF en mode d’arri%
Pour rebobfner REW an mode d’arr64
Pour arr~ter ■RADIO OFF
Pour changar de face 4P REPEAT pendant la lecture
Remarque
Si aprbs la pression dune touche, une tonafit6 bip retentit et que f’op&ation ne commence
pas, v6rifiez si la pile n’est pas 6puis6e.
Fonction de dr$tecteur de musique
Vous pouvez rechercher Ie dt$but cf’une piste s’il ya une section vierge de 4 secondes
ou plus entre Ies pistes.
Pour Iocaliser fe dt$but de la piate prriaente ou pr6c6dente, pressez REW jusqu’~
5fois pandant la iecture.
Pour Iocalissr fas platea auivantes, presaez FF jusqu’tr 5fois pendant la lecture.
Pour r6p6ter une piste (rep&ition d’une piste)
Sil yades sectione viergea de 4 secondes ou plus entre des pistes, la piste pr6sente
peut ?rtre Iue de manibre r6p&6e.
Maintenez 4F REPEAT press6 pendant 2secondes durant la lecture, Pour annuler,
pressez anouveau +> REPEAT.
Remarque
Lea foncfions d&ectaur de musique, r6pefifion dune plage et saut dea sections vierges
peuvent ne pas fonctionner correctement clans Ies cas auivants.
●quand ie niveau d’enregiatrement de la bande est faible
●quand des operations sent faites autour de la section vierge.
Pour r6p6ter une phrase de 5secondes
Pressez PHRASE sur I’appareil pendant la lecture. La bande est rebobin6e jusqu?r un
point situ6 $renviron ●5secondes avant Ie point auquel la touche a&6 press6e, et la
lecture reprend automatiquement.
●Le temps peut varier selon Ie point de lecture de la bande auquel la touche a&6
press6e.
M6moire de sens de defilement de la bande
●Vous pouvez v&ifier Ie sens de defilement de la bande sur f’afficheur.
FFace avant
RFace arri?me
La face iue ne change pas hla pression de ■RADIO OFF. Mais la iecture d6marre sur
la face avant:
●Af’ouverlure du Iogement de la cassette.
.Au retrait de la bafferie rechargeable ou de la pile sbche.
Attention
Nessayez pas d’ouvrir Ie Iogement de la cassette de force s’il ne s’ouvre pas. Cefa pourrait
endommager f’appareil. Pour rouvrir, rechargez la bafterie rechargeable ou remplacez la
pile sbche par une neuve.
Operaciones b~sicas
Basic opsration
1NOR
J
I
Nota
Despu6s de presionar un bot6n, SIse escucha un timbre yno funciona, compruebe que
la pila no estd descargada,
Funcir5n del sensor musical
Se puede buscar el inicio de una canci6n si hay espacios de 4 segundos om~s en
blanco entre una canci6n yla siguienta,
Para buscar ef prlncipio da esta canci6n ode una anterior, presione REW hasta 5
veces durante la reproducci6n.
Para buscar una canci6n m6a adalsnte, presione FF hasta 5vases durante la reproducci6n,
Para repetlr una cancirh (repetlci6n de la misma canck5n)
Si hay un espacioen blanco de 4 segundos om&s entre canciones se puede repetir
varias veces la canci6n que se estaba reproduciendo.
Mantenga <› REPEAT presionado durante 2segundos durarte la reproducci6n. Para
cancelar, presione nuevamente el <~ REPEAT.
Nota
Las funciones de sensor musical, la repefici6n de una canci6n ysalto de espacios en
blanco pueden no funcionar correctamente en toe siguientes cases.
●cuando el nivel de grabaci6n de la cinta est~ bajo
●cuando se hate una operaci6n en una secci6n en blanco
Para repetir una frase de 5segundos
Presione PHRASE en el aparato durante la reproducci6n. La cinta ae rebobina a un
punto ●5segundos antes dal punto donde se preaion6 el bot6n yempieza areproducer
autom&icamente.
●El tiempo exacto depende del punto de la cinta donde sa presion6 el bot6n.
Memoria del sentido de la cinta
●Se puede confirmar el senfido de la cinta en la pantalla.
FCara delantera
RCara trasera
El Iado reproducido no cambia cuando se presiona ■RADIO OFF. Sin embargo, la
reproducci6n empezard en la cara delantera de la cinta despw% de:
●Abrir el compartimiento de cassettes.
●Sacar la bateria opilas del aparato.
Precauci&t
Notrate de abrir el casetero ala fuerza, si no puede abrirse. Puede romper el aparato.
Para abrir el compartimiento de cassettes, recargue la bateda recargable ocambie la
pila por otra nueva,
Note
Aftar you press abutton, if a beep sound is heard and then operation does not start,
check to see that the battery does not wear out.
Music sensor function
You can eearch for the beginning of atrack if there is a4-second or longer blank between
tracks.
To locate the beginning of the current or previous track, press REW UPto 5times
during playback.
To locatethe succeeding tracka, press FF up to 5times during playback.
To repeat atrack (One track repeat)
If there is a4-second or longer blanks between tracks, you can play back the current
track repeatedly.
Keep +- REPEAT pressed for 2seconds during playback. To cancel, press +*
REPEAT again.
Note
The music sensor, one track repeat and blank skip functions may not work properly in
tha following casea.
.when the recording level of the tape is low
●when operations are performed around the blank eection
To repeat a5-second phrase
Press PHRASE on the main unit during playback. The tape is rewound to apoint
approximately’5 seconds before the point where the button was pressed and playback
resumes automatically.
‘The time may vary according to the playback point of the tape when the button is
pressed,
Tape direction memory
●You can check the tape direction In the cfkplay.
FFront side
RReverse side
The playback side does not change when ■RADIO OFF is pressed. However, playback
starts from the front side of the tape after:
●The cassette holder is opened,
●The rechargeable batteries or dry celi battery is removed.
Caution
Do not attempt to open the caeaeffe holder forcibly if it cannot be opened. This may
result in the unit being broken. To open the holder, recharge tha rechargeable battery or
replace the dry cell battery with anew one.
3
B
dD
REPEAT
Ei!izzl
