Aiwa FR-CD2500 User manual

FR-CD2500U
RADIO RECEIVER
RECEPTOR DE RADIO
WARNING
TO REDUCE THE RISK OF FIRE OR
ELECTRIC SHOCK, DO NOT EXPOSE
THIS APPLIANCE TO RAIN OR
MOISTURE.
OPERATING INSTRUCTIONS
INSTRUCCIONES DE MANEJO
MODE D’EMPLOI
OWNER’S RECORD
For your convenience, record the model number (you will find it
on the rear of the unit) and serial number (you will find it in the
battery compartment) in the space provided below. Please refer
to them when you contact your AIWA dealer in case of difficulty.
Model No.
Serial No.
FR-CD2500

PRECAUTIONS
All the safety and operating instructions should be read before
the appliance is operated. The safety and operating instructions
should be retained for future reference. All warnings and
cautions on the appliance and in the operating instructions
should be adhered to. And all operating and use instructions
should be followed, as well as the safety suggestions below.
Installation
1
Water and moisture — Do not use this unit near water, such
as near a bathtub, washbowl, swimming pool, or the like.
2Heat — Do not use this unit near sources of heat, including
heating vents, stoves, or other appliances that generate
heat. It also should not be placed in temperatures less than
5°C (41°F) or greater than 35°C (95°F).
3Mounting surface — Place the unit on a flat, even surface.
4Ventilation
—
The unit should be situated with adequate
space around it so that proper heat ventilation is assured.
Allow 10 cm (4 in.) clearance from the unit.
–Do not place the unit on a bed, rug, or similar surface that
may block the ventilation openings.
–Do not install the unit in a bookcase, cabinet, or airtight
rack where ventilation may be impeded.
5Objects and liquid entry
—
Take care that objects or
liquids do not get inside the unit through the ventilation
openings.
6Carts and stands
—
When placed or
mounted on a stand or cart, the unit should
be moved with care.
Quick stops, excessive force, and uneven
surfaces may cause the unit or cart to
overturn or fall.
2
English
The lightning flash with arrowhead
symbol, within an equilateral triangle,
is intended to alert the user to the
presence of uninsulated “dangerous
voltage” within the product’s enclosure
that may be of sufficient magnitude to
constitute a risk of electric shock to
persons.
The exclamation point within an equi-
lateral triangle is intended to alert the
user to the presence of important op-
erating and maintenance (servicing)
instructions in the literature accompa-
nying the appliance.
“CAUTION:TO REDUCE THE RISK OF
ELECTRIC SHOCK,
DO NOT REMOVE COVER (OR BACK).
NO USER-SERVICEABLE PARTS INSIDE.
REFER SERVICING TO QUALIFIED
SERVICE PERSONNEL.”
CAUTION
RISK OF ELECTRIC SHOCK
DO NOT OPEN
Explanation of Graphical Symbols:
The symbols are located on the bottom of cabinet.

PRECAUCIONES
Todas las instrucciones de seguridad y de funcionamiento
deben leerse antes de hacer funcionar el aparato. Guarde las
instrucciones de seguridad y de funcionamiento para su
referencia en el futuro. Deben respetarse todas las advertencias
en el aparato y en las instrucciones de funcionamiento. Y deben
cumplirse las instrucciones de funcionamiento y uso asícomo
las sugerencias para su seguridad a continuación.
Instalación
1Agua y humedad —No utilice este aparato cerca del agua
(por ej.: cerca de bañeras, fregaderos, piscinas, etc.).
2
Calor —No utilice este aparato cerca de fuentes de calor,
incluyendo bocas de calefacción, estufas u otros artefactos de
calefacción. Tampoco debe ponerse en lugares donde la
temperatura sea menor de 5°C (41°F) ni mayor de 35°C (95°F).
3Superficie de instalación—Ponga el aparato siempre
sobre superficies planas y estables.
4
Ventilación —Este aparato debe instalarse con el suficiente
espacio a su alrededor pare garantizar una ventilación
adecuada. Deje 10 cm de espacio alrededor del aparato.
–No lo ponga sobre camas, almohadones o superficies
mullidas que puedan obstruir las ranuras de ventilación.
–
No lo ponga en anaqueles, estanterías o muebles modulares
cerrados donde la ventilación pueda verse obstaculizada.
5Objetos y líquidos —Tenga cuidado de que no penetren
objetos pequeños y líquidos dentro del aparato por las
ranuras de ventilación.
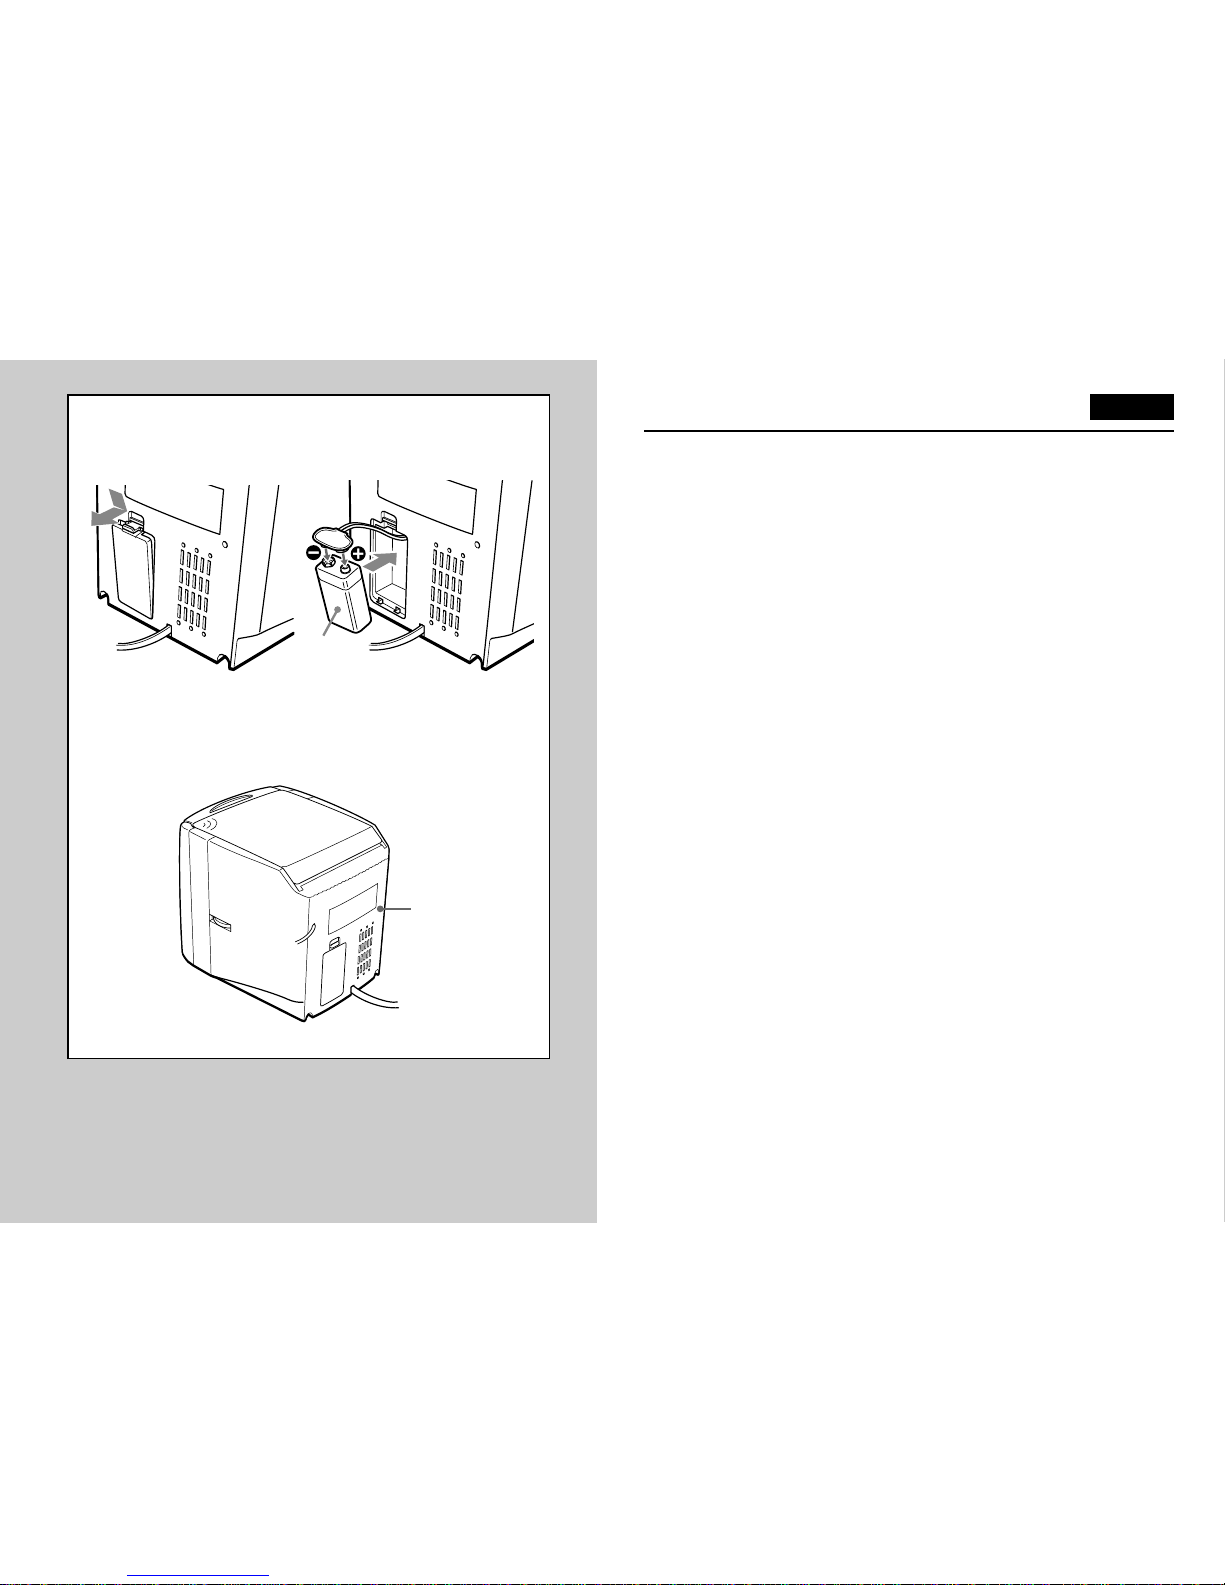
6Carros y peanas —Cuando se pone sobre
un carro o una peana, el aparato debe
moverse con sumo cuidado.
Todo movimiento brusco, fuerza excesiva o la
colocación sobre superficies irregulares puede
hacer que el carro o la peana se vuelque o caiga.
PRECAUTIONS
Toutes les instructions relatives àla sécuritéet au
fonctionnement doivent être lues avant la mise en service de
l’appareil. Elles doivent être conservées pour toute référence
ultérieure. Tous les avertissements et précautions sur l’appareil
et dans le mode d’emploi doivent être respectés. Et toutes les
instructions sur le fonctionnement et l’emploi doivent être
suivies, ainsi que les suggestions pour la sécuritéci-dessous.
Installation
1
Eau et humidité —Ne pas utiliser cet appareil en milieu
humide, près d’une baignoire, d’un lavabo, d’une piscine etc...
2Chaleur —Ne pas utiliser cet appareil près d’une source de
chaleur, àproximitéd’une bouche de chauffage, d’un
radiateur ou de tout autre système producteur de chaleur.
Ne pas exposer l’appareil àdes températures inférieures à
5°C (41°F) ou supérieures à35°C (95°F).
3
Surface de montage —Placer l’appareil sur une surface
plane et uniforme.
4Aération —Prévoir un espacement suffisant autour de
l’appareil pour en assurer l’aération. Ménager un espace de
10 cm autour de l’appareil.
–
Ne pas poser l’appareil sur un lit, un tapis ou toute autre
surface similaire risquant d’en obturer les ouvertures d’aération.
–
Ne pas installer l’appareil dans un meuble bibliothèque ou
dans un rangement clos oùl’aération risque d’être insuffisante.
5Objets et liquides
—
Prendre toutes les précautions
nécessaires pour éviter l’entrée de corps étrangers ou de
liquides par les ouvertures d’aération.
6
Chariots et étagères —Si l’appareil est montéou
installésur un chariot ou une étagère, attention
pendant les déplacements.
L’appareil peut tomber ou le chariot peut se
renverser en cas d’arrêt brusque, de force
excessive ou de surface inégale.
3
Español Français

4
English
PRECAUTIONS
7Condensation —Moisture may form on the CD pickup lens
when:
–The unit is moved from a cold spot to a warm spot
–The heating system has just been turned on
–The unit is used in a very humid room
–The unit is cooled by an air conditioner
When this unit has condensation inside, it may not function
normally. Should this occur, leave the unit for a few hours,
then try to operate again.
8Wall or ceiling mounting —The unit should not be
mounted on a wall or ceiling, unless specified in the
Operating Instructions.
Electric Power
1Power sources —Connect this unit only to power sources
specified in the Operating Instructions, and as marked on
the unit.
2Polarization —As a safety feature, some units are
equipped with polarized AC power plugs which can only be
inserted one way into a power outlet. If it is difficult or
impossible to insert the AC power plug into an outlet, turn
the plug over and try again. If it still does not easily insert
into the outlet, please call a qualified service technician to
service or replace the outlet. To avoid defeating the safety
feature of the polarized plug, do not force it into a power
outlet.
NOTE
FOR USE IN THE U.S.A.
This equipment has been tested and found to comply with
the limits for a Class B digital device, pursuant to Part 15 of
the FCC Rules. These limits are designed to provide
reasonable protection against harmful interference in a
residential installation.
This equipment generates, uses, and can radiate radio
frequency energy and, if not installed and used in
accordance with the instructions, may cause harmful
interference to radio communications. However, there is no
guarantee that interference will not occur in a particular
installation. If this equipment does cause harmful
interference to radio or television reception, which can be
determined by turning the equipment off and on, the user is
encouraged to try to correct the interference by one or
more of the following measures:
–Reorient or relocate the receiving antenna.
–Increase the separation between the equipment and
receiver.
–Connect the equipment into an outlet on circuit different
from that to which the receiver is connected.
–Consult the dealer or an experienced radio/TV
technician for help.
CAUTION
Modifications or adjustments to this product, which are not
expressly approved by the manufacturer, may void the
user’s right or authority to operate this product.
This device complies with Part 15 of the FCC Rules.
Operation is subject to the following two conditions: (1) This
device may not cause harmful interference, and (2) this
device must accept any interference received, including
interference that may cause undesired operation.

5
Español Français
PRECAUCIONES
7Condensación —Puede condensarse la humedad en la
lente receptora del disco compacto cuando:
–Se mueve la unidad de un lugar frío a uno caliente
–Se acaba de conectar el sistema de la calefacción
–La unidad se utiliza en una habitación muy húmeda
–La unidad recibe el aire frío de un acondicionador de aire
Cuando se ha condensado la humedad en el interior de la
unidad, puede no funcionar normalmente. En este caso,
deje descansar la unidad durante unas horas y trate de
hacer funcionar nuevamente.
8Instalación en la pared o el cielo cielorraso raso —Este
aparato no debe colgarse ni de la pared ni del cielo
cielorraso raso, salvo en aquellos casos indicados en el
Manual de Instrucciones.
Alimentación eléctrica
1Fuentes de alimentación —Conecte el aparato solamente
a las fuentes de alimentación especificadas en el Manual de
Instrucciones y del modo indicado en el mismo aparato.
2Polarización —Como medida de seguridad, algunos
aparatos cuentan con enchufes de corriente polarizados, los
cuales pueden enchufarse en el tomacorriente solamente
en una dirección. Si cuesta o resulta imposible insertar el
enchufe en la toma de corriente, dévuelta el enchufe y
vuelva a probar. Si incluso después de cambiar no se
puede enchufar con facilidad pida a un técnico calificado
que repare o cambie la toma de corriente. No inserte el
enchufe a la fuerza, para evitar anular la protección de
seguridad del enchufe polarizado.
PRECAUTIONS
7Condensation —De l’humiditépeut se former sur la lentille
de lecture de CD quand:
–L’appareil est déplacéd’un endroit froid àun endroit
chaud.
–Le chauffage vient juste d’être allumé.
–L’appareil est utilisédans une pièce très humide.
–L’appareil est refroidi par un climatiseur.
En cas de condensation interne, l’appareil peut ne pas
fonctionner normalement. Dans ce cas, le laisser tel quel
quelques heures, puis essayer de l’opérer ànouveau.
8Montage mural ou au plafond —Ne pas monter cet
appareil sur un mur ou un plafond sauf spécification dans le
Mode d’emploi.
Alimentation électrique
1Source d’alimentation —Ne raccorder cet appareil qu’aux
seules sources d’alimentation électrique spécifiées dans le
Mode d’emploi et marquées sur l’appareil.
2Polarisation —A titre de sécurité, certains appareils sont
équipés de prises électriques CA polarisées qui ne peuvent
donc être insérées dans une prise secteur que dans un seul
sens. S’il s’avère difficile, voire impossible d’insérer une
prise électrique CA dans une prise secteur, retourner la
prise et essayer ànouveau. Si l’insertion n’est toujours pas
possible, demander l’intervention d’un réparateur qualifié
pour réparer ou changer la prise. Forcer une prise
électrique en place est contraire àtous les principes de
sécurité.

PRECAUTIONS
3AC power cord
–When disconnecting the AC power cord, pull it out by the
AC power plug. Do not pull the cord itself.
–Never handle the AC power plug with wet hands, as this
could result in fire or shock.
–Power cords should be firmly secured to avoid being
severely bent, pinched, or walked upon. Pay particular
attention to the cord from the unit to the power socket.
–Avoid overloading AC power plugs and extension cords
beyond their capacity, as this could result in fire or shock.
4Extension cord —To help prevent electric shock, do not
use a polarized AC power plug with an extension cord,
receptacle, or other outlet unless the polarized plug can be
completely inserted to prevent exposure of the blades of the
plug.
5When not in use —Unplug the AC power cord from the AC
power plug if the unit will not be used for several months or
more. When the cord is plugged in, a small amount of
current continues to flow to the unit, even when the power is
turned off.
Maintenance
Clean the unit only as recommended in the Operating
Instructions.
6
English

PRECAUCIONES
3Cable de corriente
–Para desconectar el cable de corriente, tire tomando el
enchufe en la mano. Nunca tire del cable.
–
Nunca tome el enchufe de corriente con las manos mojadas,
ya que corre el riesgo de descargas eléctricas o incendio.
–
Los cables de corriente deben asegurarse firmemente de
manera que no queden doblados, apretados y estén fuera
del paso de las personas pare evitar que sean pisados.
Tenga especial cuidado con el cable eléctrico del aparato,
enchufado en el tomacorriente.
–Evite conectar demasiados aparatos en el mismo enchufe
o cable de extensión, ya que corre el riesgo de descargas
eléctricas o incendio.
4
Cable de extensión —Para evitar el riesgo de descargas
eléctricas, no utilice enchufes de corriente polarizados con
cables de extensión, receptáculos u otras tomas de corriente,
salvo que el enchufe pueda insertarse por completo y así
evitar que queden expuestas las patas del enchufe.
5Cuando no se utiliza el aparato —Desenchufe el cable de
corriente de la toma eléctrica siempre que no vaya a utilizar
el aparato por varios meses. Por más que estéapagado, el
aparato siempre consume una pequeña corriente eléctrica
cuando el cable estáenchufado.
Mantenimiento
Limpie de acuerdo a las instrucciones del manual de
instrucciones.
PRECAUTIONS
3Câble d’alimentation CA
–Pour débrancher le câble d’alimentation électrique
CA
,
tirer sur la prise. Ne jamais tirer sur le câble lui-même.
–
Ne jamais manipuler un câble électrique avec des mains
humides sous peine de risque d’incendie ou d’électrocution.
–Immobiliser les câbles de sorte qu’ils ne soient pas pliés ni
coincés par d’autres objets et qu’ils ne gênent pas le
passage. Attention en particulier au câble raccordant
l’appareil àla prise secteur.
–Eviter de surcharger les prises et les câbles électriques
CA
sous peine de risque d’incendie ou d’électrocution.
4Câble rallonge —Pour éviter tout risque d’électrocution, ne
pas utiliser un câble rallonge ou une prise multiple avec une
prise électrique polarisée si toutes les fiches de celle-ci ne
peuvent pas être entièrement insérées.
5Périodes de non utilisation —Si l’appareil ne doit pas être
utilisépendant une période de plusieurs mois, débrancher
le câble d’alimentation électrique
CA
de la prise secteur.
Quand le câble est raccordé, une faible quantitéde courant
électrique continue àpasser dans l’appareil même si
l’interrupteur de marche/arrêt est coupé.
Entretien
Nettoyer l’appareil seulement comme recommandédans le
mode d’emploi.
7
Español Français

PRECAUTIONS
Damage Requiring Service
Have the units serviced by a qualified service technician if:
–The AC power cord or plug has been damaged
–Foreign objects or liquid have gotten inside the unit
–The unit has been exposed to rain or water
–The unit does not seem to operate normally
–The unit exhibits a marked change in performance
–The unit has been dropped, or the cabinet has been
damaged
DO NOT ATTEMPT TO SERVICE THE UNIT YOURSELF.
Servicing –The user should not attempt to service the
appliance beyond that described in the operating instruction.
All other servicing should be referred to qualified service
personnel.
Note
Keep cassette tapes, magnetic cards and other magnetically
recorded materials away from the speaker as the recorded
information may be erased or noise on cassette tapes may
occur.
To clean the cabinet
Use a soft cloth lightly moistened with a mild detergent
solution.
Do not use strong solvents, such as alcohol, benzine or
thinner.
8
English

PRECAUCIONES
Desperfectos que requieren servicio técnico
Solicite la reparación de su aparato el servicio técnico
autorizado en los siguientes casos:
–Cuando se haya dañado el cable de corriente o el enchufe
–Cuando hayan penetrado objetos o líquidos en el interior
del aparato
–Cuando se haya expuesto el aparato a agua o lluvia
–Cuando el aparato no parezca funcionar como es debido
–Cuando note una diferencia marcada en el rendimiento del
aparato
–Cuando se haya caído el aparato o se haya dañado su
exterior
JAMÁS INTENTE REPARAR EL APARATO POR SU
CUENTA.
Servicio –El usuario no debe tratar de hacer el servicio del
aparato más alláde lo que se describe en las instrucciones de
funcionamiento. Para todos los demás trabajos de servicio,
solicite la ayuda de personal de servicio cualificado.
Nota
Mantenga las cintas de cassette, tarjetas magnéticas u otros
materiales grabados magnéticamente alejados del altavoz ya
que la información grabada puede borrarse o puede haber
ruidos en las cintas de cassette.
Para limpiar el mueble
Utilice un paño suave empapado en una solución de
detergente neutro.
No utilice disolventes fuertes tales como alcohol, bencina o
diluyente de pintura.
PRECAUTIONS
Dégâts demandant des réparations
Faire réparer l’appareil par un technicien qualifiési:
–Le câble ou la prise d’alimentation électrique est détérioré
–Un objet ou du liquide a pénétréàl’intérieur de l’appareil
–L’appareil a étéexposéàla pluie ou àl’eau
–L’appareil ne fonctionne pas normalement
–L’appareil fait montre d’un changement radical de
performance
–L’appareil est tombéou le coffret est détérioré
NE PAS TENTER DE REPARER L’APPAREIL SOI-MEME.
Entretien –L’utilisateur ne doit pas essayer d’entretenir
l’appareil au-delàdes indications du mode d’emploi. Tout le
reste doit être confiéàun personnel de service compétent.
Remarque
N’approchez pas de cassettes, cartes magnétiques ou autres
supports d’enregistrement magnétique du haut-parleur car
ceci pourrait effacer les informations enregistrées ou créer des
parasites sur les cassettes.
Pour nettoyer le coffret
Utilisez un chiffon doux légèrement imbibéd’une solution de
détergente douce.
N’utilisez pas de solvants puissants, tels qu’alcool, benzine ou
diluant. 9
Español Français

BACKUP FUNCTION
If the AC power supply is interrupted, the clock display goes
off and the alarm setting is canceled. To back up the clock and
alarm, insert a 6F22 battery in the battery compartment on the
rear of the unit. →A
•The backup battery is not for radio reception or CD
operation.
Note
The backup function lasts about 10 minutes. Set the clock
again if 10 minutes have passed after a power interruption.
Replacing the battery
Replace the battery with a new one if the clock display flashes
or the alarm timer does not work properly when you connect
the AC power cord again.
Note on battery
•When you are not going to use the unit for a long period of
time, remove the battery to prevent possible electrolyte
leakage.
•To prevent the risk of electrolyte leakage or explosions,
never recharge the battery, apply heat to it, or take it apart.
If erroneous operation or display occurs
Reset the unit by pressing the RESET button with a thin rod.
→B
When the unit is reset, clock and alarm settings are erased
automatically.
Set them again.
10
English
6F22
A
B
RESET

FUNCION DE RESPALDO
Si se corta la fuente de corriente alterna, se apaga la
indicación del reloj y se cancela la alarma. Para mantener el
respaldo del reloj la alarma, instale una pila 6F22 en el
portapilas en la parte trasera del aparato. →A
•La pila de respaldo no es para escuhar la radio o disco
compacto.
Nota
La función de respaldo dura unos 10 minutos. Ajuste
nuevamente el reloj si han transcurrido 10 minutos de un corte
eléctrico.
Cambio de la pila
Cambie la pila por una nueva cuando la indicación del reloj
destella o la alarma no funciona bien al conectar nuevamente
el cable eléctrico.
Notas sobre la pila
•Si no se va a utilizar el aparato durante un largo período de
tiempo, saque la pila para evitar que se produzca una
pérdida de electrólito.
•Para evitar que se produzca una pérdida de electrólito o
explosión, no recargue la pila, caliente o desarme.
Si funciona mal o hay errores en la indicación
Reinicialice el aparato presionando el botón RESET con una
varilla fina. →B
Cuando se reinicializa el aparato, quedarán automáticamente
borrados los ajustes de reloj y alarma. Vuelva a hacer el
ajuste.
FONCTION D’ALIMENTATION
DE SECOURS
En cas de coupure de courant, l’affichage d’horloge disparaît
et le réglage d’alarme est annulé. Pour sauvegarder l’horloge
et l’alarme, insérez une pile 6F22 dans le logement pile situéà
l’arrière de l’appareil. →A
•La pile d'alimentation de secours n’est pas destinée àla
réception de la radio ou aux CD.
Remarque
La fonction d’alimentation de secours dure environ 10 minutes.
Refaites le réglage de l’horloge si 10 minutes se sont écoulées
après une coupure de courant.
Remplacement de la pile
Remplacez la pile par une neuve si l’affichage de l’horloge
clignote ou si le programmateur d’alarme ne fonctionne pas
correctement lorsque vous rebranchez le cordon secteur.
Remarques sur la pile
•Si vous ne prévoyez pas d’utiliser l’appareil pendant
longtemps, retirez la pile afin d’empêcher une fuite
d’électrolyte.
•Pour empêcher une fuite d’électrolyte ou une explosion, ne
rechargez jamais la pile, ne la chauffez pas et ne la
démontez pas.
En cas d’opération ou d’affichage erronés
Remettez l’appareil àzéro en appuyant sur le bouton RESET
avec une tige fine. →B
A la remise àzéro de l’appareil, les réglages d’horloge et du
réveil sont automatiquement effacés.
Refaites les réglages.
11
Español Français

SETTING THE CLOCK
1 Connect the AC power cord to a wall outlet a.
The clock display begins flashing. If the clock is not
displayed correctly, disconnect the AC cord and remove the
backup battery if inserted. Then, connect the AC cord and
insert the backup battery again.
2 Press MEMORY/SET.
Day of the week starts flashing.
3 While day of the week flashes, press ror tto set
day of the week, then press MEMORY/SET.
mon: Monday / TUE: Tuesday / WEd : Wednesday / THU :
Thursday / Fri : Friday / SAT: Saturday / SUn : Sunday
The hour starts flashing.
4 While the hour is flashing, press ror tto set the
hour, then press MEMORY/SET.
To change the hour faster, keep ror tpressed.
The minutes start flashing.
5 While the minutes are flashing, press ror tto set
the minutes, then press MEMORY/SET.
The clock starts from 00 seconds.
To change the clock setting
Keep MEMORY/SET pressed for 2 seconds while the clock is
displayed.
Day of the week starts flashing, then repeat the procedure
from step 3.
To adjust the time for Daylight-saving time
Keep BAND/SUMMER T./D.S.T. pressed for 3 seconds while
the power is turned off.
appears in the display and the time advances by 1 hour.
When Daylight-saving time ends, keep BAND/SUMMER
T./D.S.T. pressed for 3 seconds again. disappears from
the display.
12
English
BAND/
SUMMER T./
D.S.T.
2,3,
4,5 3,4,5
1

13
Español Français
AJUSTE DEL RELOJ
1 Conecte el cable eléctrico en el tomacorriente de la
pared a.
La pantalla del reloj empieza a destellar. Si no aparece el
reloj correctamente, desconecte el cable eléctrico de CA y
saque la pila de reserva, si estáinstalada. Vuelva a conectar
el cable eléctrico de CA y coloque la pila de reserva.
2 Presione MEMORY/SET.
El día de la semana empieza a destellar.
3 Cuando destella el día de la semana, presione ro
tpara ajustar el día de la semana y presione
MEMORY/SET.
mon: lunes/ TUE: martes/WEd: miércoles/THU: jueves/Fri:
viernes/SAT: sábado/SUn: domingo
La hora empieza a destellar.
4 Cuando estádestellando la hora, presione ro t
para ajustar la hora y presione MEMORY/SET.
Para cambiar la hora más rápidamente, mantenga
presionado ro t.
Los minutos empiezan a destellar.
5 Cuando los minutos están destellando, presione ro
tpara ajustar los minutos y presione MEMORY/SET.
El reloj empieza desde 00 segundos.
Para cambiar el ajuste del reloj
Mantenga MEMORY/SET presionado durante 2 segundos
cuando aparezca el reloj.
El día de la semana empieza a destellar y repita el
procedimiento desde el paso 3.
Para ajustar la hora para la hora de verano
Mantenga presionado BAND/SUMMER T./D.S.T. durante 3
segundos con el interruptor desconectado.
Aparece en la pantalla y la hora avanza en 1 hora.
Cuando llega al final del verano, vuelva a mantener
presionado BAND/SUMMER T./D.S.T. durante 3 segundos.
Desaparece de la pantalla.
MISE A L’HEURE DE L’HORLOGE
1 Branchez le cordon secteur àune prise murale a.
L’affichage de l’horloge se met àclignoter. Si l’horloge n’est
pas affichée correctement, débranchez le cordon
d’alimentation et retirez la pile de secours, si elle est insérée.
Puis, rebranchez le cordon et réinsérez la pile de secours.
2 Appuyez sur MEMORY/SET.
Le jour de la semaine se met àclignoter.
3 Pendant le clignotement du jour de la semaine, appuyez
sur rou tpour régler le jour de la semaine, puis
sur MEMORY/SET.
mon: lundi/TUE: mardi / WEd: mercredi / THU: jeudi / Fri:
vendredi / SAT: samedi / SUn: dimanche
Les heures commencent àclignoter.
4 Pendant le clignotement des heures, appuyez sur r
ou tpour régler les heures, puis sur MEMORY/SET.
Pour faire changer les heures plus rapidement, maintenez
rou tpressé.
Les minutes se mettent àclignoter.
5 Pendant le clignotement des minutes, appuyez sur r
ou tpour régler les minutes, puis sur MEMORY/SET.
L’horloge commence àfonctionner àpartir de 00 secondes.
Pour modifier le réglage de l’horloge
Maintenez MEMORY/SET pressé2 secondes pendant
l’affichage de l’horloge.
Le jour de la semaine se met àclignoter; répétez la procédure
àpartir de l’étape 3.
Pour régler àl’heure d’été
Maintenez BAND/SUMMER T./D.S.T. pressé3 secondes avec
l’appareil sous tension.
s’affiche et l’heure avant d’1 heure.
A la fin de la période d’heure d’été, maintenez ànouveau
BAND/SUMMER T./D.S.T. pressé3 secondes. disparaît.

14
RADIO RECEPTION
1 Press POWER 6STANDBY/ON to turn on the power.
2 Press FUNCTION repeatedly until is displayed.
3 Press BAND to select AM or FM.
4 Press UP or DOWN to tune in to a station.
The frequency display changes to the clock display after
about 10 seconds.
5 Adjust the volume.
After listening, press POWER 6STANDBY/ON to turn off
the power.
For quick tuning
Keep either UP or DOWN pressed for 1-2 seconds.
When a station is tuned in to, it stops automatically.
To listen to FM stereo broadcast
1 While tuning in to an FM station, press FM stereo.
flashes for 3 seconds.
2 While is flashing, press FM STEREO repeatedly
until “on”is displayed.
When the FM stereo broadcast signal is weak, press FM
stereo repeatedly until “OFF”is displayed in step 2. The sound
will be heard in monaural, but distortion will be reduced.
Listening with the headphones
Connect the headphones (not supplied) to the \jack. FM
broadcasts are heard in stereo and AM broadcasts are heard
in monaural.
When the headphones are connected, sound from the speaker
will not be heard.
English
FM
STEREO
4
5
3
2
1

RECEPCION DE LA RADIO
1 Presione POWER 6STANDBY/ON para conectar el
aparato.
2 Presione FUNCTION varias veces hasta que aparezca
.
3 Presione BAND para seleccionar AM o FM.
4 Presione UP o DOWN para sintonizar una emisora.
La indicación de frecuencia cambia a la indicación del reloj
después de unos 10 segundos.
5 Ajuste el volumen.
Después de escuchar, presione POWER 6STANDBY/ON
para desconectar el interruptor.
Para una sintonización más rápida
Mantenga presionado UP o DOWN durante 1-2 segundos.
Cuando se sintoniza una emisora, se para automáticamente.
Para escuchar la emisora de FM estéreo
1 Cuando se sintoniza una emisora en FM, presione FM
estéreo.
Destella durante 3 segundos.
2 Cuando estádestellando , presione FM STEREO
varias veces hasta que aparezca “on”.
Cuando la señal de la emisora en FM estéreo es débil, presione
FM estéreo varias veces hasta que aparezca “OFF”en el paso 2. El
sonido se escucharáen monoaural pero se reducirála distorsión.
Para escuchar con los auriculares
Conecte los auriculares (no incluidos) en la toma \. Las
transmisiones de FM se escuchan en estéreo y las
transmisiones en AM se escuchan en monoaural.
Cuando los auriculares están conectados, no se escucharáel
sonido del altavoz.
RECEPTION RADIO
1 Appuyez sur POWER 6STANDBY/ON pour mettre sous
tension.
2 Appuyez plusieurs fois sur FUNCTION jusqu’à
l’affichage de .
3 Appuyez sur BAND pour sélectionner AM ou FM.
4 Appuyez sur UP ou DOWN pour accorder une station.
L’affichage de fréquence passe àl’affichage de l’horloge au
bout d’environ 10 secondes.
5Réglez le volume.
Après l’écoute, appuyez sur POWER 6STANDBY/ON pour
mettre hors tension.
Pour un accord rapide
Maintenez UP ou DOWN presséenviron 1 à2 secondes.
A l’accord d’une station, il s’arrête automatiquement.
Pour écouter une émission FM stéréo
1 Appuyez sur FM stéréo en accordant une station FM.
clignote 3 secondes.
2 Pendant le clignotement de , appuyez plusieurs
fois sur FM STEREO jusqu’à l’affichage de “on”.
Si le signal de l’émission FM stéréo est faible, appuyez
plusieurs fois sur FM stéréo jusqu’à l’affichage de “OFF”à
l’étape 2. Le son audible sera monaural, mais la déformation
sera réduite.
Ecoute avec des écouteurs
Raccordez des écouteurs (non fournis) àla prise \. Les
émissions FM seront audibles en stéréo et les émissions AM
en monaural.
Quand des écouteurs sont raccordés, le son en provenance
du haut-parleur est inaudible. 15
Español Français

16
English
RADIO RECEPTION
For better reception
FM: Extend the FM wire antenna fully.
AM: Turn the unit to find the position which gives the best
reception.
Note
Do not connect the FM wire antenna to an external antenna.
FM AM

17
Español Français
RECEPCION DE LA RADIO
Para una mejor recepción
FM: Extienda completamente la antena de cable FM.
AM: Gire el aparato para encontrar la posición donde la
recepción sea la mejor posible.
Nota
No conecte la antena de cable FM a una antena externa.
RECEPTION RADIO
Pour améliorer la réception
FM: Déployez complètement l’antenne-fil FM.
AM: Tournez l’appareil pour trouver la position offrant la
meilleure réception.
Remarque
Ne raccordez pas l’antenne-fil FM àune antenne extérieure.

18
English
PRESETTING STATIONS
→A
Up to a total of 40 stations can be preset.
1 Tune in to a station (See page 14).
2 Press MEMORY/SET.
CHANNEL and preset number flashes for about 10
seconds.
3 While the preset number is flashing, press ror t
to select the preset number.
4 While the desired preset number is flashing, press
MEMORY/SET.
To preset more stations, repeat the procedure from step 1.
Listening to preset stations →B
1 Press POWER 6STANDBY/ON to turn on the power.
2 Press FUNCTION repeatedly until is displayed.
3 Press ror tto select the preset number.
3
1
2,4 1
1
1
3
12
A
B

19
Español Français
PROGRAMACION DE
EMISORAS →A
Puede programarse un total de 40 emisoras.
1 Sintonice una emisora (Vea la página 15).
2 Presione MEMORY/SET.
Destella CHANNEL y el número programado durante unos
10 segundos.
3 Cuando destella el número programado, presione r
o tpara seleccionar el número programado.
4 Cuando estádestellando el número programado
deseado, presione MEMORY/SET.
Para programar más emisoras, repita el procedimiento
desde el paso 1.
Escuchando emisoras programadas →B
1 Presione POWER 6STANDBY/ON para conectar el
aparato.
2 Presione FUNCTION varias veces hasta que aparezca
.
3 Presione ro tpara seleccionar el número
programado.
PREREGLAGE DE
STATIONS
→A
40 stations maximum sont préréglables.
1 Accordez une station (voir la page 15).
2 Appuyez sur MEMORY/SET.
CHANNEL et le numéro de préréglage clignotent environ 10
secondes.
3 Pendant le clignotement du numéro de préréglage,
appuyez sur rou tpour sélectionner le numéro
de préréglage.
4 Appuyez sur MEMORY/SET pendant le clignotement du
numéro de préréglage souhaité.
Pour prérégler plus de stations, répétez la procédure à
partir de l’étape 1.
Ecoute de stations préréglées →B
1 Appuyez sur POWER 6STANDBY/ON pour mettre sous
tension.
2 Appuyez plusieurs fois sur FUNCTION jusqu’à
l’affichage de .
3 Appuyez sur rou tpour sélectionner le numéro
de préréglage.

CD PLAYING →A
1 Press OPEN to open the disc compartment.
2 Place a disc in the center with the label side facing up
and close the disc compartment.
3 Press POWER 6STANDBY/ON to turn on the power.
4 Press FUNCTION repeatedly until is displayed.
atotal number of tracks in the disc
btotal playback time of the disc
5 Press ePLAY/PAUSE.
Playback starts from the first track.
ccurrent track number
delapsed playing time
The display changes back to the clock display after 10
seconds.
6 Adjust the volume.
To display the CD operation, press SNOOZE. CD operation is
displayed for 10 seconds.
Basic operation
Listening with the headphones
Connect the headphones (not supplied) to the \jack.
When the headphones are connected, sound from the speaker
will not be heard.
20
English
To stop
To pause
To search for the beginning of a track
To locate a desired passage
Press sSTOP.
Press ePLAY/PAUSE.
To resume, press it again.
Press ror t.
Keep ror tpressed.
Release the button at the
start of desired passage.
A
STOP
6
1
3
5
4
Other manuals for FR-CD2500
1
Table of contents
Other Aiwa Receiver manuals