Akai AKQI1113 User manual

Clock Radio
with wireless charger
User Manual
MODEL: AKQI1113

2
Welcome
Welcome to AKAI.
This user manual tells you all you need to know about setting up your new product.
Please take special note of any important safety and usage information presented with the symbol.
All products brought to you by AKAI are manufactured to the highest standards of performance and safety
and, as part of our philosophy of customer service and satisfaction, are backed by a comprehensive
1Year Warranty.

3
Welcome 2
Product Overview 4
Controls and Connections 5
Operation 7
Troubleshooting 13
Specifications 14
Compliance and Responsible Disposal 15
Contents

4 | PRODUCT OVERVIEW
Product Overview
A. Clock Radio
B. Power Adaptor
C. User Manual
D. Warranty Certificate
E. General Safety Warnings
What’s in the box: B
CD E

CONTROLS AND CONNECTIONS | 5
M E M / M +
DIMMER
A L O F F
T I M E
S L E E P S N O O Z E
Controls and Connections
1. button: Set the hour time/tune FM
station/search previous FM station.
button:Set the clock time/tune FM
station/search next FM station
2. Alarm(1), Alarm(2) button
3. SLEEP button: set the sleep timer to
turn off the radio automatically
4. TIME/MEM/M+ button: display the
time at radio mode/recall preset FM
station, store preset FM station
5. SNOOZE button
6. DIMMER button
7. Power/Alarm Off button
8. (Volume down button),
(Volume up button)
9. Wireless charging pad
Top view
9
1 8
2
3 4 5 6 7

6 | CONTROLS AND CONNECTIONS
D C 9 V 3 . 0 A
Front view
Rear view
10. Display screen
11. Low battery warning indicator
12. Alarm (1) sound source indicator
(alarm)
13. Alarm (1) sound source indicator
(radio)
14. Alarm (2) sound source indicator
(radio)
15. Alarm (2) sound source indicator
(alarm)
16. Wireless charging indicator
10
11
12
13 14
15
16
17 18 19
1 7. USB charging port
18. DC IN jack
19. Antenna
PM

OPERATION | 7
Operation
Powering the Clock Radio
• Plug in the DC plug of the supplied adaptor to the DC IN port of the product, then plug the adaptor into a
power socket.
• The display screen will light up.
Backup System
• The product has a 3V CR2032 lithium battery (not included) as a backup system. Using a screwdriver,
remove the battery compartment cover on the underside of the product and insert the battery, ensuring
the positive (+) is facing up.
• The product will use the battery when the power adaptor is disconnected or when the AC main power is
off.
• When replacing the battery, do not disconnect the power adaptor otherwise the clock/alarm settings will
be lost.

8 | OPERATION
Setting the Time
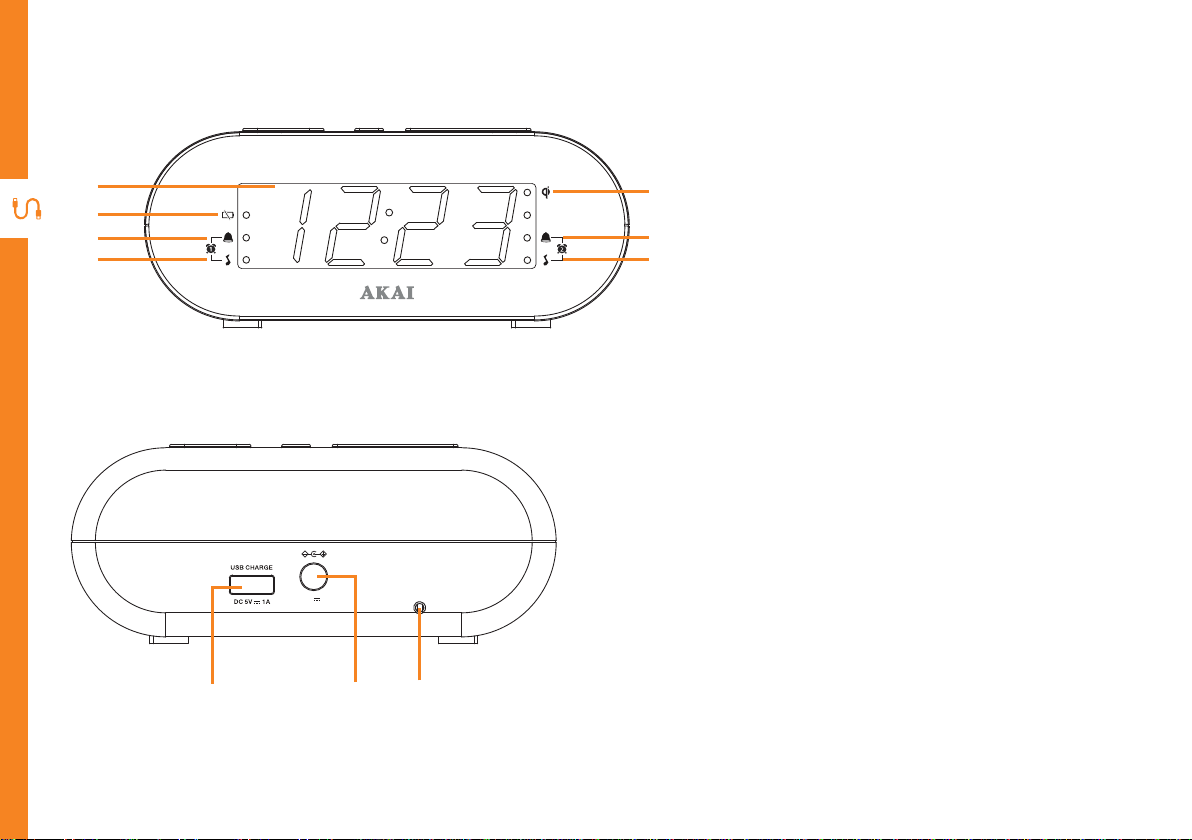
• Press and hold theTIME button to enter the time setting mode.
• To set the time, press the button to set the hour and the button to set the minute.
• Press theTIME button to confirm the hour and minute or the it will automatically set after 5 seconds .
FM Operation
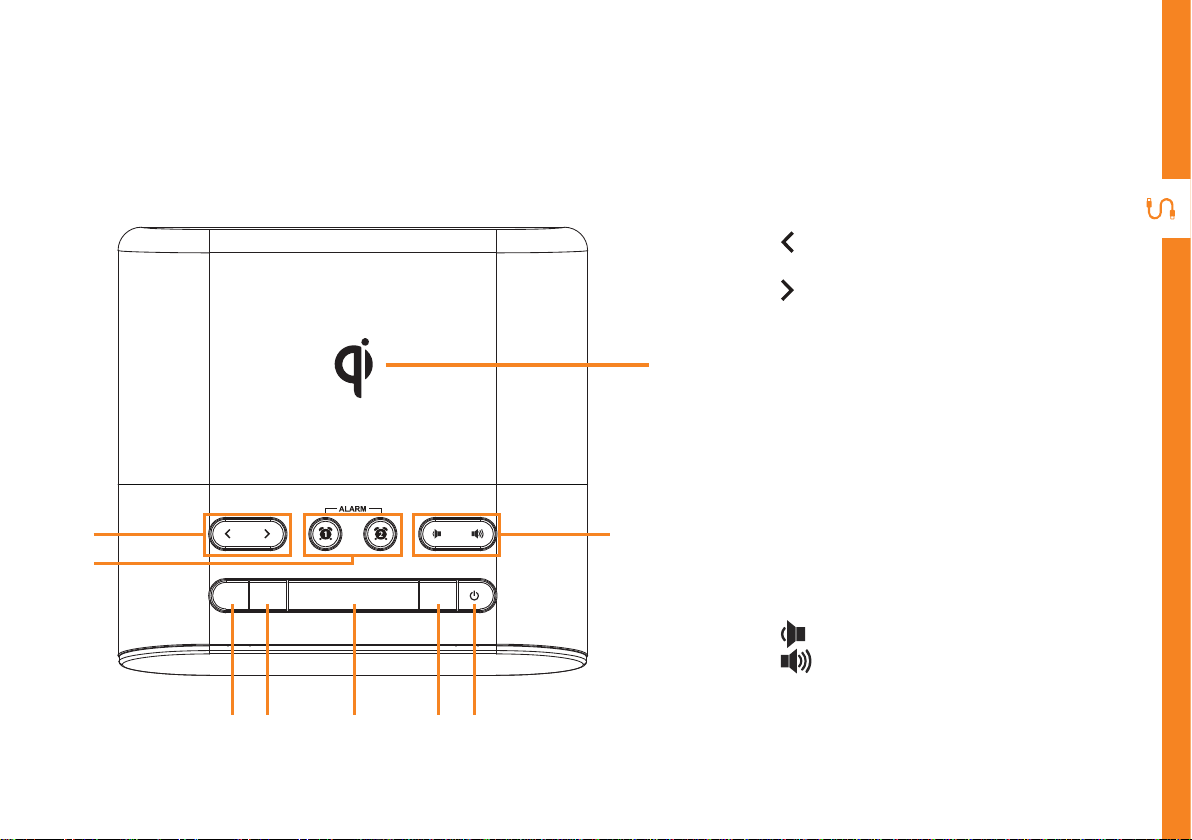
• Press the button to turn the radio on.
• Press the and buttons to tune the station frequency.
• Press and hold the or buttons to automatically tune the next available FM station.
• Press the button again to turn the radio off.
• Press the button to decrease the volume, and the button to increase the volume.
Setting Preset Stations
You can store up to 10 preset stations.
• Tune the FM stations using the or buttons.
• Press and hold the MEM/M+ button until “P01”(or the next available preset slot) shows on the display
screen.
• Press and hold the MEM/M+ button to select a preset station number (P01-P10).
• Press the MEM/M+ button to confirm; the preset station has now been saved.
• To recall a preset station, press the MEM/M+ button repeatedly while listening to the current station.

OPERATION | 9
Alarm Operation
To display the alarm time and turn alarms on/off
• Press the Alarm (1) or Alarm (2) buttons to show the alarm time and sound source indicator (alarm/radio)
on the display screen.The corresponding sound source indicator will flash and auto set the alarm on after
5 seconds.The corresponding Alarm (1) or (2) indicator will switch on when the alarm is enabled.
• To turn off the alarm, press the Alarm (1) or Alarm (2) button repeatedly until the sound source indicators
turn off.
Alarm settings
• When on clock mode (when radio is off), press and hold the Alarm (1) or Alarm (2) button to enter the
alarm settings.
• To set the time, press the to set the hour and the button to set the minute.
• Press the corresponding Alarm (1) or Alarm (2) button to set the sound source. Press the button to set the
hour and the button to select the sound source.
• Press the corresponding Alarm (1) or Alarm (2) button to confirm the setting, or it will auto confirm after 5
seconds.
• Note: the alarm will repeat everyday until the alarm is turned off.
Deactivating the alarms.
• Press the Alarm Off button to switch off an alarm.

10 | OPERATION
Snooze alarms
• Press the snooze button to temporarily mute the alarm.The alarm will sound again when the snooze period
(9 minutes) is over.
• The corresponding Alarm (1) or Alarm (2) indicator will flash on the display screen during the snooze
period.
• To cancel the snooze period and alarm, press the Alarm Off button.
Sleep timer
• Set a time period for the clock radio to automatically switch off.
• Press the SLEEP button repeatedly to select a time (minutes) period (90/80/70/60/50/40/30/20/10/off).
• The clock radio will automatically switch off after the selected time period is up.
• Press the SLEEP button to check the remaining time before the clock radio switches off.
• Press the POWER button to cancel the sleep timer.
Display Information
• Press the and buttons to change between the display screen showing the clock time and the current
FM radio station frequency.
Display Brightness
• Press the DIMMER button to change the display screen brightness (low/high/off).

OPERATION | 11
Using Qi Wireless Charging
• The wireless charging function of the clock
radio works only on wireless charging
compatible smart phones.
• Place your smart phone facing up on the
wireless charging pad. If it doesn’t start
charging, try adjusting the position and/or
remove your smart phone case.
When the smart phone is charging, the wireless charging indicator will light up.The colour of the indicator
light reflects the status of the wireless charger:
• Off - in standby mode
• Blue - charging
• Blinking red - error. If the indicator is blinking red:
1. Check that the smart phone supports wireless charging
2. Adjust position of the smart phone to the centre of the wireless charging pad.
3. Remove the smart phone case, and/or check and remove any metal or other objects between the mobile
phone and wireless charging pad.

12 | OPERATION
USB Charging
Resetting the Clock Radio
You can charge smart phones that don’t support wireless charging through the USB charging port of the clock
radio. Connect your smart phone to a USB charging cable (not included) into the USB charging port on the
back of the clock radio to charge.
To reset the clock radio, disconnect the AC power cord from the wall and remove the battery from the
compartment. Wait around 3-5 minutes and reinsert the battery and replug the AC power cord into the wall.
The times and alarms are now reset.

TROUBLESHOOTING | 13
If you encounter any problems with your clock radio, please check this list of possible issues for a solution. If you don’t find a solution
here, contact After Sales Support on 1300 886 649.
Troubleshooting
Problem Solution
Wireless charger
not working
• Check that your smart phone supports wireless charging
• Adjust the position of the smart phone to the centre of the wireless charging pad.
• Remove the smart phone case.
• Check and remove any metal or other objects between the mobile phone and
wireless charging pad.
Cannot charge
smart phone
• Check that the USB cable is securely connected for both the USB charging port on
the radio and the smart phone.
• Try another USB cable.
Display screen not
showing
• Check that the DC plug is plugged into the DC IN port and the power adaptor plug is
plugged into the power socket with a power source.
• Press the DIMMER button to check whether the display screen is turned off.
No sound from FM
radio
• Press the power button to show the radio frequency.
• Press the button.
Poor reception
from FM radio,
cannot find station
• Move the antenna.

14 | SPECIFICATIONS
Specifications
Power adaptor Input: AC 100-240V, 50/60Hz
Output: DC 9V, 3A
Audio power output 700mW
Wireless charger power output 10W Max.
Frequency range FM 87.5 - 108MHz
Backup system battery (not
included) 3V CR2032 lithium battery
Dimensions 141 (W) x 135 (D) x 58 (H) mm
Net weight 0.28kg

SPECIFICATIONS | 15
Compliance and Responsible Disposal
Compliance
This product complies with the Australian Safety
Standard AS/NZS 62368.1 to ensure the safety of the
product.
Packaging
The packaging of your product has been
selected from environmentally friendly
materials and can usually be recycled. Please
ensure these are disposed of correctly. Plastic
wrapping can be a suffocation hazard for babies
and young children, please ensure all packaging
materials are out of reach and are safely disposed
of. Please recycle these materials rather than
throwing them away.
Product
At the end of its working life, do not throw this
product out with your household rubbish. An
environmentally friendly method of disposal will
ensure that valuable raw materials can be recycled.
Electrical and electronic items contain materials
and substances which, if handled or disposed of
incorrectly, could potentially be hazardous to the
environment and human health.

For Technical and Warranty Support
1300 886 649
www.tempo.org
Distributed byTempo (Aust) Pty Ltd,
PO Box 6056, Frenchs Forest DC 2086
Table of contents
Other Akai Clock Radio manuals