Akaso Brave 6 Plus User manual

USER MANUAL
AKASO Brave 6 Plus Action Camera

What’s in the Box
Your Brave 6 Plus
Getting Started
Overview of Modes
Customizing Your Brave 6 Plus
Playing Back Your Content
Deleting Your Content
Connecting to the App
Offloading Your Content
Maintaining Your Camera
Maximizing Battery Life
Battery Storage and Handling
External Microphone
Remote
Mounting Your Camera
Contact Us
1
2
4
5
8
15
15
15
16
16
17
17
18
18
20
22
CONTENTS
V1.01

How to use all sorts of accessories of action camera?
Scan the following QR code or enter the
website to watch the video.
Unboxing: 00:00-00:19
How to remove the camera from the box it's mounted on? : 00:20-00:31
How to remove the camera from the waterproof case? : 00:32-01:05
How to mount the camera to a tripod? : 01:17-01:49
How to mount the camera to your body? : 01:50-02:08
How to mount the camera to a self stick? : 02:09-02:55
How to mount the camera to a bike? : 02:56-04:34
How to mount the protective backdoor? : 04:35-04:59
How to mount the camera to a helmet? : 05:03-11:16
WHAT'S IN THE BOX
www.youtube.com/watch?v=UqKtElRXqI8&feature=youtu.be
YOUR BRAVE 6 PLUS
10
9
2
13
14
6
5
4
7
8
Waterproof
Housing
Handle Bar/
Pole Mount
Protective
Backdoor
Mount 1
Mount 6
Mount 3
Mount 5Mount 4 Mount 7
Helmet
Mounts Tethers
Mount 2
Bandages Remote Quick Start Guide
Charger
Battery
USB Cable Lens Cloth
Clip 1 Clip 2
Brave 6 Plus
Quick Start Guide
AKASOBrave 6 Plus Action Camera
01 02

11
1. Shutter / Select Button
2. Power / Mode / Exit Button
3. Up / Wi-Fi Button
4. Down Button
5. Speaker
6. Lens
7. USB Type-C Port
8. Micro HDMI Port
9. Touch Screen
10. Battery Door
11. MicroSD Slot
Note: Camera does not record sound when it is in the waterproof case.
GETTING STARTED
Welcome to your AKASO Brave 6 Plus. To capture videos and photos, you need a microSD
card to start recording (sold separately).
MICROSD CARDS
Please use brand name memory cards that meet these requirements:
• microSD, microSDHC or microSDXC
• Class 10 or UHS-I rating
• Capacity up to 64GB (FAT32)
Note:
1. Please format the microSD card first in this camera before using. To keep your microSD
card in good condition, reformat it on a regular basis. Reformatting erases all your
content, so please make sure to offload your photos and videos before reformatting.
2. FAT32 format microSD card stops recording when the file size reaches to 4GB, and starts
to record again on a new file.
POWERING ON AND OFF
To Power On:
Press and hold the Power button for 3 seconds. The camera beeps while the camera status
light is on. When information appears on the display, your camera is on.
To Power Off:
Press and hold the Power button for 3 seconds. The camera beeps while the camera status
light is off.
SWITCHING MODE
To Switch Mode:
Turn on the camera, swipe your finger across or up the screen to change modes.
TURNING ON AND OFF Wi-Fi
Turn on the camera, press Up button to turn on Wi-Fi, and press again Up button to turn
off Wi-Fi.
03 04

There are 5 modes: Video, Photo, Video Settings, Photo Settings and Camera Settings.
OVERVIEW OF MODES
VIDEO MODE
Video Mode is the default mode when you turn on the camera.
In Video Mode, press Shutter button, the camera starts recording video. Press Shutter
button again to stop recording video. Long press Up or Down button to adjust the zoom
level.
Video Photo
Video Settings Photo Settings Camera Settings
PHOTO MODE
Swipe your finger across the screen to switch to Photo Mode after you turn on camera.
In Photo Mode, press Shutter button to take photos. Long press Up or Down button to
adjust the zoom level.
VIDEO SETTINGS
Turn on the camera, swipe your fingers up the screen, choose Video Settings to enter the
Video Settings menu. You can change video settings in this mode.
Video Setting
Video Setting
Resolution
Image Stabilization
4K30
00:01:56/00:33:52 TF
20M
0011/3482 TF
05 06

CUSTOMIZING YOUR BRAVE 6 PLUS
PHOTO SETTINGS
Turn on the camera, swipe your fingers up the screen, choose Photo Settings to enter the
Photo Settings menu. You can change photo settings in this mode.
CAMERA SETTINGS
Turn on the camera, swipe your fingers up the screen, choose Camera Settings to enter
the Camera Settings menu. You can change camera settings in this mode.
Photo Setting
Photo Setting
Resolution
Shutter interval
Camera Setting
Upside Down
Filter
Scene Mode
VIDEO SETTINGS
1. Video mode: Normal Video/Driving Mode/Time Lapse Mode/Slow Motion Video/
Still Photo/Loop Video
Default setting is Normal Video.
Driving Mode
If you turn on Driving Mode and connect camera with car cigarette lighter, the camera will
turn on automatically if you start your car and will turn off if you stop your car.
Loop Recording Interval: 1 Min/ 3 Min/5 Min/8 Min
Default setting is 3 Min.
Time Lapse Mode
In Time Lapse Video mode, press Shutter button, the camera records video from frames
captured at specific intervals.
Note: Time Lapse Video is captured without audio.
Time Lapse Interval: 1 Sec/2 Sec/5 Sec/10 Sec/ 30 Sec/60 Sec
Default setting is 2 Sec.
Slow Motion Video
In Slow Motion Video mode, press Shutter button, the camera records slow motion video.
Still Photo
In Still Photo mode, the camera will automatically take still photos during video recording.
Loop Recording: Off/1 Min/3 Min/5 Min/8 Min
Default setting is Off.
Still Photo Time: 3 Sec/5 Sec/10 Sec/30 Sec
Default setting is 3 Sec.
Loop Video
Loop Recording Interval: 1 Min/3 Min/5 Min/8 Min
Default setting is 3 Min.
07 08

Loop recording allows your camera to overwrite old files with new files. Once the memory
card becomes full, the camera will delete the first video file to make room for the latest file.
For example, if the setting for loop recording is “1 Minute”, then the camera will create
video clips of 1 minute in length, and a 1-minute clip will be deleted when the camera
needs more memory.
2. Resolution: 4K30FPS/2.7K30FPS/1440P60FPS/1440P30FPS/1080P90FPS/1080P60FPS/
1080P30FPS/720P120FPS/720P60FPS
Default setting is 4K30FPS.
Note: When capturing video at high resolutions or high frame rates in warm ambient
temperatures, the camera may become warm and use more power.
3. Image Stabilization: On/Off
Default setting is Off.
This setting adjusts the footage to offset for motion during capturing. The result is
smoother footage, especially in activities with relatively small but fast motion like cycling,
motorcycling, and handheld uses.
4. Video Encode: H.264/H.265
Default setting is H.264.
Video encode is basically a process of converting a given video input into a digital format
that is compatible with most types of Web players and mobile devices.
5. Angle: Wide/Medium/Narrow
Default setting is Wide.
The angle refers to how much of the scene (measured in degrees) can be captured
through the camera lens. Wide angle captures the largest amount of the scene, while
Narrow angle captures the least.
6. Distortion Calibration: On/Off
Default setting is On.
7. Audio: On/Off
Default setting is On.
Turn off Audio, the camera does not record audio when you record video.
8. Exposure: +2/+1.5/+1/+0.5/0/-0.5/-1/-1.5/-2
Default setting is 0.
By default, your camera uses the entire image to determine the appropriate exposure
level. However, exposure lets you select an area that you want the camera to prioritize
when determining exposure. This setting is particularly useful in shots where an important
region might otherwise be over- or underexposed.
9. White Balance: Auto/Daylight/Cloudy/Tungsten/Fluorescent
Default setting is Auto.
White Balance lets you adjust the color temperature of videos and photos to optimize for
cool or warm lighting conditions.
10. Meter Mode: Center/Average
Default setting is Average.
The meter mode refers to the way in which a camera determines exposure.
PHOTO SETTINGS
1. Photo Mode: Normal Photo/Self Timer/Time Lapse Photo/Burst Photo
Default setting is Normal Photo.
Self Timer Mode
Self-Timer Mode gives a delay between pressing the shutter release and the shutter's
firing.
Self Timer Interval: 3 Sec/5 Sec/ 10 Sec/30 Sec
Default setting is 3 Sec.
09 10

Time Lapse Photo Mode
Time Lapse Interval: 1 Sec/2 Sec/5 Sec/10 Sec/30 Sec/60 Sec
Default setting is 2 Sec.
Burst Photo Mode
In burst mode, several photographs are captured in quick succession, so it is perfect for
capturing fast-moving activities.
Burst Number: 3 Photos/5 Photos/10 Photos/15 Photos
Default setting is 3 Photos.
2. Resolution: 20MP/16MP/12MP/8MP
Default setting is 20MP.
3. Shutter Interval: Auto/1 Sec/2 Sec/5 Sec/10 Sec/ 20 Sec/30 Sec
Default setting is Auto.
Shutter Interval allows you to take photos with a delay of time.
4. Angle: Wide/Medium/Narrow
Default setting is Wide.
The angle refers to how much of the scene (measured in degrees) can be captured
through the camera lens. Wide angle captures the largest amount of the scene,
while Narrow angle captures the least.
5. Distortion Calibration: On/Off
Default setting is On.
6. Exposure: +2/+1.5/+1/+0.5/0/-0.5/-1/-1.5/-2
Default setting is 0.
By default, your camera uses the entire image to determine the appropriate exposure
level. However, exposure lets you select an area that you want the camera to prioritize
when determining exposure. This setting is particularly useful in shots where an important
region might otherwise be over- or underexposed.
7. ISO: Auto/100/200/400/800/1600
Default setting is Auto.
ISO determines the camera’s sensitivity to light, and creates a trade-off between
brightness and resulting image noise. Image noise refers to the degree of graininess in the
image. In low light, higher ISO values result in brighter images, but with greater image
noise. Lower values result in lower image noise, but darker images.
8. White Balance: Auto/Daylight/Cloudy/Tungsten/Fluorescent
Default setting is Auto.
White Balance lets you adjust the color temperature of videos and photos to optimize for
cool or warm lighting conditions.
9. Meter Mode: Center/Average
Default setting is Average.
The metering mode refers to the way in which a camera determines exposure.
CAMERA SETTINGS
1. Upside Down: On/Off
Default Setting is Off.
2. Filter: Normal/Black and White/Brown/Colorful/Warm/Cold
Default setting is Normal.
3. Scene Mode: Auto/Personage/Scenery/Defog
Default setting is Auto.
4. Voice Control: On/Off
Default setting is Off.
When you turn on the Voice Control, the Voice Control icon will appear on the top of
the screen.
11 12

Voice Commands:
AKASO Video Start: Under the Video Mode, this voice command will make the camera
start to record video.
AKASO Stop Video: Under the Video Mode, this voice command will make the camera
end recording video.
AKASO Wi-Fi On: This voice command will turn on the Wi-Fi.
AKASO Wi-Fi Off: This voice command will turn off the Wi-Fi.
AKASO Take Photo: Under the Photo Mode, this voice command will make the camera
take photo.
AKASO Turn Off: This command will make the camera turn off.
5. Diving Mode: On/Off
Default setting is Off.
Turn on Diving Mode, it can compensate for the lack of red light in underwater scenes.
Diving Mode is designed to be used in tropical and blue water, optimized for use between
10 and 80 feet.
6. Screen Saver: Off/10 Sec/20 Sec/30 Sec/60 Sec
Default setting is 60 Sec.
Turn off the display after a period of inactivity to save battery life. To turn on the display
again, press any button on the camera.
7. Auto Power Off: Off/1 Min/3 Min/5 Min
Default setting is 3 Min.
Power off your camera after a period of inactivity to save battery life.
8. Frequency: 50Hz/60Hz
Default setting is 50Hz.
9. Key Tone: On/Off
Default setting is On.
10. Date Stamp: On/Off
Default setting is On.
Turn on Date Stamp, this camera adds date stamp to the videos and photos you take.
11. Date/Time: Set Date/Set Time
12. Language: English/ Deutsch/Français/ Español/Italiano/日本語/简体中文/繁體中文
Default setting is English.
13. Wi-Fi Information
You can check the Wi-Fi name and password of this camera.
14. Factory Reset: No/Yes
Default setting is No.
This option resets all settings to their default values.
15. Format: No/Yes
Default setting is No.
To keep your microSD card in good condition, reformat it on a regular basis. Reformatting
erases all of your content, so be sure to offload your photos and videos first.
16. Information
You can check the model and version of your Brave 6 Plus.
13 14

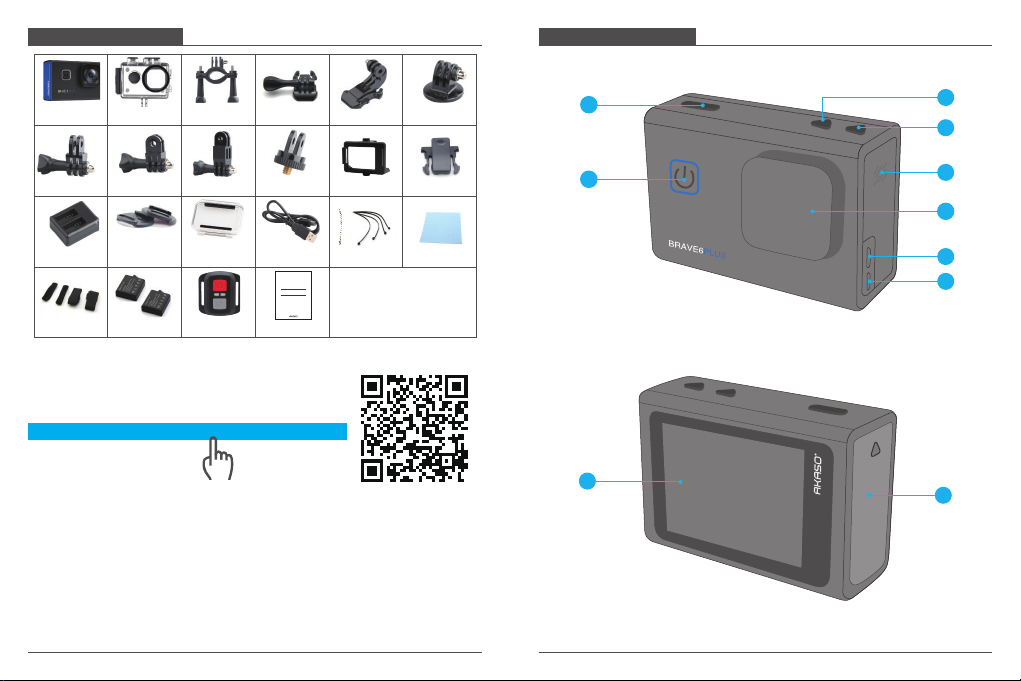
PLAYING BACK YOUR CONENT
You can playback your content on the camera, your computer, TV, smartphone or tablet.
You can also play back content by inserting the microSD card directly into a device,
such as a computer or a compatible TV. With this method, playback resolution depends on
the resolution of the device and its ability to play back that resolution.
Viewing Files on Your Brave 6 Plus
Turn on the camera, tap the Play button on the left side of the screen to enter the
Playback Mode.
In Playback Mode, swipe your finger across the screen to scroll through video or photo
files.
Please download and install the AKASO GO App in App Store or Google Play first.
The AKASO GO App lets you control your camera remotely using a smartphone or tablet.
Features include camera control, live preview, playback, download and settings.
1. Turn on the camera, press Up button to turn on the Wi-Fi.
2. Connect the Wi-Fi “Brave 6 Plus” and enter the password 1234567890 on your
smartphone.
3. Open the AKASO GO App, choose Connect the camera > Wi-Fi Connect.
BATTERY STORAGE AND HANDLING
1. Enter Playback mode. If your microSD card contains a lot of content, it might take a
minute for it to load.
2. Swipe your finger across the screen or press Up/Down button to scroll through video or
photo files.
3. Tap the Delete icon on the screen.
4. Are you sure delete files? →Select Confirm to delete the file.
5. To exit Playback mode, tap Return button.
DELETING YOUR CONTENT
OFFLOADING YOUR CONTENT
Offloading Your Content to A Computer
To play back your videos and photos on a computer, you must first transfer these files to a
computer. Transferring also frees up space on your microSD card for new content.
To offload files to a computer using a card reader (sold separately) and your computer’s
file explorer, connect the card reader to the computer, then insert the microSD card.
You can then transfer files to your computer or delete selected files.
Offloading Your Content to Smartphone
1. Open the AKASO GO App. Connect the camera with the App.
2. Click Playback to see all the videos and photos.
3. Tap the photo or video you want to download.
4. Click the Share at the right upper corner, and choose Download.
Note:
1. If you cannot offload videos or photos to iPhone or iPad, please enter Setting → Privacy
→ Photos, find "AKASO GO" and select "Read and Write".
2. iPhone and iPad do not allow you to download 4K or 2.7K video via App, please
offload 4K or 2.7K videos via card reader.
Please follow these guidelines to get the best performance from your camera:
1. For best audio performance, shake the camera or blow on the mic to remove debris
from the microphone holes.
2. To clean the lens, wipe it with a soft, lint-free cloth. Do not insert foreign objects around
the lens.
3. Don’t touch the lens with fingers.
4. Keep the camera away from drops and bumps, which may cause damage to the parts
inside.
5. Keep the camera away from high temperature and strong sunshine to avoid being
damaged.
MAINTAINING YOUR CAMERA
15 16

If the battery reaches 0% while recording, the camera saves the file and powers off.
To maximize battery life, follow these guidelines when possible:
• Turn off Wireless Connections
• Capture video at lower frame rates and resolutions
• Use Screen Saver setting.
MAXIMIZING BATTERY LIFE
Brave 6 Plus supports connecting an external microphone (sold separately) to achieve
improvement over sound quality, please connect the external microphone via the USB-C
port.
EXTERNAL MICROPHONE
The camera contains sensitive components, including the battery. Avoid exposing your
camera to very cold or hot temperatures. Low or high temperature conditions may
temporarily shorten the battery life or cause the camera to temporarily stop working
properly. Avoid dramatic changes in temperature or humidity when using the camera,
as condensation may form on or within the camera.
• Do not dry the camera or battery with an external heat source such as a microwave
oven or hair dryer. Damage to the camera or battery caused by contact with liquid
inside the camera is not covered under the warranty.
• Do not store your battery with metal objects, such as coins, keys or necklaces. If the
battery terminals come in contact with metal objects, this may cause a fire.
• Do not make any unauthorized alterations to the camera. Doing so may compromise
safety, regulatory compliance, performance, and may void the warranty.
WARNING: Do not drop, disassemble, open, crush, bend, deform, puncture, shred,
microwave, incinerate or paint the camera or battery. Do not insert foreign objects into
the battery opening on the camera. Do not use the camera or the battery if it has been
damaged - for example, if cracked, punctured or harmed by water. Disassembling or
puncturing the battery can cause an explosion or fire.
MAXIMIZING BATTERY LIFE
VIDEO
To record Video, verify the camera in Video mode.
To start recording:
Press the Grey Video Button. The camera will emit one beep and the camera light will flash
while recording.
To stop recording:
Press the Grey Video Button again. The camera will emit one beep and the camera light
will stop flashing while recording.
PHOTO
To capture a photo, verify the camera in Photo mode.
To take a photo:
Press the Red Photo Button. The camera will emit a camera shutter sound.
REMOTE
Photo Button
Video Button
Splashproof only, not waterproof
17 18

CR2032 BATTERY REPLACEMENT FOR REMOTE
1. Use a 1.8mm Phillips tip screwdriver to remove the 4 screws on the back cover of the
remote, allowing you to open it.
2. Remove another 4 screws on PCB board.
3. Lift the PCB board and slide out the battery, as shown in the picture.
Note: Do NOT rotate the PCB board to avoid reversing the camera and video button
functions.
4. Install the new battery, keeping the “+” pole facing up.
Attach your camera to helmets, gear and equipment.
MOUNTING YOUR CAMERA
5. Install all 4 screws back onto the PCB board.
6. Install all 4 screws back into the cover.
19 20

CONTACT US
For any inquires with AKASO products, please feel free to contact us, we will respond
within 24 hours.
E-mail: [email protected]
Tel: (888) 466-9222 (US) Mon-Fri (except holiday) 9am-5pm (EST)
Official website: www.akasotech.com
21 22
Other manuals for Brave 6 Plus
4
Table of contents
Other Akaso Action Camera manuals

Akaso
Akaso Brave 4 User manual

Akaso
Akaso Brave 8 User manual

Akaso
Akaso EK7000 User manual

Akaso
Akaso V50 Pro SE User manual

Akaso
Akaso V50 Pro SE User manual

Akaso
Akaso V50X User manual

Akaso
Akaso EK7000 User manual

Akaso
Akaso Brave 7 LE User manual

Akaso
Akaso V50X User manual

Akaso
Akaso EK7000 User manual

Akaso
Akaso Brave 6 Plus User manual

Akaso
Akaso Brave 7 User manual

Akaso
Akaso V50 Pro SE User manual

Akaso
Akaso V50 Pro SE User manual

Akaso
Akaso V50 Pro SE User manual

Akaso
Akaso EK7000 User manual

Akaso
Akaso EK7000 Pro User manual

Akaso
Akaso V50X User manual

Akaso
Akaso EK7000 User manual

Akaso
Akaso Brave 6 Plus User manual