ALDI FERREX FS 850-2 User manual

ID: #05007
m
y
h
a
n
s
e
c
o
n
t
r
o
l
.
c
o
m
M
A
N
U
A
L
D
E
V
E
L
O
P
E
D
I
N
G
E
R
M
A
N
Y
User-friendly
Manual
User manual
RECIPROCATING SAW
Original instructions

1
2
Dok./Rev.-Nr. 199983_20220419
Package contents
1Reciprocating saw
2Saw blade

Table of contents
3
Table of contents
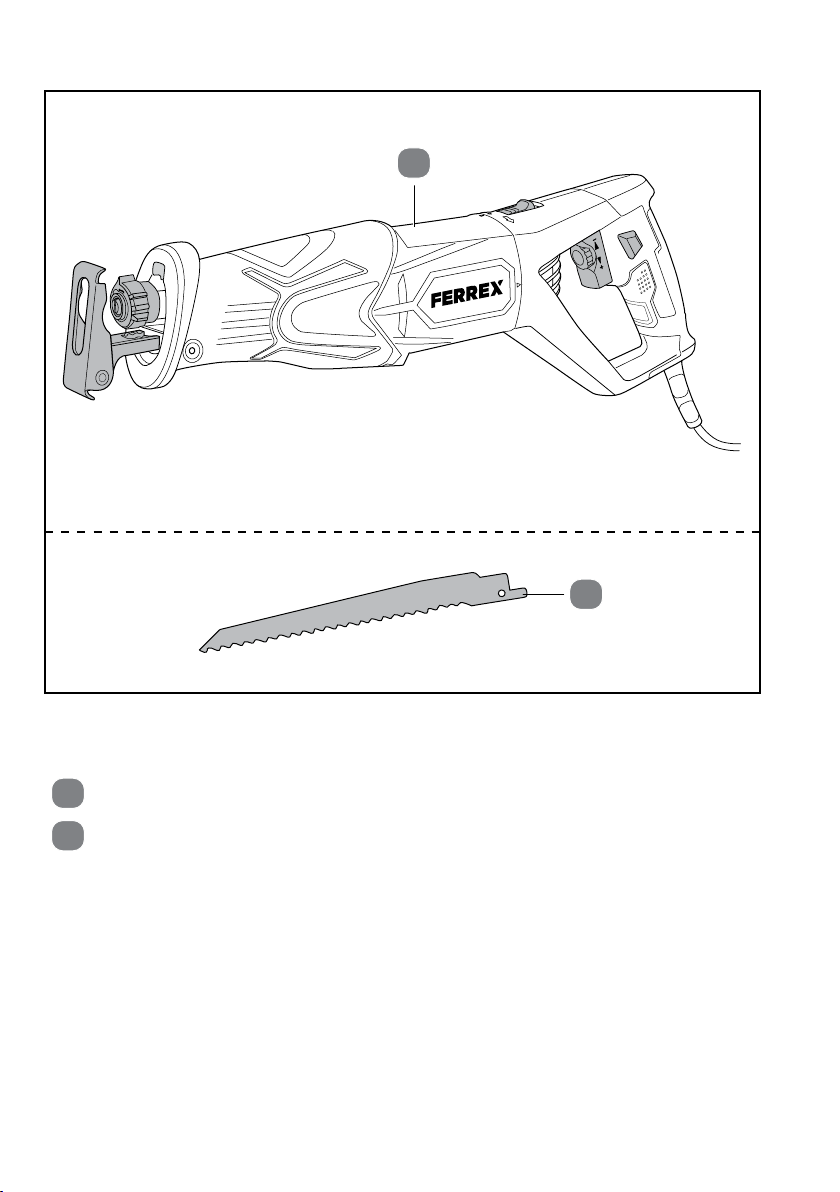
Package contents.............................................................................................2
General information ....................................................................................... 4
Reading and storing the user manual ..................................................................4
Proper use..................................................................................................................4
Residual risks.............................................................................................................5
Explanation of symbols .................................................................................. 5
Safety............................................................................................................... 6
Explanation of notes ................................................................................................6
General power tool safety instructions .................................................................6
Safety instructions for reciprocating saws ...........................................................9
Supplementary safety instructions ..................................................................... 10
Product description .......................................................................................13
First use ..........................................................................................................14
Checking the product and package contents.................................................... 14
Use ..................................................................................................................14
Inserting/changing the saw blade...................................................................... 15
Adjusting the saw shoe.......................................................................................... 15
Adjusting the saw alignment.................................................................................17
Adjusting the stroke rate limit ...............................................................................17
Connecting............................................................................................................... 18
Sawing...................................................................................................................... 18
LED work light...........................................................................................................21
Troubleshooting ............................................................................................21
Cleaning and maintenance ...........................................................................22
Cleaning ...................................................................................................................23
Inspecting the product ..........................................................................................23
Maintenance ............................................................................................................23
Storage .....................................................................................................................23
Transport..................................................................................................................24
Technical data ............................................................................................... 24
Noise/vibration information ........................................................................ 24
Disposal ......................................................................................................... 26
Disposing of the packaging ..................................................................................26
Disposing of the product .......................................................................................26
Declaration of Conformity .............................................................................27

General information
4
General information
Reading and storing the user manual
This user manual is part of this reciprocating saw (referred to below only
as the ‘product’). It contains important information on safety, usage and
care.
Before using the product, read the user manual carefully. Pay particular
attention to the safety notes and warnings. Failure to comply with the instructions in
this user manual may result in severe injury or damage to the product.
Comply with valid local or national provisions concerning the use of this product. Keep
this user manual in a safe place for future reference. Make sure to include this user
manual when passing the product on to third parties.
Proper use
The product is only intended for private use – such as hobby or do-it-yourself work –
when undertaking the following:
• sawing wood, metal or plastics.
Any other applications are expressly prohibited and are deemed improper use.
Neither the manufacturer nor the retailer can accept any responsibility for injury, loss
or damage caused by misuse of this product of any kind. Examples of misuse are given
in the following non-exhaustive list:
• Using the product for other purposes other than those intended;
• Failure to observe the safety notes and warnings as well as the assembly, operating,
maintenance and cleaning instructions contained in this user manual;
• Failure to comply with any regulations relating to accident prevention, occupational
health or safety, which specifically and/or generally apply to the use of the product;
• Use of accessories and spare parts not intended for the product;
• Changes to the product;
• Product repairs performed by parties other than the manufacturer or a qualified
professional;
• Use of the product for commercial, artisan or industrial purposes;
• Operation or maintenance of the product by persons not familiar with how to
handle the product and/or who are not aware of the related risks.

Explanation of symbols
5
Residual risks
Despite proper use, inconspicuous residual risks cannot be completely ruled out.
The following risks may arise due to the design of the product:
• Touching the exposed areas of the saw blade;
• Reaching into the rotating saw blade (cut injury);
• Tools or tool parts flying around;
• Kickback of the work piece and parts of the work piece if used improperly;
• Hearing damage as a result of working without hearing protection;
• Lung damage as a result of inhaling sawdust;
• Fire hazard due to insufficient ventilation.
Explanation of symbols
The following symbols are used in this user manual, on the product or on the
packaging.
This symbol provides you with useful supplementary information on
assembly or operation.
Declaration of conformity (see chapter ‘Declaration of conformity’):
Products marked with this symbol meet all applicable Community
regulations for the European Economic Area.
Read the user manual.
Wear protective goggles.
Wear a dust mask.
Wear ear protection.
Wear suitable protective gloves.
This symbol identifies products that belong to protection class II.

Safety
6
Safety
Explanation of notes
The following symbols and signal words are used in this user manual.
WARNING!
Indicates a hazardous situation that, if not avoided,
could result in death or serious injury.
CAUTION!
Designates a dangerous situation that may result
in minor or moderate injury if not avoided.
NOTICE!
Warns against potential damages to property.
General power tool safety instructions
WARNING Read all the safety notes, instructions, illustrations and
technical details supplied with this power tool. Failure to follow the safety
notices and instructions may result in an electric shock, fire and/or severe
injury.
Save all warnings and instructions for future reference.
The term “power tool” used in the safety instructions refers to mains-operated
power tools (corded) and battery-powered power tools (cordless).
Work area safety
a) Keep your work area clean and well lit.
Cluttered or dark areas
invite accidents.
b) Do not operate power tools in explosive atmospheres, such as
in the presence of flammable liquids, gases or dust.
Power tools
create sparks which may ignite the dust or fumes.
c) Keep children and bystanders away while operating a power
tool.
If you are distracted, you could lose control of the power tool.

Safety
7
Electrical safety
a) Power tool plugs must match the outlet. Never modify the plug in
any way. Do not use any adapter plugs with earthed (grounded)
power tools.
Unmodified plugs and matching outlets will reduce risk
of electric shock.
b) Avoid body contact with earthed or grounded surfaces, such as
pipes, radiators, ranges and refrigerators.
There is an increased
risk of electric shock if your body is earthed or grounded.
c) Do not expose power tools to rain or wet conditions.
Water
entering a power tool will increase the risk of electric shock.
d) Do not use the cord for improper purposes such as for carrying
the power tool, for hanging it up or for pulling or unplugging
it from the socket. Keep cord away from heat, oil, sharp edges
and moving parts.
Damaged or entangled cords increase the risk of
electric shock.
e) When operating a power tool outdoors, use only extension cords
that are suitable for outdoor use.
Use of a cord suitable for outdoor
use reduces the risk of electric shock.
f) If operating a power tool in a damp location is unavoidable, use
a residual current device (RCD) protected supply.
Use of an RCD
reduces the risk of electric shock.
Personal safety
a) Stay alert, watch what you are doing and use common sense
when operating a power tool. Do not use a power tool while you
are tired or under the influence of drugs, alcohol or medication.
A moment of inattention while operating power tools may result in
serious personal injury.
b) Use personal protective equipment. Always wear eye protection.
Protective equipment such as dust mask, non-skid safety shoes, hard
hat, or hearing protection used for appropriate conditions will reduce
personal injuries.
c) Prevent unintentional starting. Make sure that the power tool is
turned off before you connect it to the power supply, pick it up
or carry it.
Carrying power tools with your finger on the switch or
connecting the power tool to a power supply while the switch is set to
‘on’ may lead to accidents.

Safety
8
d) Remove any adjusting key or wrench before turning the power
tool on.
A wrench or a key left attached to a rotating part of the
power tool may result in personal injury.
e) Take care to keep a normal body position. Maintain a stable
stance and balance at all times.
This enables better control of the
power tool in unexpected situations.
f) Dress properly. Do not wear loose clothing or jewellery. Keep
your hair and clothing away from moving parts.
Loose clothes,
jewellery or long hair can be caught in moving parts.
g) If there is an option for installing dust suction devices and dust
containers, these should be attached and used correctly.
Use of
dust collection can reduce dust-related hazards.
h) Do not be lulled into a false sense of security and ignore the safety
rules for power tools, even if you are well acquainted with power
tools, having used them frequently.
Using power tools without due
care and attention can cause serious injuries in a split second.
Power tool use and care
a) Do not overload the power tool. Use the correct power tool for
your application.
The correct power tool will do the job better and
safer at the rate for which it was designed.
b) Do not use the power tool if the switch does not turn it on and
off.
Any power tool that cannot be controlled with the switch is
dangerous and must be repaired.
c) Disconnect the plug from the power source before making any
adjustments, changing attachments or storing the power tool.
Such preventive safety measures reduce the risk of starting the power
tool accidentally.
d) Store idle power tools out of the reach of children. Do not let any
individual who is not familiar with the power tool or who has not
read these instructions operate this power tool.
Power tools are
dangerous in the hands of untrained users.
e) Maintain power tools and insertion tools with care. Check for
misalignment or binding of moving parts, breakage of parts and
any other condition that may affect the power tool’s operation. If
any parts of the power tool are damaged, have them repaired
before use.
Many accidents are caused by poorly maintained power
tools.

Safety
9
f) Keep cutting tools sharp and clean.
Properly maintained cutting
tools with sharp cutting edges are less likely to bind and are easier to
control.
g) Use the power tool, accessories and fitted tools etc. in accordance
with these instructions, taking into account the working conditions
and the work to be performed.
Use of the power tool for operations
different from those intended could result in a hazardous situation.
h) Keep handles and handle surfaces dry, clean and free from oil
and grease.
Slippery handles and handle surfaces will prevent you
from operating and controlling the power tools safely in unforeseen
situations.
Service
a) Have your power tool serviced by a qualified repair person using
only identical replacement parts.
This will ensure that the safety of
the power tool is maintained.
Safety instructions for reciprocating saws
− For your own safety, only operate the saw after you have read the safety
instructions.
− Hold the saw only by the insulated handle surfaces when performing
work where the fitted tool may contact hidden power lines or its own
cable. Contact with a live wire may send current up exposed metal parts
of the power tool and give the operator an electric shock.
− Fasten and secure the workpiece to a stable surface using clamps or in
another manner. If you only hold onto the workpiece with your hand or put
it against your body, it will remain unstable and could lead to loss of control.
− Only use sharp saw blades in perfect condition. Immediately replace any
cracked, bent or dull saw blades.
− Adapt fitted tools and the stroke rate to the material. Ensure an even feed
motion.
− Make sure that the permissible stroke rate of the fitted tool is at least as
high as the maximum number specified on the saw. Accessories that
move faster than permissible may break and be projected.
− Only operate the saw if the saw shoe is mounted. When working, the saw
shoe must always be positioned on the work piece.

Safety
10
− Only run the saw up to the work piece once it has been switched on.
− Never process material containing asbestos. Use a protective mask and
dust extractor for other fibrous material.
− Do not slow down the saw blade by applying side pressure.
− Use clamping devices to secure the work piece and prevent slippage.
− During operation, always guide the saw with both hands and assume a
stable posture.
− Always route the mains cable away from the working space.
− Do not expose the saw to moisture. It must not get damp and must not be
operated in a damp environment.
− Wear a protective breathing mask and protective goggles when performing
dusty work. Do not smoke when performing dusty work and avoid open
fire.
− Wear protective gloves when handling saw blades and rough materials to
cut injuries.
− Wear ear protection when performing work.
− Do not leave any tool keys inserted.
Supplementary safety instructions
WARNING!
Risk of electric shock!
A faulty electrical installation or excessive mains voltage may result in an electric
shock.
− Only connect the product if the mains voltage of the socket corresponds to
the rating plate specification.
− Only connect the product to an easily accessible socket so that you can
quickly disconnect it from the mains supply in case of a failure.
− Never touch the product or the mains plug with damp hands.
− Lay the power cable so that it does not pose a tripping hazard.
− Do not kink the mains cord and do not lay it over sharp edges.
− Do not make any modifications or improper repairs to the product. These
may impair the operating safety of the product.
− All repair work must be carried out by trained personnel.

Safety
11
WARNING!
Risk of injury!
This product is not intended to be used by persons with impaired physical,
sensory or mental abilities or who lack experience and/or knowledge, unless
they are supervised by a person responsible for their safety or are instructed by
such a person on the use of the device.
− Supervise children to ensure that they do not play with the product.
WARNING!
Health hazard!
Under certain circumstances, the electromagnetic field that occurs during
operation may affect active or passive medical implants.
− Consult your doctor or the manufacturer of the medical implant before
using the product.
WARNING!
Health hazard!
Wood dust and plastics can be carcinogenic.
− Do not process materials that endanger health.
− Wear a respirator mask.
CAUTION!
Hearing damage!
You may damage your hearing if you use the product over a longer period of
time.
− Wear ear protection.

Safety
12
CAUTION!
Danger to health!
You may damage your health if you use the product over a longer period of time
due to the hand-arm vibration.
− Wear vibration-reducing gloves.
CAUTION!
Risk of injury!
Improper handling of the product can lead to injury.
− Only use sharp saw blades that are in perfect condition.
− Immediately replace any cracked, bent or blunt saw blades.
− Carefully secure the workpiece being processed.
CAUTION!
Risk of injury!
The LED work light on this product is very bright. Retinal damage may occur
if you look directly into the light for an extended period or at a close distance.
− Never look directly into the light for an extended period or from a close
distance.
− Do not look at the product with an optical instrument (e.g. with a magnifying
glass) when switched on.
NOTICE!
Risk of damage!
Improper handling of the product can damage the product.
− Do not clean the product with aggressive solvents.
− Never expose the product to high temperatures (e.g. heaters) or to the
influence of weather (e.g. rain).
− Never immerse the product in water or use a steam cleaner to clean it.
− Stop using the product if any of its plastic parts show cracks or deformation.
Replace damaged parts only with compatible original spare parts.

Product description
13
Product description
The product is a mains-powered reciprocating saw 1for sawing materials such as
wood, metal and plastic.
The reciprocating saw has a saw blade holder 4with rotary toggle for holding
commercially available reciprocating saw blades with a 1/2” universal shaft. A saw
blade 2for wood is included. Replacement saw blades and saw blades for other
materials are available from retailers.
The reciprocating saw has an adjustable saw shoe 3for adjusting the cutting
depth. The maximum cutting depth for wood is 180 mm, for metal it is 8 mm. There is
also an on/off switch 11 for switching on the reciprocating saw and controlling the
stroke rate, a continuous operation switch 10 for activating continuous operation,
an adjustment wheel 9for setting the stroke rate limit and an LED work light 6for
working in poor light conditions.
A
543 6 7 8 9
10
11
12
13
B

First use
14
3Saw shoe 9Adjustment wheel
(stroke rate limit)
4Saw blade holder 10 Continuous operation switch
5Rotary toggle 11 On/Off switch
6LED work light 12 Handle
7Handle surface 13 Mains cord
8Lock slide
First use
Checking the product and package contents
1. Lift the product out of the packaging with both hands.
2. Place the product on a level, stable base, such as a workbench.
3. Check whether the product or the individual parts are damaged. If this is the case,
do not use the product. Contact the warrantor by following the instructions on the
warranty card.
4. Check to make sure that all parts have been included in the delivery (see page2).
Use
WARNING!
Risk of injury!
Careless handling of the product can lead to injury.
− Always switch the product off and pull the mains plug out of the socket when
you are not using the product, when cleaning it, servicing it, replacing parts
or in the event of a fault.

Use
15
Inserting/changing the saw blade
CAUTION!
Risk of injury!
The saw blades are very sharp. Also, the saw blades can become hot during
sawing. Both of these issues can lead to injuries if you do not handle the product
carefully.
− Be extremely careful when inserting or changing the saw blade.
− Wear protective gloves when inserting or changing the saw blade.
1. Make sure that the product is disconnected from the mains.
2. Remove any saw dust from the saw blade holder 4.
14
52
3. Open the saw blade holder 4by
turning the rotary toggle 5in the
direction of the arrow and hold it in
this position (see Fig. 1).
4. Remove any inserted saw blade from
the saw blade holder.
5. Slide the saw blade to be inserted 2
into the saw blade holder as far as it
will go.
6. Release the rotary toggle. The rotary toggle will automatically snap back into its
original position and close the saw blade holder clip.
The saw blade is now inserted or changed.
Adjusting the saw shoe
NOTICE!
Risk of damage!
If you use an unsuitable cutting depth, you may damage the product or the
workpiece.
− Before beginning sawing, set a suitable cutting depth for the workpiece
being sawed.

Use
16
You can set the desired or required cutting depth using the adjustable saw shoe. The
maximum cutting depth for wood is 180 mm, for metal it is 8mm (see Fig. B). Select
the cutting depth so that the saw blade is in contact with the workpiece in every
stroke position along the entire length that the saw is engaged.
1. Make sure that the product is disconnected from the mains.
2
14 315
14 Locking lever
15 Saw shoe holder
2. Move the locking lever 14 in the
direction of the arrow to release the
saw shoe lock 3(see Fig. 2).
3. Move the saw shoe lengthwise to the
desired position. Make sure that the
saw shoe is at least up to the marking
in the saw shoe holder 15 .
4. Move the locking lever back to its original position to close the saw shoe lock. Make
sure that the locking lever engages.
The cutting depth is now set.
As well as adjusting the cutting depth, the adjustable saw shoe also
allows you to specify which area of the saw blade is in contact with the
saw entry in the workpiece.

Use
17
Adjusting the saw alignment
The front part of the product can be turned 90°to the left or right. This allows you to
saw in a sideways direction.
1. Make sure that the product is disconnected from the mains.
3
16 8
16 Front part
2. Pull the lock slide 8in the direction
of the arrow and hold it in this position
(see Fig. 3).
3. Turn the front part 16 of the product
to the desired position.
4. Release the lock release slider to lock
the front part of the product in the set
position.
The saw alignment is now set.
Adjusting the stroke rate limit
The product has a stroke rate limit of 500–2800 rpm-1. The stroke rate of the product
can be increased continuously during operation by pressing the on/off switch 11
repeatedly. You can use the adjustment wheel 9to limit the maximum number of
strokes so you do not accidentally increase the number of strokes during operation to
such a high number that the respective workpiece is damaged.
4
9
− To increase the stroke rate limit, turn
the adjustment wheel 9towards
the “+” position (see Fig. 4).
− To decrease the stroke rate limit, turn
the adjustment wheel towards the
“-” position.
The suitable stroke rate depends on the material which is being
processed.

Use
18
Connecting
− To connect the product, insert the mains plug of the mains cord 13 into a properly
installed socket.
Sawing
WARNING!
Risk of injury!
Accidentally starting the product may result in severe injury caused by the saw
blade.
− Always use both hands to hold the product on the handles intended for
this purpose in order to be able to use the product safely. Working using
one hand only can cause accidents.
− Do not reach into the saw blade when it is running.
− Operate the product with the saw blade facing away from the body.
− Always work with the product in a stable position.
− Wear protective gloves.
NOTICE!
Risk of damage!
Using the product incorrectly may damage the product.
− Select a moderate sawing speed to avoid overloading the product.
− Check the area behind the workpiece. Foreign bodies or materials lying
around may get caught in the saw and lead to the product becoming blocked.
− Check workpieces made of wood for foreign bodies such as nails or screws
before beginning work.
NOTICE!
Risk of damage!
Insufficiently secured workpieces may slip during processing and be permanently
damaged.
− Ensure that the workpiece is sufficiently fixed into place.
− Use the appropriate clamping devices e.g. vices to secure the workpiece.

Use
19
Sawing in normal operation
1. Secure the workpiece with suitable clamping elements (e.g. vices). Ensure that
the clamping elements are fixed securely to prevent them being loosened by the
vibrations caused by the product.
2. If necessary, set the maximum number of strokes using the stroke rate limiter (see
“Adjusting the stroke rate limit”).
3. Make sure that the product is plugged into a socket.
4. Pick up the product. Hold it by the handle 12 and the front handle surface 7.
5
11
5. Press and hold the on/off switch 11 .
The product will run. Press the on/off
switch gently at first to start at a lower
stroke rate (see Fig. 5).
6. Place the saw blade 2on the workpiece. Saw the workpiece at an even feed
rate. Slowly increase the pressure on the on/off switch to increase the stroke rate
and the speed of the inserted saw blade.
If the saw blade jams, switch off the product immediately. Use a suitable tool to
spread the saw gap and pull the saw blade out of the saw gap.
7. To switch off the product after sawing, release the on/off switch.
The product will gradually come to a stop. Do not put down the product while it is
coming to a stop. Hold the product steady and wait until the saw blade comes to a
complete stop. Only then can you put the product down.
8. Pull the mains plug out of the socket to disconnect the product from the power
supply.
The workpiece is now sawn.
• To prevent the product from overheating, take regular cool-down
breaks when working for long periods of time.
• To extend the cutting stability of the saw blade, you should take
regular breaks to let it cool down when sawing metal, or coat the
saw blade with cutting grease.
• The product is relatively loud during operation. Therefore, do not
use the product at unsociable times.

Use
20
Sawing in continuous operation
NOTICE!
Risk of damage!
Improper use of continuous operation may damage the workpiece.
− Before using continuous operation, set a stroke rate limit that is suitable
for the material being worked to prevent the workpiece from being
damaged by an excessive stroke rate.
1. Secure the workpiece with suitable clamping elements (e.g. vices). Ensure that
the clamping elements are fixed securely to prevent them being loosened by the
vibrations caused by the product.
2. If necessary, set the maximum number of strokes using the stroke rate limiter (see
“Adjusting the stroke rate limit”).
3. Make sure that the product is plugged into a socket.
4. Pick up the product. Hold it by the handle 12 and the front handle surface 7.
6
11
5. Press the on/off switch 11 until it
stops and hold it down (see Fig. 6).
7
10
6. Press the continuous operation
switch 10 to activate continuous
operation. Then you can release the
on/off switch (see Fig. 7).
7. Place the saw blade 2on the workpiece. Saw the workpiece at an even feed
rate.
This manual suits for next models
1
Table of contents
Other ALDI Saw manuals

ALDI
ALDI WORKZONE SD1600V User manual

ALDI
ALDI Workzone Titanium HM80MP User manual

ALDI
ALDI WS 800-1 User manual

ALDI
ALDI FERREX F-TS 2000-1 User manual

ALDI
ALDI Workzone Titanium HM80MP User manual

ALDI
ALDI WORKZONE WWPBS-18 User manual

ALDI
ALDI FERREX 704518 User manual

ALDI
ALDI WZTS 2000 User manual

ALDI
ALDI WORKZONE HBS20 User manual

ALDI
ALDI HM80L User manual
Popular Saw manuals by other brands

Delta
Delta ShopMaster BS150LS instruction manual

FLORABEST
FLORABEST FAAS 10.8 A1 Operation and safety notes

Worx Nitro
Worx Nitro WX845L.1 instruction manual

Delta
Delta DELTA 28-984 Assembly manual

BLACK DECKER
BLACK DECKER BES720 Original instruction

Mac allister
Mac allister 64 77 19 Original instructions