Alecto DBX-92 User manual

DBX-92
USERS MANUAL

2
2
GENERAL FUNCTIONS
BABY-UNIT:
PARENT UNIT:
display
adjustment
buttons
menu button
Sensitivity
control (back)
on/o switch
built-in
microphone
external
microphone
jack
antenna
display
light button
key pad lock
power adapter
input
settings key
talk button (*)
send button (*)
battery
compartment
(back)
earphone input
ashlight
on / o push
button
functions key
built-in micro-
phone (*)
setting key
monitor key
loudspeaker
*: More information on these functions
can be found in the chapter entitled
RADIO FUNCTIONS on page 11.

3
3
DISPLAY OVERVIEW
BABY-UNIT:
PARENT UNIT:
channel
number
lights up when
the connec-
tion control is
switched on
lights up when
transmitting
lights up when
the ‘alert tone’ is
enabled
sub-channel
lights up when the
monitor function is
switched on.
channel
number
battery charge
indicator
volume-level
indicator
sub-channel
number
transmit /receive
indicator:
send
receive
4
INSTALLATION
BABY UNIT:
The baby unit is powered from the supplied xed power adapter. The power
adapter can be connected to a 230V electrical outlet.
Place the baby unit in the nursery. It is recommended to keep the baby and the
baby monitor at a minimum distance of 2 meters. Ensure that the baby cannot
touch the baby monitor or the power adapter cord.
The baby unit can also be mounted on the wall. There is an opening for mounting
located at the back of the baby unit.
PARENT UNIT:
The parent unit is powered by an included NiMH battery pack (4.8V). The parent
unit is not xed to a power adaptor so it can be used cordless.
Connect the power adapter to the parent unit, and then plug the power adapter
into a 230V 50Hz electrical outlet.
Please note that the battery pack needs about 14 hours in order to fully charge.
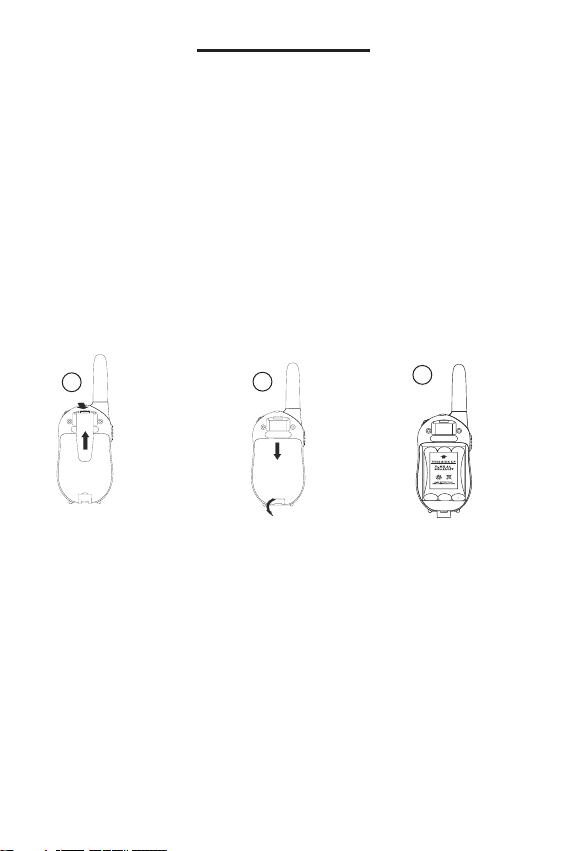
123
1. Take o the belt clip 2. Open the battery
compartment located
on the bottom of the
unit by clicking open
the cover
3. Place the battery pack
into the battery com-
partment as indicated
and close the cover.
4

5
HOW TO USE
ON / OFF SWITCH:
Baby unit:
Switch on the baby unit located on the right side of the baby unit by sliding the on
/ o switch to position 1. This will allow to switch the channel.
Slide this switch to the 0 position in order to turn the baby unit o.
Parent unit:
Press and hold down the on/o button for about 2 seconds until the display
lights up. The parent unit is now switched on.
Press this button down again until the display goes o. The parent unit is now
turned o.
Channel and sub-channels:
Make sure the parent unit and the baby units are set to the same channel and
sub channel (see the illustration on page 3). Refer to the next page if the settings
need to be changed.
OPERATION:
If the baby unit detects sound, the transmitter will be activated and the sound sent
to the parent unit.
Level of sensitivity:
Turn the dial VOXSENS located on the back of the baby unit to set the level
of sensitivity. The very left of the dial is the least sensitive, turn the dial in a
clockwise direction to increase the level of sensitivity.
Receiving volume:
You can set the call volume level on the parent unit by pressing the or the
button; there will be conrmation beep tone. The display screen will show the
level of the selected volume ( ).
Multiple baby units:
See page 10 if you would like to use more than one baby unit.
5
6
ADDITIONAL FEATURES AND SETTINGS
CHANGE SEND / RECEIVE CHANNEL:
Baby unit:
1. Push 1x on the MENU button, after the channel indicator light [CH] comes on
2. Push on the button or to select a new channel (1-8)
3. Push on the button MENU to set the new channel
Parent unit:
1. Push 1x on the button ; the channel display will start ashing
2. Push on the button or to select a new channel (1-8)
3. Push on the button PTT to set the new channel
CHANGE SUB CHANNELS (CTCSS):
Baby unit:
1. Push 2x on the button MENU ; the sub channels will show up in large with
the letters [Ct] behind.
2. Use the buttons or to select or disable the sub-channel (1-38) or to
enable or disable this feature by setting sub-channel to 00.
3. Push on the MENU button to set the selected sub-channel.
Parent unit:
1. Push 2x on the button; the sub-channel indicator will begin to ash.
2. Use the buttons or to select or disable the sub-channel (1-38) or to
enable or disable this feature by setting sub channel to 00.
3. Push the PTT button to set the selected sub-channel
ENSURE THAT THE PARENT UNIT
AND BABY UNIT ARE ON THE
SAME CHANNEL AND THAT THE
SAME SUB-CHANNELS ARE
SELECTED.
ALSO SEE PAGE 10, CHAPTER
ENTITLED ‘BABY MULTIPLE
UNITS’.
6
Explanation of the CTCSS code:
Continuous Tone Controlled
Squelch System is the tone code
that is sent when transmitting. This
code is not an audible tone.
Only when the tone code from the
baby unit corresponds to the tone
code from the parent unit, will the
parent unit display the signal. This
prevents the baby monitor from
interference from other devices
that may communicate on the
same channel.

7
CONNECTION CONTROL:
Every 30 seconds, you can send three short beep tones from the baby unit to the
parent unit. This enables the connection to be checked every 30 seconds. This
function can be switched on or turned o as follows:
Baby unit only:
1. Push 3x on the button MENU ; the word [BEEP] will light up.
2. Push on the button to turn this function [ON] in the display or push on the
button to turn this function [OFF] in the display.
3. Push on the MENU button to set the selected function.
MONITORING: (forced listening)
Baby unit:
You can set the baby unit so that it broadcasts every 5 minutes for 5 seconds,
even when the baby unit does not detect sound.
1. Push 4x on the MENU button; the word [AUTO MON] will light up.
2. Push the button to turn this function ([ON] in the display) or press the
button to turn this function [OFF] in the display.
3. Push on the MENU button to set the selected function.
Parent unit:
You can temporarily or permanently disable the noise reduction of the parent unit
so you can still hear the baby unit when a weak signal is received.
- Push on the button to switch o the noise reduction, when you release this
button, the noise reduction will be switched on again.
- If you push and hold the button for more than 3 seconds, you will hear a
short beep sound which will indicate that the continuous noise reduction has been
turned o. If you release the button you can continue to listen for a short
time. Push the button to turn the noise reduction on again.
7

8
SOUND ALERT:
You can set the baby unit to send an alert tone rst before a transmission is sent.
The alert signal will be dierent from any other signals you receive.
Only baby unit:
1. Push on the MENU button 5x; the word [CA] will then light up.
2. Push on the button to turn the function [ON] in the display or push the
button to turn the function [OFF] on the display.
3. Push the MENU button to set the selected function.
Note: These sounds are NOT added to the beeps sent for the purpose of con-
nection control.
KEYPAD LOCK:
To avoid accidentally changing the channel on the parent unit or turning the
volume too low, you can lock the keypad in the following way:
Only parent unit:
1. Push on the () button until the icon lights up in the display.
2. To unlock it, push the () button again until the icon disappears from the display.
The buttons , and will be blocked when the icon lights up on the
display.
STOPWATCH:
The parent unit is equipped with a stopwatch function,
1. Push on the button for 3 seconds to turn on the stopwatch
- Push the button to start the stopwatch
- Push the button for the laps time (the time will continue to run)
- Push the button to continue
- Push the button to set the stopwatch at 00:00
2. Push the button for 3 seconds to turn o the stopwatch
During this mode, the baby monitor function on the parent unit will still be active.
KEYPAD TONE:
When you push a button on the parent unit a beep tone will sound. You can
switch the beep tones on or o using the following steps:
1. Push the button 6x; [ONto] or [OFFto] will then ash on the display.
2. Push the button to switch the beep tone function [ON] in the display, or push
the button to deactivate the function [OFF] in the display.
3. Push the PTT button to set the selected function.
8

9
EARPHONE:
You can connect a headset with a 2.5mm plug into the parent unit in order to
monitor your baby without disturbing other people in the same room as you. The
built-in loud speaker will be disabled when the headset is plugged in.
FLASHLIGHT:
The parent unit is equipped with a ashlight. Press the button to turn on the
ashlight. When you release the button, the ash light will go out.
BELT CLIP:
The parent unit is equipped with a belt clip; this enables you to have the parent
unit on you while also keeping your hands free.
The belt clip can be removed by pressing on the latch with a small screwdriver
and sliding the belt clip upwards.
EXTERNAL MICROPHONE:
You can attach an external microphone on the right side of the baby unit which
can be connected with a 2.5 mm plug. The built in baby unit microphone will then
be muted.
The external microphone function can be used in the event that the baby unit
itself cannot be put in the room.
9
10
MULTIPLE BABY UNITS
After you have purchased loose baby units (DBX-93) you can set up multiple
babies ‘monitoring’. Ensure that the baby units and the parent unit are connected
on the same channel and sub-channel. In case this does not work, you can also
choose an alternate monitoring, see below:
ALTERNATE MONITORING OF 2 BABY UNITS:
Baby units:
1. Set the two baby units on dierent channels (the sub-channel setting may be
selected too)
Parent unit:
1. First set the parent unit to the same channel and sub-channel as the 1st baby
unit, press the PTT button to conrm the setting.
2. Now push 7x on the button and by using the button or the button
select the channel of the 2nd baby unit (select [OFF] to disable this feature).
3. Push 1x on the button and using the button or the button select the
sub-channel of the 2nd baby unit.
4. Push the PTT button, the parent unit will now alternately listen between baby
unit 1 and baby unit 2.
ALTERNATE MONITORING OF MORE THAN 2 BABY UNITS:
Baby units:
1. Set the baby units to dierent channels (set the sub-channel settings to 00)
Parent unit:
1. Push the button and button simultaneously, this enables the parent
unit to consecutively listen to all the channels.
2. When the parent unit picks up sound from one of the channels it will stop
scanning and transmit only the signal from that camera. The parent unit will
continue scanning a few seconds after the sound has stopped.
- Push the button to continue scanning if only noise or an unwanted channel
is received on the signal.
- Push the PTT button to end the scanning function.
10
Table of contents
Other Alecto Baby Monitor manuals

Alecto
Alecto DBX-86 User manual

Alecto
Alecto IVM-200 User manual

Alecto
Alecto DVM-70 User manual

Alecto
Alecto DOS-150 User manual

Alecto
Alecto DBX-82 User manual

Alecto
Alecto DVM-120 User manual

Alecto
Alecto DBX-20 User manual

Alecto
Alecto DBX-93 User manual

Alecto
Alecto DIVM-550 User manual

Alecto
Alecto DBX-57 User manual

Alecto
Alecto DVM-67 User manual

Alecto
Alecto DBX-85 eco User manual

Alecto
Alecto DBX-99 User manual

Alecto
Alecto DVM-370 User manual

Alecto
Alecto DVM-65 User manual

Alecto
Alecto DVM-275C User manual

Alecto
Alecto DBX-112 User manual

Alecto
Alecto DBX-33 User manual

Alecto
Alecto DBX-88eco User manual

Alecto
Alecto DBX-84 User manual


