All Pond Solutions CURVE Series User manual
NANO AQUARIUM
NANO AQUARIUM
NANO AQUARIUM

SAFETY
Important! Disconnect the mains electricity supply
before attempting any installation / maintenance
of any kind.
Mount the aquarium on a flat, stable surface.
The pump included should never be run dry as
this will cause the pump to overheat, which
could result in permanent damage to the pump.
Do not attempt to modify any part of this unit in
any way and only use the recommended spare
parts for replacement.
All connections must be earthed.
Do not connect to any voltage other than stated.
Do not use with any liquids other than water.
Do not use with water above 90°F or 30°C.
Do not install or store the aquarium, or its parts,
where it will be exposed to temperatures below
freezing (indoor household use only).
Please note: This equipment can be used by
children aged from 8 years and above and
persons with reduced physical, sensory or mental
capabilities or lack of experience and knowledge
if they have been given supervision or instruction
concerning use of the equipment in a safe way
and understand the hazards involved. Children
should not play with the equipment.

ELECTRICAL GUIDANCE
Cleaning and user maintenance shall not be
made by children without supervision.
Please ensure:
The pump power supply is earthed and fused at
3amps.
The cable is regularly inspected for damage
and deterioration.
A qualified electrician is consulted if you are in
doubt about wiring the product yourself.
Never to plug in any electrical part of the
aquarium if water is on parts not intended to be
wet.
Not to operate any appliance if it has a
damaged cord or plug.
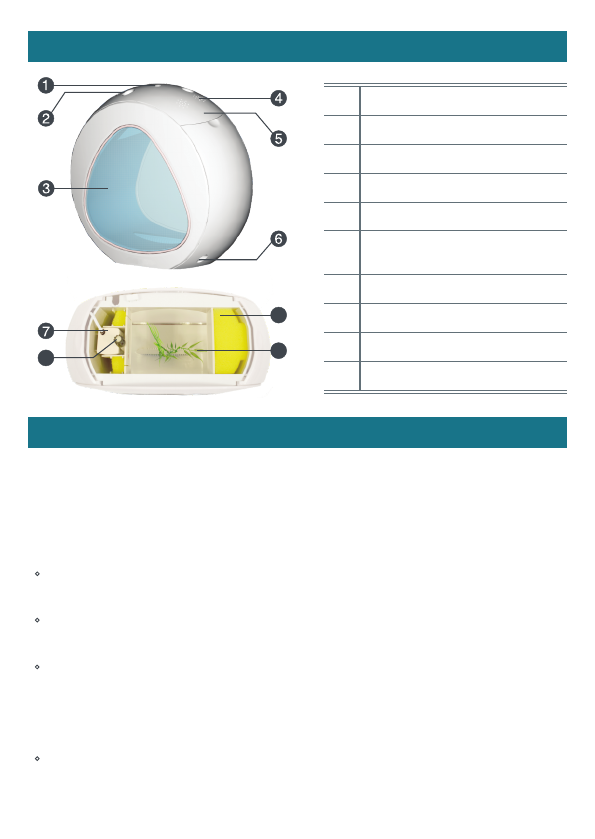
LED LIGHT SWITCH
FEEDING HOLES
ACRYLIC VIEWPOINT
AIR VENT HOLES
LID
DRAINAGE / WATER
CHANGE TUBE
WATER PUMP
FILTER FOAMS
LED LIGHT PINS
ARTIFICIAL PLANT
1
2
3
4
5
6
7
8
9
10
10
8
9
TANK DIAGRAM
PREPARING YOUR AQUARIUM
IMPORTANT: the aquarium should not be placed near a
window or put in direct sunlight. This will void your warranty.
Ensure that your aquarium is not plugged in when you carry
out the steps below.
Remove all components from the packaging and ensure
that nothing is damaged.
Clean the aquarium inside and out with a damp cloth
using fresh water. NEVER USE ANY SOAP OR DETERGENTS.
Position your aquarium on a flat, stable surface that
cannot be damaged by water, and is away from other
electrical equipment, direct sunlight, drafts and heat
sources.
Remove the filter foams from inside the aquarium and
wash thoroughly with fresh water. Return these inside
your aquarium filter bay.

DECORATING AND FILLING YOUR AQUARIUM
Ensure that your aquarium is not plugged in when you carry
out the steps below.
Do not add decorations, inhabitants, or place hands into
the tank without first removing at least 20% of the tank
water volume, as the displacement could overflow the
aquarium and cause damage to the aquarium and its
support surface.
Rinse the coloured stones provided (and any additional
ornaments or plants that you wish to include) with fresh
water before adding to your aquarium.
Add coloured stones to the aquarium.
Fill the aquarium up to half its height with room
temperature water and decorate with ornaments.
Add aquarium water conditioner and a filter start
treatment to the aquarium, for example AquariumRescue
Dechlorinator and AquariumRescue Bacteria Balls
(available at www.allpondsolutions.co.uk)
Top up the aquarium with water, ensuring the water is no
lower than the water level line (image 1).
Once you have added all of your decorations and your
water has been added, you can then plug in your
aquarium.
1
2
3
4
5
6
LED LIGHT
WATER PUMP
FILTER SPONGE image 1

ADDING FISH TO YOUR AQUARIUM
Before adding fish to your aquarium, you must check that
your aquarium has cycled fully. This could take up to 3-4
weeks.
You can test this either by purchasing a test kit, or asking
if your local aquatics store can do this for you (many
stores offer this service).
Remember to allow a minimum of 3 litres of water for
every 1cm of fish, including the tail (consult with your fish
dealer for aquarium requirements when purchasing).
Float the fish in their bag inside the aquarium - add a little
water from aquarium to the bag and acclimatise for 15
minutes this will regulate the water temperature in the
bag and reduce the risk of stressing your inhabitants.
Using a net, carefully remove the fish from the bag and
place in your aquarium. It is not recommended to pour
the water from the bag into your aquarium.
Once all gravel, decor and inhabitants have been added,
top up the aquarium with water to the bottom of the
aquarium rim.
1
2
3
4
5
6
PREPARING YOUR AQUARIUM
The pump power supply is earthed and fused at 3amps.
The cable is regularly inspected for damage and
deterioration.
A qualified electrician is consulted if you are in doubt
about wiring the product yourself.
Never to plug in any electrical part of the aquarium if
water is on parts not intended to be wet.
Not to operate any appliance if it has a damaged cord or
plug.

MAINTENANCE
Ensure that all equipment is disconnected from the mains
power supply prior to performing cleaning and
maintenance on the aquarium and its parts.
We recommend that a regular cleaning and maintenance
schedule is followed to ensure responsible fishkeeping.
Do not use equipment that has come in contact with
soap.
Depending on your stocking levels and the kind of fish
you are stocking, you may need to maintain and
complete water changes at varying times.
The following is a suggested schedule:
Weekly - Once a week, remove 20% of the water using the
water outlet pipe.
Replace with tap water that has been treated with water
conditioner, and that is a similar temperature to your tank.
Monthly - Once a month, remove the pump and filter foams
for cleaning.
IMPORTANT: Do not rinse your pump and filter foams with
tap water. Rinse in a bowl with water taken from your
aquarium. This way, you will not wash away the beneficial
bacteria that has established.
TROUBLESHOOTING – WATER
Can occur due to a biological imbalance during initial
setup, or as a result of overfeeding.
Cloudy Water
Perform a water change (up to 25% of water) - use water
conditioner and a biological supplement.
1

3
Reduce your feeding to once every 2 days until you see
an improvement.
Consult your local fish shop with test results, to determine
a course of action.
2
Can occur due to poor water quality (high levels of
ammonia and nitrites).
Lethargic Fish
Perform a water change (up to 25% of water) - use water
conditioner and a biological supplement.
Reduce your feeding to once every 2 days until you see
an improvement.
Consult your local fish shop with test results, to determine
a course of action.
1
3
2
Can occur due to high levels of ammonia, nitrites and
nitrate.
Smelly Water
Perform a water change (up to 25% of water)
- use water conditioner and a biological supplement.
Reduce your feeding to once every 2 days until you see
an improvement.
Consult your local fish shop with test results, to determine
a course of action.
1
3
2
Caused by the growth of algae.
Green Water
As advised above in the preparing your aquarium section,
ensure that your tank is not positioned in direct sunlight.
Perform a water change every four days (up to 25% of
water) - use water conditioner and a biological
supplement.
1
2

4
Reduce the number of hours you operate your aquarium
LED light. It is recommended to only have the light on for
6-8 hours per day.
Cut back on feeding and ensure you are using a high
quality fish food.
Consult your local fish shop with test results, to determine
a course of action. with test results, to determine a
course of action.
3
5
TROUBLESHOOTING – EQUIPMENT
Pump not operational
Ensure the unit is plugged into the mains and red light is
visible.
Check the impeller is not blocked and does not simply
need cleaning.
Check the impeller and shaft are not damaged.
1
2
3
Light not operational
Ensure the unit is plugged into the mains and red light is
visible on the plug adapter with the aquarium is switched
on. If a green light displays, this indicates that the power
cable is not correctly inserted into the adapter.
If you have checked that the red light is visible on the
adapter but the LED light is still not working, switch off
the adapter and unplug from the mains. Next, lift the lid
and inspect the light pins to check they are not obscured
or damaged. The LED will only light with the pins come
into contact with the contact point in the underside of the
lid. (image 2)
If the above has not helped resolve the issue, please
consult the supplier of your aquarium.
1
2
3

CONTACT POINT
LIGHT PINS
image 2
DIMENSIONS
CURVE-6
CURVE-14

WARRANTY
All Pond Solutions products are supplied with a 12 months
warranty, guaranteeing parts in the event of a genuine fault
or mechanical failure (warranty commences from date of
purchase).
We do not accept liability for reasonable wear and tear,
accidental damage, or problems arising from modification
or misuse.
Your aquarium must be placed away from other electrical
equipment, direct sunlight, drafts and heat sources.
In the event of a genuine fault or mechanical failure that is
covered under warranty, please contact the supplier of your
item directly.
Spare parts are available from our official website or from
your local supplier. Please ensure that only genuine All
Pond Solutions components are used when completing a
replacement or repair.
SPECIFICATIONS
VOLUME
VOLTAGE
PUMP POWER
LED LIGHT
DIMENSIONS
6 Litres
5V
2w
w3
345 x 165 x 317mm
13.5 Litres
5V
2w
w3
415 x 230 x 380mm
MODEL CURVE-6 CURVE-14
This manual suits for next models
2
Table of contents
Other All Pond Solutions Aquarium manuals


