Fluval SEA EVO Troubleshooting guide

Quick Start-Up Guide
13.5 US Gal - 52 L
EVO

IMPORTANT SAFETY INSTRUCTIONS
WARNING - To guard against injury, basic safety precautions should be observed, including the following:
1.
READ AND FOLLOW ALL SAFETY
INSTRUCTIONS.
2. DANGER – To avoid possible electrical shock, special care should be taken since water is employed in the use
of aquarium equipment.
3. Never attempt to repair this appliance yourself. Return the appliance to an authorized service facility for
service or discard the appliance. Do not operate the appliance if it has a damaged cord or plug. If cord is
damaged, the appliance should be destroyed.
A. If the appliance falls into the water, DO NOT reach for it. First unplug the appliance and then retrieve
it from the water. If electrical components of the appliance get wet, unplug it immediately and allow
the appliance to thoroughly dry. Carefully examine the appliance after installation. It should not be
plugged in if water is present on parts not intended to be wet.
B. To avoid the possibility of the appliance plug getting wet, position the tank to
the side of a wall mounted receptacle to prevent water from dripping onto the
receptacle. A “drip loop”, should be arranged by the user for each cord connecting
an aquarium device to the receptacle. The “drip loop” is the part of the cord
below the level of the receptacle or the connector if an extension cord is in use, to
prevent the water from travelling along the cord and coming into contact with the
receptacle. If plug or receptacle gets wet, DO NOT un-plug the cord. Disconnect
the fuse or circuit breaker that supplies power to the receptacle then unplug the
transformer and examine for the presence of water in the receptacle.
4. WARNING - This appliance is not intended for use by persons (including children)
with reduced physical, sensory or mental capabilities, or lack of experience and knowledge, unless they
have been given supervision or instruction concerning use of the appliance by a person responsible for
their safety. Children should be supervised to ensure that they do not play with the appliance.
5. Always unplug the appliance from the outlet when not in use, before putting on or taking o parts and
before cleaning. Never yank the cord to pull the plug from the outlet.
6. Do not use this appliance for any purpose other than that recommended by the manufacturer. The use of
attachments not recommended or sold by the appliance manufacturer may cause an unsafe condition.
7. Do not install or store the appliance where it will be exposed to weather or temperatures below freezing.
8. Make sure the appliance is mounted correctly and securely positioned on the aquarium before operating
the appliance.
9. Read and observe all important safety notices on the appliance.
10. If an extension cord is necessary, a cord with the proper current (amps) rating should be used. A cord
rated for fewer amps than the appliance rating may overheat. Care should be taken to arrange the cord
so that it will not be tripped over or pulled.
11. This appliance is intended FOR INDOOR HOUSEHOLD USE ONLY.
12. This appliance is for use with salt water only. Not for Freshwater use.
13. (For North America only) This appliance has a polarized plug (one blade is wider than the other). As a
safety feature, this plug will fit in a polarized outlet only one way. If the plug does not fit fully into the
outlet, reverse the plug. If the plug will still not fit fully into the outlet, contact a qualified electrician to
inspect the outlet and make the needed alterations. Never use with an extension cord unless the plug can
be fully inserted. Do not attempt to defeat this safety feature.
SAVE THESE INSTRUCTIONS

CONGRATULATIONS
on the purchase of your EVO aquarium. In this guide, you’ll find
basic installation and maintenance tips to ensure you create and
enjoy a thriving saltwater environment at home.
SOME IMPORTANT DO’S AND DON’TS
Before setting up, inspect your tank
for any signs of damage that may have
occurred during transport.
Avoid drafts by placing
away from direct heating
or cooling vents.
Place the EVO on a stable flat surface,
which can hold a minimum of 120 lbs (54 kg).
120 lbs
Never use household
cleaning products on
the aquarium glass or
surrounding areas.
Do place the aquarium near an electrical
source.
Avoid direct sunlight, which
can heat the aquarium, stress
the animals and cause
algae growth.
Rinse Aquarium
54 kg
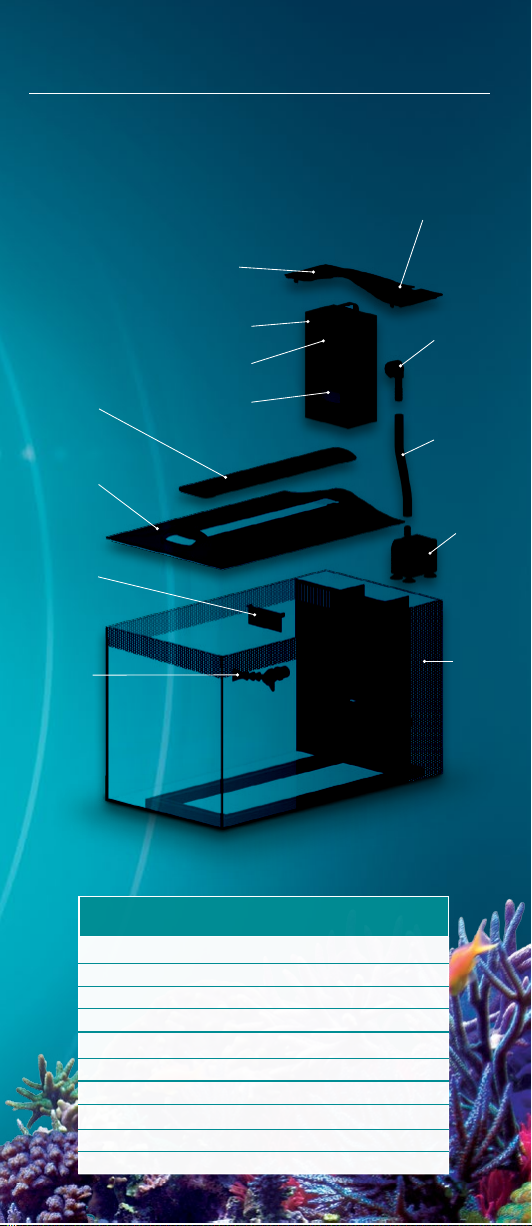
CONTENTS
Please review the following diagram to ensure you have all of
the necessary components included with your EVO aquarium:
LED Lamp
Rear cover
Protein
skimmer
cut-out
Elbow
connection
Return hose
Pump
Filter
chamber
Foam filter block
Carbon insert
Biomax insert
Cover
Output
nozzles
Adjustable
skimmer
plate
A14659 Molded Cover
A14677 Circulation Pump
A14678 Impeller for Circulation Pump
A14679 Output Nozzle
ART. DESCRIPTION
REPLACEMENT PARTS/MEDIA
A14700 LED Lamp & Transformer
A1377 Carbon Insert
A14702 LED Power Cord
A1378 BIOMAX
10532 Foam Filter Block

INSTALLATION
Ax pump to tubing and lower into corner of rear chamber. Next, feed
the output nozzle through the hole in the filter wall and screw into elbow.
Thoroughly rinse Carbon and Biomax media. Next, insert
Carbon in top Foam Bio-Foam compartment, and Biomax in
bottom compartment. Using the handle, lower entire foam
filter block unit into rear filter compartment (as shown
above).
Step 1. Connect pump to outlet
Step 2. Insert Filter Media
Foam Filter
Block
Carbon
Insert
Biomax
Insert

Insert Protein
Skimmer (1)
in designated
compartment
and secure
Heater (2).
In a separate and clean container (i.e. 5 gallon bucket), add a
professional grade saltwater mix to either filtered drinking water
or Reverse Osmosis water.
Make sure to follow the instructions on the package
until the salt is fully dissolved by
mixing solution with a small
power head or air pump with air
stone (all sold separately). We
recommend using Fluval SEA
Salt as it quickly dissolves and
provides a safe and stable pH
level immediately after mixing.
Step 3. Insert Protein
Skimmer & Heater
(sold separately)
Step 4. Add Salt Water
(1)
Protein
Skimmer
(sold separately)
Handle
Foam Filter
Block
Heater
(sold separately)
Biomax
Pump
Carbon
14324
A781
(2)

(Fig. 2)
Water fill
line
Step 5. Add Sand and Rock
Step 6. Connect the light
Add 3 inches of saltwater to the aquarium, and then add 1 inch of live sand
to prevent air bubbles from becoming trapped in this substrate. (Fig. 1)
When creating a rock structure inside your tank, ensure you use cured, live
rock and leave enough room for water to flow freely around it. You’ll also
want to incorporate some flat areas where possible, as this is where you
will ax corals at a later time. Next slowly add the remaining saltwater
mix until the tank is filled just past the overflow area (which leads water
into the rear filter area) to begin recirculation. (Fig. 2) Ensure the rear filter
compartment is filled with water as well.
Light unit rests into top channel of aquarium cover. Once light is in
place, connect to transformer and plug cord into electrical outlet.
1” sand
(Fig. 1)
Convenient touch switch
controls the integrated LED
light fixture which oers white
and blue, blue only and o
modes.

ADDING LIVESTOCK
Coral
1. Locate a suitable area within your rock structure where
your corals will not be knocked over by water movement,
snails, crabs, etc.
2. Be sure not to crowd your corals since they will grow.
Always give them sucient access to aquarium light
and their required amount of water flow.
3. Bond your corals using a marine water-safe
adhesive such as the Fluval Sea Epoxy Stick.
4. Many corals actually require feeding, and there are a
variety of dry and frozen commercial diets available.
Your fish and coral retailer will be able to advise more
specifically on this.
!Once you’ve added sand and rock, your tank will need to
be “cycled” (free of Ammonia and Nitrite) before you add fish
and corals. To learn more about this process, please visit:
www.FluvalAquatics.com/cycling.

Fish
1. Float fish (while still inside bag) in your aquarium for
20-30 minutes, allowing them to acclimate to the tank
water temperature. It is recommended to run the blue light
setting during this time to further help them adapt.
2. Carefully cut top of bag with scissors and add a small
amount of aquarium water (1 cup) to the fish bag. Rest
open bag on side of tank and let sit for 20 minutes.
3. Pour out all of the bag water into the sink while using a
net to ensure the fish do not jump out or go down the
drain. Quickly place fish from the net into the aquarium.
4. Corals (if applicable) should be acclimated the same way
as above and can be placed into the aquarium by hand.
5. Fish can be fed after 2 hours of being placed into the
aquarium with the lights on.
!Ensure floating bag
does not block overflow
area that leads to the rear
filter compartment.
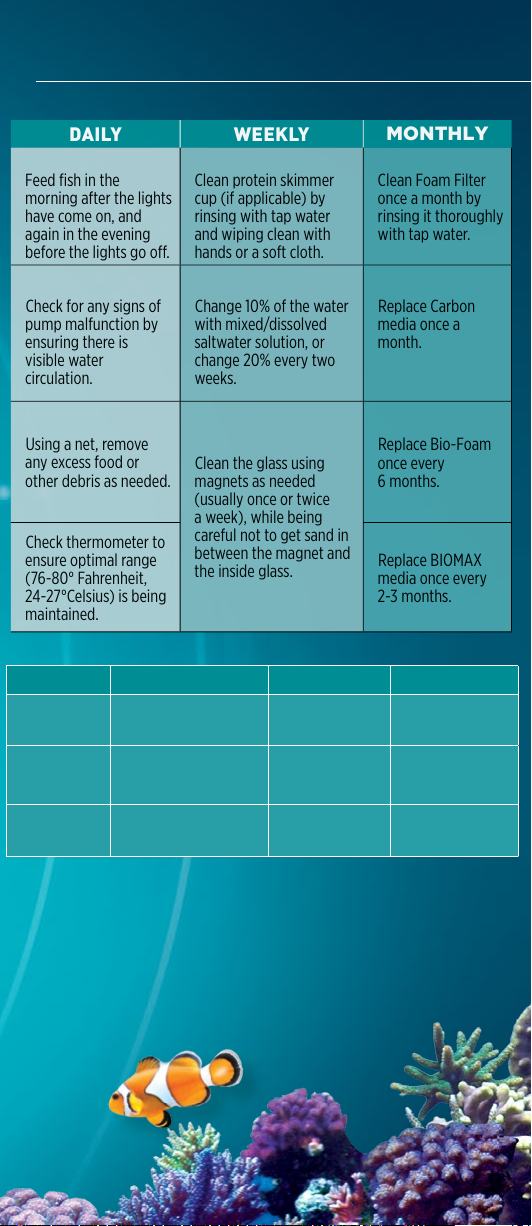
DAILY WEEKLY MONTHLY
Feed fish in the
morning after the lights
have come on, and
again in the evening
before the lights go o.
Clean protein skimmer
cup (if applicable) by
rinsing with tap water
and wiping clean with
hands or a soft cloth.
Clean Foam Filter
once a month by
rinsing it thoroughly
with tap water.
Check for any signs of
pump malfunction by
ensuring there is
visible water
circulation.
Change 10% of the water
with mixed/dissolved
saltwater solution, or
change 20% every two
weeks.
Replace Carbon
media once a
month.
Using a net, remove
any excess food or
other debris as needed. Clean the glass using
magnets as needed
(usually once or twice
a week), while being
careful not to get sand in
between the magnet and
the inside glass.
Replace Bio-Foam
once every
6 months.
Check thermometer to
ensure optimal range
(76-80° Fahrenheit,
24-27°Celsius) is being
maintained.
Replace BIOMAX
media once every
2-3 months.
CARE & CLEANING
MEDIA PURPOSE MAINTENANCE REPLACEMENT
Foam Filter Block Mechanical Filtration:
Traps particles and debris
Rinse every
4-6 weeks 12 months
Activated Carbon
Insert
Chemical Filtration:
Eliminates toxic impurities,
odors and discoloration
N/A 2 to 4 weeks
BIOMAX insert
Biological Filtration:
Provides Optimum Biological
Balance
Rinse every
6-8 weeks 2-3 months

TWO YEAR LIMITED WARRANTY
Your Fluval Sea EVO aquarium and included electrical components are guaranteed for defects in material
or workmanship for a period of two years from the date of purchase. This guarantee is valid with proof
of purchase only. The guarantee is limited to repair or replacement of the unit only and does not cover
consequential loss or damage to animate or inanimate objects. This guarantee is valid provided the
aquarium is placed on a surface that is flat and levelled. This guarantee excludes aquarium breakage
due to misuse, chips, stress cracks caused by improper support or other breakage. This guarantee is valid
only under normal operating conditions for which the unit is intended. It excludes any damage caused by
unreasonable use, negligence, improper installation, tampering, abuse or commercial use. Failure of less
than 5% of the total number of LEDs shall not be considered a defect under the terms of this warranty. The
warranty does not cover the impeller, or any item which has not been adequately or correctly maintained.
This guarantee does not aect your statutory rights.
To register your warranty online or for more information on this and other products go to www.hagen.com.
If at sometime in the future you have cause to claim under this guarantee, you will need to provide proof and date
of purchase. We recommend that you retain your receipt for this purpose. Rolf C. Hagen Inc. wishes you many
hours of enjoyment with your Fluval EVO aquarium.
FOR AUTHORIZED GUARANTEE REPAIR SERVICE
For Authorized Warranty Service please return (well packaged and by registered post) to the address below
enclosing dated receipt and reason for return. If you have any queries or comments about the operation of this
product, please let us try to help you before you return the product to your retailer. Most queries can be handled
promptly with a phone call. When you call (or write), please have all relevant information such as model number,
age of product, details of aquarium set-up, as well as the nature of the problem.
If you have any queries or comments about the operation of this product, please contact your Specialist Aquatic
Retailer in the first instance. Most queries can be handled easily at store level. In the unlikely event that it cannot,
please return the item to the retailer, with your valid proof of purchase, for repair or replacement under the two
year warranty terms.
CANADA: Rolf C. Hagen Inc., Consumer Repair
20500 Trans Canada Hwy, Baie D’Urfé, QC H9X 0A2
Canada only: 1-800-554-2436 between 9:00 a.m. and 4:30 p.m.Eastern Standard Time. Ask for Customer Service.
U.S.A.: Rolf C. Hagen (U.S.A.) Corp.
305 Forbes, Blvd, Mansfield, MA. 02048
U.S.A only: 1-800-724-2436 between 9:00 a.m. and 4:00 p.m. Eastern Standard Time. Ask for Customer Service.
UK: Rolf C. Hagen (UK) Ltd, Customer Service Department
California Drive, Whitwood Ind Est., Castleford West, Yorkshire WF10 5QH
http://faq..hagencrm.com?/uk
U.K. only: Helpline Number 01977 521015. Between 9:00 AM and 5:00 PM, Monday to Thursday and
9:00 AM and 4:00 PM on Friday (excluding Bank Holidays).
RECYCLING
This product bears the selective sorting symbol for waste electrical and electronic
equipment (WEEE).This means that this product must be handled pursuant to
European Directive 2012/19/EU in order to be recycled or dismantled to minimize
its impact on the environment. Check with your local Environmental Agency
for possible disposal instructions or take to an ocial council registered refuse
collection point. Electronic products not included in the selective sorting process
are potentially dangerous for the environment and human health due to the
presence of hazardous substances.
For best results,
remove impeller from
motor. Clean any build
up from impeller and
well every three (3) to
six (6) months.
Table of contents
Other Fluval Aquarium manuals

Fluval
Fluval 10943 User manual

Fluval
Fluval PF2 User manual

Fluval
Fluval AquaVAC+ User manual

Fluval
Fluval T Series User manual

Fluval
Fluval Shaker 168 User manual

Fluval
Fluval Roma Aquarium LED User manual

Fluval
Fluval FX UVC User manual

Fluval
Fluval SIENA 332 User manual

Fluval
Fluval FLEX User manual

Fluval
Fluval FLEX User manual


