manuals.online logo
Brands
  1. Home
  2. •
  3. Brands
  4. •
  5. Allen + Roth
  6. •
  7. Plumbing Product
  8. •
  9. Allen + Roth WSWS-PB1C User manual

Allen + Roth WSWS-PB1C User manual

PACKAGE CONTENTS/CONTENU DE L’EMBALLAGE/CONTENIDO DEL PAQUETE
DECORATIVE PEDESTAL
BASE
ITEM/ARTICLE/ARTÍCULO #0339216, 1465195
0810377
MODEL/MODÈLE/MODELO #WSWS-PB1C,
LWSPBW, WSWS-PB1G
Serial Number/Numéro de série/Número de serie
Purchase Date/Date d’achat/Fecha de compra
Questions?/Des questions?/¿Preguntas?
Call customer service at 1-866-439-9800,
8 a.m. - 8 p.m., EST, Monday - Friday./
Communiquez avec notre service à la clientèle
au 1 866 439-9800, entre 8 h et 20 h (HNE), du lundi au
vendredi./
Llame al Servicio al Cliente al 1-866-439-9800, de lunes a
viernes de 8 a.m. a 8 p.m., hora estándar del Este. ATTACH YOUR RECEIPT HERE
JOIGNEZ VOTRE REÇU ICI
ADJUNTE SU RECIBO AQUÍ
Stretcher
Entretoise
Extensor
Leg
Pied
Pata
x 2 x 2
AB
allen + roth® is a registered trademark
of LF, LLC. All Rights Reserved.
allen + roth® est une marque de commerce
déposée de LF, LLC. Tous droits réservés.
allen + roth® es una marca registrada de
LF, LLC. Todos los derechos reservados.
EB145 1
SAFETY INFORMATION/CONSIGNES DE SÉCURITÉ/INFORMACIÓN DE SEGURIDAD
WARNING/AVERTISSEMENT/ADVERTENCIA
PREPARATION/PRÉPARATION/PREPARACIÓN
CAUTION/ATTENTION/PRECAUCIÓN
Please read and understand this entire manual before attemting to assemble, operate or install the product./Assurez-
vous de lire et de comprendre l’intégralité du présent manuel avant de tenter d’assembler, d’utiliser ou d’installer
l’article./Lea y comprenda completamente este manual antes de intentar ensamblar, usar o instalar el producto.
• Make sure all bolts/screws are tightly fastened before the unit is used./Assurez-vous que tous les boulons et toutes les
vis sont bien serrés avant d’utiliser l’article./Asegúrese de que todos los pernos/tornillos estén bien apretados antes de
usar la unidad.
• Check bolts/screws periodically and tighten them if necessary./Vériez les boulons et les vis régulièrement et serrez-les
au besoin./Revise periódicamente los tornillos/pernos y apriételos si es necesario.
THIS BASE IS INTENDED FOR DECORATIVE PURPOSES ONLY. THIS IS NOT A WEIGHT-BEARING BASE.
PLEASE FOLLOW INSTRUCTIONS OF TOWER OR KIT TO BE ASSEMBLED WITH DECORATIVE BASE. TOWER
OR KIT USED WITH BASE MUST BE ATTACHED TO THE WALL. • Use this unit for its intended purpose only./Utilisez cet article uniquement pour l’usage auquel il est destiné./Use esta
unidad solo para el n para el cual se diseñó.
Before beginning installation of product, make sure all parts are present. Compare parts with package contents list and hard-
ware contents list. If any part is missing or damaged, do not attempt to assemble, install or operate the product./Avant de
commencer l’installation de l’article, assurez-vous d’avoir toutes les pièces. Comparez le contenu de l’emballage avec la liste
des pièces et celle de la quincaillerie incluse. S’il y a des pièces manquantes ou endommagées, ne tentez pas d’assembler,
d’installer ni d’utiliser l’article./Antes de comenzar a instalar el producto, asegúrese de tener todas las piezas. Compare las
piezas con la lista del contenido del paquete y la lista de aditamentos. No intente ensamblar, instalar ni usar el producto si
falta alguna pieza o si estas están dañadas.
Estimated Assembly Time: 10 minutes./Temps d’assemblage approximatif : 10 minutes./Tiempo estimado de ensamb-
laje: 10 minutos.
Tools Required for Assembly (not included): Hammer./Outils nécessaires pour l’assemblage (non inclus) : marteau./Herra-
mientas necesarias para el ensamblaje (no se incluyen): martillo.
2
HARDWARE CONTENTS/QUINCAILLERIE INCLUSE/ADITAMENTOS
Bolt
Boulon
Perno
x 10
AA BB CC
Note: Hardware shown not actual size./Remarque : La quincaillerie n’est pas illustrée en grandeur réelle./Nota:
Los aditamentos no se muestran en tamaño real.
DD EE
x 10
Lock Washer
Rondelle de blocage
Arandela de seguridad x 10
Flat Washer
Rondelle plate
Arandela plana
Wood Dowel
Goujon en bois
Espiga de madera
x 8 x 1
Hex Wrench
Clé hexagonale
Llave hexagonal
1
ASSEMBLY INSTRUCTIONS/INSTRUCTIONS POUR L’ASSEMBLAGE/INSTRUCCIONES DE
ENSAMBLAJE
ASSEMBLY INSTRUCTIONS/INSTRUCTIONS POUR L’ASSEMBLAGE/INSTRUCCIONES DE
ENSAMBLAJE
1. Insert wood dowels (DD) into stretchers (A) and attach legs (B).
Secure assembly with at washers (CC), lock washers (BB) and bolts
(AA), tightening with Allen wrench (EE)./Insérez des goujons en bois
(DD) dans les entretoises (A) et xez les pieds (B). Fixez l’ensemble
avec des rondelles plates (CC), des rondelles de blocage (BB) et des
boulons (AA). Serrez les boulons à l’aide de la clé hexagonale (EE)./
Coloque las espigas de madera (DD) en los extensores (A) y je las
patas (B). Asegure el ensamblaje con las arandelas planas (CC), las
arandelas de seguridad (BB) y los pernos (AA), apriételos con la llave
de tuercas Allen (EE).
4. With the help from another person, carefully hang the unit onto wall
hanging cleat./Avec l’aide d’une autre personne, installez soigneuse-
ment l’ensemble sur les traverses de xation au mur./Con la ayuda
de otra persona, cuidadosamente cuelgue la unidad sobre el listón de
colgante para pared.
Note: You can cut away the baseboard of the wall if you want this unit
ush against the wall before hanging to the wall./Remarque : Vous
pouvez couper la plinthe du mur si vous voulez que cet appareil soit
aligné contre le mur avant de l’accrocher au mur./Nota: Usted puede
cortar el zócalo de la pared si desea que esta unidad contra la pared
antes de colgar a la pared.
2. Attach the assembled decorative pedestal base to the bottom of a wall
cabinet (sold separately) with at washers (CC), lock washers (BB) and
bolts (AA). Tighten with Allen wrench (EE).
NOTE: THIS BASE IS INTENDED FOR DECORATIVE PURPOSES
ONLY. THIS IS NOT A WEIGHT-BEARING BASE. PLEASE FOLLOW
INSTRUCTIONS OF TOWER OR KIT TO BE ASSEMBLED WITH
DECORATIVE BASE. TOWER OR KIT USED WITH BASE MUST BE
ATTACHED TO THE WALL.
3. Refer to Wall Hanging Installation of the wall cabinet./Se reporter
à la section Installation murale de l’armoire murale./Reérase a la
instalación que cuelga de la pared del gabinete de pared.
Note: The bottom of the installation template should be 37.1 in./
Remarque : Le bas du modèle d’installation doit être de 94.2 cm./
Nota: La parte inferior de la plantilla de instalación debe ser 37.1
pulg/94.2 cm.
3
DD
B
A
B
DD A
AA BB CC
2
AA
BB
CC
A
B
3
4
16 in.
40.64 cm
16 pulg
39.5 in.
100.33 cm
39.5 pulg
37.1 in.
94.2 cm
37.1 pulg
2
CARE AND MAINTENANCE/ENTRETIEN/CUIDADO Y MANTENIMIENTO
• Periodically check to make certain all components are properly positioned, free from damage
and rmly connected./Vériez périodiquement si les composants sont bien positionnés, en bon état et fermement montés./
Revise periódicamente para asegurarse de que todos los componentes estén ubicados de forma correcta, no presenten
daños y de que estén rmemente conectados.
• Use a soft, clean cloth that will not scratch the surface when dusting./Utilisez un linge doux et propre qui n’égratignera pas
la surface lorsque vous époussetterez l’article./Use un paño suave y limpio que no raye la supercie al limpiarla.
• Never use water to clean the furniture as it may damage to the nish./N’utilisez jamais d’eau pour nettoyer l’article puisque
vous risqueriez d’endommager le ni./Nunca utilice agua para limpiar los muebles, ya que puede provocar daños en el
acabado.
• Wipe clean using a damp cloth and a mild cleaner. Wipe dry with a clean cloth./Nettoyez l’article à l’aide d’un linge humide
et d’un nettoyant doux. Essuyez-le à l’aide d’un linge propre./Limpie con un paño húmedo y un limpiador suave. Seque con
un paño limpio.
• Keep product away from direct sunlight as it may damage the nish./Conservez l’article à l’abri du soleil pour éviter
d’endommager le ni./Mantenga el producto lejos de la luz solar directa, ya que puede provocar daños en el acabado.
• It is best to keep the furniture in a climate-controlled environment. Extreme temperature and humidity changes can cause
fading, warping, shrinking and splitting of wood./Il est préférable que l’article soit gardé dans un endroit à température con-
trôlée. Les variations d’humidité et de température importantes peuvent décolorer, déformer, contracter et même fendre le
bois./Es mejor mantener los muebles en un ambiente climatizado. Los cambios extremos de temperatura y de humedad
pueden ocasionar decoloración, deformación, contracciones y grietas en la madera.
WARRANTY/GARANTIE/GARANTÍA
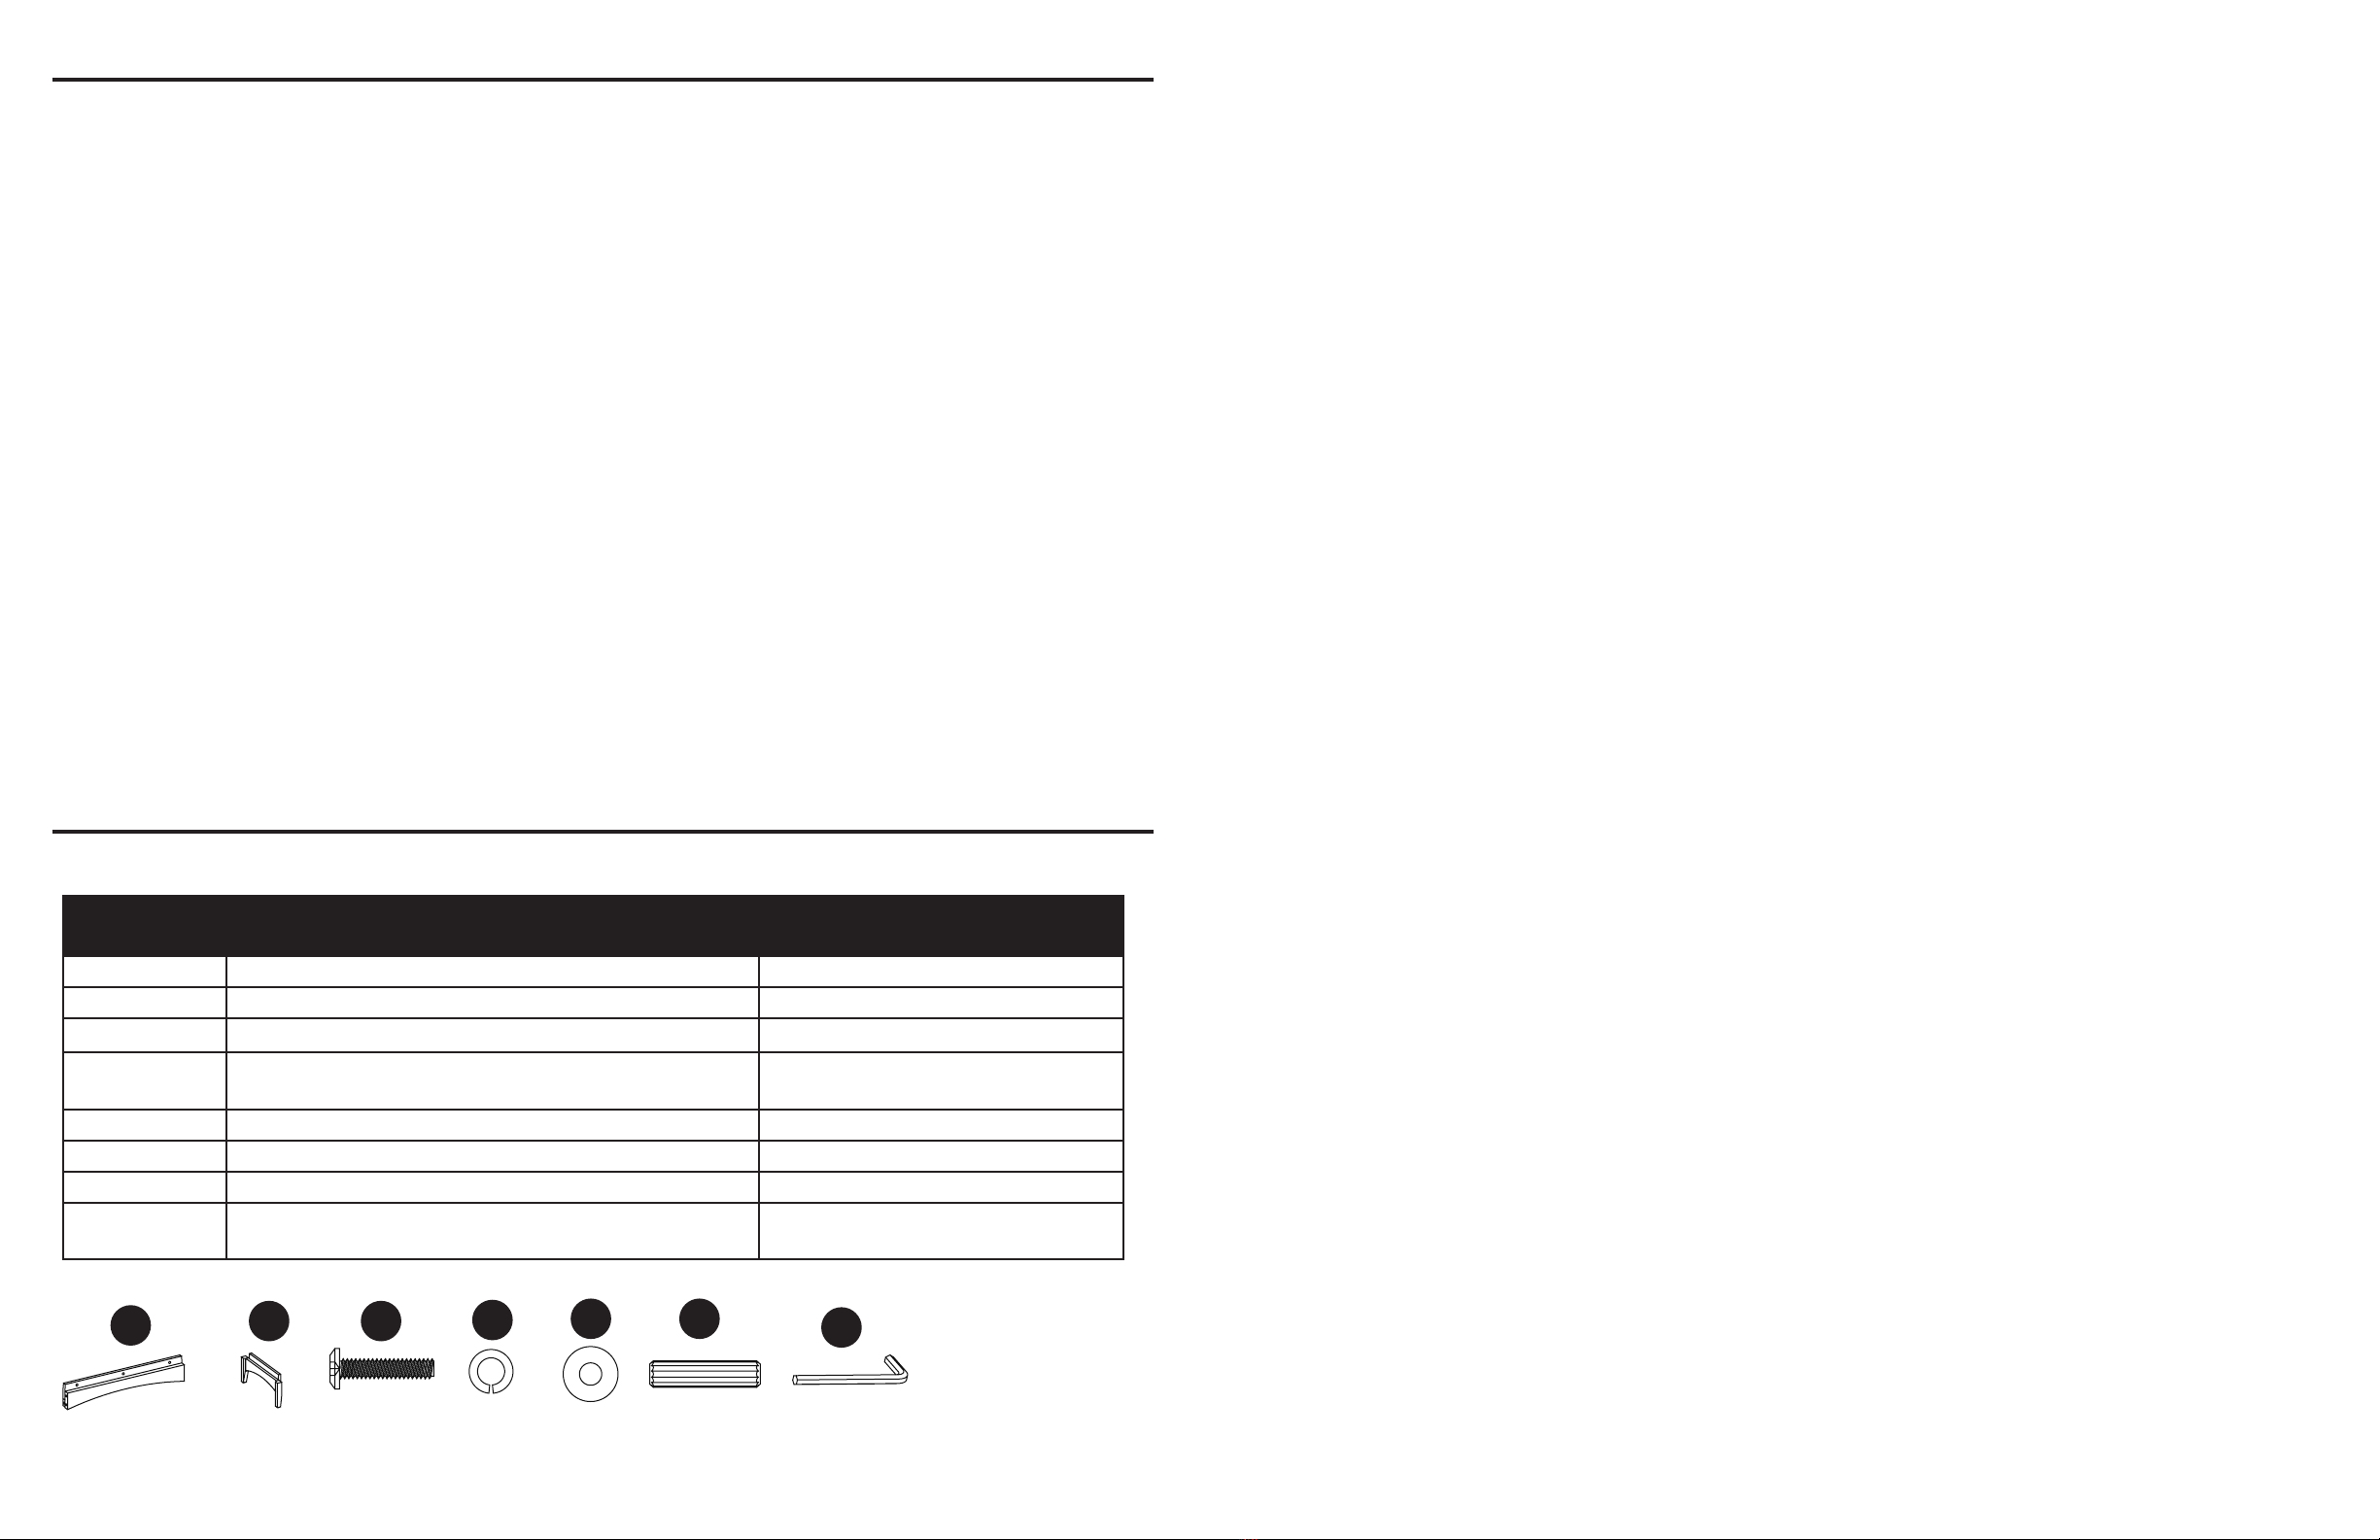
REPLACEMENT PARTS LIST/LISTE DES PIÈCES DE RECHANGE/LISTA DE PIEZAS DE REPUESTO
This product is warranted to the original purchaser. If there is a failure in this unit due to defects in materials or workmanship,
the manufacturer will repair or replace this item at our discretion without charge. Warranty is void if product has been as-
sembled incorrectly, misused, abused by overloading, altered in any way or damaged due to accident. This warranty is not
transferable and does not cover chipping, aking, scratches, rust, dents, or other damages to the surfaces of this product.
Responsibility of the manufacturer is limited to repair or replacement of this product. The manufacturer is not responsible for
consequential, incidental, or other damages or losses resulting from product failure.
This warranty is in lieu of all other expressed warranties. Some states do not allow the exclusion or limitation of incidental or
consequential damages, so the above limitation may not apply to you. This warranty gives you specic legal rights and you
may have other rights which vary from state to state. /
La présente garantie n’est o󰀨erte qu’à l’acheteur initial. Si cet article présente des défauts de matériaux ou de fabrication, le
fabricant choisira, à sa seule discrétion, de réparer ou de remplacer l’article sans frais. La garantie sera annulée si l’article a
été assemblé incorrectement, a été utilisé de manière inappropriée ou abusive en le surchargeant ou en l’altérant d’une quel-
conque façon, ou a subi des dommages causés par un accident. La présente garantie est non transférable et ne couvre pas
les ébréchures, l’écaillement, les égratignures, la rouille, les bosses et tout autre dommage à la surface de cet article.
La responsabilité du fabricant se limite à la réparation et au remplacement de cet article. Le fabricant n’est pas responsable
des dommages accessoires, consécutifs ou autres ni de toute perte causée par une défectuosité de l’article.
La présente garantie prévaut sur toute autre garantie explicite. Certains États ou certaines provinces ne permettent pas
l’exclusion ou la limitation des dommages accessoires ou consécutifs, de sorte que la limitation ci-dessus peut ne pas
s’appliquer à vous. Cette garantie vous confère des droits précis. Il est possible que vous disposiez d’autres droits, qui varient
d’un État ou d’une province à l’autre./
La garantía de este producto es válida para el comprador original. Si esta unidad presenta alguna falla debido a defectos en
los materiales o la mano de obra, el fabricante reemplazará o reparará este artículo sin cargos y a su discreción. La garantía
se anula si el producto no se ensambló correctamente y debido al mal uso, abuso por sobrecarga, modicación de cualquier
tipo o daños producidos por un accidente. Esta garantía no es transferible y no cubre el desportillado, desprendimiento,
rayones, oxidación, abolladuras u otros daños en la supercie de este producto.La responsabilidad del fabricante se limita a
la reparación o el reemplazo de este producto. El fabricante no se hará responsable por daños accidentales o resultantes u
otros daños o pérdidas causadas por fallas del producto.
Esta garantía reemplaza a todas las demás garantías explícitas. Algunos estados no permiten la exclusión o limitación de los
daños accidentales o resultantes, de modo que las limitaciones anteriores pueden no aplicarse en su caso. Esta garantía le
otorga derechos legales especícos, y podría tener otros derechos, que varían según el estado.
For replacement parts, call customer service 1-866-439-9800./Pour obtenir des pièces de rechange, communiquez avec notre
service à la clientèle au 1 866 439-9800./Para obtener piezas de repuesto, llame a Servicio al Cliente al 1-866-439-9800.
PART/PIÈCE/
PIEZA
DESCRIPTION/DESCRIPTION/DESCRIPCIÓN PART #/NODE PIÈCE/PIEZA #
A Stretcher/Entretoise/Extensor *WSWS-PB1C/W/LWSPBW-1-BS
B Leg/Pied/Pata *WSWS-PB1C/W/LWSPBW-2-BL
AA Bolt/Boulon/Perno *WSWS-PB1C/W/LWSPBW-3-B
BB Lock Washer/Rondelle de blocage/Arandela de
seguridad
*WSWS-PB1C/W/LWSPBW-4-LW
CC Flat Washer/Rondelle plate/Arandela plana *WSWS-PB1C/W/LWSPBW-5-FW
DD Wood Dowel/Goujon en bois/Espiga de madera *WSWS-PB1C/W/LWSPBW-6-WD
EE Hex Wrench/Clé hexagonale/Llave hexagonal *WSWS-PB1C/W/LWSPBW-7-HW
Complete Hareware/Quincaillerie complète/Todos los
aditamentos
*WSWS-PB1C/W/LWSPBW-8-CH
5
Printed in Vietnam
Imprimé au Vietnam
Impreso en Vietnam
AA BB CC DD EE
AB
Date/Date/Fecha: 2023-09-26 Rev./Rév./Rev. 0001-A

Other manuals for WSWS-PB1C

1

This manual suits for next models

5

Other Allen + Roth Plumbing Product manuals

Allen + Roth FW6AC035CP User manual

Allen + Roth

Allen + Roth FW6AC035CP User manual

Allen + Roth 873X-732707 User manual

Allen + Roth

Allen + Roth 873X-732707 User manual

Allen + Roth 58101-X607011 User manual

Allen + Roth

Allen + Roth 58101-X607011 User manual

Allen + Roth 67691W-6204 User manual

Allen + Roth

Allen + Roth 67691W-6204 User manual

Allen + Roth 21-B45WDCP-AR User manual

Allen + Roth

Allen + Roth 21-B45WDCP-AR User manual

Allen + Roth 67124W-6104 User manual

Allen + Roth

Allen + Roth 67124W-6104 User manual

Allen + Roth 3074-02618-ARCH User manual

Allen + Roth

Allen + Roth 3074-02618-ARCH User manual

Allen + Roth LWSG30VBR User manual

Allen + Roth

Allen + Roth LWSG30VBR User manual

Allen + Roth FELIX 24WG User manual

Allen + Roth

Allen + Roth FELIX 24WG User manual

Allen + Roth FS1A9281CP User manual

Allen + Roth

Allen + Roth FS1A9281CP User manual

Allen + Roth ML-20602R User manual

Allen + Roth

Allen + Roth ML-20602R User manual

Allen + Roth ML-20503R User manual

Allen + Roth

Allen + Roth ML-20503R User manual

Allen + Roth 67692W-6104 User manual

Allen + Roth

Allen + Roth 67692W-6104 User manual

Allen + Roth LWSJ60VBR User manual

Allen + Roth

Allen + Roth LWSJ60VBR User manual

Allen + Roth 67123W-6004 User manual

Allen + Roth

Allen + Roth 67123W-6004 User manual

Allen + Roth CAMERON 30MB User manual

Allen + Roth

Allen + Roth CAMERON 30MB User manual

Allen + Roth CAMERON 36MB User manual

Allen + Roth

Allen + Roth CAMERON 36MB User manual

Allen + Roth SUMTER 21-B461H-BN-AR User manual

Allen + Roth

Allen + Roth SUMTER 21-B461H-BN-AR User manual

Allen + Roth 67746W-612707 User manual

Allen + Roth

Allen + Roth 67746W-612707 User manual

Allen + Roth 67123W-6104 User manual

Allen + Roth

Allen + Roth 67123W-6104 User manual

Allen + Roth 67693W-6104 User manual

Allen + Roth

Allen + Roth 67693W-6104 User manual

Allen + Roth ML-20522 User manual

Allen + Roth

Allen + Roth ML-20522 User manual

Allen + Roth ML-20518 User manual

Allen + Roth

Allen + Roth ML-20518 User manual

Allen + Roth 67123W-622707 User manual

Allen + Roth

Allen + Roth 67123W-622707 User manual

Popular Plumbing Product manuals by other brands

Bradley S19-280 Series Installation

Bradley

Bradley S19-280 Series Installation

Bradley S96-085 installation manual

Bradley

Bradley S96-085 installation manual

Hans Grohe PuraVida 15473 Series Instructions for use/assembly instructions

Hans Grohe

Hans Grohe PuraVida 15473 Series Instructions for use/assembly instructions

Hans Grohe Talis S 32220000 Instructions for use/assembly instructions

Hans Grohe

Hans Grohe Talis S 32220000 Instructions for use/assembly instructions

VADO WG-81552A-CP installation guide

VADO

VADO WG-81552A-CP installation guide

Westfalia 86 98 98 instruction manual

Westfalia

Westfalia 86 98 98 instruction manual

Central Brass 0122-GSAELS quick start guide

Central Brass

Central Brass 0122-GSAELS quick start guide

Triton T900pi Installation and operating instructions

Triton

Triton T900pi Installation and operating instructions

Axor Starck HANDSHOWER 28532XX1 Installation instructions / warranty

Axor

Axor Starck HANDSHOWER 28532XX1 Installation instructions / warranty

Grohe Get 23 227 manual

Grohe

Grohe Get 23 227 manual

Nobili SP57011/1 Using instructions

Nobili

Nobili SP57011/1 Using instructions

KWC DESIGNO K.27.H3.70.000A99 Specification sheet

KWC

KWC DESIGNO K.27.H3.70.000A99 Specification sheet

Hans Grohe Axor Starck 10407 1 Series Installation/User Instructions/Warranty

Hans Grohe

Hans Grohe Axor Starck 10407 1 Series Installation/User Instructions/Warranty

Hans Grohe PuraVida 15771001 Installation/User Instructions/Warranty

Hans Grohe

Hans Grohe PuraVida 15771001 Installation/User Instructions/Warranty

Heatstore AQUA PROFILE PLUS AQP8 Installation instructions & user guide

Heatstore

Heatstore AQUA PROFILE PLUS AQP8 Installation instructions & user guide

Hans Grohe C Lever 06067 0 Series installation instructions

Hans Grohe

Hans Grohe C Lever 06067 0 Series installation instructions

Omnires SYSCT11AT Installation and Maintenance

Omnires

Omnires SYSCT11AT Installation and Maintenance

Aqualisa HiQu HQD1001 installation guide

Aqualisa

Aqualisa HiQu HQD1001 installation guide

manuals.online logo
manuals.online logoBrands
  • About & Mission
  • Contact us
  • Privacy Policy
  • Terms and Conditions

Copyright 2025 Manuals.Online. All Rights Reserved.