Allflex APR450 User manual

Public
APR600
User Manual
Firmware v1.02 and higher
Allflex APR450
User Guide

Public
©Copyright Agrident GmbH 2021
This manual is copyrighted. All rights are reserved, and no part of this publication
may be reproduced or transmitted in any form or by any means without prior
written consent.
Disclaimer
The information in this manual was accurate and reliable at the time of its release.
However, we reserve the right to change the specifications of the product
described in this manual without notice at any time.
Registered Trademarks
All other proprietary names mentioned in this manual are the trademarks of their
respective owners.
Revision 1.0
September 2022

PublicPublic
1 Introduction....................................................................................................................... 1
2 Before You Start ................................................................................................................ 1
3 Hardware Specifications.................................................................................................... 2
3.1 APR450 Parts ................................................................................................................ 2
3.2 Accessories ................................................................................................................... 3
3.3 Connecting the USB Cable............................................................................................ 4
4 Controlling the APR450 ..................................................................................................... 5
4.1 APR450 Display............................................................................................................. 5
Home Screen........................................................................................................ 5
Symbols at the Top of the Display ....................................................................... 6
4.2 Status LEDs ................................................................................................................... 8
4.3 Using the Keyboard ...................................................................................................... 9
Alphanumeric Entries ........................................................................................ 10
5 Operating States.............................................................................................................. 12
6 Reading EID Tags ............................................................................................................. 13
7 Menu Items ..................................................................................................................... 17
7.1 Menu Structure .......................................................................................................... 18
7.2 New Group ................................................................................................................. 20
7.3 Join Data..................................................................................................................... 21
EID + VID ............................................................................................................ 21
EID + Weight ...................................................................................................... 21
7.4 Tasks ........................................................................................................................... 22
7.5 Data ............................................................................................................................ 25
Show Data.......................................................................................................... 25
Set Active Group................................................................................................ 27
Clear Data .......................................................................................................... 29
Memory Info...................................................................................................... 30
Search DB by VID ............................................................................................... 30
Search DB by EID................................................................................................ 32
7.6 Print............................................................................................................................ 33
Print Active Group ............................................................................................. 34
Select Group ...................................................................................................... 34
Print All Groups.................................................................................................. 34
Print Barcode ..................................................................................................... 34
Setup Printer...................................................................................................... 35
7.7 Setup........................................................................................................................... 36
Reader Settings.................................................................................................. 36
Display................................................................................................................ 40
Interface Setup .................................................................................................. 42
Configuration..................................................................................................... 47
Device Info......................................................................................................... 47
Appendix A: Battery Precautions............................................................................................. 49

PublicPublic
Storage Instructions ............................................................................................................ 49
Using the Battery................................................................................................................. 49
Charging the Battery............................................................................................................ 50
Discharging the Battery....................................................................................................... 50
Disposing of the Battery...................................................................................................... 50
Appendix B: Safety and Care ................................................................................................... 51
Appendix C: Warranty ............................................................................................................. 52
Appendix D: International Approvals ...................................................................................... 53
CE Marking........................................................................................................................... 53
FCC and IC digital device limitations.................................................................................... 53
Apple Legal Notice................................................................................................................... 55
Troubleshooting ...................................................................................................................... 55

Allflex APR450 User Guide
1Introduction
The APR450 is a high quality, ruggedized portable RFID reader for EID tags complying with
the ISO11784 / 11785 standard. It can read EID tags with FDX-B and HDX technology. In
addition to the reading functions, the device can store up to 1.000.000 records in several
groups in the large internal memory. Each record also contains a timestamp plus a Visual ID
and an Alert, if available. The data are transmitted via the several available interfaces (USB,
and Bluetooth ) directly after reading.
The APR450 also supports the Task-Mode and the Data Base Function (DBF) if the
appropriate definitions or data have been uploaded. This is usually done by 3rd-party
Management Software.
The reader has a large color display that displays various information at one glance. Together
with the 19 keys it allows the easy and convenient navigation through menus and data. In
addition, the device has status LEDs above the display for indicating charging- and interface
status plus the reading status. The integrated speaker provides acoustical feedback to the
user and the vibrating motor is very useful in noisy environments.
2Before You Start
The internal Lithium-Polymer battery should be fully charged before the first use. The
battery can be charged by using the provided Magnetic-USB cable and any USB power
source. Note that computers usually do not supply more than 500mA, therefore charging the
APR450 over a USB port of a computer takes longer than charging it from the Allflex USB
power supply.
The internal fast charging takes approximately 4 hours maximum when
the battery is completely empty and using the Allflex USB power supply.
Note that the battery will only be charged within the temperature range
of 0°C to 45°C (+32 to 113°F).

Allflex APR450 User Guide
Allflex APR450 User Guide ver 1.00.docx Page 2
Public
3Hardware Specifications
This section describes the APR450 hardware including all accessories.
3.1 APR450 Parts
•190x98x40 millimeters long
•280 grams
•Provides an excellent reading performance
•Large 2.4-inch color TFT display
•Two status LEDs above the display
•Speaker and vibrating body
•The Reader can be controlled with seven ergonomic keys and 12 alphanumeric keys
below the display
•Uses a 3.7V Lithium-Ion battery with a capacity of 3.400mAh located in the body. It is
not replaceable in the field. The battery can be exchanged by authorized technical
staff only, in case it has reached its end of life.
Multicolor Status LED
Blue Status LED
Large 320X240 Dots Color
TFT Display
Magnetic USB Connector
7 keys for easy controlling the
reader
12 alphanumeric keys for
entering data

Allflex APR450 User Guide
Allflex APR450 User Guide ver 1.00.docx Page 3
Public
3.2 Accessories
Accessory
Description
The APR450 comes with a USB-A to Magnetic-
Connector cable.
The USB-A plug can be connected to any USB-
port. Note that the appropriate USB driver must
be installed first. If you need to use a USB
extension, it should be of high-quality cable and
no longer than two meters. The maximum USB
Cable length is five meters and may cause
problems such as slow charging or USB failures.
The robust transport box ATB400 enables easy
transportation of the APR450. It can
accommodate the reader and accessories.
Approx. 328x218x75mm
The APR450 Kit contains the transport box
'ATB400', an USB power supply 'APS500' for
charging the reader from the mains and the car
charger 'ACC500' thatallows to charge the device
from a cigarette lighter socket.
Optional: AEA675 75cm external wand antenna

Allflex APR450 User Guide
Allflex APR450 User Guide ver 1.00.docx Page 4
Public
3.3 Connecting the USB Cable
The APR450 uses a Magnetic-USB connector. Because the magnets are polarized, the connectors 'find'
the correct orientation almost automatically. When the magnetic connector of the cable is moved
towards the plug at the bottom of the reader (1) the magnets attract each other in the correct
orientation (2) In the wrong orientation, the magnets repel each other.
For disconnecting USB, just pull the connector away from the device (3).
(1) (2) (3)
Do not try to force a connection when the connector is in the wrong orientation –this
might damage the reader and voids the warranty.

Allflex APR450 User Guide
Allflex APR450 User Guide ver 1.00.docx Page 5
Public
4Controlling the APR450
The APR450 has a large color display and 19 keys used for controlling the device.
•The Reader is activated by pressing the key in the middle of the directional pad.
4.1 APR450 Display
Home Screen
After the reader is switched on, the following home screen appears:
•The battery status indicator shows the approximate battery level. In this example the
battery is fully charged. It would also display possible faults concerning the battery,
when charging is not possible like high temperature.
•In the screenshot above, the only active connection is USB. The reader would also
indicate a Bluetooth connection in this area.
•The soft keys have different meanings depending on the current operation.
oIn the home screen, the left soft key is used for entering the menu and the right
one for creating a new group separator.
oThe ‘new group’ function is only the default action triggered by pressing the
right soft key.
oOther ‘quick menus’ can be configured and uploaded to the reader from the PC
and the action to be started can be changed on the reader by long pressing the
right soft key.

Allflex APR450 User Guide
Allflex APR450 User Guide ver 1.00.docx Page 6
Public
Symbols at the Top of the Display
The status bar in the first display line provides the time (on the right side) and information
about the battery status and the different interfaces.
The orange symbol is for Bluetooth. The color of the symbols depends on the current
connection status.
4.1.2.1 Battery Status
The battery symbol on the left side indicates the approximate remaining battery capacity.
Status
Meaning
Battery capacity is higher than 80 percent.
Capacity is between 60 and 80 percent.
Capacity is between 40 and 60 percent.
Capacity is between 20 and 40 percent (no charger connected -> discharging)
Capacity is between 10 and 20 percent (no charger connected -> discharging)
When flashing, capacity is lower than 11 percent.
Capacity is between 20 and 40 percent (only green when charging).
Capacity is between 10 and 20 percent (only green when charging).
General charging error. There is a condition that prevents charging. Check the
external power supply. If this error is shown repeatedly, the battery may no longer
work correctly and should be replaced. This error also occurs when the battery is
charged outside the allowed temperature range of 0°C to 45°C.
During charging, the battery symbol fills from the point of the remaining capacity. The battery
charge is complete when flashing stops. The charger can be disconnected in this case.
The menu item ‘Show Battery Info’ in the ‘Setup’
menu shows an estimate of the remaining
battery capacity in percent as well as the
estimated remaining operating time in idle
mode and in continuous read mode.
Navigation from the home screen:
1x
1x
1x
1x
2x

Allflex APR450 User Guide
Allflex APR450 User Guide ver 1.00.docx Page 7
Public
4.1.2.2 Bluetooth Status
Status
Meaning
Slave Mode –APR450 can be connected from other devices
Master Mode –APR450 is trying to connect to remote device
Connected (in either Bluetooth Mode)
Bluetooth init: Communication to Bluetooth module failed, a Bluetooth Firmware
update is in progress, or booting in progress
4.1.2.3 USB Status
The USB status is shown in the middle at the top of the display:
Status
Meaning
The USB symbol displays when the APR450 is connected to the USB port of a
computer or a USB Power Supply that is not detected as an Allflex Power Supply.
In these cases, Fast Charging is not possible.
In case the APR450 is connected to an Allflex USB power supply, the symbol
changes from white to red. In this case the fast charging is used.

Allflex APR450 User Guide
Allflex APR450 User Guide ver 1.00.docx Page 8
Public
4.2 Status LEDs
There are two status LEDs above the display:
•Left LED is a multicolor LED and color changes depending on the charging status.
•Right LED is blue, and it is used for indicating the connection status.
The RGB LED on the left side indicates the charging status of the battery pack as follows:
Status
Interval
Meaning
Flashing, every second for 10ms
Battery is charging
Solid
Battery is fully charged
The multicolor LEDs are only used when the APR450 is in Suspend-Mode (display is switched
off, but the device is connected to USB and hence is being charged). When switched on, the
battery symbol in the display indicates the charging status.
With activated RFID engine, the multicolor LED shows the reading status as follows:
Status
Interval
Meaning
Flashing slowly
RF is activated, ready to scan EID tags
Flashing fast
EID tag has been read the first time (new EID
tag)
Flashing fast
Same EID tag has been read repeatedly *
*- Only when in Continuous reading Mode with activated animal counter see chapters
Animal Counter On/Off and Set Read Mode, later in this manual.
The blue LED on the right side is only used when the display is turned off. Then it indicates the
following operating modes:
Status
Interval
Meaning
Flashing every 3 seconds
APR450 is in SD-Card-Mode
Flashing once a second
APR450 is in Suspend-Mode (CDC)
RGB
Blue
Allflex APR450 User Guide
Allflex APR450 User Guide ver 1.00.docx Page 9
Public
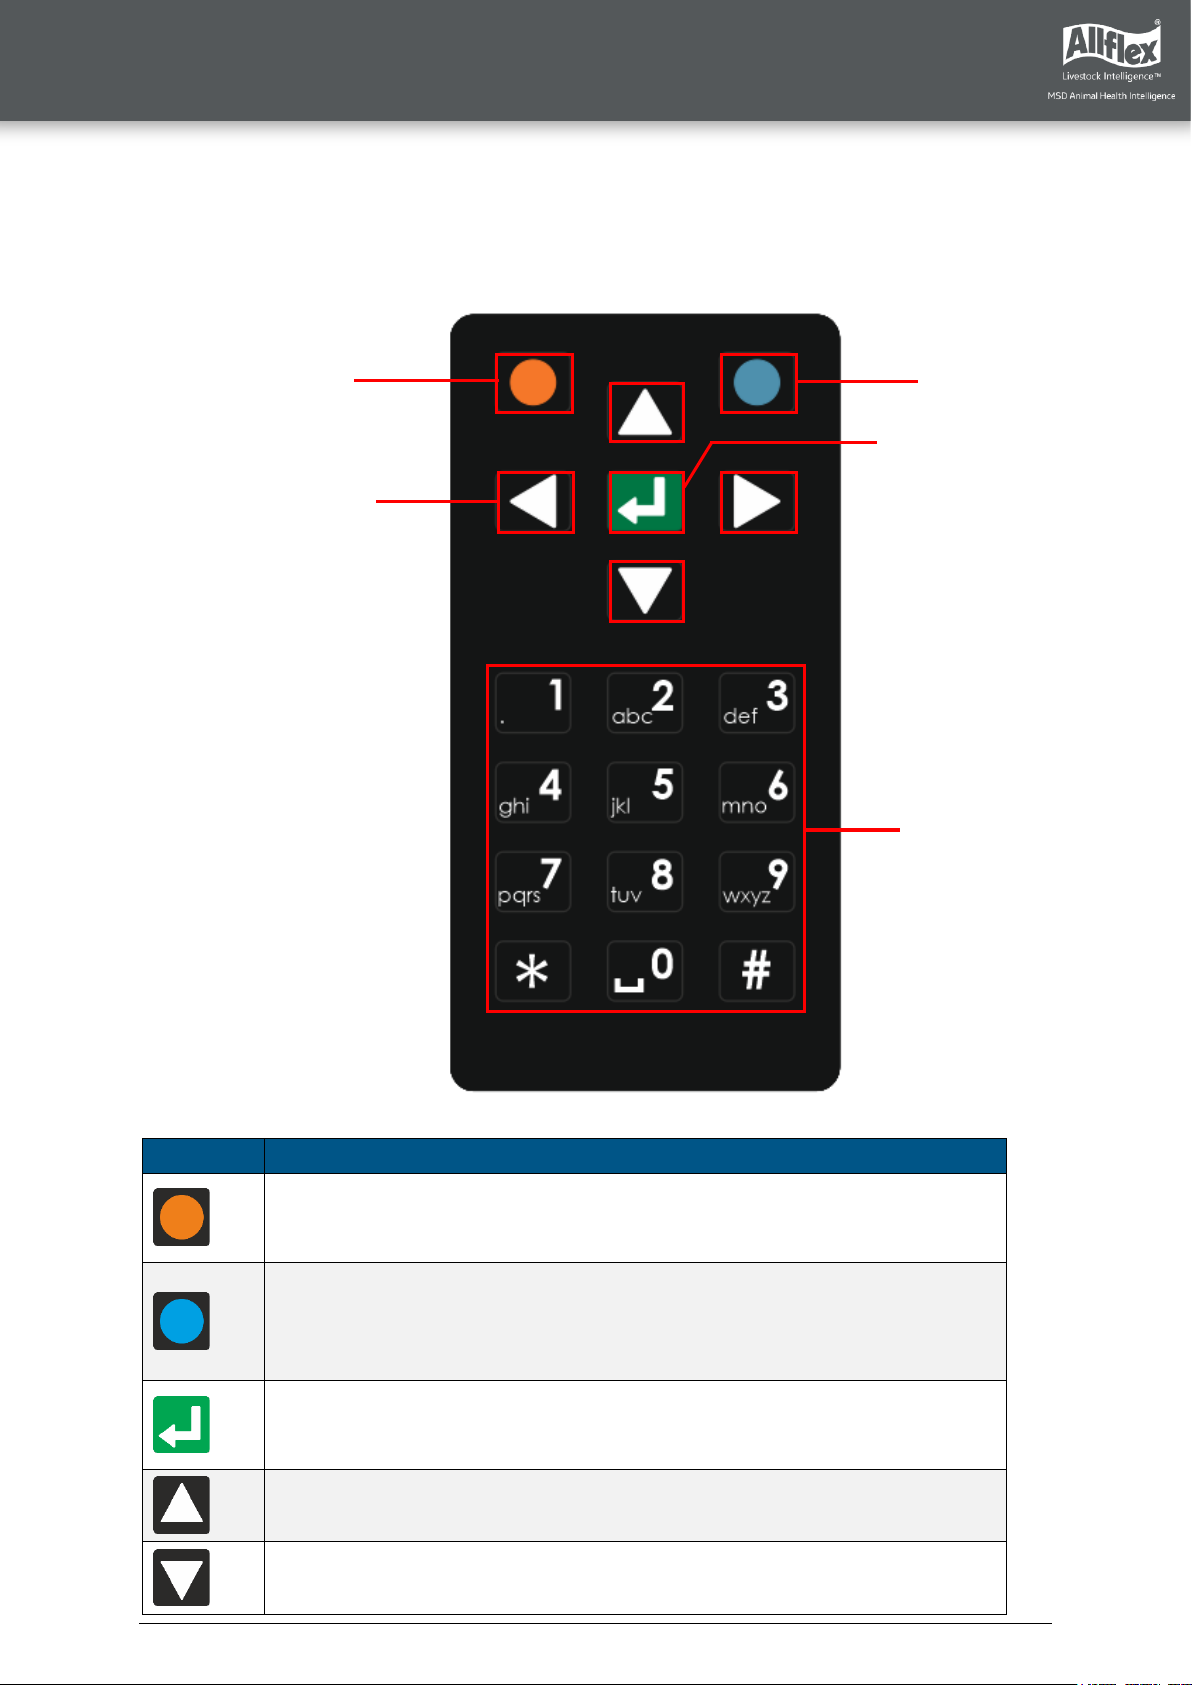
4.3 Using the Keyboard
The APR450 has 19 keys that allow the easy operation of the reader. The directional pad has
an ENTER key in the middle and two additional soft keys below the display whose
functionality is dependent on the current action.
Status
Action
Opens the menu in the home screen. Moves up one menu level (‘Back’),
other functions depend on current operation –the current function is
always displayed on the left side in the last display line (above the key).
From the home screen, executes the configured ‘quick action’. Exits the
menu completely and moves back to the home screen. Depending on the
actual operation, other functions are shown in the display on the lower
right side.
Switches on the APR450. Starts a reading attempt from the home screen.
Enters menu items and confirms selections and moves to the next field in
Task Mode.
No function in home screen *
Switches off the APR450 on a long press (>2 seconds) *
•Left soft key
•Right soft key
•ENTER key
•Direction
keys
•Alphanumeric
keys

Allflex APR450 User Guide
Allflex APR450 User Guide ver 1.00.docx Page 10
Public
Status
Action
No function in home screen *
No function in home screen *
*The directional keys are also used to navigate within menus (up, down, left and right), for
scrolling through selection lists and database fields and for selecting characters in numeric or
text input fields.
The alphanumeric keys are mainly used for entering data in text or numeric fields.
Alphanumeric Entries
▪The keys [1], [2], … [0] serve multiple functions.
▪The first press on a key selects the large, imprinted character, e.g. '1' or '2'.
▪When the same key is pressed again within one second, the first small, imprinted character
will be selected in lower case, e.g. 'a' or 'd'.
▪Another keystroke of the same key within one second selects the next imprinted character.
▪When the last character is selected, another keystroke will select the first (large) imprinted
character again.
▪If the key is not pressed again (within one second), the last selected character is entered.
▪In case a different key is pressed, the selection of the previously pressed key is ended, and
the last selected character is entered.
▪For text inputs, the [*] key is used as Caps Lock –one can switch between lower- and
upper-case letters.
▪Within lists it is possible to move to the last entry in the list via [#] and to the first entry by
pressing [*] –the same applies to minimum and maximum values in the menus for the
reader settings.

Allflex APR450 User Guide
Allflex APR450 User Guide ver 1.00.docx Page 11
Public
The following shows some keyboard use examples:
Screen
Details
Beside the usage of the alphanumeric keys, it is possible to
change the character of the selected position using the
or button for simple text input fields.
This is an extended text input field which starts a new
group. The ↑ symbol in the status line indicates that the
Caps Lock is activated (the [*] key was pressed). Hence all
letters are directly entered as capitals. When [*] is pressed
again, lower case letters will be used.
It is also possible to activate a virtual keyboard for
extended text input fields. This can be done by pressing
or . The key switches between lower case letters,
capitals and numbers (plus special characters). The virtual
keyboard can be closed by pressing . When an
alphanumeric key is pressed while the virtual keyboard is
open, it will be closed right away.
When using selection lists in Task-Mode or Data-Base-
Function, it is possible to enter the initial letter. This allows
to switch to the next entry that starts with that letter.
Therefore, one should press the alphanumeric key
repeatedly until the desired letter appears on the upper
right side. If no key is pressed within the next second, the
reader assumes that this is the selected initial letter and
starts searching. When a search letter has been entered,
one can switch between the available matches in the list
using the / keys.
2

Allflex APR450 User Guide
Allflex APR450 User Guide ver 1.00.docx Page 12
Public
5Operating States
The APR450 has several operating states related to display status and communication
possibilities over USB. The following chart shows the different states.
When the reader is switched on and it is connected via USB, it works in CDC-Mode. That
means a virtual comport is created on the computer and it is possible to send commands to
the device via a serial port connection. In this state the mass storage mode is not activated,
it is not possible to copy files to or from the APR450.
After the configurable switch-off-time (default = 60 seconds) has elapsed, the reader enters
Suspend-Mode when a USB cable is connected. The display is switched off, but
communication is still possible. In this state the blue LED on the right above the display is
flashing in cycles of one second. The device will not enter sleep mode if USB is connected,
and the battery is still charging. The red LED flashes in intervals of one second, indicating
that the battery is being charged. After the battery has been charged completely, the reader
enters sleep mode after a timeout of 60 seconds.
If the APR450 is connected to USB while it is switched off, the MSC mode is activated. Then
the reader is attached to the computer as a mass storage device and file transfer is possible.
Once the key is pressed, the device will switch on and use CDC-Mode right away. When
pressing for at least two seconds while USB is connected, the APR450 will enter SD-Card
Mode as well.

Allflex APR450 User Guide
Allflex APR450 User Guide ver 1.00.docx Page 13
Public
6Reading EID Tags
Field Lines
Press to read
The EID tag is recognized
Visual and Electronic
ID display
If no EID tags were recognized,
tap to start the reading again
1
2

Allflex APR450 User Guide
Allflex APR450 User Guide ver 1.00.docx Page 14
Public
Optimal Reading
Orientation
Not Recommended Reading
Orientation

Allflex APR450 User Guide
Allflex APR450 User Guide ver 1.00.docx Page 15
Public
When an EID tag is read, the following information displays:
VID –Visual ID
EID –Electronic ID
Name of the current group, here: ‘group 9’
Number of records in the current group, here: ‘20’
Return to home screen
Show more information
Screen
Details
This screen displays when Data is pressed. It provides
information about the EID, VID (if available), Date and Time
of reading and the Alert text (if there is one for this EID tag).
This screen displays when or is pressed. It indicates the
EID tag type (FDX or HDX) and displays the so called
‘advanced ISO information’. You can move from one screen
to the other by pressing any of these keys.
If a Database-Record is available for this EID tag, you can
view the Database information by pressing the left soft key.
This picture shows the Database entries. The fields depend
on the definition of the Database. You can also edit fields by
selecting them and pressing if they have been defined for
editing in the Database definition. All other fields cannot be
selected.

Allflex APR450 User Guide
Allflex APR450 User Guide ver 1.00.docx Page 16
Public
If an alert is present for the EID tag just read, the alert text
is displayed continuously, with the color inverting and an
alert sounding. The alert can be disarmed (not shown again
after next reading of this EID tag) or it can be skipped.
Other manuals for APR450
1
Table of contents
Other Allflex Farm Equipment manuals


Popular Farm Equipment manuals by other brands

Infinite Cedar
Infinite Cedar Ultimate Chicken Coop instructions

Repossi
Repossi RA RAKE 12+12 VS User and maintenance manual

Raven
Raven AccuBoom installation manual

Farm King
Farm King 1450 Operator and parts manual

TerraMarc Industries
TerraMarc Industries Lockwood 472H Owner's/operator's manual

MASSEY FERGUSON
MASSEY FERGUSON 9125 Workshop service manual


