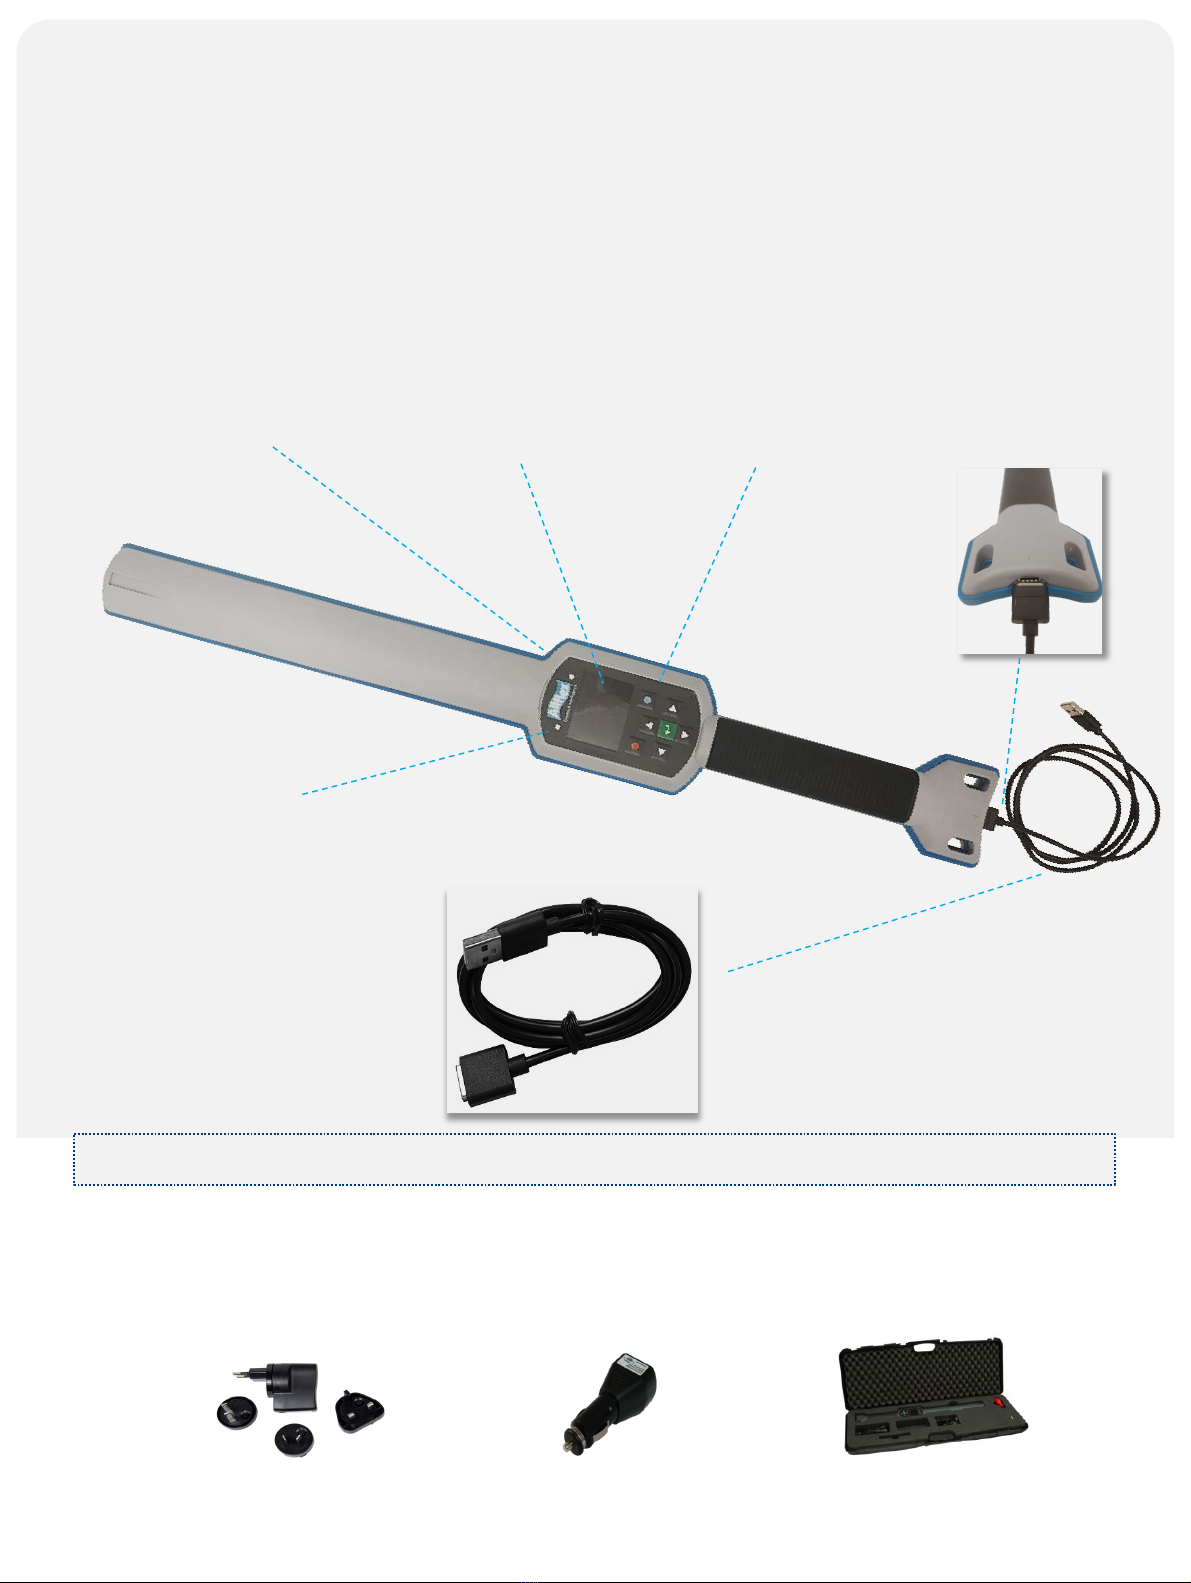
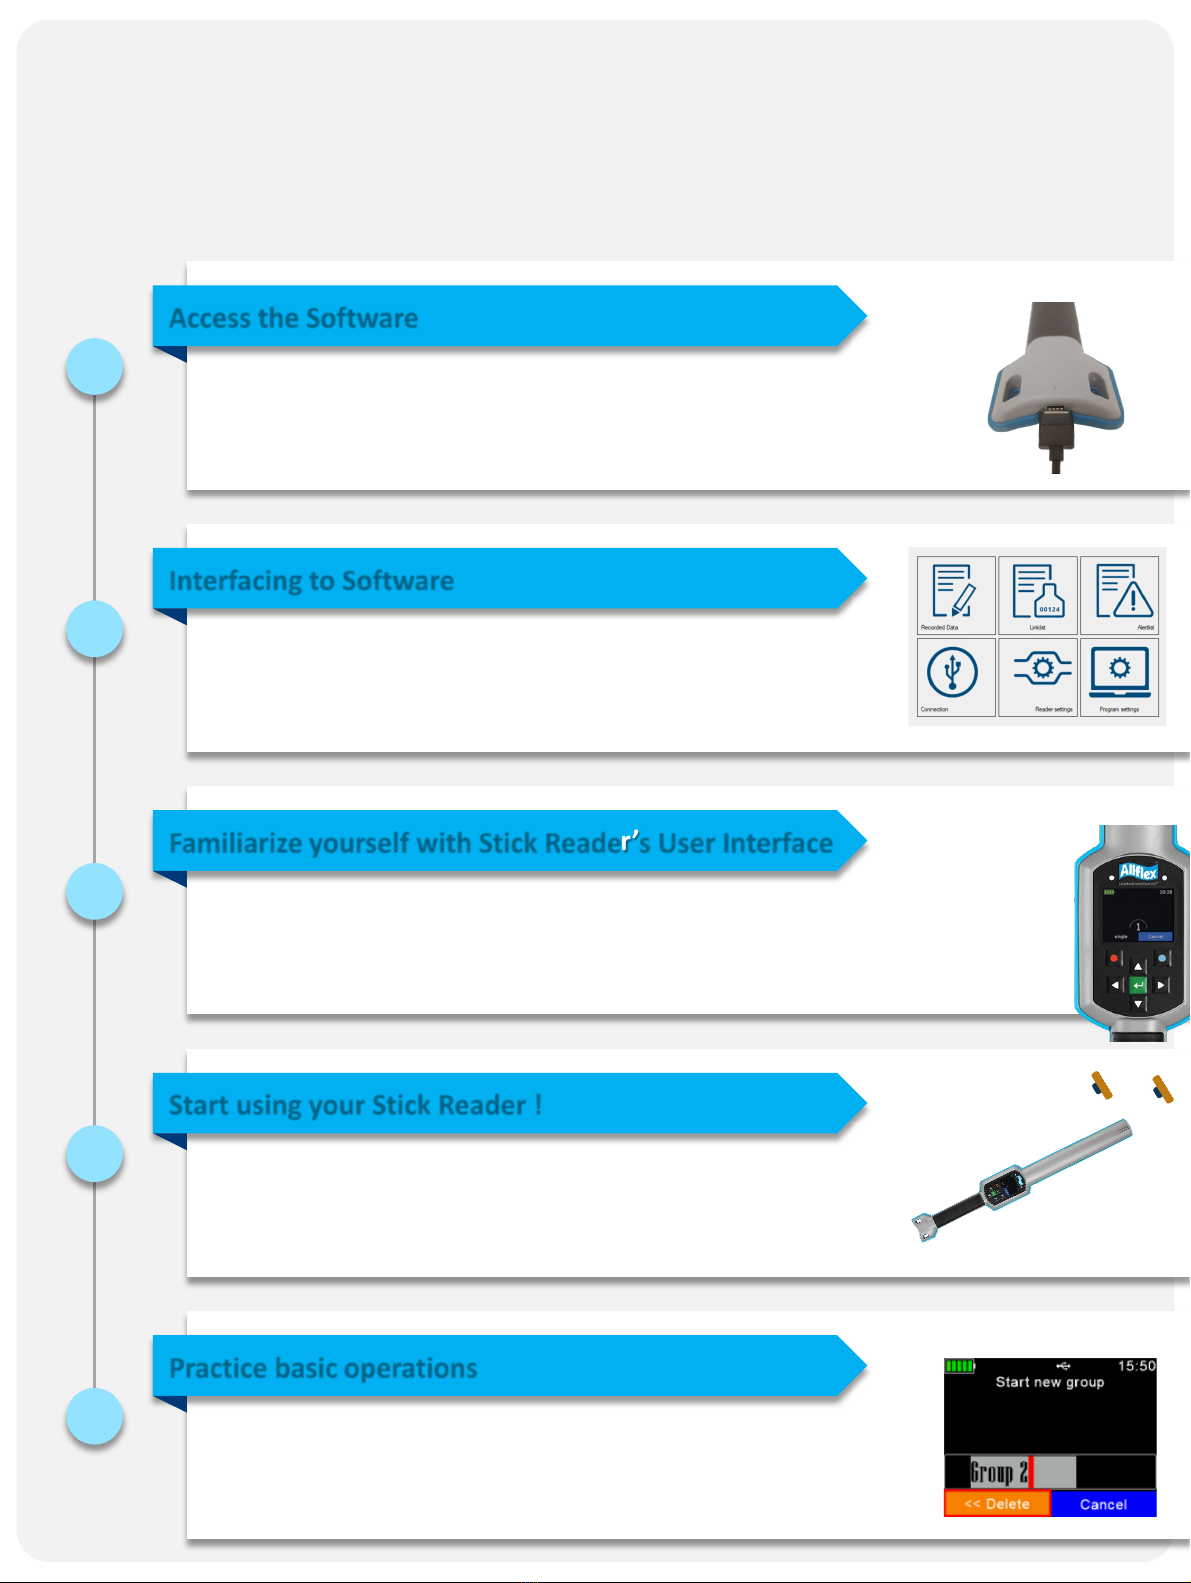
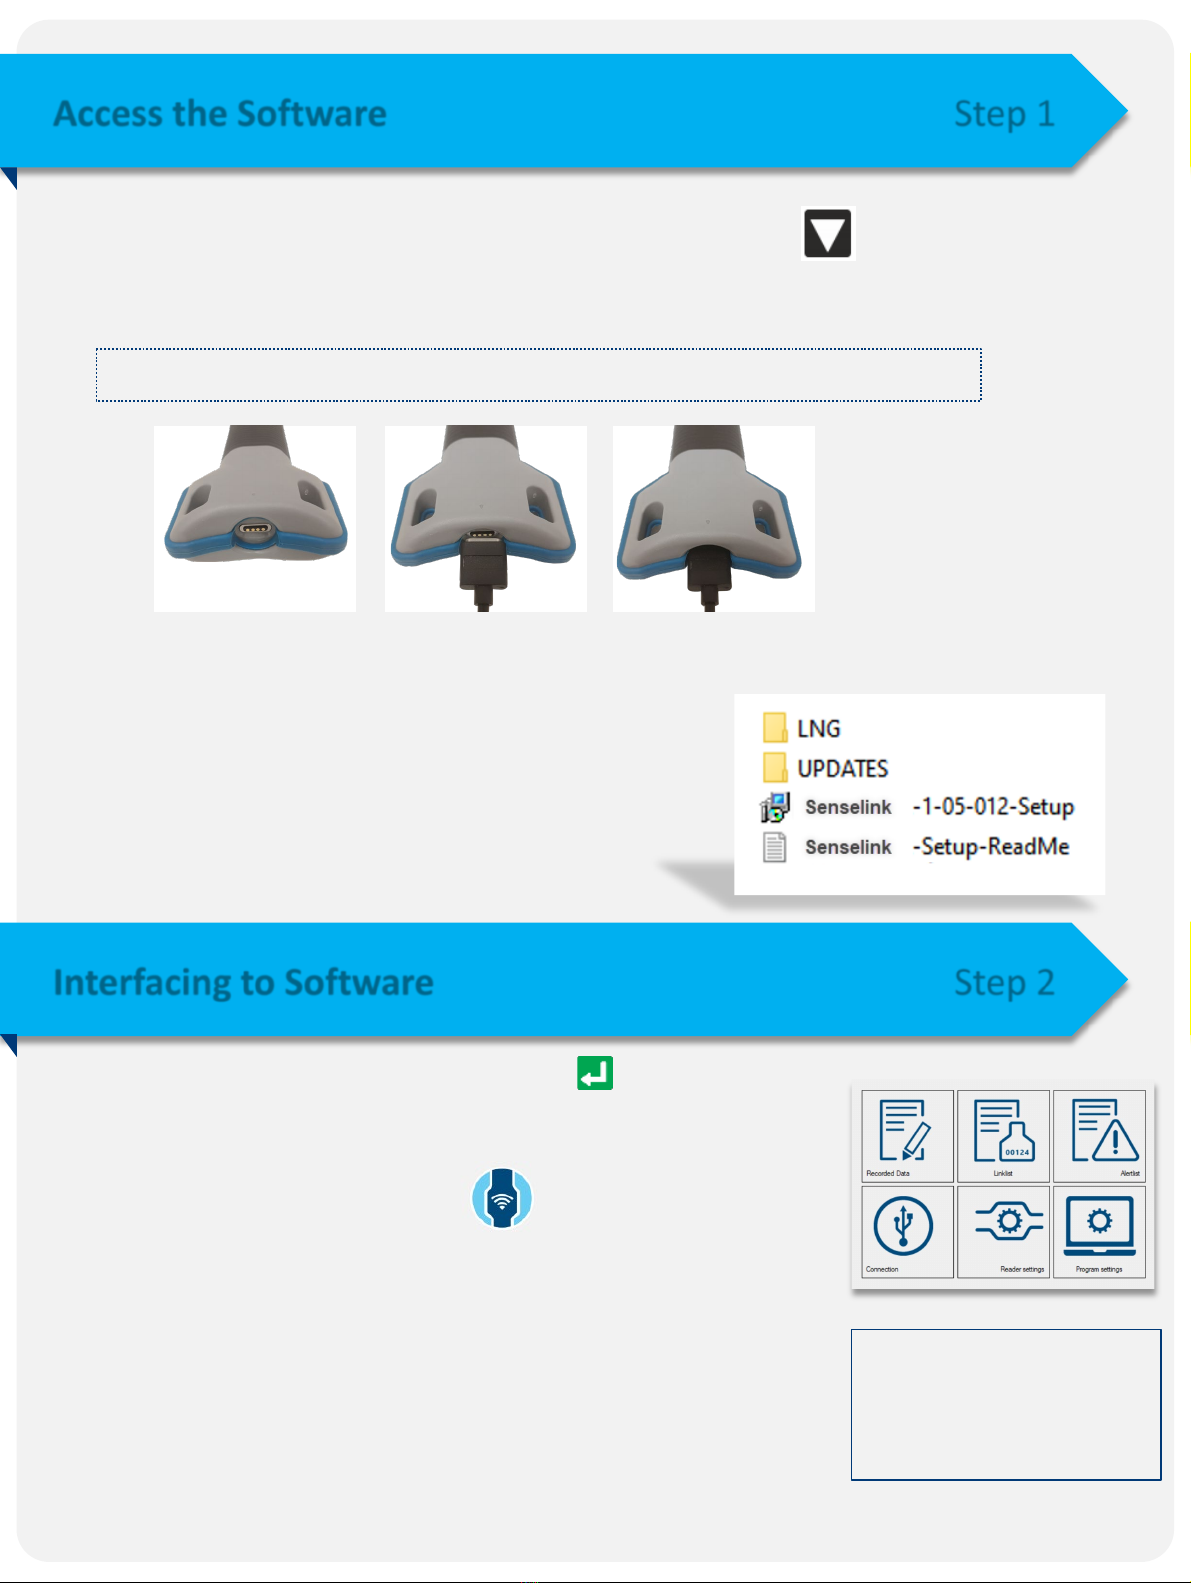
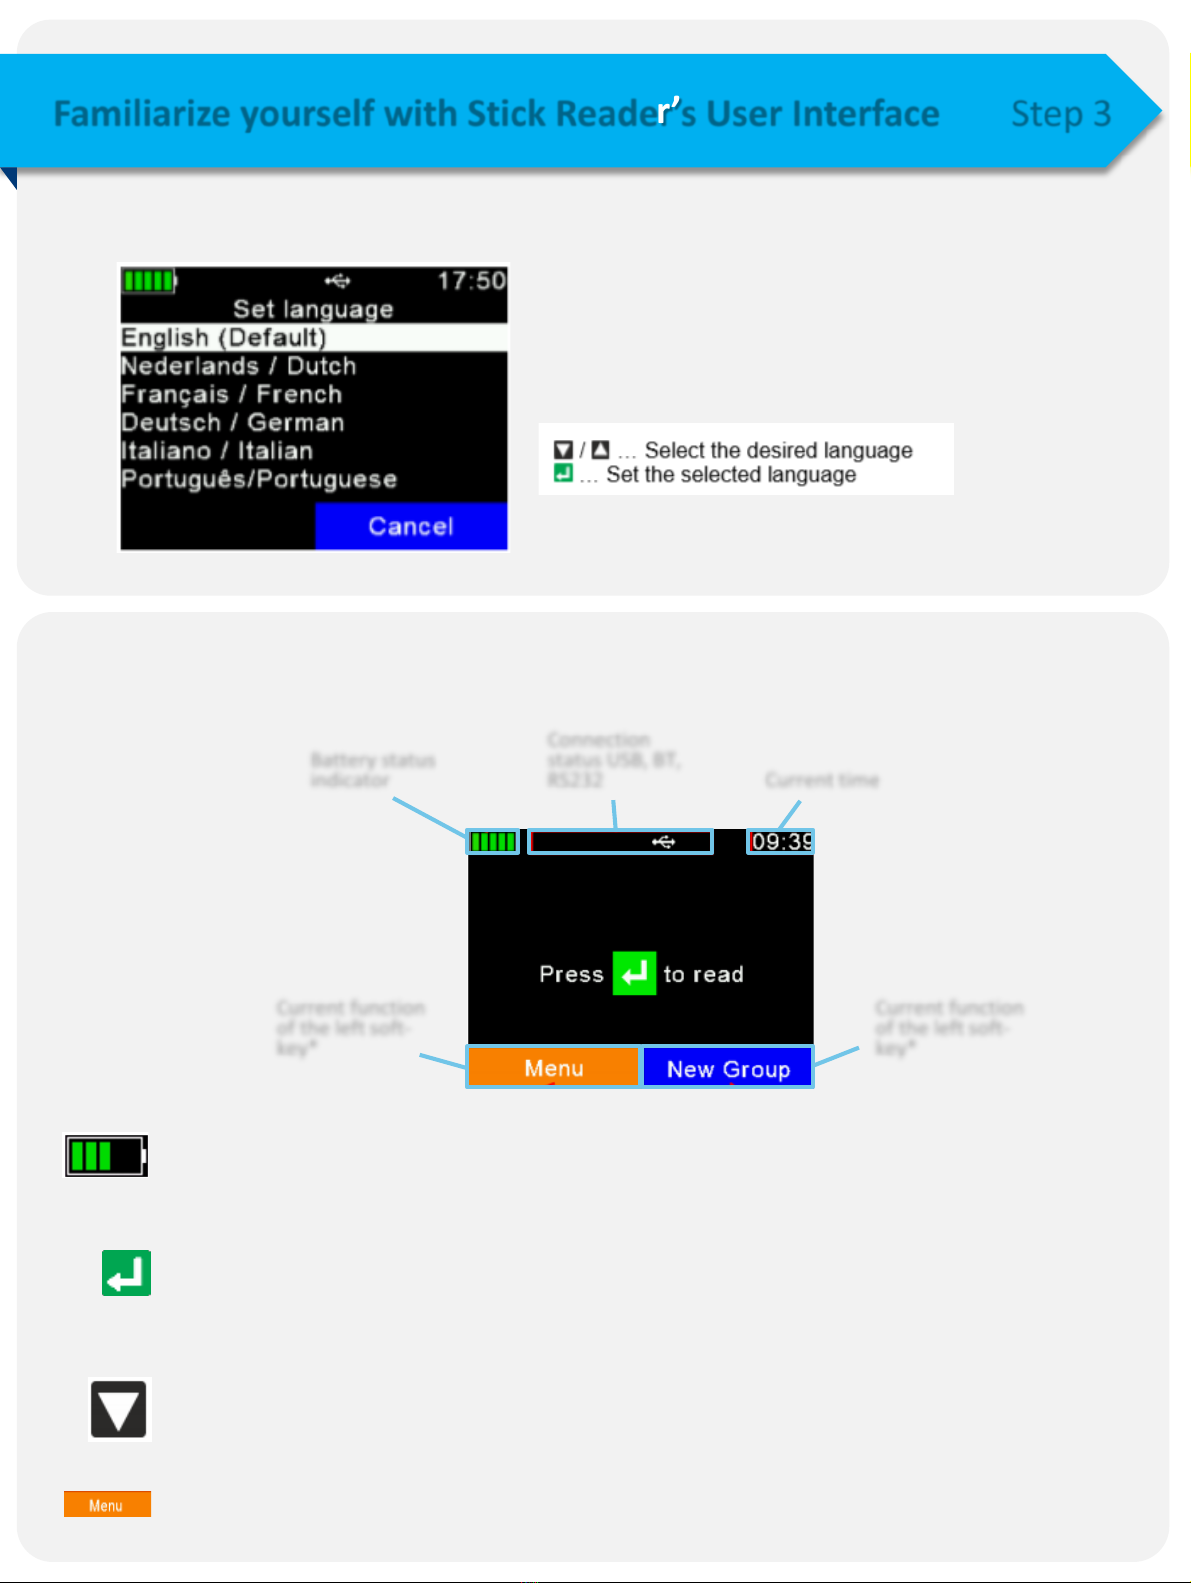
Allflex AWR250 User manual

Allflex AWR250
Quick Start Guide
Reader Unboxing Video

Before you Start
Magnetic USB connector
Large 320x240 dots
color TFT display
7 keys for easily
controlling the Reader
Multicolor status LED
Blue status LED
AUSB-A to Magnetic-Connector cable.
The USB-A plug can be connected to any USB-
port.Note that the appropriate USB driver
must be installed first
The following optional accessories are also available:
The internal high-capacity lithium-ion battery should be fully charged before the first use.
* All products are compatible with the ISO code for animal identification -ISO 11784.
USB power supply ‘APS500’Car charger ‘ACC500’Transport box ATB300’
The Allflex Stick Reader is a strong, smart and easy solution that allows you to
identify and manage your livestock using advanced technology and provides
comprehensive reading capabilities, including all types of ISO compatible* HDX
and FDX-B ear tags

•The Reader software is stored in the device
•Make sure the Stick Reader is Off
•Connect to PC via USB
•Download the software
Access the Software
•Install the software on your PC
•Turn the Stick Reader ON
•Make sure the Stick Reader is recognized by the software
Interfacing to Software
Make sure to understand the basic functionality and screens:
•Home Screen
•Navigation
•LEDs and Indicators
Familiarize yourself with Stick Reader’s User Interface
Make sure to follow the instructions
and note the best tag reading orientation
Start using your Stick Reader !
•Basic setup operations –important configurations
•Information display
•Grouping
•Data management
Practice basic operations
1
Quick Start Guide
5 easy steps to start working with your Stick Reader
This handbook provides step-by-step workflows for each of the following steps.
2
3
4
5

1. Make sure the Stick Reader is switched OFF.If not, press the key for longer than
2seconds.
2. Connect the magnetic USB cable to the Stick Reader.
3. Once connected to the computer, the reader software can be
downloaded to your computer.
4. Double-click the Senselink Setup and follow the
on-screen instructions to download and install
the software and driver on your computer.
Access the Software Step 1
Interfacing to Software Step 2
1. Activate the Stick Reader by pressing the key in the
middle of the directional pad (leave the Stick reader connected
via the USB cable).
2. Double-click the SenseLink icon that appears on your
desktop
3. The system’s main screen appears and displays the basic
functionality.
4. It is automatically connected to your Stick Reader and displays
its name on the bottom left corner of your screen.
When done, make sure to unlock and remove the connector.
For more information on
data download and
management, see the
Senselink manual.
Note not to force the connection against the orientation of the magnetic connector.

Familiarize yourself with Stick Reader’s User Interface Step 3
It is important to understand the Stick Reader’s basic functionality and display before
starting: Battery status
indicator
Connection
status USB, BT,
RS232 Current time
Current function
of the left soft-
key*
Current function
of the left soft-
key*
Status
Evaluation
Language Customization
The default display language is always English.
To set the language, go to Menu>>Setup>>Display>>Set
Language
If the language you want to use is not available, please
contact your local distributor for further details.
Main Display
Battery Status:The battery status indicator shows the approximate battery level.It will also
display possible faults concerning the battery, such as high-temperature.
Enter Key: Selection key when using the soft menu.
When in main screen prompts to scan for tags.
When device is OFF, use the Enter key to switch it ON.
Down Arrow:Press the Down arrow for more than 2seconds to turn the Stick Reader OFF.
Soft keys:Soft menu –changes according to selection
The highest menu level contains the items* ‘New Group’, ‘Data’, ‘Print’and ‘Setup’.

Familiarize yourself with the Stick Reader’s User Interface Step 3
LEDs and Indications
This is the LED display. Refer to the User Manual for a full description of functionality :
* Each of these main functionalities are discussed later in this Quick Guide.
Main Functionality
Blue LED:
Used for indicating the
connection status when the
display is switched off.
Multicolor LED:
The colors change according
to the charging status when
the display is switched off.
RGBBlue
New group:Grouping can be done according to
requirements.For example, all medicated animals.
An animal can be included in more than one group.
Data: Review and manage collected data.
Print: Print out collected data with matching mobile
BT printer.
Set-up:Customization of device settings

Start Using Your Stick Reader ! Step 4
After setup, you can start reading tags:
Reading Tags Process
It is best to read the tags when they are either facing the Stick Reader’s tip
or when the side of the tag is facing the side of the Stick Reader.
Flashing Green = New animal
Flashing Blue = Read this animal in the past
Press to read The tag is recognized
If no tags were recognized,
tap to start the reading again
Best reading orientation Worst reading orientation
8
12

Basic Operations Step 5
Basic Setup Operations
More setup operations such as alert events etc. are available in the User Guide.
Animal Counter ON/OFF
Menu >Setup >Reader Settings >Animal Counter On/Off
If the Animal counter is activated, an electronic ID can
only be available once per group.
Set Read Mode
Menu >Setup >Reader Settings >Set Read Mode
‘Single Read’is triggered for one read attempt only.
‘Continuous Read’allows one read after the other and is
ideal for batch reading.With the ‘Auto’function, you
can easily switch between ‘Single Read’and ‘Continuous
Read’mode, by ashort or long press of the green ‘Read’
button in the main screen.
Set Switch Off Time
Menu >Setup >Display >Set Switch Off Time
The ‘Switch Off Time’period determines when the
AWR250 enters Suspend mode.Any action, like astroke
of abutton, retriggers the timer.

Basic Operations Step 5
Creating groups
Records are organized in groups.The name can be customized
and used e.g. for reference to action, animal status or location.
One group can contain up to amaximum of 10.000 records.
Enable the “Animal Counter’to make sure that aduplicated
record is not saved in the same group.
1. To create a new group, press the New Group key.
2. Insert a new name for the group. Use the / keys to
open a keyboard.
3. Press Close.
4. Check and confirm the name by pressing the key.
Note that only very basic operations are included in this Quick Guide. For additional
information, refer to the User Guide.
If no group has been created manually before the first tag is read, the device creates agroup
with the default name ‘Group 1’ automatically.If you want the name of the first group to be
different, you must insert agroup before scanning for tags.
For additional information, refer to the full User Guide.
Set Active Group
Menu >Data >Set Active Group
It is possible to switch back to an existing group and activate it again.
This means you can add tags to the previous group again by scanning
them after the activation of that group.
For more information, see the Application Note for Set Active Group.
Reading and Assigning to Groups
1. Create or select a group.
2. Scan for the ID tag.
3. The new scanning is automatically added to the active group
until you create a new group or switch the active group.

Basic Operations Step 5
Data Management
The ‘Data’menu contains ‘Show Data’and ‘Clear Data’ options.
It is also possible to search an uploaded database for aparticular
entry based on either the input of the VID or an EID (read tag), but
only if adatabase has been uploaded.If this is not the case, these
menu items are not shown.
1. Browse for the target group (use the up and down
arrows to navigate; right and left arrows will help you
skip 6 groups).
2. Press to select.
3. All records within this group are shown.
4. To show detailed information for aparticular record,
select an entry from the list and confirm by pressing .
5. The details of the record are shown on two pages:
Group
name
Number
record
Time of
reading
Refer to the User Guide to learn more about editing the database fields.

Bluetooth Settings
Menu > Setup > Interface Setup > Bluetooth >Set Bluetooth Mode
The Bluetooth menu contains items to set the Bluetooth mode.
By default, Bluetooth is deactivated (OFF), so you must switch to ‘Master’ or ‘Slave’mode
to turn it ON.
In Master Mode,you can establish aBluetooth connection to another device via the stick
reader interface.In Slave Mode,you can establish the Bluetooth connection to the stick
reader via the interface of the other device.
Refer to the User Guide to learn more about Bluetooth settings.
Bluetooth is awireless technology that allows the contactless exchange of data between
different devices.Communication ranges of up to 80min line of sight are possible,
generally.
It is not mandatory for basic functionality of the stick reader but can be used in operation
with other applications such as weight scales and smartphone applications.
Optional
The stick reader supports the following Bluetooth profiles:
Serial Port Profile (SPP): The most common profile for weight
scales.
Human Interface Device (HID and HID Smart): Allows the stick
reader to function as a virtual keyboard for a software application
Bluetooth Low Energy (BLE) technology: Used for short range, low
power communication and supports easy pairing
iPOD Accessory Protocol Profile (iAP): Allows serial
communication with the iOS devices
Select the profile type according to the preference of the device and/or
software app you are connecting to.

To learn more, visit:
www.allflex.global/allflex-awr250-stick-reader/
Copyright© 2020 SCR Engineers Ltd., subsidiary of Merck &Co., Inc., Kenilworth, New
Jersey, U.S.A. The information contained herein is subject to change without notice.The
only warranties for SCR’s products and services are set forth in the express warranty
statements accompanying such products and services.Nothing herein should be
construed as constituting an additional warranty. SCR shall not be liable for technical or
editorial errors or omissions contained herein.
Other manuals for AWR250
1
Table of contents
Other Allflex Farm Equipment manuals
Popular Farm Equipment manuals by other brands

Duratech
Duratech Haybuster CMF-425 Operating Instructions and Parts Reference

HE-VA
HE-VA VARIO-EXACT Operating and mounting instructions

PRONAR
PRONAR T286 Operator's manual

Montag
Montag GEN 2 - 2218 Operation manual

Producer's PRIDE
Producer's PRIDE CANOPY COOP Assembly instruction

Chapman
Chapman BT500 Original instructions