Alliance Bio Expertise MIXWEL User manual

MIXWEL
Alliance Bio Expertise –Le Tremplin ZA de Courbouton 35480 –Guipry
+33 (0)2 40 51 79 53 –contact@abioexpertise.com
Revision 5

UM A.B.E. - MIXWEL
2
Édition de base :
Pages
version
Date
Rédigé par :
Vérifié par :
Chapitres
modifiés
19
1
10/09/2015
A. PINEDA
A. BLANCHARD
M. MAURO
-
Mises à jour :
16
4
24/12/2015
A. PINEDA
A.

UM A.B.E. - MIXWEL
3
Table of contents
General Information ..................................................................... 4
Technical Specifications ...........................................................................4
Standard accessories shipped with your Mixwel............................5
Overview ..........................................................................................................5
Setting up your Mixwel................................................................. 6
Installation and operating environment..............................................6
Unpacking .......................................................................................................6
Supply systems............................................................................. 7
Power supply .................................................................................................7
Getting Started your Mixwel......................................................... 8
Functions of the Mixwel controller........................................................8
Opening of the door and insertion of the blender bag...................9
Selecting the parameters..........................................................................9
Closing of the chamber and auto-start function .............................9
End of cycle....................................................................................................9
Removing the door ..................................................................... 10
Take out the blending blades:..................................................... 11
Reassembly of the blades..................................................................... 12
Reassembling the door........................................................................... 12
Adjusting blades ......................................................................... 13
Upkeep and maintenance........................................................... 14
Upkeep and daily cleaning..................................................................... 14
External body .............................................................................................. 14
Blending chamber..................................................................................... 14
Annual upkeep............................................................................................ 14

UM A.B.E. - MIXWEL
4
General Information
Read this document to find out the functionalities and features of your Mixwel.
Technical Specifications
UM A.B.E. - MIXWEL
5
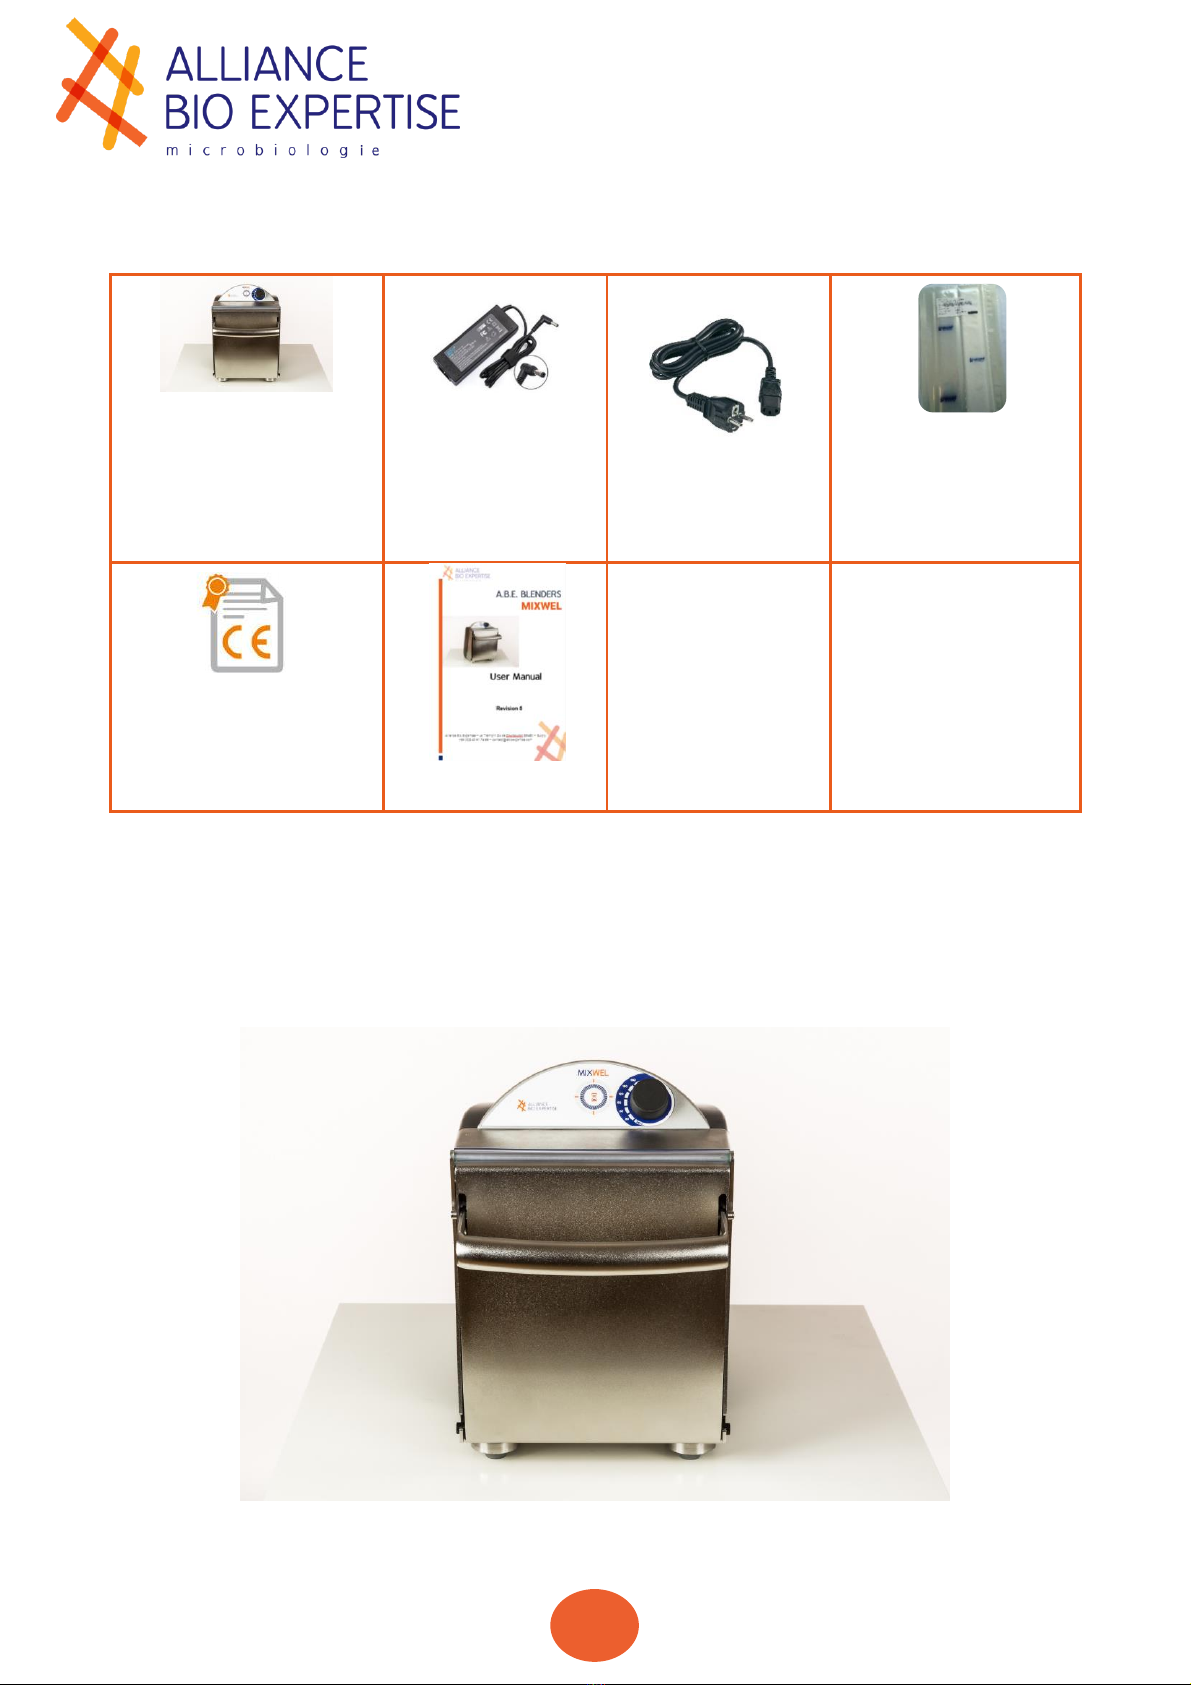
Standard accessories shipped with your Mixwel
Overview
Compacity: W x D x H: 220 x 410 x 340 mm
Lightness:14,6 kg
Figure 1. Mixwel front
Blender
Mains supply unit
120W
ref. Gs120A24–
P1M
Power cable
50 Bags
MIXBAG_SIDE
FILTER
Certification
User manual

UM A.B.E. - MIXWEL
6
Setting up your Mixwel
Installation and operating environment
Environmental
Conditions:
- Temperature: 5 °C to 45 °C (41 °F to 113 °F);
- Maximum relative humidity 80%;
- Indoor utilization.
Electrical
environment:
According to EN61010-1 ED. 2011, international
standard about the safety requirements for
electrical equipment for measurement, control, and
laboratory use standard.
Installation
Category II
Pollution category 2 environments.
Electromagnetic
compatibility
(EMC)
Performance:
According to EN61010-1 ED. 2011, international
standard about the safety requirements for
electrical equipment for measurement, control, and
laboratory use standard. Requirements about the
CEM (emission and immunity).
Unpacking
•Realize the unpacking in a clean and accessible place;
•take out the standard accessories shipped with your Mixwel;
•take the Mixwel out of its package by lifting its lower part;
•install the Mixwel on a stable and horizontal support preferably;
•make sure there are no elements remaining in the packing before disposal.

UM A.B.E. - MIXWEL
7
Supply systems
Power supply
The equipment must be connected to an electrical installation that
complies with the applicable standards in the country (NFC 15-100 for
France).The installation must be equipped with protections against over-
currents, over-voltages, earth faults.
Do not install the equipment next to a source of heat or source of
humidity.
For your own safety, the equipment must be switched off and
disconnected from the mains before any technical intervention.
Connecting any other type of power supply may disrupt the machine's
operation or the surrounding machines.
•Make sure the electric supply matches the specifications of the
manufacturer's plate;
•Power supply of the unit must be assured by a grounded outlet, and a
safety device must guarantee automatic power-off in case of faulty
insulation. A power supply equipped with a differential circuit breaker,
powerful enough, would meet this requirement. To insure the power
switch off of the unit;
•the outlet must be immediately identifiable and within easy reach of the
operator;
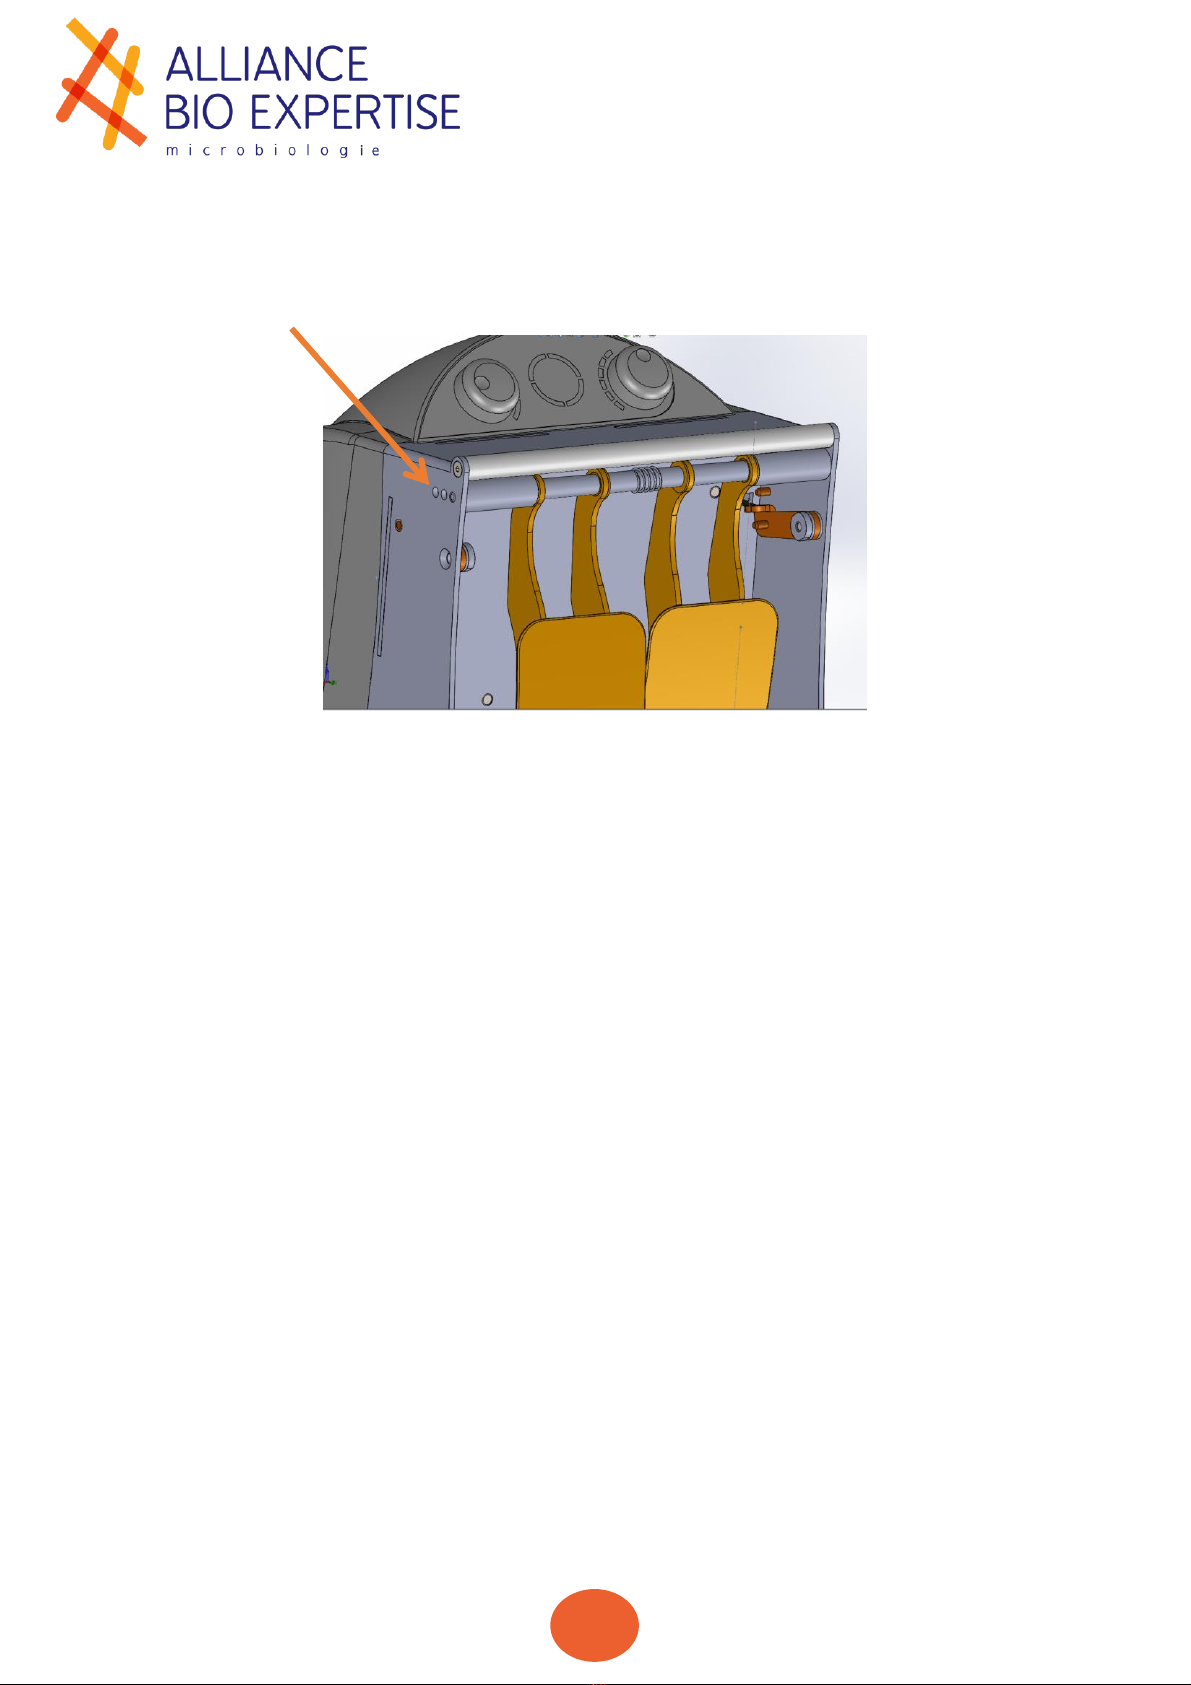
•connect the power supply to the Mixwel’s back in the location indicated
by:

UM A.B.E. - MIXWEL
8
Getting Started your Mixwel
Functions of the Mixwel controller
Button
General Features
Modality
Powering
Turn on ( I ).
Turn off ( 0 ).
Turn on the ignition switch on
position (I).
Turn off the ignition on the position
(o)
Cycle time
synchronization
The led flashes at the same time of
closing the door.
The cycle 's progress is displayed by
the backlight of the central symbol
dials.
Blending time
Scroll the knob toselect an option on
the 6 available.

UM A.B.E. - MIXWEL
9
Opening of the door and insertion of the blender bag
•Lift the ambidextrous handle to open the door;
•access to the blender chamber;
•slide into the blender chamber the blending bag containing the sample and
the diluent (max. volume 400 mL). The bag is positioned automatically in
the tank for accidental spills;
•take care to remove the air from the bag by gently smoothing the sides of
the bag upward.
Selecting the parameters
•Time:
oYou can set the duration from 30 seconds to 180 and in the Continuous
mode;
oselect the desired value by scrolling the right knob.
Closing of the chamber and auto-start function
•Gently lower the handle upwards. The blending cycle starts automatically
once the door is closed;
•the progress of the cycle is displayed through the knob backlights of the
central pictogram.
Note: in case of emergency, open the door, the device stops automatically
End of cycle
•Once the selected time delay is over, the blender stops;
•the luminous knob flashes: the operator is well aware about the end of the
cycle, even if he stays away;
•the blades move back slightly to facilitate removal from the bag;
•lower the handle to open the door;
•at the door opening, you can remove the bag.
UM A.B.E. - MIXWEL
10
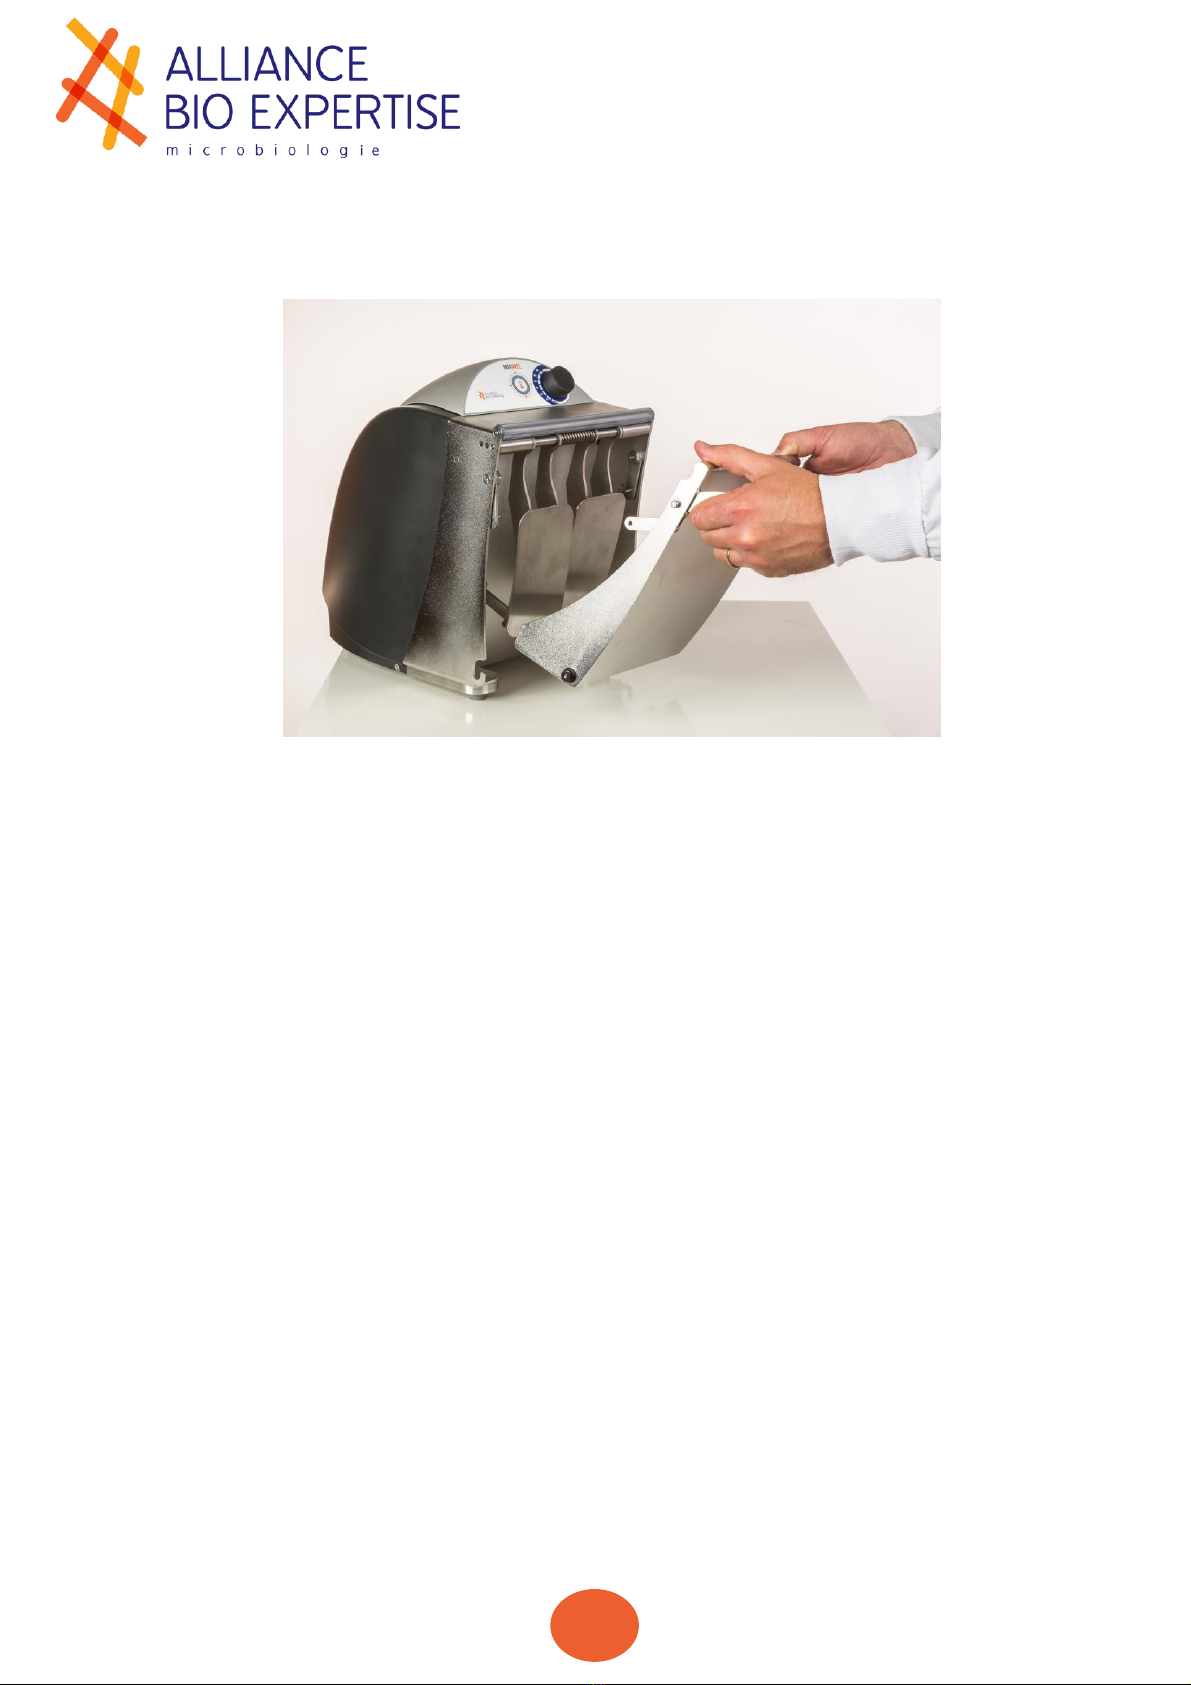
Removing the door
•Lift the door slightly upward;
•successively disengage the brackets (ball joints) from the articulated
rods holding the door;
•slightly lift the door upward, then forward in order to disengage the
locking parts at the base (left and right) of the door.

UM A.B.E. - MIXWEL
11
Take out the blending blades:
•Disengage the first blade from its lower attachment by gently pulling it
on the lower section;
•move it horizontally and pull it gently toward you;
•do the same with the second blade;
•compress the spring by applying two central forces inward, either on
the blades or on the two compression rings;
•it allows to remove the two pieces of compression rings of holes on
both ends. of the holes on both ends.
Spring
Blade rotational
axis
Compression ring

UM A.B.E. - MIXWEL
12
Reassembly of the blades
•Engage the axis of rotation of the blades on the left in one of the three
positioning holes;
•compress the central spring exerting two forces inwardly;
•engage the axis of rotation of the blades from the right side in one of
the three positioning holes;
•engage the first blade to its lower attachment by gently pushing on its
lower part;
•do the same with the second blade.
Reassembling the door
•Engage locking parts at the bottom;
•successively engage the legs of the left and right fixing rods articulated
in the upper part.
UM A.B.E. - MIXWEL
13
Adjusting blades
•Disengage the first blade from its lower attachment by gently pulling
on the lower part;
•move it on the horizontal way and pull it gently toward you;
•do the same with the second blade;
•compress the spring by applying two central forces inward, either on
the blades or on the two compression rings;
•position the axis of rotation of the blades in one of the three positioning
holes;
•you have 3 possible settings of the blades;
•move the blades away and toward depending on the size of your
sample.
3 possible settings
of the blades

UM A.B.E. - MIXWEL
14
Upkeep and maintenance
Upkeep and daily cleaning
External body
•Clean the smears on the paint of the outer body and keyboard using
an absorbent paper slightly soaked with a hydro-alcoholic or
quaternary ammonium solution.
Blending chamber
•Maintain the blending chamber clean and dry.
•NEVER USE CHLORINATED PRODUCTS (bleach, quaternary
ammonium chloride).
Annual upkeep
•It is recommended to perform a functional and safety check (continuity of
protection) at least once a year.
•Make sure that the grounding of the unit is always properly ensured by its
power supply cord and wall outlet to which it is connected.
•The user access to the interior of the device is not authorized. The
maintenance is exclusively carried out by an authorized technician A.B.E.
Table of contents
Other Alliance Bio Expertise Laboratory Equipment manuals


Popular Laboratory Equipment manuals by other brands

Molecular Devices
Molecular Devices SpectraMax iD3 installation guide

Endress+Hauser
Endress+Hauser CAT820 operating instructions

Agilent Technologies
Agilent Technologies 5110 ICP-OES Service manual

Invitrogen
Invitrogen BW1000 user guide

ELITechGroup
ELITechGroup CYTOPRO 7622 Applications manual

vitro
vitro Vitrolux H V2 user manual


