Invitrogen BW1000 User manual

For Research Use Only. Not for use in diagnostic procedures.
Bandmate™Automated Western Blot
Processor
USER GUIDE
For automation of western blot processing
Catalog Numbers BW1000
Publication Number MAN0018722
Revision C.0

Thermo Fisher Scientific | 3747 N. Meridian Road | Rockford, Illinois 61101 USA
For descriptions of symbols on product labels or product documents, go to thermofisher.com/symbols-definition.
The information in this guide is subject to change without notice.
DISCLAIMER: TO THE EXTENT ALLOWED BY LAW, THERMO FISHER SCIENTIFIC INC. AND/OR ITS AFFILIATE(S) WILL NOT BE
LIABLE FOR SPECIAL, INCIDENTAL, INDIRECT, PUNITIVE, MULTIPLE, OR CONSEQUENTIAL DAMAGES IN CONNECTION WITH OR
ARISING FROM THIS DOCUMENT, INCLUDING YOUR USE OF IT.
Revision history: Pub. No. MAN0018722
Revision Date Description
C.0 14 Sep 2021 Added to products for separate purchase and troubleshooting topics.
Minor corrections.
B.0 06 Oct 2020 Corrected safety and regulatory topics per guidance from Compliance.
Added Canadian French translations to Electrical Safety topic.
A.0 28 Feb 2020 New Manual.
Important Licensing Information: These products may be covered by one or more Limited Use Label Licenses. By use of these
products, you accept the terms and conditions of all applicable Limited Use Label Licenses.
TRADEMARKS: All trademarks are the property of Thermo Fisher Scientific and its subsidiaries unless otherwise specified.
©2021 Thermo Fisher Scientific Inc. All rights reserved.

Contents
■CHAPTER 1 Bandmate™Automated Western Processor ....................... 4
Product description ............................................................. 4
Contents ....................................................................... 5
Operate the Bandmate™Automated Western Blot Processor ......................... 6
Set up the system .......................................................... 6
Program the processor ...................................................... 7
Run the processor .......................................................... 9
Clean the processor ........................................................ 10
General maintenance ....................................................... 10
Instrument dimensions and specifications .................................... 12
Troubleshooting ................................................................ 12
■APPENDIX A Safety ............................................................... 15
Symbols on this instrument ..................................................... 15
Standard safety symbols ................................................... 15
Control and connection symbols ............................................. 16
Conformity symbols ........................................................ 16
Safety information for instruments not manufactured by Thermo Fisher Scientific ...... 17
Instrument safety .............................................................. 17
General ................................................................... 17
Physical injury ............................................................. 18
Electrical safety ........................................................... 18
Cleaning and decontamination .............................................. 19
Instrument component and accessory disposal ................................ 19
Safety and electromagnetic compatibility (EMC) standards .......................... 19
Safety standards .......................................................... 19
EMC standards ............................................................ 20
Environmental design standards ............................................. 21
Chemical safety ................................................................ 22
Biological hazard safety ......................................................... 23
■APPENDIX B Documentation and support ...................................... 24
Customer and technical support ................................................. 24
Limited product warranty ........................................................ 24
Bandmate™Automated Western Blot Processor User Guide 3

Bandmate™Automated Western
Processor
Product description
The Invitrogen™Bandmate™Automated Western Blot Processor is a self-contained western blot
processing system that can process up to 4 mini blots or 2 midi blots at a time. Each blot can be
probed with dierent antibodies, if desired. The instrument has built-in traditional programs, but permits
custom programs for incubation and wash times. Antibodies and reagents are directly streamed into
incubation trays, which eliminates cross-contamination between reagents. The curved mini and midi
trays allow for even processing of blots with minimal antibody volumes; minimally 3.5 mL primary
antibody for mini blots and 7.5 mL for midi blots.
1
6
2
3
4
5
7
8
Figure 1 Instrument overview
1Reagent tubes (antibody reservoirs)
2Wash buer tubing
3Rocker cradle
4Tray cover
5Sample tray
6Reagent slider
7Waste and recovery funnel tray
8Waste tank compartment (behind door panel)
1
4Bandmate™Automated Western Blot Processor User Guide

Table 1 Program icons
Icon Function Icon Function
Accept Fill
Back Home
Cancel (Stop) Pause
Continue Run
Drain Save
Edit
Contents
Table 2 Bandmate™Automated Western Blot Processor (Cat. No. BW1000)
Contents Amount
Buer Hose w/ Quick-connect Coupling 1
Interior Siphon Hose for Buer Bottle 1
Reagent Tubes 40
50 mL Recovery Tubes 8
Mini Trays 2
Midi Trays 2
Tray Covers 2
Funnel Trays 2
Waste Trays 2
Quick Reference Guide 1
Table 3 Available for separate purchase
Product Cat. No.
Reagent Tubes (100 tubes) BW020X5
Reagent Tubes (500 tubes) BW020X25
Mini Trays (2 trays) BW0060
Midi Trays (2 trays) BW0070
Chapter 1 Bandmate™Automated Western Processor
Contents 1
Bandmate™Automated Western Blot Processor User Guide 5

Table 3 Available for separate purchase (continued)
Product Cat. No.
Waste Tray BW0030
Funnel Tray BW0040
Tray Cover BW0050
4 L Buer Bottle BW0010
Table 4 Accessory products
Product Cat. No.
Pierce™Clear Milk Blocking Buer (10X) 37587
Blocker FL Fluorescent Blocking Buer (10X) 37565
Blocker BSA (10X) in PBS 37525
Blocker BSA (10X) in TBS 37520
SuperSignal™West Pico PLUS Chemiluminescent Substrate 34579
SuperSignal™West Atto Ultimate Sensitivity Substrate A38555
Pierce™Reversible Protein Stain Kit for Nitrocellulose
Membranes
24580
Pierce™Reversible Protein Stain Kit for PVDF Membranes 24585
Operate the Bandmate™Automated Western Blot
Processor
Set up the system
1. Set up the processor on a stable, level lab bench.
2. Open the door and remove the funnel tray.
3. Replace the funnel tray so that it hooks onto the catch at the back of the unit. Close the door.
4. Attach the wash buer hose to the connector located in the back of the instrument and attach the
other end to the buer bottle using the quick-connect fitting.
5. Plug the power supply into the power jack on the back of the instrument and connect the plug into
a wall outlet.
Chapter 1 Bandmate™Automated Western Processor
Operate the Bandmate™Automated Western Blot Processor
1
6Bandmate™Automated Western Blot Processor User Guide

Program the processor
•Store up to 8 programs.
•All incubation steps can be set from 1 second to 96 hours.
•Volume range for washes is between 10 mL to 75 mL for mini gels and 10 mL to 150 mL for midi
gels.
•We recommend using 20-30 mL per wash for mini gels and 30-50 mL for midi gels.
•Recommended antibody volumes are ≥3.5 mL for mini blots and ≥7.5 mL for midi blots.
•Maximum number of given steps in a protocol is 9.
•Recommended rocks per minute for incubation steps is 15 rpm. Recommended rocks per minute
for wash steps is 20 rpm.
1. From the home screen, select Programs. A list of programs, with default times will appear. The
Standard Western Blotting Protocol may be used for guidance and as a template. Select the
desired program using the dial. Press Edit.
2. Enter a name for the custom protocol. Select letters and numbers by turning the dial. Use the
cluster of 4 buttons at the lower left of the screen to navigate between characters and delete
characters or add spaces. When finished, press Save to save the program name, and then
press Continue .
3. Select whether the protocol will be used with a mini tray (two chambers with a central divider) or a
midi tray (one large chamber). Press Save , then press Continue .
4. Choose whether a quick rinse step is required in the protocol. A rinse will dispense 10 mL of wash
buer at the end of each step. If a rinse is desired, highlight Enable on the screen. Press Continue
.
Chapter 1 Bandmate™Automated Western Processor
Operate the Bandmate™Automated Western Blot Processor 1
Bandmate™Automated Western Blot Processor User Guide 7

5. On the last screen, input the times and reagent for each step in your protocol. Buer wash steps
can be repeated up to ten times, but reagent steps cannot be repeated. When selecting the step,
the following may be chosen: Buer; Reagent 1; Reagent 2; and End. Use the toggle button to
highlight what needs to be modified and use the knob to move through the selections. Selecting
End indicates that there are no more steps. End must be selected as the last step in the protocol.
Below are the Preprogrammed Standard Western Blot Protocols, whereby Step 1 already has the
blocking solution pre-filled in the tray and contains two reagent (antibody addition) steps. Step 2
is the dispensing step for primary antibody, which is designated as Reagent 1, while Step 4 is the
dispensing step for secondary antibody and is designated as Reagent 2. Steps 3 and 5 are wash
steps with buer.
Table 5 Standard Mini
Step Reagent Repeat Fill volume Rock time Rocks per
min. Drain to[1]
1Pre Fill 1X — 1 hr 15 Waste
21 1X — 1 hr 15 Waste
3Buer 3X 20 mL 10 mins 20 Waste
42 1X — 30 mins 15 Waste
5Buer 6X 20 mL 5 mins 20 —
[1] Change from Waste to Recover if antibodies need to be saved.
Table 6 Standard Midi
Step Reagent Repeat Fill volume Rock time Rocks per
min. Drain to[1]
1Pre Fill 1X — 1 hr 15 Waste
21 1X — 1 hr 15 Waste
3Buer 3X 40 mL 10 mins 20 Waste
42 1X — 30 mins 15 Waste
5Buer 6X 40 mL 5 mins 20 —
[1] Change from Waste to Recover if antibodies need to be saved.
6. Choose the antibody recovery option if antibodies need to be recovered for future use. Recovered
reagents will be diverted to 50-mL conical tubes that can be placed in the brackets on either side
of the waste tray in the numbered holes (position 1 for first antibody addition and position 2 for
second antibody addition). If antibodies do not need to be recovered, all reagent steps may be set
to Waste. Press Save .
Note: If you choose to recover the antibody, place uncapped 50-mL recovery tubes, or
comparable 50-mL conical tubes, in the appropriate location(s) in the waste tray. Skirted conical
tubes are recommended because these tubes maintain proper positioning under the funnel tray
opening. If non-skirted tubes are used, align tubes vertically and do not allow the tubes to lean.
This will reduce the risk of solution loss during the recovery steps.
Chapter 1 Bandmate™Automated Western Processor
Operate the Bandmate™Automated Western Blot Processor
1
8Bandmate™Automated Western Blot Processor User Guide

Note: When modifying an existing program, it is important to save before starting the program.
Only saved in-process programs will automatically resume after a power shutdown or outage.
Run the processor
1. Turn the power switch located at the back of the unit to the "On" position. The display will
illuminate and the moving parts will return to their home positions. After a few seconds, the home
screen will display.
2. Program or select your preferred western blot protocol (see “Program the processor” on page 7).
3. Fill the buer bottle in the back of the processor. Ensure that the hose hanging from the cap
reaches the bottom of the bottle. Leave the cap loose to allow air into the bottle as liquid is
pumped out.
For each wash, 10–75 mL of wash buer can be dispensed for mini gels and 10–150 mL for midi
gels. We recommend using 20–30 mL per wash for mini gels and 30–50 mL for midi gels. Ensure
there is enough wash buer to complete the protocol.
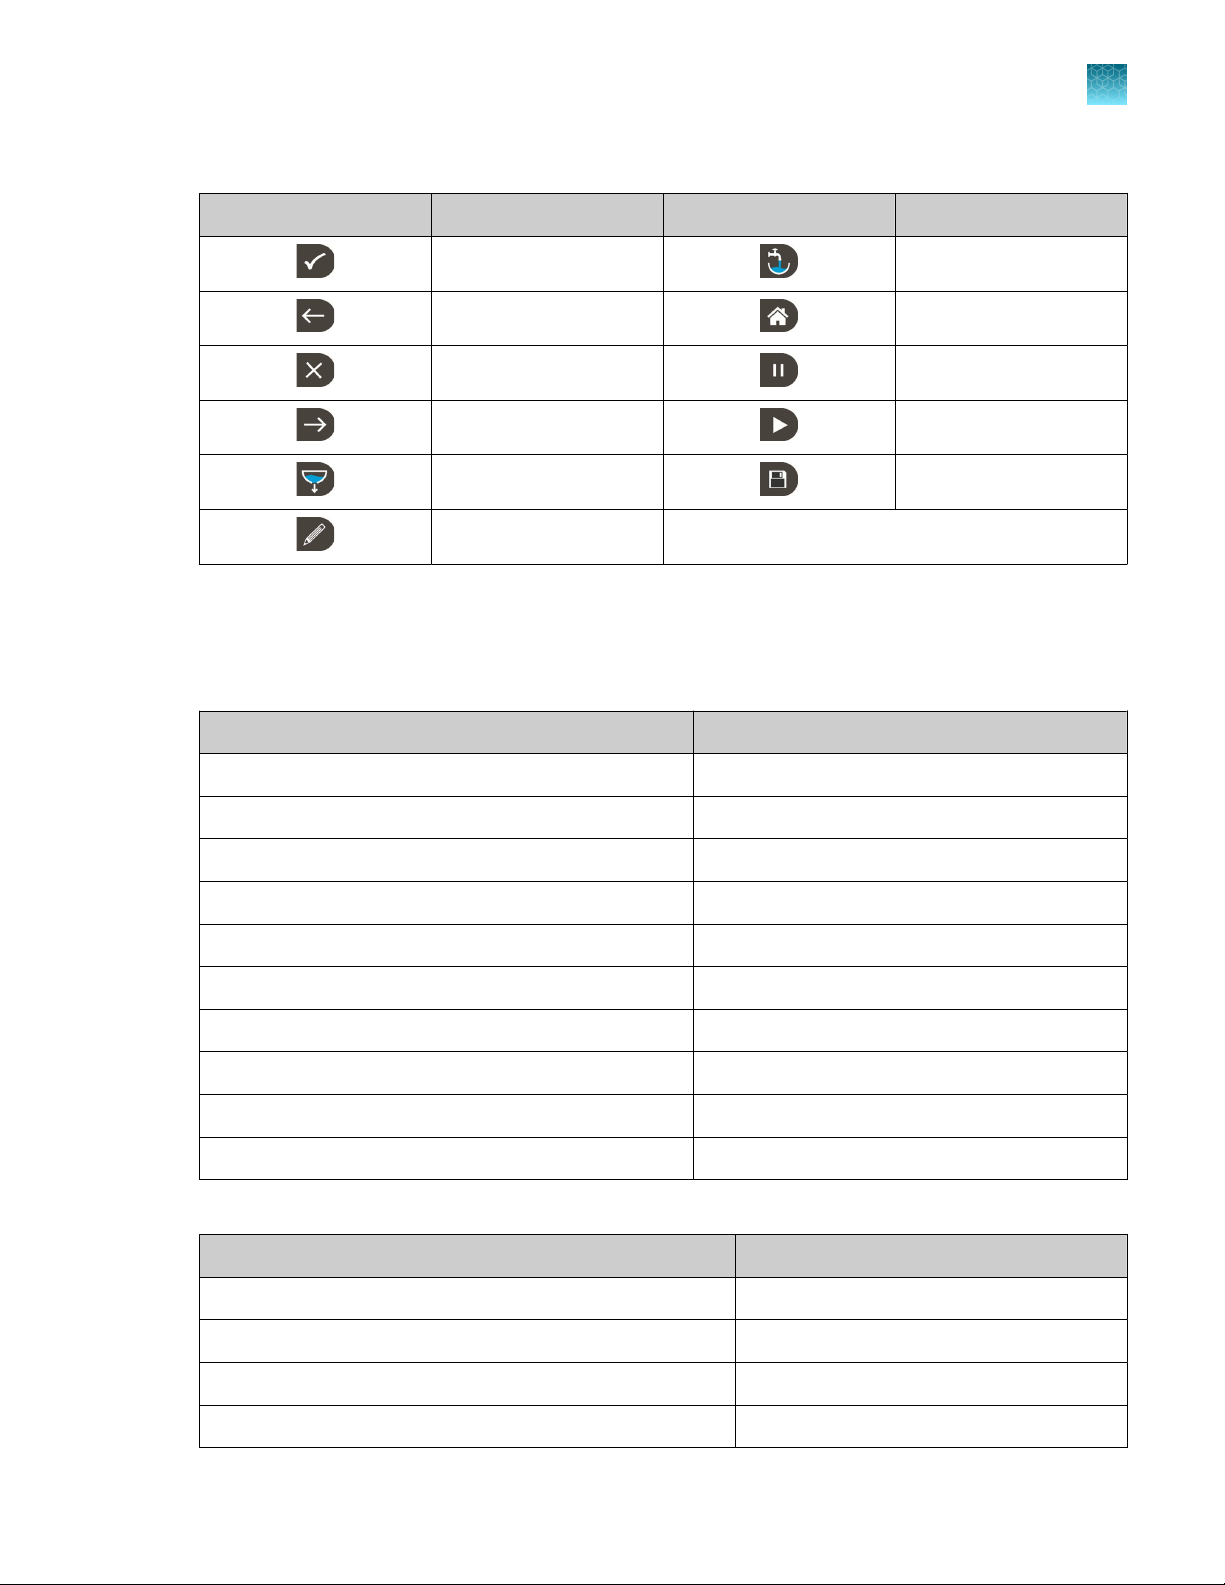
4. Flush the buer lines by selecting Flush from the home screen menu, then press Accept . Press
Fill until wash buer is dispensed from all nozzles. This may take several seconds. The wash
buer dispenses into the blot tray. Drain all wash buer from blot tray before use.
5. If using primary and secondary antibodies, two reagent tubes will be required for each blot being
processed. Check to ensure the foil on the bottom of the reagent tubes is not damaged. Screw
one reagent tube firmly and completely into the primary antibody position, noted with the number
1 toward the back of the slider. Next, screw the other reagent tube into the secondary antibody
position, noted with the number 2, just behind the buer dispensing nozzle.
6. Pipet the appropriate antibody solution into each reagent tube.
A standard-sized mini blot processed in a mini tray requires a minimum of 3.5 mL of each primary
antibody and secondary antibody solutions. A standard-sized midi blot processed in a midi tray
requires a minimum of 7.5 mL of each primary antibody and secondary antibody solutions.
7. Place blot(s) into the sample tray protein side up with protein lanes perpendicular to the tray gates.
If using a mini tray, which has a central divider, make sure the blot is on the same side of the
divider as the appropriate antibody reagent tubes.
8. Pour blocking buer of choice in to the tray. Use no more than 45 mL of blocking buer per mini
tray and no more than 90 mL of blocking buer for midi trays. Replace the tray cover and make
sure it is fully seated.
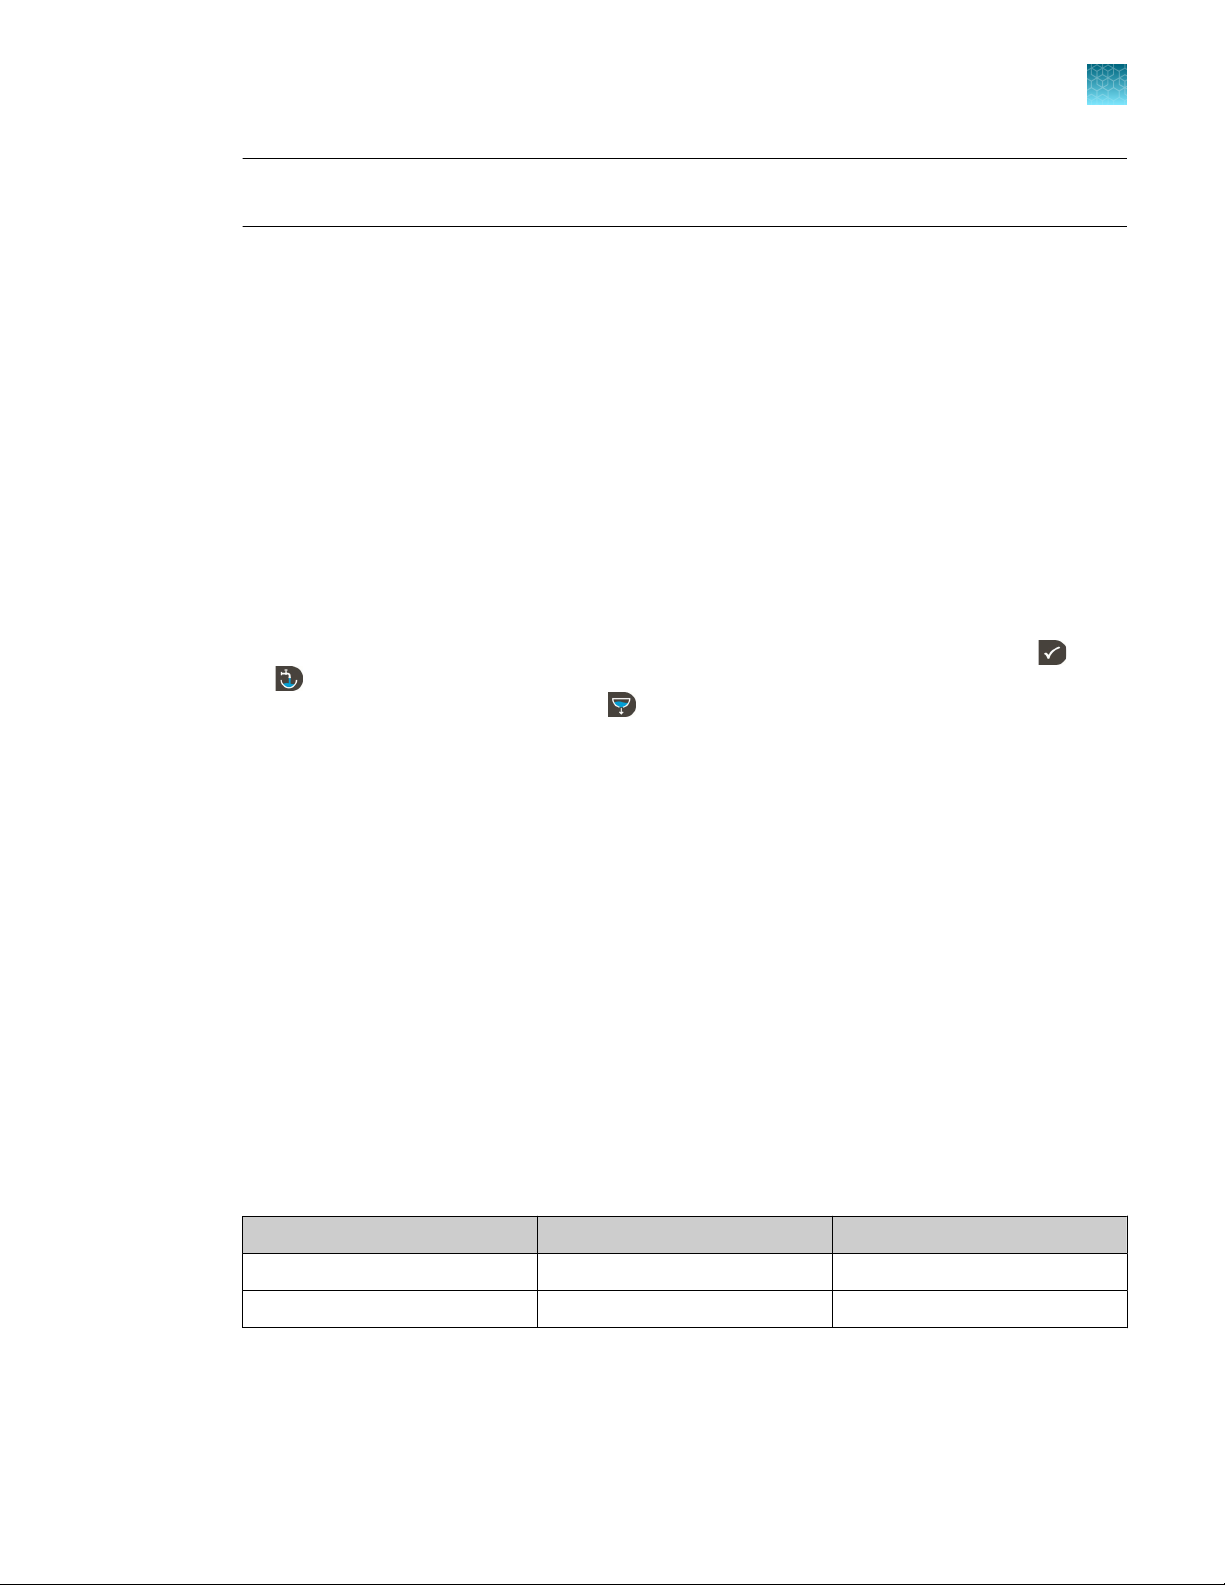
Tray Size Minimum Volume Maximum Volume
Mini 3.5 mL 45 mL
Midi 7.5 mL 90 mL
Chapter 1 Bandmate™Automated Western Processor
Operate the Bandmate™Automated Western Blot Processor 1
Bandmate™Automated Western Blot Processor User Guide 9

9. To recover the antibody solutions, place empty 50 mL uncapped conical tubes in the appropriate
spaces on each side of the waste tray (space #1 for the primary antibody and #2 for the secondary
antibodies).
Note: For antibody recovery from midi trays, conical tubes must be added on both sides of the
waste tank as recovered solutions will be distributed in both tubes.
10. Check the waste tank to make sure that it is empty. Ensure that the funnel tray and waste trays are
pushed all the way to the back and are in place. Close the waste compartment and the work area
window.
11. Select the desired protocol from the menu and press Run .
12. Select the trays to be used for the protocol. Follow the instructions on the screen to indicate which
section(s) are in use.
13. Press Continue .
14. Press Run .
15. Once the run is complete, press Home to stop the rocker and return to the home screen.
Open the window and remove the blot. The blot is now ready for downstream processing
(chemiluminescent or colorimetric detection) and/or immediate imaging (fluorescence).
Note: The rocker will continue to rock with the final dispensed wash buer volume in the tray after
all of the steps of the protocol are completed to ensure that the blots do not dry out. The Home
button should be selected before removing the blot from the blot tray.
Clean the processor
1. Wash the sample trays, funnel trays, and tray covers using a gentle laboratory detergent. Rinse
with distilled water and dry face down.
2. Remove the Reagent Tubes from the instrument.
3. If the processor is not going to be used again for some time, flush the buer line with distilled
water to prevent salt build-up. To flush, place the wash buer hose into a container of distilled
water, then select Flush to run water through the lines and into the trays. Once water has been
flushed through the tubing, remove the tubing from the water container, then select Flush until the
liquid is completely flushed from the system and tubing.
General maintenance
Replacing buers
When replacing or adding additional wash buer to the wash bottle, it is recommended to flush the lines
to ensure no bubbles were introduced when the buer was replenished.
Chapter 1 Bandmate™Automated Western Processor
Operate the Bandmate™Automated Western Blot Processor
1
10 Bandmate™Automated Western Blot Processor User Guide

Calibration
The pumps that deliver wash buer to the tray have been calibrated at the factory. To check or
re-calibrate the pumps, use the Calibration function. Pumps should be re-calibrated every 6 months or
when moving the instrument from room temperature to a cold room or vice versa. The temperature of
the environment can impact the dispensed volume.
1. Prior to calibration of the pumps, confirm that the wash buer line is completely full of liquid. If
there are bubbles in the line, use the Flush function to remove them.
2. Open the waste compartment and remove the funnel trays and sample trays. If using a larger
graduated cylinder and extra room is needed, remove the waste tank. Alternatively, detach the
hose from the hose nozzle and place it in the graduated cylinder.
Note: Be careful not to stretch or distort the hose.
3. Place the graduated cylinder under the buer, position as indicated on the graphical display, and
press Fill to dispense liquid into the cylinder. The pump will dispense approximately 40 mL.
4. Once the pump has stopped running, measure the actual amount of liquid dispensed and enter the
value using the encoder knob. Measure the volume from the other positions in the same way and
record the value. Press Save . The pumps are now calibrated.
5. Replace the waste tank and trays, then close the waste compartment.
The amount of liquid dispensed by the pumps is temperature-dependent. This is accounted for in
the factory calibration.
The Bandmate™processor calibrates based on temperature. "Warm" calibration is indicated by the
red numbers, while "cold" calibration is indicated by the blue numbers. These numbers represent the
pump coecients, ranging from 100 to 300 with 200 being the intrinsic value of the pump. The cuto
temperature between "warm" and "cold" is 12°C. To check the calibration and use the processor
at dierent temperatures, perform a "warm" and a "cold" calibration at the warmest and coldest
temperatures at which the processor is planned to be used. If the processor is only used at one
temperature, it is unnecessary to calibrate it at any other temperature.
Chapter 1 Bandmate™Automated Western Processor
Operate the Bandmate™Automated Western Blot Processor 1
Bandmate™Automated Western Blot Processor User Guide 11

General system cleaning
•Rinse the waste tank and funnel tray. The trays are resistant to chemicals typically used in a
western blot, but some of the components of blocking buers (nonfat dry milk, BSA, etc.) can form
deposits on the surface.
•If needed, use water and a lab tissue to clean the display screen protector, work area window, and
any interior surfaces of the instrument. Using alcohol is not recommended as it may fog plastic
surfaces over time.
Instrument dimensions and specifications
Dimensions 60 cm × 39 cm × 42 cm
Weight 15 kg (32 lbs)
Capacity 4 mini blots, 2 midi blots
Rocks per minute 5-40 rpm
Maximum washes per step 10
Minimum reagent per blot 3.5 mL (mini), 7.5 mL (midi)
Maximum number of protocol steps 9
Maximum number of protocols 7
Buer dispensing volume 10-150 mL
Incubation step time range 0.1 sec to 96 hrs
Power requirements 12 VDC, 5 A
Relative humidity 5-90%
Operating temperature 4-40°C
Altitude 2,000 m
Storage temperature -40 to 50°C
Troubleshooting
Observation Possible cause Recommended action
Processor won't start. Power cord plug is inserted in
an inactive wall outlet and/or
not fully inserted in the socket
on the back of the processor.
Ensure the power cord plug is inserted in a live
wall outlet and/or fully inserted in the socket
on the back of the processor.
Chapter 1 Bandmate™Automated Western Processor
Troubleshooting
1
12 Bandmate™Automated Western Blot Processor User Guide

Observation Possible cause Recommended action
Processor stopped working. Processor electronics errored. Turn the system o for one minute to allow
the electronics to reset. If the processor does
not turn on after resetting, contact technical
support.
Processor loses power. Processor was unplugged or a
power outage occurred.
Restore power to the unit when possible. If
a run was in progress, it will automatically re-
start at the point it had reached when power
was lost (only if the program was saved). No
other special measures are needed. If you
wish to terminate the recovered run, press
the "home" button when the program recovery
screen is displayed.
Processor stops during a run
and displays an error message.
An error was detected. The
most common error is that the
work area window is not fully
closed.
The run will resume once the error is
corrected.
Antibodies are not dispensed. The pokers on the sample tray
are not facing toward the back
of the instrument.
Ensure that the pokers on the sample tray are
facing toward the back of the instrument.
The pokers on the sample tray
have been damaged.
Ensure that the pokers on the sample tray
remain at a 90° angle to the horizontal, are
not bent over, and that they are still sharp.
If the pokers are bent, it may be possible to
bend the pokers back to their original vertical
position. Test the tube-puncturing capability of
the pokers with water or buer in the reagent
tubes after repositioning.
Repeat the run with a new sample tray that
is provided with the processor. Alternatively,
replacement trays are available for puchase if
the pokers become damaged.
Buer is not dispensed during
the run.
The end of the buer hose
may not have been resting at
the bottom of the filled buer
bottle, or the cap may be tight
and not allowing air flow into
the bottle.
Ensure that the end of the buer hose is
resting in the bottom of a filled bottle of buer.
The buer bottle cap should be slightly loose
to allow air to flow into the bottle.
The device is noisy. The tray’s magnet covers were
omitted, or the trays were not
correctly seated on the rocker
cradle. The omission of the
magnet cover may lead to the
tray bouncing out of the rocker
cradle.
Before starting the program, ensure that both
magnetic cover trays are securely in place and
correctly aligned on the blot trays.
Chapter 1 Bandmate™Automated Western Processor
Troubleshooting 1
Bandmate™Automated Western Blot Processor User Guide 13

Observation Possible cause Recommended action
There is no detection for
targets that were successfully
detected using traditional
processing.
The primary antibody might
have been placed on position
number 2 instead of position
number 1.
Perform a short program with only the
secondary antibody to see if the band will
appear.
The reagent tubes were
not pierced. Possible issues
can include: a faulty tube,
bent piercing points on the
incubation tray, or faulty
alignment of the reagent slider.
Verify that all tubes have foil covers on the
bottoms and that the incubation tray piercing
points are not bent, broken, or dull.
If the alignment of the reagent slider appears
to be an issue, contact technical support.
Chapter 1 Bandmate™Automated Western Processor
Troubleshooting
1
14 Bandmate™Automated Western Blot Processor User Guide

Safety
WARNING! GENERAL SAFETY. Using this product in a manner not specified in the user
documentation may result in personal injury or damage to the instrument or device. Ensure that
anyone using this product has received instructions in general safety practices for laboratories and
the safety information provided in this document.
·Before using an instrument or device, read and understand the safety information provided in the
user documentation provided by the manufacturer of the instrument or device.
·Before handling chemicals, read and understand all applicable Safety Data Sheets (SDSs) and use
appropriate personal protective equipment (gloves, gowns, eye protection, and so on). To obtain
SDSs, see the “Documentation and Support” section in this document.
Symbols on this instrument
Symbols may be found on the instrument to warn against potential hazards or convey important safety
information. In this document, the hazard symbol is used along with one of the following user attention
words.
•CAUTION!—Indicates a potentially hazardous situation that, if not avoided, may result in minor or
moderate injury. It may also be used to alert against unsafe practices.
•WARNING!—Indicates a potentially hazardous situation that, if not avoided, could result in death or
serious injury.
•DANGER!—Indicates an imminently hazardous situation that, if not avoided, will result in death or
serious injury.
Standard safety symbols
Symbol and description
CAUTION! Risk of danger. Consult the manual for further safety information.
CAUTION! Risk of electrical shock.
A
Bandmate™Automated Western Blot Processor User Guide 15

Control and connection symbols
Symbols and
descriptions
On (Power)
O (Power)
Earth (ground) terminal
Protective conductor terminal (main ground)
Direct current
Alternating current
Both direct and alternating current
Conformity symbols
Conformity mark Description
Indicates conformity with safety requirements for Canada and U.S.A.
Indicates conformity with China RoHS requirements.
Indicates conformity with European Union requirements.
Indicates conformity with Australian standards for electromagnetic compatibility.
Indicates conformity with the WEEE Directive 2012/19/EU.
CAUTION! To minimize negative environmental impact from disposal of
electronic waste, do not dispose of electronic waste in unsorted municipal
waste. Follow local municipal waste ordinances for proper disposal
provision and contact customer service for information about responsible
disposal options.
Appendix A Safety
Symbols on this instrument
A
16 Bandmate™Automated Western Blot Processor User Guide

Safety information for instruments not manufactured by
Thermo Fisher Scientific
Some of the accessories provided as part of the instrument system are not designed or built by Thermo
Fisher Scientific. Consult the manufacturer's documentation for the information needed for the safe use
of these products.
Instrument safety
General
CAUTION! Do not remove instrument protective covers. If you remove the protective instrument
panels or disable interlock devices, you may be exposed to serious hazards including, but not limited
to, severe electrical shock, laser exposure, crushing, or chemical exposure.
CAUTION! Solvents and Pressurized fluids. Wear eye protection when working with any
pressurized fluids. Use caution when working with any polymeric tubing that is under pressure:
·Extinguish any nearby flames if you use flammable solvents.
·Do not use polymeric tubing that has been severely stressed or kinked.
·Do not use polymeric tubing with tetrahydrofuran or nitric and sulfuric acids.
·Be aware that methylene chloride and dimethyl sulfoxide cause polymeric tubing to swell and
greatly reduce the rupture pressure of the tubing.
·Be aware that high solvent flow rates (~40mL/min) may cause a static charge to build up on the
surface of the tubing and electrical sparks may result.
Appendix A Safety
Safety information for instruments not manufactured by Thermo Fisher Scientific A
Bandmate™Automated Western Blot Processor User Guide 17

Physical injury
CAUTION! Moving and Lifting Injury. The instrument is to be moved and positioned only by the
personnel or vendor specified in the applicable site preparation guide. Improper lifting can cause
painful and permanent back injury.
Things to consider before lifting or moving the instrument or accessories:
·Depending on the weight, moving or lifting may require two or more persons.
·If you decide to lift or move the instrument after it has been installed, do not attempt to do so
without the assistance of others, the use of appropriate moving equipment, and proper lifting
techniques.
·Ensure you have a secure, comfortable grip on the instrument or accessory.
·Make sure that the path from where the object is to where it is being moved is clear of
obstructions.
·Do not lift an object and twist your torso at the same time. Keep your spine in a good neutral
position while lifting with your legs.
·Participants should coordinate lift and move intentions with each other before lifting and carrying.
·For smaller packages, rather than lifting the object from the packing box, carefully tilt the box on its
side and hold it stationary while someone else slides the contents out of the box.
Electrical safety
WARNING! Do not overfill trays with liquid. Excess liquid can overflow into the control unit and
possibly cause electrical shock. Follow the appropriate instructions for reagent amounts and empty
any remaining liquid in the waste containers upon run completion.
WARNING! Use outside of the workflows described in this manual may put the operator at risk
of dangerous exposure to electrical shock. Do not use this instrument for any purposes or in any
configurations not described in this manual.
WARNING! Ensure appropriate electrical supply. For safe operation of the instrument:
·Plug the system into a properly grounded receptacle with adequate current capacity.
·Ensure the electrical supply is of suitable voltage.
·Never operate the instrument with the ground disconnected. Grounding continuity is required for
safe operation of the instrument.
WARNING! Power Supply Line Cords. Use properly configured and approved line cords for the
power supply in your facility.
WARNING! Disconnecting Power. To fully disconnect power either detach or unplug the power
cord, positioning the instrument such that the power cord is accessible.
Appendix A Safety
Instrument safety
A
18 Bandmate™Automated Western Blot Processor User Guide

Cleaning and decontamination
CAUTION! Cleaning and Decontamination. Use only the cleaning and decontamination methods
that are specified in the manufacturer user documentation. It is the responsibility of the operator (or
other responsible person) to ensure that the following requirements are met:
·No decontamination or cleaning agents are used that can react with parts of the equipment or with
material that is contained in the equipment. Use of such agents could cause a HAZARD condition.
·The instrument is properly decontaminated a) if hazardous material is spilled onto or into the
equipment, and/or b) before the instrument is serviced at your facility or is sent for repair,
maintenance, trade-in, disposal, or termination of a loan. Request decontamination forms from
customer service.
·Before using any cleaning or decontamination methods (except methods that are recommended by
the manufacturer), confirm with the manufacturer that the proposed method will not damage the
equipment.
Instrument component and accessory disposal
To minimize negative environmental impact from disposal of electronic waste, do not dispose of
electronic waste in unsorted municipal waste. Follow local municipal waste ordinances for proper
disposal provision and contact customer service for information about responsible disposal options.
Safety and electromagnetic compatibility (EMC) standards
The instrument design and manufacture complies with the following standards and requirements for
safety and electromagnetic compatibility.
Safety standards
Reference Description
EU Directive 2014/35/EU European Union “Low Voltage Directive”
IEC 61010-1
EN 61010-1
UL 61010-1
CAN/CSA C22.2 No.
61010-1
Safety requirements for electrical equipment for measurement, control, and laboratory
use – Part 1: General requirements
Appendix A Safety
Safety and electromagnetic compatibility (EMC) standards A
Bandmate™Automated Western Blot Processor User Guide 19

EMC standards
Reference Description
EU Directive 2014/30/EU European Union “EMC Directive”
EN 61326-1
IEC 61326-1
Electrical Equipment for Measurement, Control and Laboratory Use – EMC
Requirements – Part 1: General Requirements
AS/NZS CISPR 11 Limits and Methods of Measurement of Electromagnetic Disturbance Characteristics
of Industrial, Scientific, and Medical (ISM) Radiofrequency Equipment
ICES-001, Issue 4 Industrial, Scientific and Medical (ISM) Radio Frequency Generators
FCC Part 15 Subpart B (47
CFR)
U.S. Standard Radio Frequency Devices
This equipment has been tested and found to comply with the limits for a Class
A digital device, pursuant to part 15 of the FCC Rules. These limits are designed
to provide reasonable protection against harmful interference when the equipment
is operated in a commercial environment. This equipment generates, uses, and can
radiate radio frequency energy and, if not installed and used in accordance with
the instruction manual, may cause harmful interference to radio communications.
Operation of this equipment in a residential area is likely to cause harmful interference
in which case the user will be required to correct the interference at his own expense.
This equipment has been tested and found to comply with the limits for a
Class B digital device, pursuant to part 15 of the FCC Rules. These limits are
designed to provide reasonable protection against harmful interference in a residential
installation. This equipment generates, uses and can radiate radio frequency energy
and, if not installed and used in accordance with the instructions, may cause
harmful interference to radio communications. However, there is no guarantee that
interference will not occur in a particular installation. If this equipment does cause
harmful interference to radio or television reception, which can be determined by
turning the equipment o and on, the user is encouraged to try to correct the
interference by one or more of the following measures:
•Reorient or relocate the receiving antenna.
•Increase the separation between the equipment and receiver.
•Connect the equipment into an outlet on a circuit dierent from that to which the
receiver is connected.
•Consult the dealer or an experienced radio/TV technician for help.
This equipment has been designed and tested to CISPR 11 Class A. In a domestic
environment it may cause radio interference, in which case, you may need to take
measures to mitigate the interference.
Do not use this device in close proximity to sources of strong electromagnetic
radiation (e.g. unshielded intentional RF sources), as these can interfere with the
proper operation.
Appendix A Safety
Safety and electromagnetic compatibility (EMC) standards
A
20 Bandmate™Automated Western Blot Processor User Guide
This manual suits for next models
1
Table of contents
Other Invitrogen Laboratory Equipment manuals
Popular Laboratory Equipment manuals by other brands

BASENHURT
BASENHURT Tebas-Economic EFka300 pH/Chlor Installation and maintenance instructions

Rice Lake
Rice Lake TP Series Technical manual

Lifeguard Aquatics
Lifeguard Aquatics AquaStep PRO R440515 instruction manual

Shimadzu
Shimadzu Shim-pack GIST Series instruction manual

Sakura Seiki
Sakura Seiki Cyto-Tek 2500 operating manual

DIGISYSTEM
DIGISYSTEM DSC-302SMD instruction manual