Alpha PSC-150 User manual

Part No: PSC-150
Version 1
103 Bauer Drive, Oakland, NJ 07436 • 800-648-7229 • Fax: 800-286-0114
www.alpha-tools.com
Alpha®6” Pneumatic
Stone Cutter Instruction
Manual
MANUAL

2
TABLE OF CONTENTS
Introduction.......................................................................................... 3
About the Symbols .............................................................................. 3
Safety Instructions for Power Tools ..................................................... 4
PSC-150 Overview.............................................................................. 6
Specications................................................................................. 7
Accessories ......................................................................................... 7
Additional Precautions for Using the Pneumatic Stone Cutter ............ 8
Air Pressure and Volume................................................................ 9
Rust Protection............................................................................... 9
Cleaning the Rotor Assembly ......................................................... 9
How to Add the Rust Inhibitor Oil ................................................. 10
Filter/Regulator System..................................................................... 11
Water Control Valve........................................................................... 12
Air Supply Hose Assembly ................................................................ 12
Water Supply Hose Assembly ........................................................... 12
Arbor Size.......................................................................................... 12
Sound Level....................................................................................... 12
Attaching the Side Handle................................................................. 13
Height Adjustment ............................................................................. 13
Mounting Diamond Wheels ............................................................... 14
Cutting Angle Adjustment .................................................................. 15
Operation........................................................................................... 16
Connecting (Air & Water Hoses to PSC-150).................................... 16
Straight Cutting.................................................................................. 17
Curve Cutting Application (Using Step-Cutting Method).................... 18
PSC-150 Pneumatic Stone Cutter Schematic - 1.............................. 20
PSC-150 Pneumatic Stone Cutter Schematic - 2.............................. 21
PSC-150 Pneumatic Stone Cutter Parts List..................................... 22
Accessories and Factory Service ...................................................... 26
Product Registration.......................................................................... 27

3
INTRODUCTION
Thank you for purchasing an Alpha® PSC-150 Pneumatic Stone Cutter.
Please read this instruction manual thoroughly to ensure safe and correct
use of the Pneumatic Stone Cutter. Keep this manual in a place where
operators can access it easily whenever necessary.
ABOUT THE SYMBOLS
According to the hazard level, all safety notes in this manual are
classied into “DANGER”, “WARNING”, and “CAUTION”.
DANGER! Death or serious personal injury is imminent when
handling this pneumatic stone cutter incorrectly.
WARNING! There is a possibility of death or serious personal
injury when handling this pneumatic stone cutter
incorrectly.
CAUTION! There is a possibility of personal injury or property
damage when handling this pneumatic stone
cutter incorrectly.
Note: In some situations, failing to observe WARNING notes could result
in death or serious personal injury. Be sure to read and observe
the safety notes to ensure safety and correct use of the pneumatic
stone cutter.

4
SAFETY INSTRUCTIONS FOR POWER TOOLS
1. KNOW YOUR POWER TOOL. Read owner’s manual carefully.
Learn its applications and limitations as well as specic potential
hazards particular to this tool.
2. KEEP WORK AREA CLEAN. Cluttered areas and benches invite
accidents.
3. AVOID DANGEROUS ENVIRONMENTS. Keep work areas as dry
as possible. Do not use tool in presence of ammable liquids or
gases. Keep the area well lit.
4. KEEP CHILDREN AND VISITORS AWAY. All visitors should be kept
a safe distance from the work area. Keep out of reach of children.
5. DON’T FORCE TOOL. It will do the job better and safer at the rate
for which it was designed.
6. WEAR PROPER APPAREL. Do not wear loose clothing or jewelry
as it can get caught in moving parts. Rubber gloves and insulated
non-skid footwear are recommended. Wear protective covering to
contain long hair.
7. WEAR PROPER EYE PROTECTION. All users and bystanders
must always wear proper personal eye protection which conform with
ANSI/ISEA Z87.1 (CAN/CSA Z94.3). Also use a face or dust mask if
operation is dusty. Always wear certied safety equipment.
8. WEAR PROPER EAR PROTECTION. All users and bystanders
must wear proper personal ear protection which conforms with ANSI
S12.6 (S3.19) hearing protection.
9. WEAR PROPER RESPIRATORY PROTECTION. All users and
bystanders must wear proper personal respiratory protection. Always
use NIOSH/OSHA approved respiratory protection appropriate for the
dust exposure.
Warning: Some dust created by power sanding, sawing, grinding, drilling,
polishing and other construction activities contains chemicals known to the
State of California to cause cancer, birth defects, or other reproductive harm.
Some examples of these chemicals are:
- Lead from lead-based paints
- Crystalline silica from bricks, cement and other masonry products, and
- Arsenic and chromium from chemically-treated lumber.

5
Your risk from these exposures varies, depending on how often you do this
type of work. To reduce your exposure, work in a well ventilated area, and
work with approved safety equipment, such as dust masks that are specially
designed to lter out microscopic particles.
To familiarize with the risks associated with a material, consult with your
employer, manufacturer/supplier and government agencies regarding the
hazards of the materials and their recommendations to protect yourself.
10. DON’T ABUSE WATER SUPPLY HOSE. Don’t carry tool by supply
hose or expose to trafc areas where it can be crushed.
11. ALWAYS SECURE WORK PIECE. Use clamps or a vise to hold
work. It’s safer than using your hand and it frees both hands to
operate tool.
12. DON’T OVERREACH. Keep proper footing and balance at all times.
13. DISCONNECT TOOLS WHEN NOT IN USE. Always disconnect
tool before servicing when changing blades.
14. REMOVE ADJUSTING KEYS AND WRENCHES. Form a habit of
checking to see that keys and adjusting wrenches are removed from
tool before turning it on.
15. MAINTAIN TOOLS WITH CARE. Keep tools clean at all times for
best and safest performance. Follow instructions for lubricating and
changing accessories. Keep handles dry, clean and free of oil or
grease. Inspect moving parts for alignment and binding as well as
for breakage and improper mounting.
16. AVOID ACCIDENTAL STARTING. Do not carry a “connected” tool,
or make adjustments, or change discs without making sure the tool
is disconnected from the air supply.
17. USE ONLY RECOMMENDED ACCESSORIES. The use of any
accessories other than what is listed or recommended for this
particular tool may be hazardous.
18. KEEP HANDS AWAY FROM ALL MOVING PARTS.
19. USE SIDE HANDLES. Supplied with tool for control and safety.
20. STAY ALERT. Watch what you are doing and use common sense.
Do not operate tool when you are tired, or under the inuence of
medication or alcohol.

6
6” PNEUMATIC STONE CUTTER OVERVIEW
Angle
Adjustment
Water Nozzle

7
SPECIFICATIONS:
Air Pressure .............................................................................90 PSI
Air Consumption Min ................................................. 32 CFM / 1HP*
Air Consumption Max ..................................................48 CFM / 2HP
No Load RPM ........................................................................... 8,500
Air Inlet...............................................................................3/8” BSPP
Water Inlet..........................................................................1/4” BSPP
Arbor ............................................................................... 7/8” / 22mm
Max HP ..........................................................................................2.0
Cutting Disc Diameter..................................................................... 6”
COMPONENTS
1. Flanges ............................................................................ 3 pcs
2. Bolts (M6X30 Left) / (M6x20 Left) .................................... 2 pcs
3. Side Handle .......................................................................1 pc
4. Combination Wrench (9mm) ..............................................1 pc
5. Hex Wrench (5mm)............................................................1 pc
6. Open End Spanner Wrench (22mm)..................................1 pc
7. Air Hose (15ft / 4.5m).........................................................1 pc
8. Water Hose (15ft / 4.5m)....................................................1 pc
9. Rust Inhibitor Oil (8oz / 237ml) (AIR-008)..........................1 pc
10. Alpha® Eclispe II 6” Blade (DEE006) .................................1 pc
ACCESSORIES
Figure-3
Bolt (M6x30-Left)
Bolt (M6x20-Left)
FLANGE I FLANGE II FLANGE III
* To control the amount of CFM required, use the reduced ow air inlet tting 3001-0084.

8
ADDITIONAL PRECAUTIONS FOR USING
THE PNEUMATIC STONE CUTTER
In addition to the general safety notes described on the preceding pages,
please read and observe the following precautionary notes before using
the pneumatic stone cutter.
DANGER!
INSTRUCTIONS
Alpha Professional Tools® provides the highest quality parts and manufactur-
ing techniques in the manufacture of this tool. In order to obtain the maximum
effectiveness and provide the highest degree of safety, it is necessary to
review and follow these instructions carefully before using the tool.
SAFETY ADVICE
• Please note safety instructions on Page 4-5.
• Always disconnect the air line before making any changes to the set-
tings or carrying out maintenance.
• Keep water and air lines clear from working range of the machine. These
lines should always lead away from you and behind the operating area.
• Before use, check the machine, hose and ttings for any damage or
material fatigue, only authorized service agents should carry out repairs.
• Always wear safety glasses and respiratory protection when working
with this machine. It is further recommended to wear safety gloves,
apron, as well as sturdy non-slipping shoes.
• Only use saw blades whose permitted speed is at least as high as the
highest no-load speed of the machine.
• Be sure saw blade ts the tool properly and securely. Do not modify the
tool to force t the blade. For example, do not remove blade guard.
• Check blades before use. The saw blade must be properly mounted
and turn freely. Perform a test run for at least 30 seconds without any
load. Do not use damaged, out of round or vibrating blades.
• Immediately switch off the machine in case of considerable vibrations
or if other malfunctions occur. Check the machine in order to nd out
the cause.
• Always use and store the saw blades according to the manufacturer’s
instructions. The ange bolt must be tightened before starting to work
with the machine.
• The work piece must be secured if it is not heavy enough to prevent
movement.
• The tool is designed for cutting on horizontal surfaces.

9
AIR PRESSURE AND VOLUME
The recommended air pressure for this stone cutter is 90 PSI. The most
important factor in running this stone cutter is the volume of air being sup-
plied to the stone cutter. The volume is the air consumption needed to run
this stone cutter at a constant speed under light downward hand pressure.
The volume is measured in CFM (cubic foot per minute (ft3/min)). You need
a minimum of 32 CFM to run this tool at the 1 HP rating. Alpha® recom-
mends running the tool at the maximum ow volume of 48 CFM to get the
full 2 HP rating out of the stone cutter.
It is also very important to keep your air cool, dry, and clean, so look for
a compressor with a refrigerated dryer and high-efciency lter built-in or
purchase a separate air dryer and lter unit rated for your compressors
CFM. (See page 11 for Alpha®Filter/Regulator Manifold System)
RUST PROTECTION (A rust inhibitor oil is used to protect the tool
from rusting when not in use)
PROPER CARE AND MAINTENANCE ARE IMPORTANT FACTORS IN
PREVENTING THIS TOOL FROM RUSTING ON THE INSIDE WHEN
NOT IN USE.
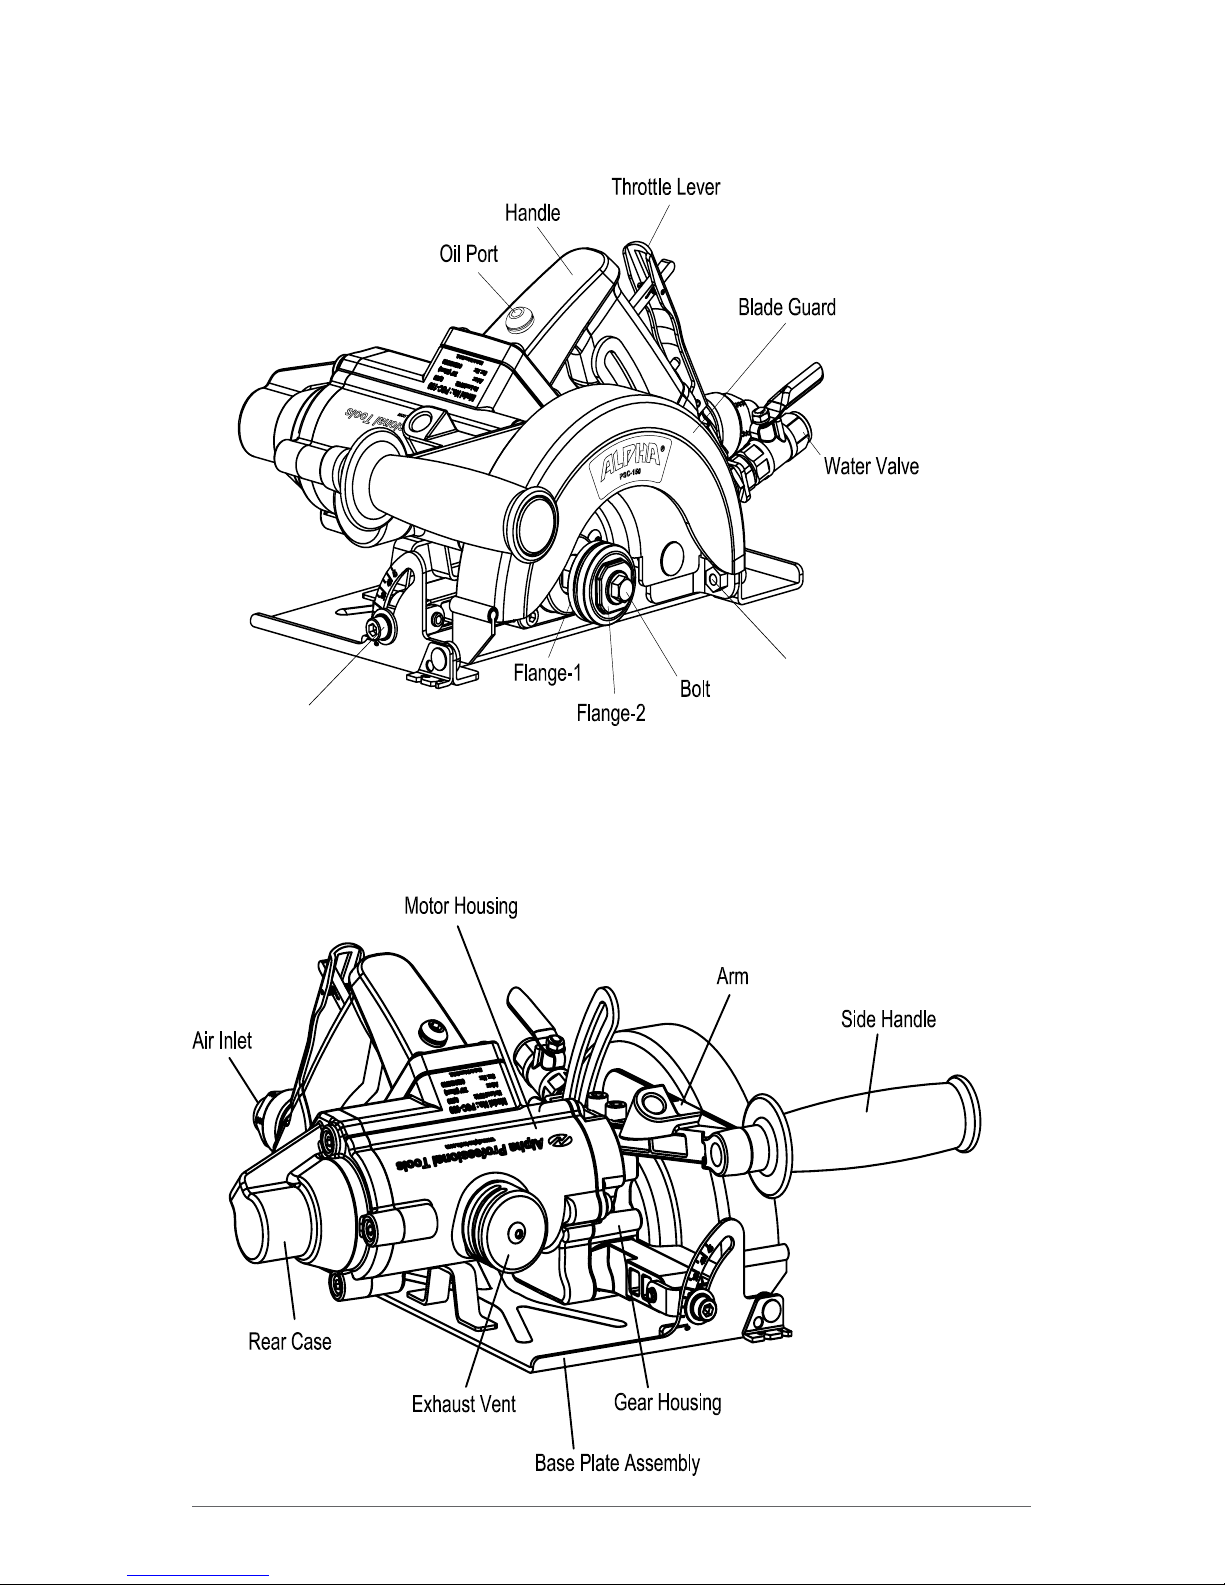
At the end of each workday, place 5-6 drops of rust inhibitor oil (included
with each stone cutter) into the tool using the oil port. Depress the throttle
lever varying the speed from very low to half speed, for a minute or two.
This will allow the oil to transition into the rotor assembly and coat the
inside of the tool.
CLEANING THE ROTOR ASSEMBLY
Over time, the rotor assembly can ll up with oil sludge, vane dust residue,
and contamination and will need to be cleaned. To accomplish this remove
the mufer assembly from the tool to allow the waste to exit. You can hold a
paper towel over the exit port to reduce the sound level and catch the exit-
ing waste. Add 10 to 20 drops of oil to the oil port and run the tool varying
the speed from very slow to half speed for two to three minutes to allow the
oil to process through the machine. Check the paper towel for exit waste,
continue until there is little to no exit waste.
Run the tool at its slowest speed. If the tool sounds like it is running with
a variation in speed, this is an indication that one of the vanes is still stick-
ing in the rotor. Repeat the process to see if this will correct the variation
in sound. If the problem continues, contact an authorized Alpha®Repair
Center for routine repair and maintenance.

10
HOW TO ADD THE RUST INHIBITOR OIL
1. Disconnect the stone cutter from your air supply.
2. Remove the screw (Part No.
3001-0061) using the supplied Hex
Wrench (5mm). (See Fig. 1)
3. Add 5-6 drops of the Rust Inhibitor
Oil into the oil port. (See Fig. 2)
4. Reinstall the Oil screw (Part
No.3001-0061).
5. Reconnect the pneumatic stone
cutter to your air supply.
6. Depress the throttle lever (Part No.
3001-0071) varying the speed from
very low to half speed, for a minute
or two. (See Fig. 3)
Replacement Rust Inhibitor Oil can be purchased from Alpha® Professional
Tools (Part No. AIR-008).
Figure 1
Figure 2
Figure 3
Figure 3

11
CAUTION!
Lubricating the stone cutter before and during work is not needed. Exces-
sive oil will turn to a tar-like substance inside the tool, causing the vanes
to stick in the rotor and slow the tool down. This is the reason we do not
recommend automatic oilers to be used with this stone cutter. Old or worn
compressors, which emit oil through the air lines, can signicantly shorten
the life of the tool.
HELPFUL HINT:
• Air throttle lever should be pressed and released slowly to
allow the stone cutter to accelerate and decelerate during all
applications. Rapid acceleration and deceleration can wear
out the ball bearings prematurely.
HELPFUL HINT:
• Using a Filter Regulator System i s
Recommended
FILTER/REGULATOR SYSTEM
Having a Filter/Regulator (See Fig. 4)
helps prevent pressure drops when
using a large volume of air, so you
can set the pressure to the tools at 85
to 90 PSI, while the main system can
run at 125 PSI. The F/R unit will also
remove any water from the air supply while
also ltering the air of contamination down to ve microns. By only using
aluminum and brass after the F/R unit, you are eliminating any rust and
contamination from getting into the air tools.
Alpha® recommends the F/R Manifold 106 CFM for use with the PSC-150
stone cutter. (Part Nos. 1030-0023/1030-0024). All F/R manifolds are
available through our distributor network, and via our website.
Figure 4

12
WATER CONTROL VALVE
This valve lets you adjust the ow of water to the blade. When storing the
stone cutter overnight, open the valve and drain all water from the supply
hose and tool.
AIR SUPPLY HOSE ASSEMBLY
The new 1/2” x 15’ exible air hose has a 3/8” Male NPT threaded tting
to connect to your air supply. This hose is composed of a premium hybrid
polymer that allows the hose to avoid kinking and remains exible down
to -40°F.
WATER SUPPLY HOSE ASSEMBLY
The new 1/4” x 15’ exible water hose has a 3/4”-11 GHT (Garden Hose
Thread) tting to connect to your water supply. This hose is composed of a
premium hybrid polymer that allows the hose to avoid kinking and remains
exible down to -40°F.
ARBOR SIZE
The Alpha® PSC-150 Pneumatic Stone Cutter features 7/8” / 22mm arbor
anges.
Maintenance and Usage Tip:
• Do not leave the stone cutter submersed in water. This could
expose the inner moving parts to moisture, which will shorten
the life of the stone cutter.
• Excessive force or impact to the spindle may result in
premature failure of gears and/or bearings, which may not be
immediately evident.
SOUND LEVEL (HEARING PROTECTION MUST BE WORN)
To comply with OSHA Occupational Noise Exposure Standard Number
1926.52, this tool is equipped with an internal Silencer System. When the
tool is operated correctly at 90 PSI, the sound level emitted should be less
than 91.3 dBA. The internal Silencer System is also used to maintain a
constant back pressure inside the tool; this helps prevent it from exceeding
the recommended 8,500 RPM. The exhaust deector for this stone cutter
also helps to reduce the noise level by venting the exhaust air.

13
ATTACHING THE SIDE HANDLE
Attach the handle into one of the three appointed locations on the arm
(Part No. 3001-0015) for the best comfort for stability during the cutting
application. (See Fig. 5)
Position 1 Position 2
Position 3
HEIGHT ADJUSTMENT
Height adjustment is possible if you need to raise the PSC-150 body to
control the depth of cut.
1. Loosen the clamping lever (Part
No. 3001-0057) and lift the
main body. When you reach the
desired cutting depth, tighten
the adjustment lever.
Adjustment Lever
Figure 5
Figure 6

14
MOUNTING DIAMOND WHEELS
STRAIGHT BLADE INSTALLATION
CURVE CUTTING BLADE INSTALLATION
Figure 7
Figure 8

15
CUTTING ANGLE ADJUSTMENT
The PSC-150 is capable of making angled bevel cuts up to 45 degrees. To
set the tool to the desired angle, follow the steps below.
1. Loosen both the screws of the front and rear using the Hex. wrench.
2. Tilt the PSC-150 to the desired angle.
3. When the cutting angle is decided, re-tighten the screws.
Figure 9
Figure 10

16
OPERATION
THROTTLE OPERATION
Press the safety bar forward to unlock the spring mechanism. Grip the body
in a way that the throttle lever (Part No. 3001-0071) is depressed to activate
the motor. Releasing the throttle lever shuts down the motor.
CONNECTING (AIR & WATER) HOSES TO PSC-150
Figure 11 Figure 12
Figure 13
Water Hose
Air Hose

17
STRAIGHT CUTTING
1. One-pass cutting can be performed on all thickness materials using
the PSC-150. (2cm, 3cm & 4cm thickness materials)
NOTE: ALPHA® ALWAYS RECOMMENDS STEP-CUTTING
2. Adjust the amount of water-ow to cool the blade and remove the waste.
3. Set the base plate on the work piece and align to the cutting mark on
the base plate to cut line on the material.
4. Press the throttle level and allow the stone cutter to attain full speed
before starting to cut.
5. Advance the stone cutter slowly allowing the blade to do the work,
keeping the base plate at on the stone and the cut mark in line with
your cut line. (See Fig. 14)
Figure 14

18
CURVE CUTTING APPLICATION
(USING STEP-CUTTING METHOD)
WARNING!
Support the sink cutout area; sinkhole cutout piece may drop to the
oor at the end of cutting application, if not supported.
1. Support the sink cutout area prior to cutting; otherwise, the work piece
may drop to the oor at the end of the cutting application.
2. Use the Alpha® Contour Cutting blade only. Application with inferior
blades may cause damage to the stone cutter.
3. Plunge Cut into the material until the base of the stone cutter makes
ush contact with the material, then proceed to cut the bowl cut-out
following the step-cutting process.
4. Do not force the stone cutter during the cutting application. Allow the
blade to cut at its own pace. Excessive force may damage the stone
cutter.
HELPFUL HINT:
The PSC-150 can accept a 4-1/2”, 5” and 6” Curve Cutting Blades.

19
Figure 15
Figure 16
Figure 17
Score along the cutting line (1/3
width of stone).
Step-cut along scored line (2/3
width of stone).
Plunge cut all the way to make full
contact between bottom plate and
stone, then maintain even cutting
pressure to follow curved cut line.
STEP 1
STEP 2
STEP 3

20
92
91
93
ALPHA®PSC-150 6” PNEUMATIC STONE CUTTER
SCHEMATIC
ADDITIONAL AVAILABLE SIZES FOR THE ALPHA® AIR
AND WATER HOSE ASSEMBLY
PART NO. LENGTH DESCRIPTION
1030-0030 15./4.5m Water Hose
1030-0031 15./4.5m Air Hose
1030-0032 20./6.0m Water Hose
1030-0033 20./6.0m Air Hose
1030-0034 25./7.6m Water Hose
1030-0035 25./7.6m Air Hose
1030-0036 30./9.1m Water Hose
1030-0037 30./9.1m Air Hose
1030-0038 35./10.6m Water Hose
1030-0039 35./10.6m Air Hose
1030-0040 40./12.1m Water Hose
1030-0041 40./12.1m Air Hose
Figure 18
Water Hose
Air Hose
Table of contents
Other Alpha Cutter manuals
Popular Cutter manuals by other brands

Tracmaster
Tracmaster CAMON TC07 Operating instructions & safety notes

ALFRA
ALFRA VKS 125 Operation manual

KRUG+PRIESTER
KRUG+PRIESTER EBA 4855 operating instructions

Hitachi
Hitachi CL 10D2 Handling instructions

EINHELL
EINHELL TE-TC 920 UL Original operating instructions

Interpump
Interpump Hydralok HCLMOBILE user manual