Alternate Mode malletKAT User manual

malletKAT User Manual (ver.07-17-18)
by Alternate Mode Product Documentation
1 / 109

malletKAT User Manual (ver.07-17-18)
1. Introduction ................................................................................................... 4
1.1. Basic Performance Features ....................................................................... 5
1.2. Advanced Performance Features ................................................................ 5
1.3. What's New? .............................................................................................. 7
2. Quick Start Guide ......................................................................................... 8
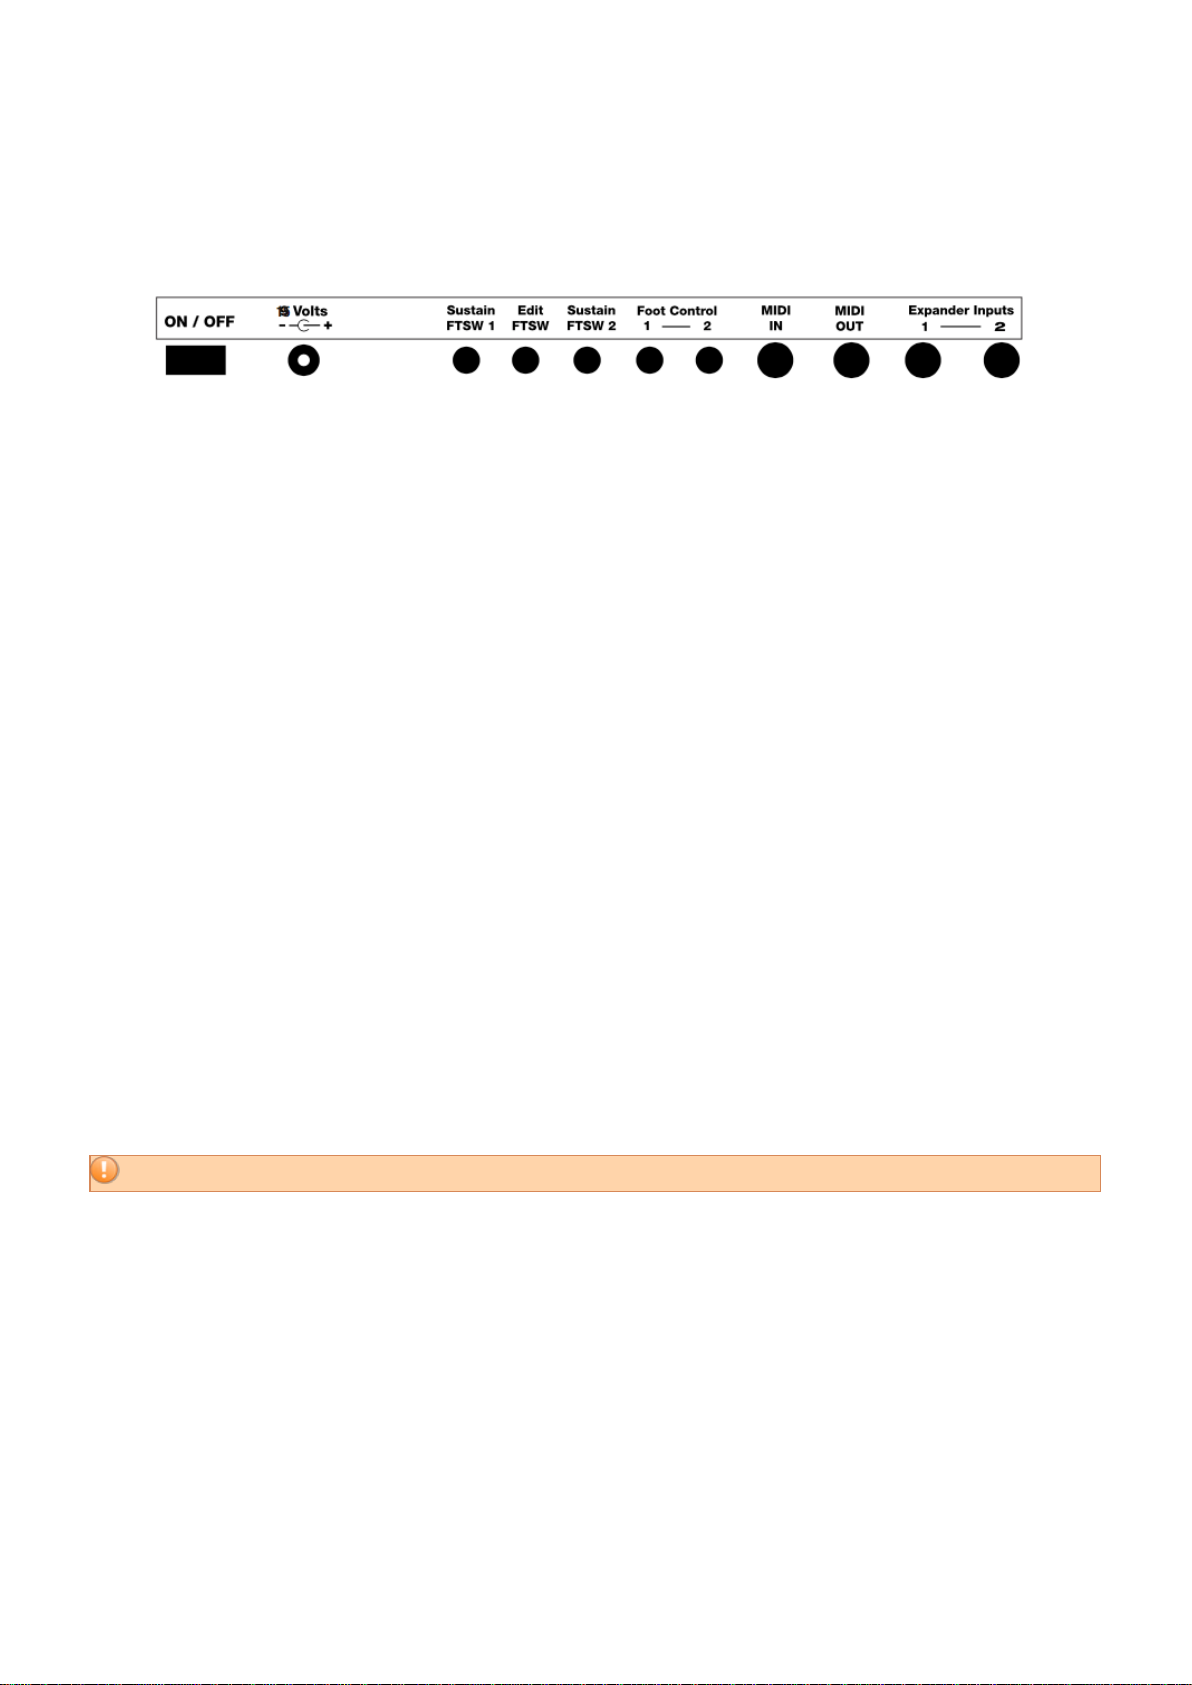
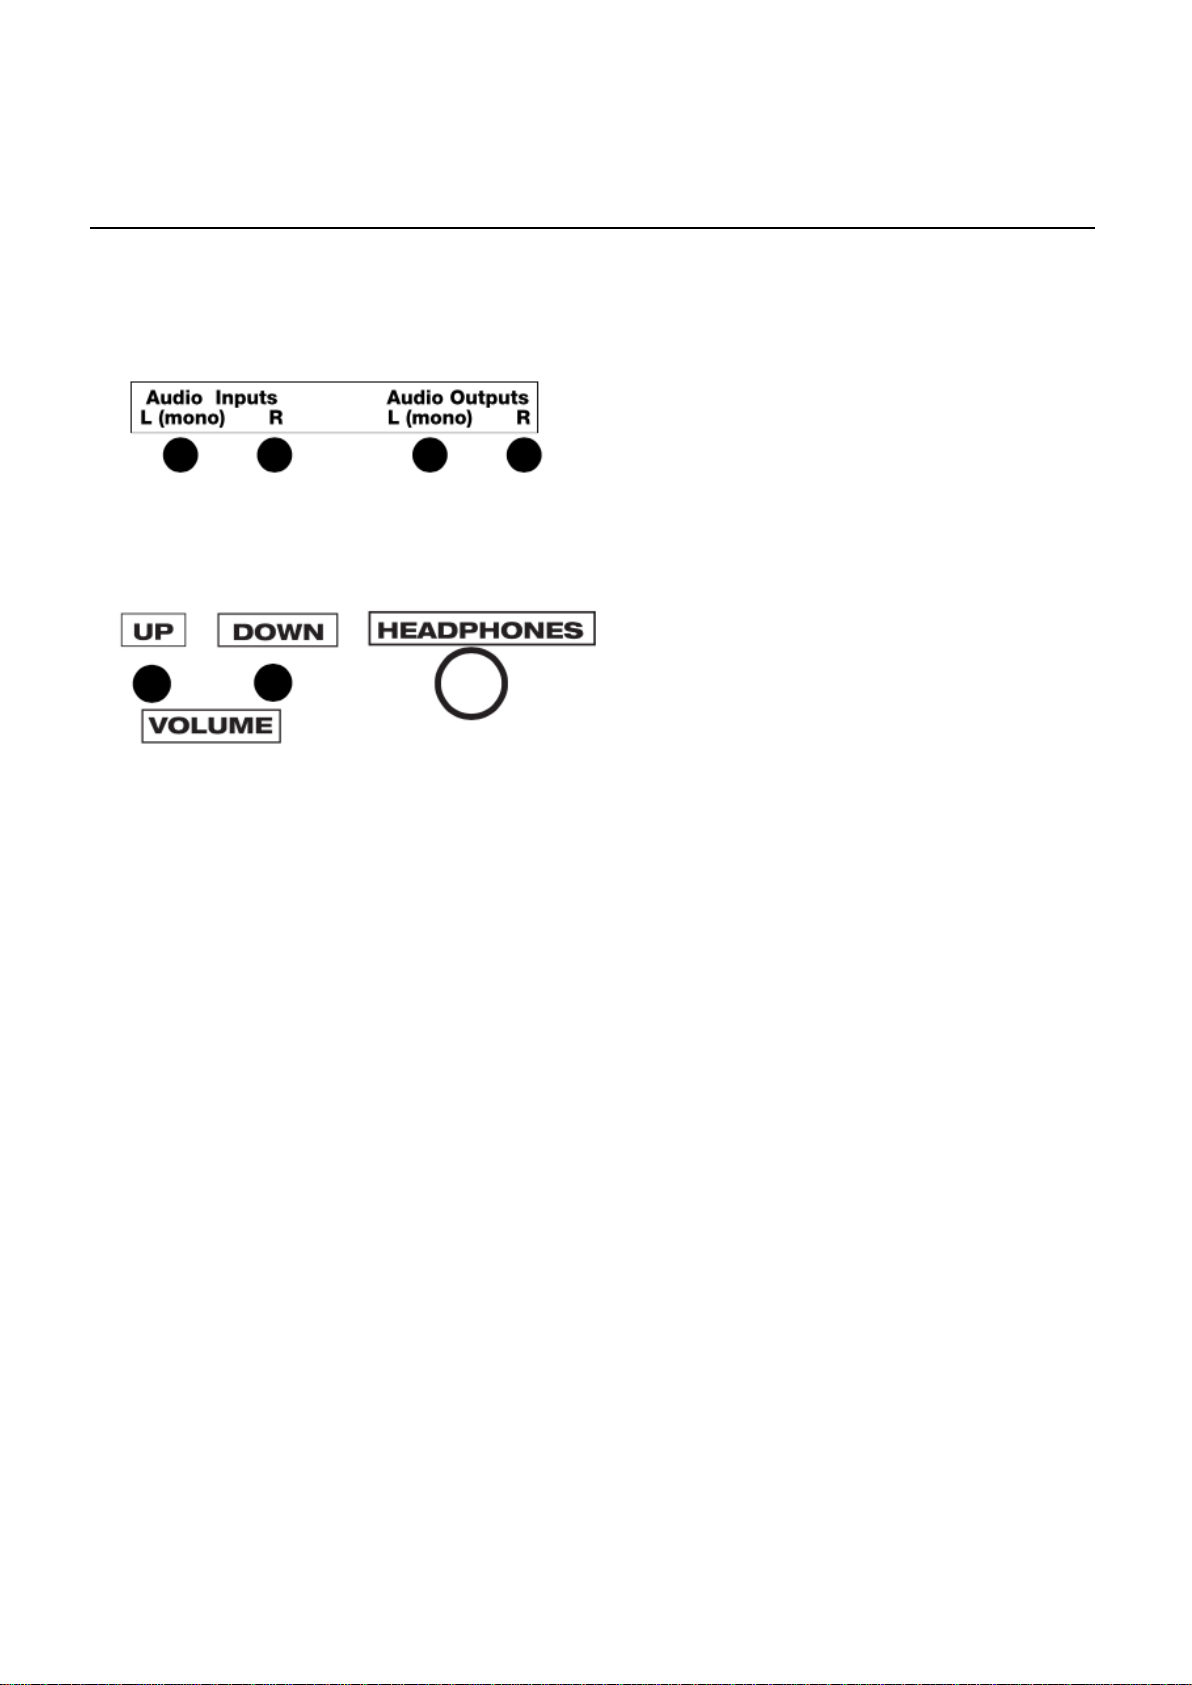
2.1. Back Panel Connections ............................................................................. 9
2.2. Using the malletKAT Internal Sound Card ................................................... 10
2.3. Connecting to an iOS/Android Device ......................................................... 10
2.4. Connecting to an External Synthesizer........................................................ 11
2.5. Connecting to a Computer/DAW................................................................. 11
3. malletKAT Essentials ................................................................................. 12
3.1. How The malletKAT Works ....................................................................... 12
3.2. User Setups, Factory Setups, and Chains .................................................. 15
3.3. Reading The malletKAT Screen ................................................................ 17
4. Important Settings Everyone Should Know ............................................. 20
4.1. How to Access & Edit malletKAT Settings .................................................. 20
4.1.1. malletKAT EXPRESS - Accessing Editing Functions .................................. 23
4.2. Switching Between Factory Setups, User Setups, and Chains ..................... 24
4.3. Changing User Kits - a Shortcut! ............................................................... 24
4.4. Training Your malletKAT To Your Playing Style .......................................... 25
4.5. Adjusting Pad Thresholds ......................................................................... 30
4.6. How to Program Controller Two to Use a Different Sound ........................... 33
4.7. Shifting the Octave Range ........................................................................ 33
4.8. Adjusting MIDI Volume ............................................................................. 34
4.9. Adjusting Note Sustain (Gate Time) ........................................................... 34
4.10. How to Create a Chain............................................................................ 34
4.11. How to Create a Split .............................................................................. 35
4.12. The malletKAT is Not Retaining Changes When Turned Off ...................... 37
4.13. Protecting/Saving the malletKAT Memory ................................................ 38
4.14. Reinitializing the malletKAT ..................................................................... 39
5. User Setup Playing Modes......................................................................... 40
5.1. Pressure Modes (Normal/Dampen/DeadStroke/Aftertouch) ......................... 40
5.2. Monophonic/Polyphonic Modes ................................................................. 42
5.3. Layer Modes ............................................................................................ 43
5.3.1. Hang Mode ......................................................................................... 44
5.3.2. Blend Mode ......................................................................................... 45
5.3.3. Split Mode ........................................................................................... 45
5.3.4. Double Mode ....................................................................................... 46
2 / 109

malletKAT User Manual (ver.07-17-18)
5.3.5. Melodic Chord Mode ............................................................................. 46
5.3.6. Velocity Shift Mode ............................................................................... 47
5.3.7. Alternate Mode .................................................................................... 48
5.4. Warp Mode .............................................................................................. 48
6. Working With User Kits .............................................................................. 48
6.1. Setting Up The Controllers ........................................................................ 49
6.2. Setting Up the Sustain Pedal Inputs........................................................... 53
6.3. Using the Foot Controller Inputs ................................................................ 54
6.4. Working With Gate Settings ...................................................................... 56
6.5. Note Reassignments (Reassignment Layer)............................................... 59
6.6. RTC - Real Time Controller ....................................................................... 64
6.7. Pitch Wheel.............................................................................................. 69
6.8. Virtual Control Wheel ................................................................................ 70
7. Full malletKAT Programming Guide ......................................................... 71
7.1. Editing Functions - Pad Shortcuts .............................................................. 71
7.2. Global Auxiliary Screens (Alphabetical)...................................................... 81
7.3. Kit Auxiliary Screens (Alphabetical) ........................................................... 93
7.4. MIDI IN and MIDI Routing ......................................................................... 98
7.5. Using the Metronome in "Groove Mode" ................................................... 100
7.6. Using Warp Mode................................................................................... 103
8. Additional Useful Info............................................................................... 104
8.1. Understanding External Synthesizer Program Changes ............................ 104
8.2. Why is There No USB Port on my malletKAT? ......................................... 105
8.3. Velocity Curves ...................................................................................... 106
8.4. MIDI Note Numbers ................................................................................ 106
8.5. MIDI Continuous Control Number (CC) Definitions.................................... 107
3 / 109

malletKAT User Manual (ver.07-17-18)
1. Introduction
Version: malletKAT 8.1
(see “What’s New” in Section 1.3(https://alternatemode.com/online-docs/malletkat/#whats-new)
)(https://alternatemode.com/online-docs/malletkat/#whats-new)
Online Manual Revised: 1/31/2019
Congratulations! You have purchased the world’s most powerful MIDI
mallet percussion controller.
The MalletKAT is a powerful MIDI controller that is designed to capture your playing
gestures and performance. It transforms your performance into musical notes (MIDI
data), and captures the details of dynamics, pressure, speed, dampening, pitch bend,
vibrato, etc. — creating an incredible musical representation of your playing. It is this
attention to nuance and detail that makes this instrument so enjoyable to play. It is by
far the most powerful percussion controller ever created.
This latest edition of our manual was based on feedback from numerous beginners and professionals with widely
varying degrees of experience with electronic percussion.
First impressions are the most powerful, and we want you to start on the right foot. So let’s start here:
You do NOT need an advanced technical degree to use your malletKAT!
Start Playing Right Now:
Those that wish to get their feet wet sooner than later will find that you can start performing music with your
malletKAT straight out of the box in minutes by visiting the Quick Start
Guide(https://alternatemode.com/online-docs/malletkat/#quick-start-guide)
section.
Discover What the malletKAT Can Do:
The remainder of the introduction will talk about the unique and exclusive capabilities of your new malletKAT,
including what’s new in the latest edition of the instrument firmware.
…and Discover How the malletKAT Can Do It:
The malletKAT
Essentials(https://alternatemode.com/online-docs/malletkat/#essential-information-to-understand-your-malletkat)
section gives an broad overview of the capabilities of the malletKAT, as well as an overview of important
essential concepts of how the malletKAT works.
The most popularly demanded features of the malletKAT appear in the Important Settings Everyone Should
4 / 109

malletKAT User Manual (ver.07-17-18)
Know(https://alternatemode.com/online-docs/malletkat/#settings-everyone-should-know)
section.
Learn how the malletKAT’s various Playing
Modes(https://alternatemode.com/online-docs/malletkat/#playing-modes)
can expand your creativity and expression.
For everything else, there is the Programming Guide(https://alternatemode.com/online-docs/malletkat/#full-
malletkat-programming-guide)
.
1.1. Basic Performance Features
Individual Pad Training
Everyone plays differently. The MalletKAT has a feature that “learns” your playing style. When you train it, the
MalletKAT converts your softest and hardest hits from 256 possible levels into the 128 velocity dynamics that’s
offered in MIDI. This gives the instrument the widest dynamic range possible.
Dynamic Articulations
Every Kit stores a set of minimum and maximum velocity ranges along with velocity curves to get the instrument
dynamics tailored to personal taste. Dynamics can be used to change a sound at a particular velocity point.
Besides setting any “gate” length of a sound, dynamics can also control how long a sound speaks. These “gate
time settings” can also be controlled by a foot or breath controller. The MalletKAT can detect “rolls” and instructs
the software to let the notes ring so they don’t have the machine gun effect heard on other devices. This is
extremely useful when playing timpani or cymbal swells.
Acoustic Emulations
The MalletKAT can recognize “dampen” strokes, a common vibraphone technique and now “dead” strokes, a
common marimba style of articulation. Like Individual Pad Training, dampening and dead stroke articulations can
be tailored to respond to your personal style of playing.
Mono Modes
Special Mono Modes have been developed to allow you to play solo instruments such as flutes or lead lines
without the “bleeding” of sounds heard when using a sustain pedal on a synth. Instead, the sustain pedal in this
mode creates a legato single line passage. It is now possible to create staccato / legato articulations effortlessly.
Auto Gate functions also help control the “bleeding” of sounds when playing fast passages. The length of a
sound can vary depending on how fast you are playing.
1.2. Advanced Performance Features
Multiple Performance Layers – Controller One and Controller Two
Each of the 128 User Setups on the malletKAT actually contains TWO separate MIDI controllers, allowing the
performer to two separate sounds simultaneously in a number of highly creative ways! Each one of these
controllers can have its own sound, or access the same sound. These two sounds can be played separately using
a second sustain pedal (Hang Mode), combined (Layer Mode) or split across the keyboard (Split Mode). Each of
these controllers can also have their own dedicated sustain footswitch.
5 / 109

malletKAT User Manual (ver.07-17-18)
There are SO many ways to utilize this exclusive functionality, that they are described in their own section: User
Setup Playing Modes(https://alternatemode.com/online-docs/malletkat/#playing-modes)
To better understand how this concept, please refer to the section, How the malletKAT
Works(https://alternatemode.com/online-docs/malletkat/#how-the-malletkat-works-2)
Roll Modes
This mode is a necessary feature when playing drum and timpani rolls. This helps eliminate the dreaded machine
gun effect when rolling on drum machines and other sound modules.
Pitch Bend and Mod Wheel
Imagine bending notes and adding vibrato to any sound without having to find a pitch wheel. Simply program a
third footswitch to perform this function on the fly.
Note Resassignments
The malletKAT has 14 programmable note reassignment layers. Applying Reassignment layers to a User Setup
allows you re-route any pad to another MIDI note and channel assignment. When combined with the two built in
controllers, you can use reassignments to layer three sounds per setup, or use the new reassignments to LATCH
certain pads in combination with your existing layer. These latch pads can control your loops with Start/Stop
Commands. Reassignment mode can also replace your normal chromatic pad layout to any MIDI note and
channel assignment you desire per pad. Great for special “percussion setups”. Reassignment 14 is designed to
send out program changes instead of note numbers. This can be used to control MIDI lighting and other devices
that accept MIDI program change commands.
Velocity Gate Control
Automatically control the length of a sound by how hard or soft you play. Adds expression and realism to any
performance simply by naturally using your dynamics while playing.
Auto Gate
Playing fast runs with the sustain pedal down can be tricky business when trying to control note bleed. Auto Gate
helps by making notes shorter when playing fast. Of course, this feature is programmable.
Built-in Metronome with Tap Tempo
Assign any MIDI note and channel to the list of rhythms (sequences) built in. Tap in your tempo and go. Great for
practicing.
Create GROOVE Rhythms with notes and chords
Instead of a metronome click, you can also assign the metronome function to use one of many built-in
rhythmic patterns including odd time patterns.
Synth Control
A controller needs to automatically set up your synths and sound modules, and nothing does it better than
MalletKAT. The MalletKAT sends out three bank change (MSB, LSB), program change, and volume change
6 / 109

malletKAT User Manual (ver.07-17-18)
commands per kit. It also sends out “controller values” so you can preset settings for reverb, chorus, delay and
more, automatically. You can further adjust these settings via our two controller pedal inputs and one breath
control input. Velocity ranges, octave range, gate times, channel assignment, etc. are also stored in one of the
128 User Kits. You have the ultimate control you need to make music. The MalletKAT acts as a MIDI Mixer built
right into each setup.
DJ Surface Control (Real Time Control Mode)
Turn your MalletKAT into a virtual surface controller. Control programs like REASON and LIVE right from the
MalletKAT. In this mode, the MalletKAT’s black keys represent the knobs and buttons on your synth. The white
keys move the knobs left (low notes) to right (hi notes). Play rhythms in real time to create effects only possible
with the MalletKAT. Use the MalletKAT’s other controller (layer) to play live on top of these effects.
MIDI Merging/Routing
The MalletKAT can function as a MIDI Merger. Incoming MIDI channel information can be filtered, routed, etc. A
real time saver in the studio.
Programmable Footswitches and Controllers for Effects
While you can use the footswitch inputs as KIT INCREMENT and DECREMENT for fast Setup changes. You can
assign special functions to them such as vibrato, pitch bend, combined sustain functions, and even play MIDI
notes (up to four simultaneously). The two Controller Pedals can send out data on any of the 128 CC numbers.
Special functions such as Blend, Warp, etc. are also featured.
Additional Tweakables
Lots of global “geek” controls like auto train value adjustments, synth fine tuning adj., data stripping, CC#
assignments, scan control, MIDI routing, etc.
1.3. What's New?
malletKAT 8.0 Features:
Multiple Controller Numbers Presets Per User Kit
Every User Setup now stores and transmits up to 3 pre defined Controller Numbers along with a discrete value for
each number. This means that now you can assign things like reverb or chorus settings in each kit.
Note: Kit Controller #1 resets the assigned discrete value to zero when exiting the kit. This means that if you have
controller #1 set to Modulation, the malletKAT will automatically reset modulation to the neutral position.
All three controller numbers and values share the same MIDI channel.
Improved Dampening
Dampening now sends out a velocity of zero when seeing a dampening gesture. Version 7 sent out a velocity of
7 / 109

malletKAT User Manual (ver.07-17-18)
10, followed by zero. This created a little blip sound on some synthesizers.
Global Function Preset Changes
Alternate Mode will soon be releasing its KATALIZER Software, containing the world’s most powerful looper and
mapper. Changes to the Global Screens allows for optimum routing of MIDI data for controlling looping and
overdubbing. MIDI Merge is set to off, and all note numbers coming from all 16 MIDI channels are pre-routed to
the internal sound card. When reinitializing the malletKAT, the malletKAT now defaults to USER Kits.
Version 8 now ships with a USB to MIDI Cable Standard.
The malletKAT 8 has the best of both worlds….. MIDI and USB. You choose
User Kit 128 Preassigned for controller use for the outside world.
Kit number 128 is preassigned not to send out any bank, program or control changes. Routing is assigned to
EXTERNAL only. This allows for easy control to outside sound sources like the iPAD, computer, etc.
Ketron SD1000 Presets
User Kits can now be optionally pre programmed for Ketron SD 1000.
Just click on the sd1000 option at check out
malletKAT 8.1 Features:
Visual Editor Compatibility
The malletKAT 8.1 firmware chip corrected several minor issues with communication between the Visual Editor
and the malletKAT.
This issue is also resolved by downloading the latest SysEx files (dated 12/12/18 or later) from the Alternate Mode
website.
Visual Editor:
https://www.alternatemode.com/news-press-releases/malletkat-visual-
editor(https://www.alternatemode.com/news-press-releases/malletkat-visual-editor)
SysEx Download Page:
https://www.alternatemode.com/altmode-info/kat-downloads(https://www.alternatemode.com/altmode-info/kat-
downloads)
2. Quick Start Guide
Your malletKAT can be set up and ready to play in minutes! Review this section to see
how to get started!
8 / 109

malletKAT User Manual (ver.07-17-18)
2.1. Back Panel Connections
The back connections on your malletKAT should look like this:
ON/OFF
Turns the malletKAT on and off.
DC INPUT
Make sure that you are using a KAT transformer or an adapter that matches our power speci cations (15 Volt 1.6
Amps, Positive Tip). Our power supplies have a special screw in connector so that it stays attached during
performances.
SUSTAIN FTSW 1
Use this footswitch when you want to sustain the sound that you are playing. It is very similar to the sustain pedal
on a piano. The malletKAT comes with a sustain pedal (a square black footswitch – KF1). You can use this
footswitch on any of the FTSW inputs. They can also be used on Foot Control inputs under certain circumstances.
You might want to get some extra footswitches if you plan on doing editing and if you want to use all of the FTSW
functions at the same time.
EDIT FOOTSWITCH
Insert a footswitch here when you want to edit the malletKAT. With the exception of changing kits (sounds), all of
the editing functions require that you rst step down on this pedal to begin an editing function.
SUSTAIN FTSW 2
This is the coolest footswitch input. Depending on the kit, when you step on this footswitch, a pre-de ned function
will happen. This includes things like pitch bending, octave shifting on the pads or even a different sound playing.
You will have plenty of time to check these functions later.
FOOT CONTROL 1 and FOOT CONTROL 2
These two jacks are designed to be configured to use footswitches or controller pedals. Unlike the footswitches
that are just an on/off connection, controller pedals move from up to down in increments. Depending on the
function, they can control the volume of a sound, or affect the pitch of a note.
By default, Foot Controller One is assigned as a VOLUME controller.
MIDI IN
You can attach a MIDI cable to this input, when you want to have some other MIDI device send information TO
your malletKAT.
MIDI OUT
Plug a MIDI cable into this output when you want to connect the malletKAT to an external MIDI source.
There is also a second MIDI OUT port in the side of the malletKAT. These two ports can be used independently if
your malletKAT contains an internal sound card.
OCTAVE EXPANDER INPUTS
These input jacks are for connecting your expander octaves (up to two per malletKAT). Expander ONE is the
9 / 109

malletKAT User Manual (ver.07-17-18)
closet expander to the malletKAT itself. Note: Octave Expander cables must be attached before powering on the
unit.
If your malletKAT has an internal sound card:
You will also find 1/4? input and output jacks on this back panel. The INPUT jacks allow for adding an external
source like a CD or MP3 player to allow you to play along.
On the front of the malletKAT, you will find a 1/4? headphone jack, and two buttons for raising and lowering the
MIDI volume of the internal sound card.
2.2. Using the malletKAT Internal Sound Card
A malletKAT with an internal sound card comes with 126 pre-configured User Setups for immediate
performance use. You can access all of these Setups using the smaller Forward and Backward pads underneath
the LCD screen, or quickly with between setups using the shortcut found in Changing User Kits – a
Shortcut!(https://alternatemode.com/online-docs/malletkat/#changing-user-kits-a-shortcut)
Attach any pedals (sustain, volume, etc…) before turning the malletKAT on.
Attach your headphones and/or cables to your speaker/amp.
Turn on your malletKAT, and you’re ready to play!
Not getting the sound you expected? Review the Important Settings Everyone Should
Know(https://alternatemode.com/online-docs/malletkat/#settings-everyone-should-know)
section and be certain that your instrument is set to use User Setups or Chains.
2.3. Connecting to an iOS/Android Device
10 / 109

malletKAT User Manual (ver.07-17-18)
To connect your malletKAT to an iOS or Android device, your device will need to have the proper iOS Camera
Connection Kit or USB converter kit to receive incoming data. See your device manufacturer for details on using
your device with MIDI USB.
Converting the malletKAT MIDI signal to USB can be done through the MIDI OUT port by either
Directly connecting a MIDI-to-USB converter cable (included)
Using an external MIDI to USB interface. Some third party companies, like iConnect, manufacture MIDI
interfaces with outbound ports for connecting to portable devices.
Attach any pedals (sustain, volume, etc…) before turning the malletKAT on.
Turn on your malletKAT, and you’re ready to play!
Is your device not receiving a signal? While all pre-programmed User Setups should be usable with your device
broadcasting to MIDI channel 1 by default, User Setup 128 has been pre-programmed with a minimum of
additional MIDI configuration specifically for generic use. Review the Important Settings Everyone Should
Know(https://alternatemode.com/online-docs/malletkat/#settings-everyone-should-know)
section and be certain that your instrument is set to use User Setups (or Chains), and set the malletKAT to use
User Setup 128.
Why is There No USB Port on my malletKAT?(https://alternatemode.com/online-docs/malletkat/#why-is-there-no-
usb-port-on-my-malletkat)
2.4. Connecting to an External Synthesizer
To connect your malletKAT to an external keyboard or synthesizer, use a 5-pin MIDI cable (included with your
instrument) from the MIDI OUT port in the malletKAT to the MIDI IN port on the synth.
Attach any pedals (sustain, volume, etc…) before turning the malletKAT on.
Turn on your malletKAT, and you’re ready to play!
Not getting a MIDI signal? While all pre-programmed User Setups should be usable with your device broadcasting
to MIDI channel 1 by default, User Setup 128 has been pre-programmed with a minimum of additional MIDI
configuration specifically for generic use. Review the Important Settings Everyone Should
Know(https://alternatemode.com/online-docs/malletkat/#settings-everyone-should-know)
section and be certain that your instrument is set to use User Setups (or Chains), and set the malletKAT to use
User Setup 128.
2.5. Connecting to a Computer/DAW
To connect your malletKAT to your computer, workstation, or DAW, the MIDI signal will need to be converted to
USB.
Converting the malletKAT MIDI signal to USB can be done through the MIDI OUT port by either
Directly connecting a MIDI-to-USB converter cable (included)
Using an external MIDI to USB interface.
Connecting the MIDI OUT of the malletKAT to the MIDI IN of an external sound card.
11 / 109

malletKAT User Manual (ver.07-17-18)
Attach any pedals (sustain, volume, etc…) before turning the malletKAT on.
Turn on your malletKAT, and you’re ready to play!
Not getting a MIDI signal? By default, all pre-programmed User Setups broadcast performance data on MIDI
Channel 1. Make sure that the cables are connected to the correct IN/OUT ports and that your device is set to
receive data on MIDI Channel 1 (or whatever channel you have configured your current User Kit to use). Review
the Important Settings Everyone Should Know(https://alternatemode.com/online-docs/malletkat/#settings-
everyone-should-know)
section and be certain that your instrument is set to use User Setups (or Chains), and set the malletKAT.
Why is There No USB Port on my malletKAT?(https://alternatemode.com/online-docs/malletkat/#why-is-there-no-
usb-port-on-my-malletkat)
3. malletKAT Essentials
This section contains information on basic core functionality of the malletKAT. Refer to
this section often when discovering what sort of things are possible, technically and
creatively!
Striking a balance between ease-of-use and unlimited potential NEVER comes easy. Just a general
understanding how a malletKAT User Setup works can go a long way in reducing confusion while taking
advantage of what is possible!
3.1. How The malletKAT Works
Your malletKAT is a MIDI controller. It transforms every note of your performance into complex packets of MIDI
data that containing all of the details of dynamics, pressure, speed, dampening, pitch bend, vibrato, note length,
etc. These packets are then sent to your sound source, which takes this data and finishes processing it through.
The primary building block in using your malletKAT is the User Setup (or
User Kit).
Your malletKAT comes with 128 fully customizable User Setups used to store your own own velocity response
settings, gate time settings, octave ranges, external program changes, etc… When you have taken the time to get
your sounds exactly the way you want them, you save them in a User Kit.
User Kits can be accessed using the smaller Forward/Backward function pads found under the LCD screen on
your malletKAT.
12 / 109

malletKAT User Manual (ver.07-17-18)
User Kits for the KS with Built in Sounds
Alternate Mode uses sound engine from Kurzweil Music Systems that has been modified especially for the
MalletKAT and trapKAT. We picked our favorite 128 sounds and programmed them into the User Kits. That
means that you do not have to know about the innards of MalletKAT programming in order to enjoy playing. Just
scroll through the kits and play. All of the work has been done for you.
The Kurzweil (KS) sound card was discontinued in December 2018. It is included here for reference.
In these 128 User Kits, we loaded in the vibraphone and marimba sounds as well as the orchestral timpani, bells,
chimes, xylophone, orchestral percussion, ethnic percussion drum sets as well as keyboards, basses, orchestral
instruments, vocals, synth sounds and more. These sounds will keep you busy for quite some time. But if you
want hear more, you can go through the instrument list of over 1000 sounds and create your own User Kits.
Complete list of the sounds in the Kurzweil internal sound card:
https://www.alternatemode.com/downloads/malletkat_ks/malletKAT_7_KS_Sound_List.pdf(https://www.alternate
mode.com/downloads/malletkat_ks/malletKAT_7_KS_Sound_List.pdf)
User Kits for the Ketron SD1000
Alternate Mode offers both a firmware chip and a SysEx file download for use with the Ketron SD 1000 sound
module. We picked our favorite 128 sounds and programmed them into the User Kits. That means that you do not
have to know about the innards of MalletKAT programming in order to enjoy playing. Just scroll through the kits
and play. All of the work has been done for you.
In these 128 User Kits, we loaded in the vibraphone and marimba sounds as well as the orchestral timpani, bells,
chimes, xylophone, orchestral percussion, ethnic percussion drum sets as well as keyboards, basses, orchestral
instruments, vocals, synth sounds and more. These sounds will keep you busy for quite some time. But if you
want hear more, you can go through the instrument list of over 512 sound patches and create your own User Kits.
About the Ketron SD1000:
https://www.alternatemode.com/altmode-info/ketron-sd1000-midi-sound-
module/(https://www.alternatemode.com/altmode-info/ketron-sd1000-midi-sound-module/)
Pre-Programmed User Kit list for the Ketron SD1000:
https://www.alternatemode.com/downloads/ketron/SD1000-MIDI-
Spec.pdf(https://www.alternatemode.com/downloads/ketron/SD1000-MIDI-Spec.pdf)
13 / 109

malletKAT User Manual (ver.07-17-18)
Complete list of the sound patches in the Ketron SD1000:
https://www.alternatemode.com/downloads/ketron/KETRON-SD1000_mK_vK_UserKits.pdf(https://www.alternate
mode.com/downloads/ketron/KETRON-SD1000_mK_vK_UserKits.pdf)
The default settings on your malletKAT have been carefully chosen to make your
playing sound great without any need for additional programming. But when you ARE
ready to start truly tailoring your malletKAT to your own individual needs, you will find it
is capable of a great many amazing things!
Here is an overview of how a User Kit works:
When the instrument is first turned on and initialized, or a new User Kit has been selected, the malletKAT sends
an initial packet of information your sound source containing things like:
Program Change information — setting the patch to use on your synthesizer (vibraphone, xylophone, piano,
etc…)
Volume — setting the MIDI initial volume for the selected patch. This initial volume can be adjusted later by
attaching a controller pedal to the malletKAT.
When you begin to play your malletKAT, communication continues to your external source containing things like:
Note Number — what pitch did you hit (A natural, B-Flat)?
Velocity — how hard did you hit it?
MIDI Channel — if your sound source accepts different MIDI channels (there are 16). More on this later…
Other important functions stored in a User Kit include the settings that are particular to the instrument, or the
patches you are using. These include things like:
Octave — the octave range that the malletKAT is using must be translated before it is sent out.
Gate Time — the total length of time a note will sound when a pad is struck (without using a sustain pedal)
14 / 109

malletKAT User Manual (ver.07-17-18)
Monophonic/Polyphonic — the malletKAT can play chords (polyphonic) or will automatically dampen a note
when a new note is stuck (monophonic)
Transposition — the malletKAT can transpose itself to different keys
When you start to consider all of these possibilities, you will see the value in having 128
presets (User Kits) ready and available during your performance!
Now for the most interesting part…
Each User Kit in your malletKAT contains TWO independent controllers.
They can have their own sounds, dynamic response, keyboard and octave range, etc. These sounds can be
toggled back and forth by stepping on a footswitch, layered so that both play, or they can be split or overlapped so
that both sounds are active at the same time.
If you have an internal sound card inside your malletKAT, remember that this sound card is a professional
synthesizer. It is treated the same as described in this section.
3.2. User Setups, Factory Setups, and Chains
When you first turn on the malletKAT, it is in “Playing Mode”. There are three different banks that this playing
mode can occupy.
15 / 109

malletKAT User Manual (ver.07-17-18)
User Setups (or Kits)
User Kits were described at the beginning of this section. They are the default bank for the malletKAT, indicated
by a “U” in the upper left corner of the malletKAT screen.
Chains
In performance situations where you find you are needing to change User Setups very quickly, these setups can
be organized in “performance order” into up to 16 User Chains. When your malletKAT is placed into Chain Mode,
only those User Setups are available and can be easily stepped through and looped using the Forward and
Backward pads or a foot switch. Chain mode is indicated by a “C” in the upper left corner of the malletKAT
screen.
Factory Setups
Factory Setups are pre-programmed for General MIDI. That means that if you have a sound source that responds
to General MIDI (it should have a GM MIDI logo displayed on it), the MalletKAT is ready to go without any
programming involved – right out of the box. The instrument name that you see on the display is the sound that
you will hear on your synth. Factory Setups are indicated by a “F” in the upper left corner of the malletKAT
screen. For more information on General MIDI, refer to the section, Understanding External Synthesizer Program
Changes(https://alternatemode.com/online-docs/malletkat/#understanding-external-synthesizers)
16 / 109

malletKAT User Manual (ver.07-17-18)
3.3. Reading The malletKAT Screen
When you first turn on the malletKAT, the display tells you on the second line what version number of the software
that’s inside your malletKAT.
When it finishes initializing itself, it is officially in Play Mode.
Even though there are only four lines of text on the LCD display, there is a LOT of information on this screen.
KIT (SETUP) NUMBER
The very first character on Line one will either be:
Ffollowed by a number. Example F01 meaning Factory Kit 1or
Ufollowed by a number. Example U89 meaning User Kit 89 or
Cfollowed by a group of numbers. Example. C02-12 Meaning Chain Two, Step 12.
You can step through Kits or Chains at any time by using the Backward /Forward Pads. (The little function pads
on the far right of the malletKAT). Strike the pad twice to get your direction going.
LAYER MODE
Layer Modes tell the malletKAT how to control its sound layers. These layers are a part of every User Setup (Kit)
and are called CONTROLLER ONE AND CONTROLLER TWO. These Controller Layers can be total
independent, split on the keyboard, layered, velocity shifted or alternated. Your screen will have one of the
following:
17 / 109

malletKAT User Manual (ver.07-17-18)
Hang = Hang Mode
Splt = Split Mode
Doub = Double Mode
Mel1 = Melody Chord Mode 1
Mel2 = Melody Chord Mode 2
Mel3= Melody Chord Mode 3
VelS = Velocity Shift Mode
Alt = Alternate Mode
These Layer Modes are described in detail in the User Setup Playing Modes(https://alternatemode.com/online-
docs/malletkat/#layer-mode)
section.
PRESSURE MODE
The malletKAT can detect continuous pressure on a pad. This gesture of applying pad pressure can be
interpreted by the malletKAT to perform specific functions such as mallet dampening, dead stroking or aftertouch.
Your screen will have one of the following:
Norml = Normal
Dampn = Dampen
Aftch = Aftertouch
DeadS = DeadStroke
These Layer Modes are described in detail in the User Setup Playing Modes(https://alternatemode.com/online-
docs/malletkat/#pressure-mode)
section.
CONTROLLER
On the second line of the Display, you will see the word “Controller” followed by 1 or 2. Whenever you edit the
malletKAT, you will need to know what Controller you are working on. Any USER KIT parameter changes you
are making only apply to the Controller that shows on this screen.
Switching Between Controllers
You can change what Controller you are using by stepping on the EDIT, and while held down, tap the
INCREMENT or DECREMENT pads (C# or D# on the highest octave). The display will toggle the Controller
Number.
18 / 109

malletKAT User Manual (ver.07-17-18)
CONTROLLER FUNCTIONS
Every Setup has two Controller Layers, and each Layer can have its own assigned Function. Remember also that
they can be layered in DOUBLE Mode or accessed independently in HANG Mode.
These are the Controller Functions:
Poly = Polyphonic Mode
Mono = Monophonic Mode
RTC = Real Time Controller
RT+V = Real Time Controller Plus Velocity
PTW = Pitch Wheel Controller
CTLA = Virtual Control Wheel A
CTLB = Virtual Control Wheel A
CTLC = Virtual Control Wheel A
Polyphonic and Monophonic modes are described in the User Setup Playing
Modes(https://alternatemode.com/online-docs/malletkat/#monophonic-polyphonic-modes)
section. Real Time Controllers, Pitch Wheel, and Virtual Wheel Controllers are slightly more advanced features
that are described in the Full Programming Guide(https://alternatemode.com/online-docs/malletkat/#full-malletkat-
programming-guide)
.
KIT NAME
Every User Kit has a 16 character name to help easily identify it, and will be displayed in both User Mode and
Chain Mode. These names can be easily changed when editing the User Kit.
PROGRAM BANK VALUES
When a User Kit is first selected, the malletKAT sends a Program Change command to the external sound source
indicating which patch is to used. This command is comprised of three values: MSB, LSB, and Program Change
Number (PC). For more information on Program Changes, see the section Understanding External Synthesizer
Program Changes(https://alternatemode.com/online-docs/malletkat/#understanding-external-synthesizers)
.
19 / 109

malletKAT User Manual (ver.07-17-18)
VOLUME
The initial MIDI volume is also sent when a User Kit is first selected. Establishing an initial volume level is helpful
to both “balancing” patches that may not be at equal levels, and to establish a baseline for bringing volume levels
up or down with a controller pedal.
4. Important Settings Everyone Should Know
The feature set for the malletKAT is quite deep. Throughout the years, we have seen a
pattern of common questions coming to us through phone calls, emails, and social
media. This section has those questions… and answers.
If the question and answer is not here, we hope this section points you in the direction
of where to look deeper.
4.1. How to Access & Edit malletKAT Settings
There are a few basic editing concepts that must be understood if you ever want to make any changes to the
malletKAT.
All settings on the malletKAT can be accomplished directly on the instrument without having to put down your
mallets. There is no need for any additional hardware or software. Instead, editing any settings in the malletKAT
requires inserting a foot switch (or sustain pedal) into the Edit FTSW jack on the back panel:
Unless the Edit footswitch is depressed, the malletKAT is always in “performance mode”.
20 / 109
Other manuals for malletKAT
1
Table of contents
Other Alternate Mode Recording Equipment manuals
Popular Recording Equipment manuals by other brands

Extron electronics
Extron electronics EBP 108 RAAP Button Panel Setup guide

Smartflow
Smartflow Tracer VMBTI-100 operating instructions

LevelOne
LevelOne HVE-9002 Brochure & specs

Brigade
Brigade MDR-404GW-500 Installation and operation guide

Apogee
Apogee DA-16 datasheet

Black Corporation
Black Corporation Deckard's Dream Expander FAQ and Build Guide