AM Solar 99-CMPGLD User manual

1. Overview Diagram !--------------------------------
2. Table Of Contents --------------------------------
3. Tools -----------------------------------------------
!
!
4. Bill Of Materials ------------------------------------
!
5. Installation: Solar ---------------------------------
6. Installation: Battery Bank -------------------------
7. Installation: Inverter -------------------------------
8. Programming & Commissioning Your System !--
Diagram showing all of the various components, cables & connectors, detailing
connections for each subsystem in the kit
Complete bill of materials broken down by subsystem listing quantities, part numbers
and descriptions with QR codes to link data sheets for major components
Detail of the battery bank connections and components
Detail of the Solar Charging subsystem connections and components
99-CMPGLD Explorer Camper Kit
Installation Manual Table of Contents
Tool suggestions to prepare for the work ahead along with some friendly advice
AM Solar Inc.!
3555 Marcola Rd.!
Springfield, OR 97477!
541.726.1091!
www.amsolar.com
How to program your Victron MPPT Smsrt Solar Charge Controller and Battery
Monitor
Detail of the Inverter subsystem connections and components
This page outlining the entire manual
Rev.20190716

Suggested Tools For Installation
Here is a list of some of the tools that might be needed for your installation.!If you feel this list is too ambiguous or potentially
intimidating, now would be a great time to schedule your installation work with the professionals at AM Solar."
•Sturdy Ladder"
•Hammer Crimper"
•Heat Gun"
•Wire Crimper"
•Wire stripper"
•Cable Cutter"
•Multimeter"
•Screwdriver"
•Smartphone"
•Drill"
•Box knife"
•91% Isopropyl Alcohol"
•Cleaning rags"
•Crescent wrench"
•Safety glasses
99-CMPGLD Explorer Camper Kit
AM Solar Inc.!
3555 Marcola Rd.!
Springfield, OR 97477!
541.726.1091!
www.amsolar.com
Rev.20190716

+
+
FUSE
TEMP
CAUTION:
BMV 7xx only!
99-CMPGLD Explorer Camper Kit
Solar wire
penetrates roof
here
20-ROOF
92C-INTR
92C-INTR
Roof Combiner Box
93C-ZCBNR
AM Solar Inc.!
3555 Marcola Rd.!
Springfield, OR 97477!
541.726.1091!
www.amsolar.com
CAUTION:
There should be no continuity between the negative cable
from the roof and the negative cable from the charge
controller. If they connect it will fail.!
Keep these isolated from each other.
ROOF COMBINER BOX
INSTALLATION VIDEO
ROCKER FOOT MOUNT
INSTALLATION VIDEO
SOLAR PANEL
INSTALLATION VIDEO
CABLE OUTPUT
INSTALLATION VIDEO
1
2
3
4
If the connections seem
tight on the MPPT, that is
normal. Scan here for
assistance.
5
Back of Solar Panel(s) with Rocker Foot Mounts
Fuse
SOLAR-ZS100
91M-35MZ
+
SEAL-SLVL
SEAL-SLVL
Zamp Solar Panel
SEAL-SLVL
SEAL-SLVL
93S-MINI
LUG-8GA-RING-3/8
SEAL-SKF
HS-RED-HD-1/2
CABLE-8GA-2-R&B
Back of Solar Panel(s) with Rocker Foot Mounts
Fuse
+
Zamp Solar Panel
Solar Panel 1
Solar Panel 2
SEAL-SLVL
SEAL-SLVL
SEAL-SLVL
SEAL-SLVL
HS-RED-HD-1/2
LUG-8GA-RING-3/8
-
-
93C-ZCBNR
93T-NEG-8GA
NOTICE:
The "greyed out"
battery bank items
are not included, but
you will be interacting
with them.
CABLE-8GA-2-R&B
20A
93F-ATC-020A
SOLAR-ZS100
91M-35MZ
CCTLR-VT-MPPS-020A
Rev.20190716
Solar

99-CMPGLD Explorer Camper Kit
AM Solar Inc.!
3555 Marcola Rd.!
Springfield, OR 97477!
541.726.1091!
www.amsolar.com
Rev.20190716
+
+
This device is
Bluetooth
view with!
the v.e. App
FUSE
TEMP
DC SHUNT
Direction Sensitive
CAUTION:
BMV 7xx only!
Battery Side
Load Side
TEMP-VTBMV
MONITOR-VTBMV-S
(Monitor)
BATTAGM-06-220AH
BATTAGM-06-220AH
LUG-4/0-RING-3/8!
LUG-4/0-RING-3/8!
LUG-4/0-RING-3/8!
LUG-4/0-RING-3/8!
CABLE-4/0-1-BLK
93H-B3/4
93H-B3/4
93H-B3/4
93H-R3/4
MONITOR-VTBMV-S
(Shunt)
ALL NEGATIVE CONNECTIONS –
ALL POSITIVE CONNECTIONS +
Chassis Ground
BATTERY 1"
MOST POSITIVE
BATTERY 2"
MOST NEGATIVE
Battery Bank and Monitor

99-CMPGLD Explorer Camper Kit
AM Solar Inc.!
3555 Marcola Rd.!
Springfield, OR 97477!
541.726.1091!
www.amsolar.com
Rev.20190716
ALL NEGATIVE CONNECTIONS –
Represents!
Chassis
Ground
DC
SHUNT
Victron Brand
for Battery
Management
Direction Sensitive
+
CAUTION:
BMV 7xx only!
FUSE
BATTERY 1"
MOST POSITIVE
BATTERY 2"
MOST NEGATIVE
ALL POSITIVE CONNECTIONS +
TEMP
+
Ground
Remote
BLUETOOTH DONGLE
HS-BLK-DWALL-1/2
95F-CLST-150A
LUG-2GA-RING-3/8
FUSE-CLST-150A
Inverter / Charger"
Master Disconnect
93S-MINI
HS-RED-HD-1/2
HS-RED-HD-1/2
LUG-2GA-RING-3/8
LUG-2GA-RING-3/8
LUG-2GA-RING-3/8
HS-RED-HD-1/2
HS-RED-HD-1/2
FSTSCW-1025SS
MONITOR-VTVT
CABLE-2GA-2-GRY
CABLE-2GA-2-GRY
INV-VT-1200
FSTSCW-1034Z
FSWASH-FLT-1/2
FSTSCW-1034Z
FSWASH-FLT-1/2
FSTSCW-1034Z
FSWASH-FLT-1/2
FSTSCW-1034Z
FSWASH-FLT-1/2
AC Output
AC Output
FSTSCW-1025SS
FSTSCW-1025SS
FSTSCW-1025SS
LUG-2GA-RING-3/8
HS-RED-DWALL-1/2
LUG-2GA-RING-3/8
Inverter

Programming: The Battery Monitor
Programming Your BMV-712 Smart Battery Monitor for AGM Batteries
Programming on the BMV-712 Battery Monitor in the Victron
Connect App:
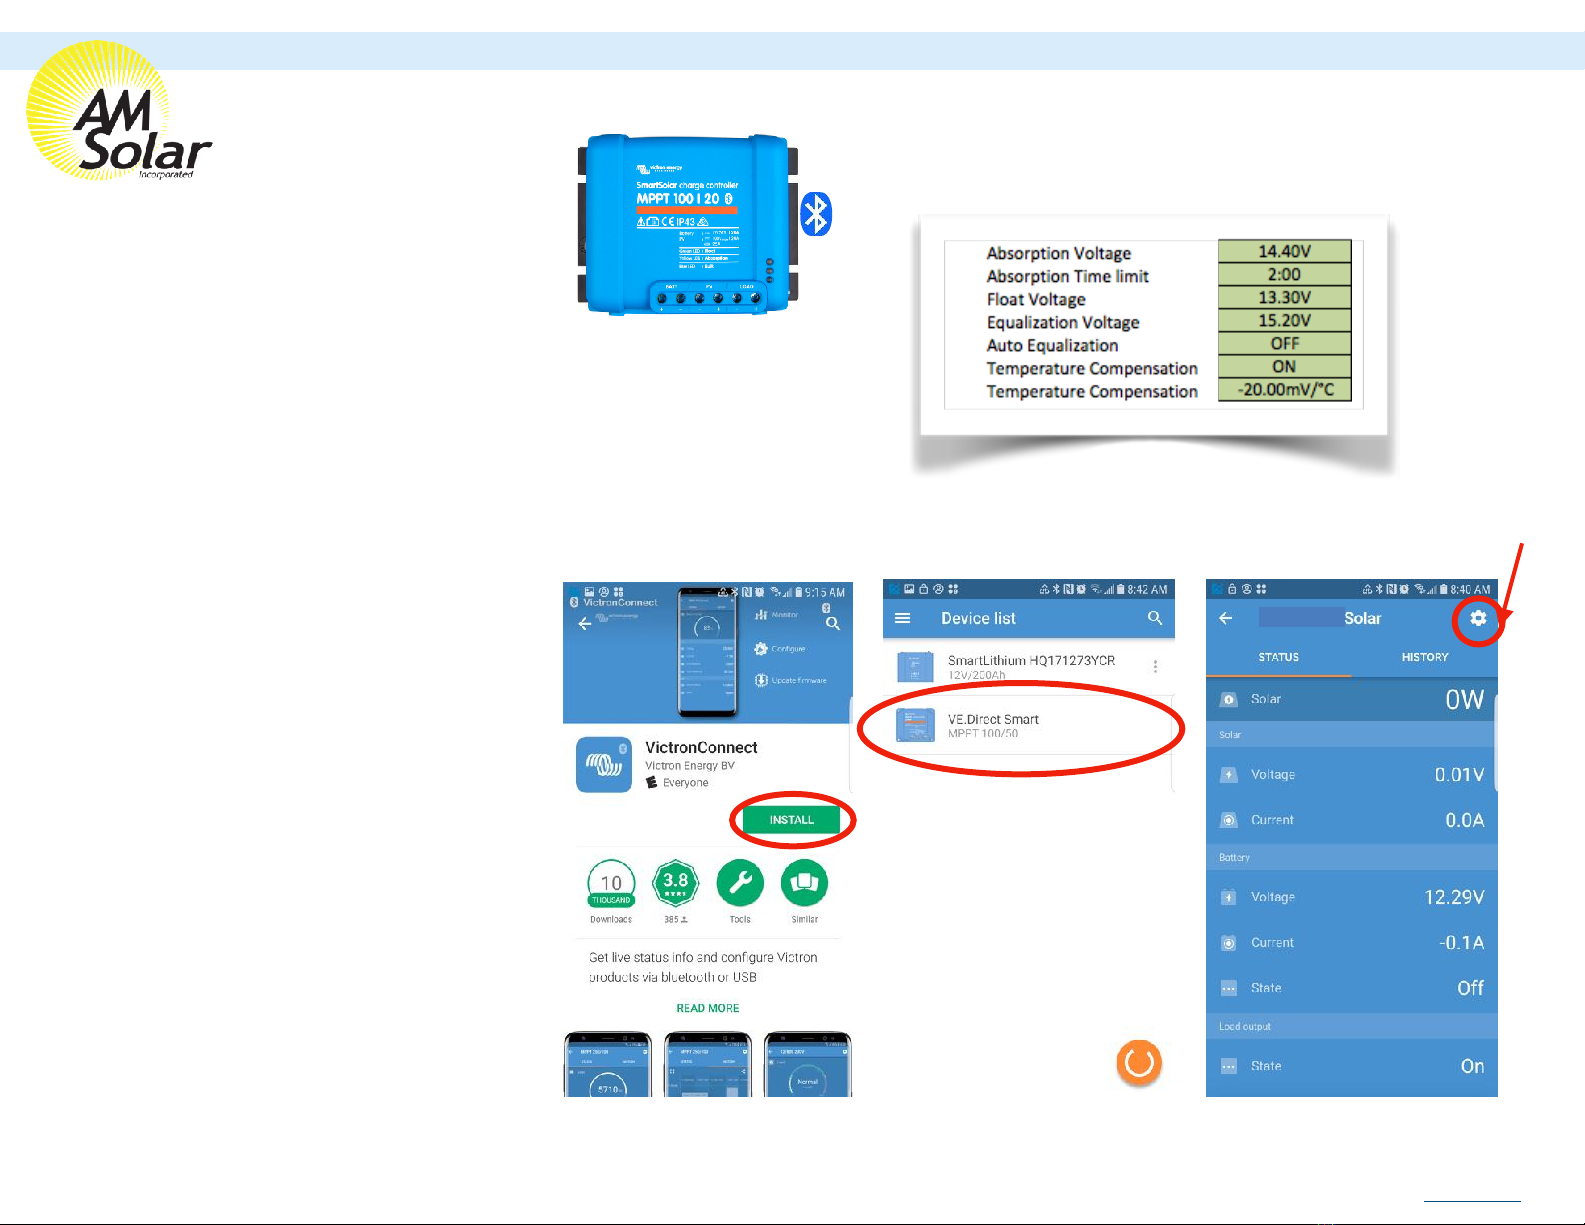
1. Download “VictronConnect” from the Google Play Store (picture 1)."
2. Turn on your Phone’s Bluetooth, and get as close as possible to your Victron
Component(s)."
3. Open the Victron Connect app, and after it takes a moment to scan it will
recognize your BMV-712."
NOTE: If your device is not shown, it is probably signal interference. Try
closing the app and moving to a different location before re-entering the app in a
location that can pick up the BMV's signal."
4. Select the BMV-712 on the Device List (picture 2)."
5. Press the gear icon in the top right corner (picture 3)."
6. Enter “Battery” and change the values to match the colored box at the top right
(screen shown on picture 4):"
7. Changing Battery Capacity: Enter the number$
of Ah of your entire battery bank"
8. Charged Voltage: 14.1"
9. Tai l Cu rre nt : 2%"
10. Peukert Exponent: 1.12"
11. Charge Efficiency Factor: 97%"
12. Go back to Settings, enter “Misc”"
13. Enter “Relay”"
14. Change Low SOC relay to$
50/50"
15. Aux Input: Select “Temperature”"
16. Tem pe ra tu re Un it : Select “Fahrenheit”"
17. Exit from settings, you have completed$
programming."
NOTE: Only one phone can be connected!
to each device at a time. Be sure to completely !
disconnect and close the app to log out.
NOTE: To change the PIN code from the app, go back to the device list page in the app. Click on the three circles to the right of your device, and select “Reset PIN code”.
1
2
3
4
AM Solar Inc.!
3555 Marcola Rd.!
Springfield, OR 97477!
541.726.1091!
www.amsolar.com
Program Settings for AGM Batteries
•Battery Capacity: Enter the total battery capacity in Amp Hours."
•Charged Voltage: 14.1"
•Tai l Cu rre nt : 2%"
•Peukert Exponent: 1.12"
•Charge Efficiency Factor: 97%"
•Aux Input: “Temperature”"
•Tem pe ra tu re Un it : “Celsius” or “Fahrenheit”
Rev.20190716

Programming: The MPPT Charge Controller for AGM Batteries
Programming / Commissioning Your System - The Charge Controller
Charge Control Settings for AGM Batteries:
1. Download the “VictronConnect” App to your phone."
2. Open the App."
3. You ’l l se e a se le ct io n fo r yo ur S ma rt So la r MP PT C ha rge r, s el ec t it ."
4. Typ e 000000 to login for the first time.$
NOTE: To change the PIN code, go back one step to the main screen. Click on the
3 buttons to the right of the controller image, and select “Reset PIN Code”."
5. Click on the gear in the top right corner."
6. Click on “Battery”."
7. Click on the settings and adjust them acccordingly to match below:$
- Battery voltage: 12V$
- Max charge current: 20A (In this example)$
- Use default charge settings: OFF$
- Charger: ON$
- Absorption voltage: 14.40 V$
- Absorption Time Limit: 02:00$
- Float voltage: 13.30 V$
- Equalization voltage: 15.20 V$
- Auto Equalization: DISABLE (OFF)$
- Temperature Compensation: ON$
- Temperature Compensation: -20.00
Rev.20190716
Download VictronConnect
In App Store
Device List within
VictronConnect
MPPT Charge Controller
Screen
AM Solar Inc.!
3555 Marcola Rd.!
Springfield, OR 97477!
541.726.1091!
www.amsolar.com
Table of contents
Other AM Solar Inverter manuals
Popular Inverter manuals by other brands

enphase
enphase IQ6-60-2-US Installation and operation manual

Siemens
Siemens SINAMICS G120P Hardware installation manual

DSPM
DSPM Defender Micro Elite Maintenance manual

hpmont
hpmont HD3N-TC Series user manual

WARRIOR
WARRIOR 6000S operating manual

Mitsubishi Electric
Mitsubishi Electric FREQROL-K Series instruction manual

Daikin
Daikin 3MKD75BVMA8 Service manual

Delixi Drives
Delixi Drives WS-160MX manual

Hitachi
Hitachi IVX-ES Series Installation and operation manual

Goodwe
Goodwe GW5000-DNS-BR30 Quick installation guide

Thurlby Thandar Instruments
Thurlby Thandar Instruments TGR2050 instruction manual

DEK
DEK 4550Pro owner's manual